A friend of mine that I’ve had since I was thirteen years old inspired this guide.
The photography bug bit me at the tender age of fourteen.
This means that my friend has known me for 43 years, and for 42 of those years I’ve been consumed by photography.
This story begins because of a photo like this…

Photo by WikiImages
My friend never had an interest in photography, ever. That is until his son took up sports and became somewhat of a high school football star.
He then decided that he wanted to document his son’s burgeoning sports career with millions of photos.
Being the photo-guru friend, he came to me for advice on what camera equipment to buy.
Knowing him as I do, I tried to tell him to resist the temptation to spend too much money. “Buy some entry-level equipment,” I told him. “Learn how to take photographs and then upgrade.”
He didn’t listen to me.
The next time I saw him, he had purchased a new Canon 60D, 70-200mm f/2.8 L series lens, a 300mm f/4 L series lens, and a 16-35mm f/2.8 L series lens. His total investment was close to $5000.00.
He was proud to display his new bag of gear to me. I looked at him, somewhat shocked, and asked, “Why did you spend so much money?”
He told me that the camera store salesman said, “With this setup, you’re practically guaranteed to get professional quality photos.”
Let’s skip ahead to approximately three months later.
My friend called me. He was upset. He told me his new camera equipment was junk. He tried to read the manual; he fiddled with the settings (that’s an exact quote by the way); and his pictures, all of them, looked terrible.
I said, “Let me come over. I’ll take a look at the photographs, and we will see what we can do.”
It took only moments for me to realize that almost all of his photographs were blurry.
I asked him, “How are you setting up your camera settings?”
He had no clue.
So, I set about explaining to him the basic camera functions of ISO, shooting modes, focus modes, shutter speed, and aperture.
He looked like I had kicked him in the gut. We hadn’t even gotten into the subject of how those settings could vary radically based on the lens that was mounted to the camera.
I decided he probably had enough.
"Buy some entry-level equipment.. Learn how to take photographs and then upgrade.”
When I left that day, I had tried to simplify the concept of camera settings for him as much as possible.
Over the course of the “football” season, I received numerous emails from him complaining that my advice did not help, and he was very unhappy. I continued to try and help him (as best I could) from a distance.
Let’s now skip ahead to the following spring. My friend invited us over to his home for a barbecue. Through the course of conversation, he revealed that he was now getting the “expert level” photographs that he wanted all along, and all it took was a simple piece of advice from a fellow parent at a football game.
My wife and I looked at each other. “Really?” I asked. “Yes,” he replied. “I saw him taking photos, and he had a nice camera and a big lens. I went up to him
and asked how he was getting good pictures. He replied, ‘I put it in the Sports Mode.’”
My friend sat back in his chair and gave me a smug look. I said, “I’d love to see these expert level shots you’re getting with the Sports Mode.”
He shared them with me. The net result was that now, instead of 90% of his shots being blurred or out of focus, only 50% were—and he was now satisfied that he was getting expert level results.
This is the dirty secret of scene modes. They perpetuate mediocrity. They are meant to ‘dumb down’ the photographer’s decision-making process.
The camera manufacturers sell it as allowing you to concentrate on your creativity and not worry about camera settings… because the camera is taking care of it.
Don’t fall into this trap.
Does this mean you should NEVER use the scene modes? Not necessarily, and we will discuss that too.
About this Article
When you finish this article, you should be able to answer the following questions.
What are the different Scene Modes?
- What controls does a particular Scene Mode take away from you, the photographer?
- How can the use of a Scene Mode cause you problems?
- What are the alternatives to using Scene Modes?
- When are Scene Modes the right option to choose?
Scene Modes can vary widely by camera manufacturer and camera model. Some professional level cameras may not have them at all, or they may be buried in the menus as a ‘custom’ function.
This article is not meant to describe your camera to you. Take this information and apply it to your own circumstances.
What are the different Scene Modes?
- Backlight
- Beach/Snow
- Fireworks
- Landscape
- Macro or Close Up
- Night Portrait
- Night Scene
- Candlelight
- Party
- Portrait
- Sports
- Sunset
- Aquarium
- Foliage
- Food
- Museum
Let’s look at each mode, determine what it is doing, what you are giving up, and whether there is a real use for it.
Backlight Mode
The Backlight mode tries to compensate for a subject in shadow, due to backlight. It does this by doing one or two things (depending on the camera model): it will likely automatically turn on the built-in electronic flash and it may also increase exposure compensation.
There are some problems with this mode. You likely won’t be able to turn the flash off, and if you want your subject in partially deep shade, some camera models will also disable your ability to do flash and exposure compensation. You will also not be able to determine the amount of light and shadow allowed onto the subject.
Unless you have absolutely no idea on how to set your camera exposure or the use of a flash, I don’t recommend using the Backlight Mode. I would use Manual Mode in this circumstance.
Recommended Resources: Here are some resources to help educate you in the use of exposure and flash:

The camera, when placed into a Scene Mode, will try to read the situation. However, it cannot properly judge exposure, lighting, and circumstances like you can. If the camera were set to the Backlight Scene Mode for this image of the man by the rock, the camera would most likely destroy the mood through overexposure and overpowering the scene with harsh flash lighting. Photo by nardb8
The Backlight mode tries to compensate for a subject in shadow, due to backlight.
Beach/Snow Mode
This mode will try and compensate exposure based on the predisposed decision that the scene will be primarily light tones, and brightly lit, with highly-reflective surfaces. Basically, the camera is going to overexpose the image. Depending on the camera model, it may also try to automatically adjust the color balance by removing some ultraviolet blue light.
The problem here is the camera cannot discern your situation. For example, let’s say you’re at the beach during sunset. You set your camera to Beach Mode because you’re at the beach. This would be entirely wrong for this particular situation, and you would end up with an overexposed, washed out, image.
If you’re on the beach or in the snow in bright midday light, you could give the Beach Mode a try. However, under any other circumstances, I would avoid it. Again, the references listed above will help you learn to adjust exposure.
For beach and winter scenes, I recommend Manual Mode.

A photographer may have been tempted to put their camera into Beach/Snow Mode for this shot. If they had, what would have happened? Much of the detail in the snow (foreground) and clouds would have been lost, as the camera would have compensated the exposure by trying to ‘whiten up’ those clouds off in the distance. Photo by Skeeze
Night Scene, Night Portrait, and Firework Modes
We are going to look at these three together, because they operate similarly. The Night Scene Mode is going to self adjust the ISO to a medium-high setting. It’s also going to turn the electronic flash off and set a slow shutter speed. It also may set the metering pattern to ‘Evaluative,’ sometimes referred to as ‘Matrix’ (depending on the camera model), while trying to determine the best exposure to not blow out the highlights while keeping the shadow detail.

In Night Mode, a photographer is likely to not think about core decisions such as shutter speed, color balance, and exposure. I’ve witnessed photographers putting their cameras into Night Mode and walking around snapping away like it’s midday light. Remember, in Night Mode, you are still likely going to need a tripod or some kind of camera stabilization. Photo by Yanko Peyankov
This picture of Amsterdam demonstrates some of the ‘failures’ of the Night Mode. The camera slowed the shutter speed down to capture mid-tone details in the buildings. This resulted in movement in the boats, which is distracting to the composition, and it gave the image a washed-out look overall.
Should you use Night Mode? My feeling is, since you’re going to have to slow down and put the camera on a support anyway, why not use Manual Mode and determine the best exposure yourself? On the other hand, let’s say you’re walking around Times Square wanting to shoot freely and you’re not worried about excessive noise—by all means, put it into Night Mode.
I feel differently about the Night Portrait setting. I wouldn’t use it unless you have absolutely no idea how to set it up yourself. The camera is essentially going to do everything we discussed in Night Mode, with the addition of turning on the flash and the red-eye reduction. This mode is generally going to give you harsh results that aren’t very pleasing. As an alternative, I would consider using Aperture Priority Mode.

Night Portrait Mode will likely give you harsh and unpleasant results. Photo by yeurodvall
For any nighttime application, I recommend Shutter Priority Mode or Manual Mode.
Recommended Reading: Here are some recommended additional reading material to help you.

The problem with Fireworks Mode is that the camera doesn’t know how long you want the fiery trails to be! I do not recommend using Fireworks Mode. Photo (Top) by Lee_seonghak. Photo (Bottom) by DeltaWorks
Landscape Mode
I’m going to say this right off the bat: don’t use the Landscape Mode.
Depending on the camera model, Landscape Mode will attempt to set your focal length, set your aperture, and set your focus point to ‘infinity.’ I can’t think of a single reason why any photographer—even a newbie—would want to do this.
For landscape photography, I recommend Manual Mode or Aperture Priority Mode.
Recommended Reading: If you’re interested in learning more about landscape photography, check out these resources.

What if you don’t want those rocks in the surf to be so far off into the picture? What if you want the rocks in the foreground to be sharply focused? The Landscape Mode gives away too much control. Photo by MartyNZ
Macro Mode
The main problems with scene modes are that they provide an excuse not to think about the situation.
For example, the Macro (or Close Up) Scene Mode for most cameras does one thing: it selects an aperture of around f/5.6 to f/8.0. That’s it. That’s all it does.
So, if you put your camera into Macro Mode and then say, “Okay. I’m ready to go,” and you start snapping away, your chances of success are very low.
I do not recommend using the Macro Mode. Instead, I would recommend using Aperture Priority Mode.

Macro photography requires you to consider NOT JUST YOUR DEPTH OF FIELD, but also your shutter speed, lighting, and background. Photo by realworkhard
Candlelight Mode
This mode seems silly to me. It’s essentially Night Mode, with the flash disabled, and the White Balance biased toward the warm end of the light spectrum. I wouldn’t use this mode. I would set my camera to Auto ISO and use Shutter Priority Mode. Using Shutter Priority Mode would make sure that I don’t end up with a blurry picture. I would then adjust the White Balance to my personal taste.
"Candlelight mode... is essentially Night Mode, with the flash disabled"
Party Mode
Party Mode is probably one of the least objectionable Scene Modes (to me). Party Mode will set your camera at a higher ISO. It will keep the shutter speed slow, but fast enough that you should be able to hold the camera. In some camera models, it will turn on the electronic flash and set it to rear-curtain sync.
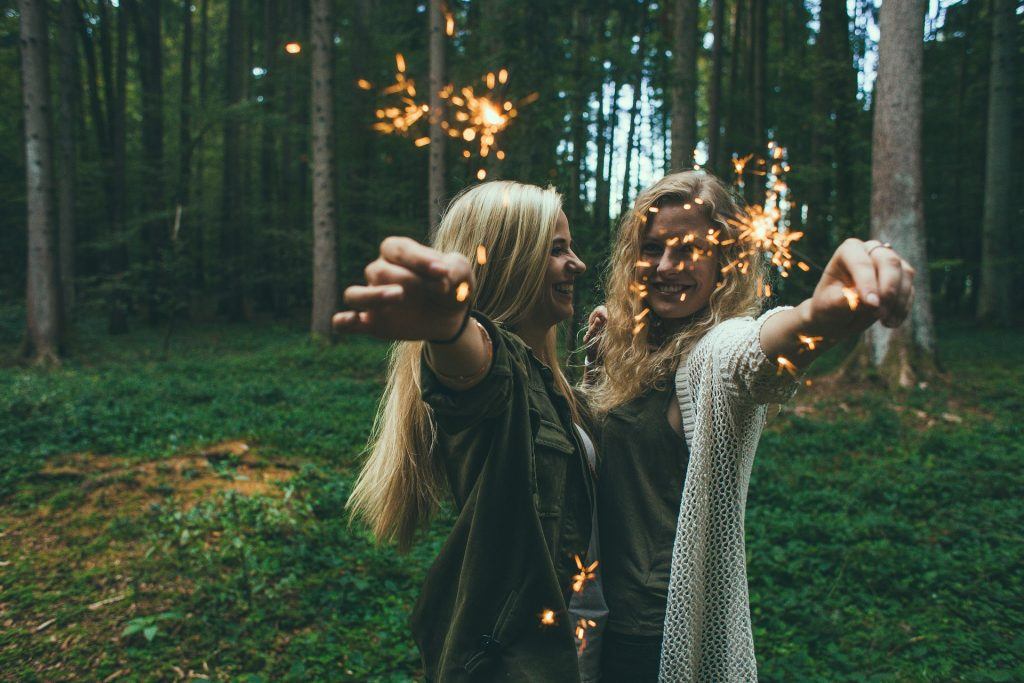
Party Mode, without an electronic flash, will yield results similar to this image of the girls with sparklers. Be alert to your shutter speed. Photo from Pixabay
Party Mode is fine when you’re starting out. When you’re ready to take more control, I would recommend Program Mode.
Recommended Resources: To learn more about shooting modes, check out these resources.

Party Mode, with an electronic flash, will yield results similar to this. Keep an eye on the flash-to-background exposure. Photo by Vilandrra
Portrait Mode
This is another mode that I highly recommend you stay away from. Depending on your camera, Portrait Mode will do everything from choosing the focal length of the lens to setting the aperture, and possibly turning on the harsh built-in electronic flash. It may also use face detection, which in effect takes away your ability to decide where to place the camera’s focus. Some models will alter the color balance and even try to smooth out the skin through a blurring algorithm. All of this is something that you don’t want to give up to the camera.
Recommended Reading: You can learn more about creating portraits with these resources.

The choice of lens focal length, focus placement, aperture, shutter speed, and ISO are critical decisions when creating portraits. If you’re looking for an auto mode, so that you can work fast, I suggest using Aperture Priority Mode. Choose the appropriate f-stop to give you the depth of field that you desire with the lens that you’re using. Set your ISO high enough to give you a shutter speed that eliminates the possibility of camera shake. Photo by AdinaVoicu
Sunset and Foliage Modes
These two modes bump up the contrast and saturation settings on your camera. Now, if you’re shooting in the raw format (and you should be), these two Scene Modes would not affect the raw file, they would only affect the .JPG output.
Recommended Reading: Learn more about shooting a sunset here:

Situations where you want vivid colors (sunsets and autumn foliage) really need to be adjusted in post-production. You want to be able to push those settings without going too far. What mode should you consider using on the camera? With sunsets, I would always use Manual Mode. The appropriate mode for autumn foliage would depend on the situation. Photo by Kent DuFault
Aquarium Mode
The Aquarium Mode does two things: it will significantly raise the ISO setting, and it will set the White Balance to help remove the “blue” that is inherent in underwater photography.
This is a mode that I’ll say, “Go ahead! Give it a whirl!” Chances are most of us don’t photograph an aquarium setting very often. If it were a passion for the photographer, they probably wouldn’t use the Aquarium Mode anyway.
Recommended Reading: If you like the idea of shooting aquarium settings, check this out!

Aquariums, or any underwater photograph, tend to look blue as the water absorbs the warmer colors of the light spectrum first. In the whale photograph, look at the fish near the top of the tank. The sunlight is still slightly penetrating at that shallow depth, allowing some warmer colors to become visible. At the bottom of the tank all you see is blue. This is why underwater photographers typically use an electronic flash. Photo by ImageDragon
Depending on your camera, Portrait Mode will do everything from choosing the focal length of the lens to setting the aperture, and possibly turning on the harsh built-in electronic flash.
Museum Mode
The Museum Mode will raise the ISO and disable the electronic flash. It does this because most (if not all) museums do not allow electronic flash. This mode could save you the embarrassment of having your flash fire when it’s not supposed to.
Food Mode
This mode is completely silly. Don’t even think about it. If you’re shooting food and you want an auto mode, use Aperture Priority. Make sure that your ISO is high enough to give you an appropriate shutter speed. The truth is, good food photography is an entirely different realm. It takes some special skills. But, for the occasional snapshot, go with Aperture Priority.
Well, I’ve saved the best for last. We are back to my friend, and his use of the…
Recommended Reading: You can learn more about food photography here.
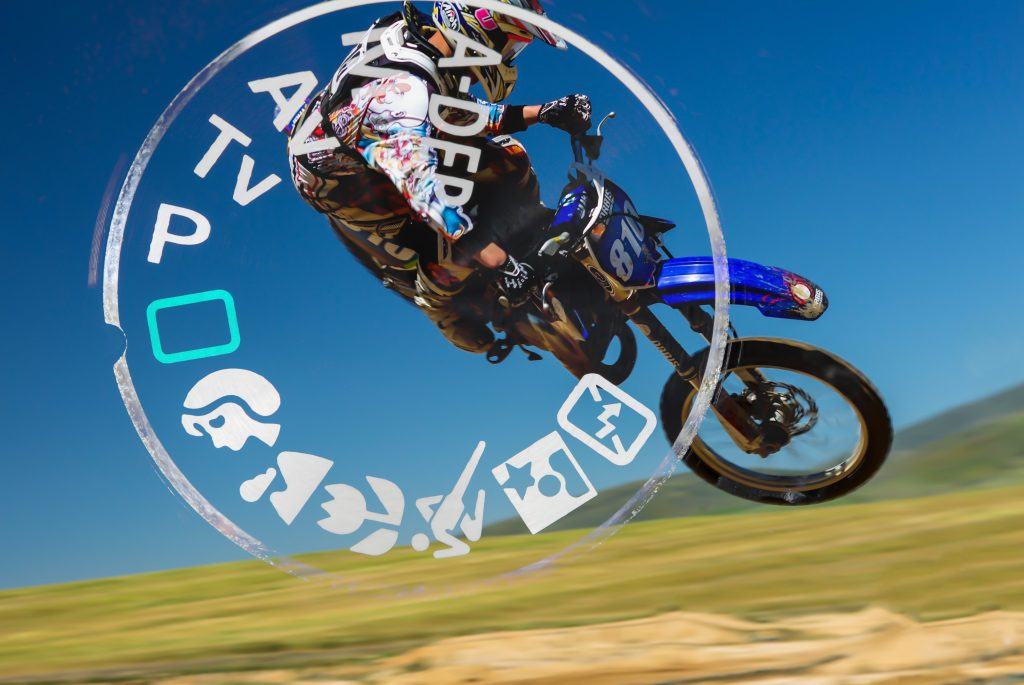
Sports Mode
Sports, or action photography, are completely unpredictable. This is an endeavor where you must use your mind to get good, predictable results. The Sports Mode creates a bias to increase the shutter speed. It will also increase the ISO if the lighting conditions will not allow for that higher shutter speed. Some models might shift the camera to continuous drive and focus tracking.
Here is the problem: the camera doesn’t know what you’re shooting. Are you shooting football, bowling, surfing, golf, rugby, or any other of the myriad sports activities out there?
Your settings would vary widely depending on what you are shooting, what lens you are using, and what kind of photograph you want to attain. Maybe you don’t want the image perfectly sharp. Maybe you want to try some panning techniques.

Panning is a great way to shoot sports. The technique helps to freeze part of the picture in focus while blurring the rest to indicate motion. You must tell your camera what to do when photographing sports. Don’t use the Sports Mode and settle for mediocrity. For sports photography, I suggest Manual Mode, or if lighting conditions were constantly changing, I would set my camera to Auto ISO and Shutter Priority Mode. Photo from Pixabay
Summary
- Scene Modes are a crutch
- Most Scene Modes will affect both a raw file and a .jpg file
- Scene modes take away critical settings that determine the creativity and technical excellence of your images
- The Party Mode, Aquarium Mode, and Museum Mode are probably the most useful Scene Modes (if you must)
Shooting Assignment: Pick a scene mode. I want you to plan a shoot. Do your homework. If you are planning to shoot sports, you must figure out what kind of shutter speeds and aperture settings you will need to the images you want. If you choose Night Mode, educate yourself on how to shoot a night picture. Don’t go into this assignment blind. Now do your shoot. Use the Scene Mode you selected for 1/2 of the photo shoot. Use your mind, research, and decision-making process to shoot the other half. Compare your results.