

As photographers, it’s our dream, our goal, and sometimes even our job, to capture what we see in the world around us.
As humans, we are not exempt from the natural instinct to become familiar, and therefore less interested, in our natural surroundings.
This is one of the reasons that photographers are always looking for new ways to express themselves with their photography.
Night photography is a fantastic avenue to pursue when looking for inspiration. It doesn’t require a lot of equipment, and even within the genre of “night photography” there are multiple creative outlets for you to explore- with a little knowledge and healthy dose of creativity your opportunities are almost endless.
One of the beautiful aspects of night photography is that you can return to familiar locations, and they will present you with a fresh look.
Let’s face it, Times Square, in New York City, does not appear the same when visited at Noon as it does when visited at Midnight.
This “fresh look” will be true, even if you’re simply stepping out into your backyard.
Even world famous scenes such as, New York City’s, Times Square, take on a fresh look when photographed at night.

Photo by joiseyshowaa
Photographic Gear
Night photography requires a camera that is capable of extended exposures.
Most cameras, with the exception of some inexpensive point and shoot cameras should have this capability.
Check Your Manual
Many cameras have built-in shutter speeds ranging up to approximately 30 seconds.
This will work for some night photography projects, but it will not work for everything we’re going to discuss in this guide.
What you really want is a camera that has a “bulb” setting on the shutter speed dial.
Virtually all SLR film cameras, and DSLR cameras, will have this function.
With other types of cameras you’ll need to check the manual.
Why is the "Bulb" Setting Important?
As we stated earlier, you will be able to perform some types of night photography with automated shutter speeds ranging up to 30 seconds.
But, here is what the bulb setting brings to the party; it allows you to manually open the camera’s shutter and keep it open for whatever length of time that you specify, and then you can release the shutter- ending the exposure. This is essential to many forms of night photography.
Some older cameras also have a “T” setting on the shutter speed dial.
This setting allowed you to press the shutter release once, to open the camera’s shutter, and then press the shutter release again, to close the camera’s shutter- ending the exposure.
As we get further into this guide, you will see why the bulb setting (or T setting) is important.
There are three Gear Requirements for You to be Successful at night photography!
- A tripod
- An external camera release
- An external flash unit (optional)
A good sturdy tripod is a must if you want to produce top quality night photographs. Sure, you could get away with just setting your camera on some solid surface.
But, you will be severely limited on what you can accomplish, and, your chances for a sharp image will be greatly decreased.
Buy a tripod.
There are several types of external camera releases: a cable release, an electronic cable release, or a radio remote trigger.
"One of the beautiful aspects of night photography is that you can return to familiar locations, and they will present you with a fresh look."
Which of these you end up using depends on your camera and your wallet.
Older film cameras, and Lomography cameras, take a cable release. Most electronic film cameras (manufactured from the mid 1990s on), and DSLR cameras, take an electronic cable release.
The radio remote trigger allows you the most versatility (You could literally be sitting in your house having a cup of coffee while you trigger your camera out in the backyard), but, they are far more expensive, require batteries, and you will need further knowledge on how to use them properly.
If you are interested in using a radio remote trigger, make sure your camera has a connection point for it.
Here is what any of the external camera release options does for you; it allows you to fire the camera and “hold” the shutter open for as long as you want without ever touching the camera.

Photo by jaliyaj
This blurred night shot is what happens when you don’t use a tripod and an external release.
Any of the camera release options will allow you to physically hold the shutter open by keeping the button pressed.
However, the will also have a locking mechanism (this is far easier for extended exposures).
The locking mechanism works a lot like the old T setting. You press the button to open the shutter and lock it, thereby holding the shutter open until you release the mechanism.
The entire purpose of the external camera release is to allow you to create an exposure without ever having to touch the camera.
This will keep you from bumping the camera and creating blurry pictures.
Other Stuff You Will Find Useful
When you’re heading out for some night photography fun these few items can help you bring home the award winning shot!

Photo by H Matthew Howarth
- A 12” by 12” piece of matte black cardboard. Here is why you need this- You are right in the middle of a 5 minute expo sure when you see a garbage truck approaching. All of his safety lights are glowing bright. He stops right in the middle of your shot and decides to have a cigarette break- photograph ruined. Now, if you have your matte black cardboard and you see him approaching, simply hold the board in front of your lens (don’t touch the lens – a couple of inches in front of it). This effectively ends the exposure until you remove the board. That’s why it’s important that it must be matte, not glossy, so that it reflects no light!
- A large powerful flashlight. Here is why you need this- You’re out in the middle of nowhere and you drop your expensive 16GB Sandisk memory card into the grass. That’s probably enough said, don’t you think?
- A small penlight. When you’re in the dark, you may want to check camera settings, or anything that you might want to do (while creating an extended exposure) without affecting the image.
- A notepad or some note taking device. Determining expo sure in night photography is more about experience than taking a meter reading. You would be well advised to keep notes. (More on exposure later)
- Light sticks. These provide a nice soft light that won’t affect the exposure unless you put them into the scene. They’re also really cool for painting with light. (More on that later.)
Film vs. Digital
We are such a digital world that it seems strange to even bring this up. But the truth of the matter is that in night photography film has a slight advantage.
The reason for this is something called “dark current noise”. That’s a big, somewhat intimidating, term.
The simplified explanation is this- Digital cameras tend to build up noise (looks granular)in the dark areas of a photograph when the sensor is exposed for a length of time.
The reason for this is a sensor is, “hot”, it has electricity passing through it the entire time it’s being exposed.
The higher end your camera is, the less likely it will build up dark current noise.
But we don’t expect that anybody who is just starting out in night photography is going to want to invest in new gear.
Here is what you do: keep your ISO low (don’t run it up because of low light), use a wide aperture to keep your exposure time to a minimum, and you can always run your photograph through noise reduction software.
"The longer film is exposed, the longer it takes to expose it."
Now, you don’t have this problem with film. However, something else comes into play called “reciprocity failure”.
This is once again a daunting term for us to comprehend. Here is a simplified explanation of reciprocity failure- The longer film is exposed, the longer it takes to expose it.
Reciprocity failure occurs at exposures longer than one second. Think about this-If I shoot a picture at 1/60th of a second, then I shoot the same picture, at the same f/stop, at 1/30th of a second, I have doubled the exposure to the film. But… if I shoot a picture at 4 seconds, then shoot it again at the same f/stop, at 8 seconds, I have not doubled the exposure to the film… it takes 10 seconds to double the exposure; that’s reciprocity failure.
In this Beginner’s Guide, I just want you to glean onto a couple of points- Digital cameras do not have reciprocity failure but do have dark current noise: keep your exposures as short as possible.
Film cameras do not have dark current noise but do have reciprocity failure: when figuring out your exposures remember to add extra time to the exposure.
Let's Look at Some Photographs

Photo by Jonathan Combe
One very exciting aspect of night photography is the color. All light has a color spectrum. Different lights proved different color spectrums: fluorescent lighting tends to go green, sodium vapor lights go orange, all lighting can be affected by a filter placed in front of it such as a colored globe. This shot has green light from fluorescent lighting, orange from sodium vapor lights, and a purplish glow from a mixture of distant city lights.

Photo by Mauro
This night shot took on an orange glow from a single sodium vapor light source.

Photo by Kevincole
Earlier we mentioned that an external flash unit is an optional piece of night photography equipment.
This photograph is a perfect example on the use of an external flash for night photography.
You don’t have to rely on existing light sources in your night photography; you can add lighting.
In this photograph above, the photographer set his exposure for the existing light, and then during the extended exposure he manually popped his flash several times to “light up” the bell tower!

Photo by Jonathan Kos-Read
Another cool technique with night photography is called a “shutter drag”.
This is easy to do and will provide some interesting results. For this technique, you set your shutter to whatever slow speed you need to capture the background.
But you turn your flash on. You place some element of your composition close enough so that the flash will illuminate it with a burst of light.
The effect is this- whatever the flash lights up will be “frozen” in a burst; but the background will continue to expose. There are many variations on this technique.
But that’s the fun part- learning the variations and seeing how they will change your photograph!

Photo by Paul Bica
Night photography occurs any time the sun has set, or before the sun rises.
So, your choice of time will affect your photographs. Pre-dawn light, and post-sunset, light will affect the color values of your sky.
Night photography also allows you to capture motion when lights move.
Here (above), the photographer combined two elements: moving car lights and pre-dawn light.

Photo by Bulliver
Here is a good place to talk about exposure.
The lights that glow in a night scene are much brighter than you might imagine.
It shouldn’t be your goal to turn the night scene into a day scene; which is what your meter is going to want to do.
Exposure in night photography is a lot about experience- which is why notes are important. Our best advice (when starting out) is to shoot your scene at ISO 400, f/5.6, at 1 second. Review what you have and make adjustments accordingly.
Star trails (such as this photograph above) can take up to several hours to expose.
If you’re trying to do astronomical night photography, make sure you’re in a dark area far away from any city lights.
"You don’t have to rely on existing light sources in your night photography; you can add lighting."

Photo by Ian Sane
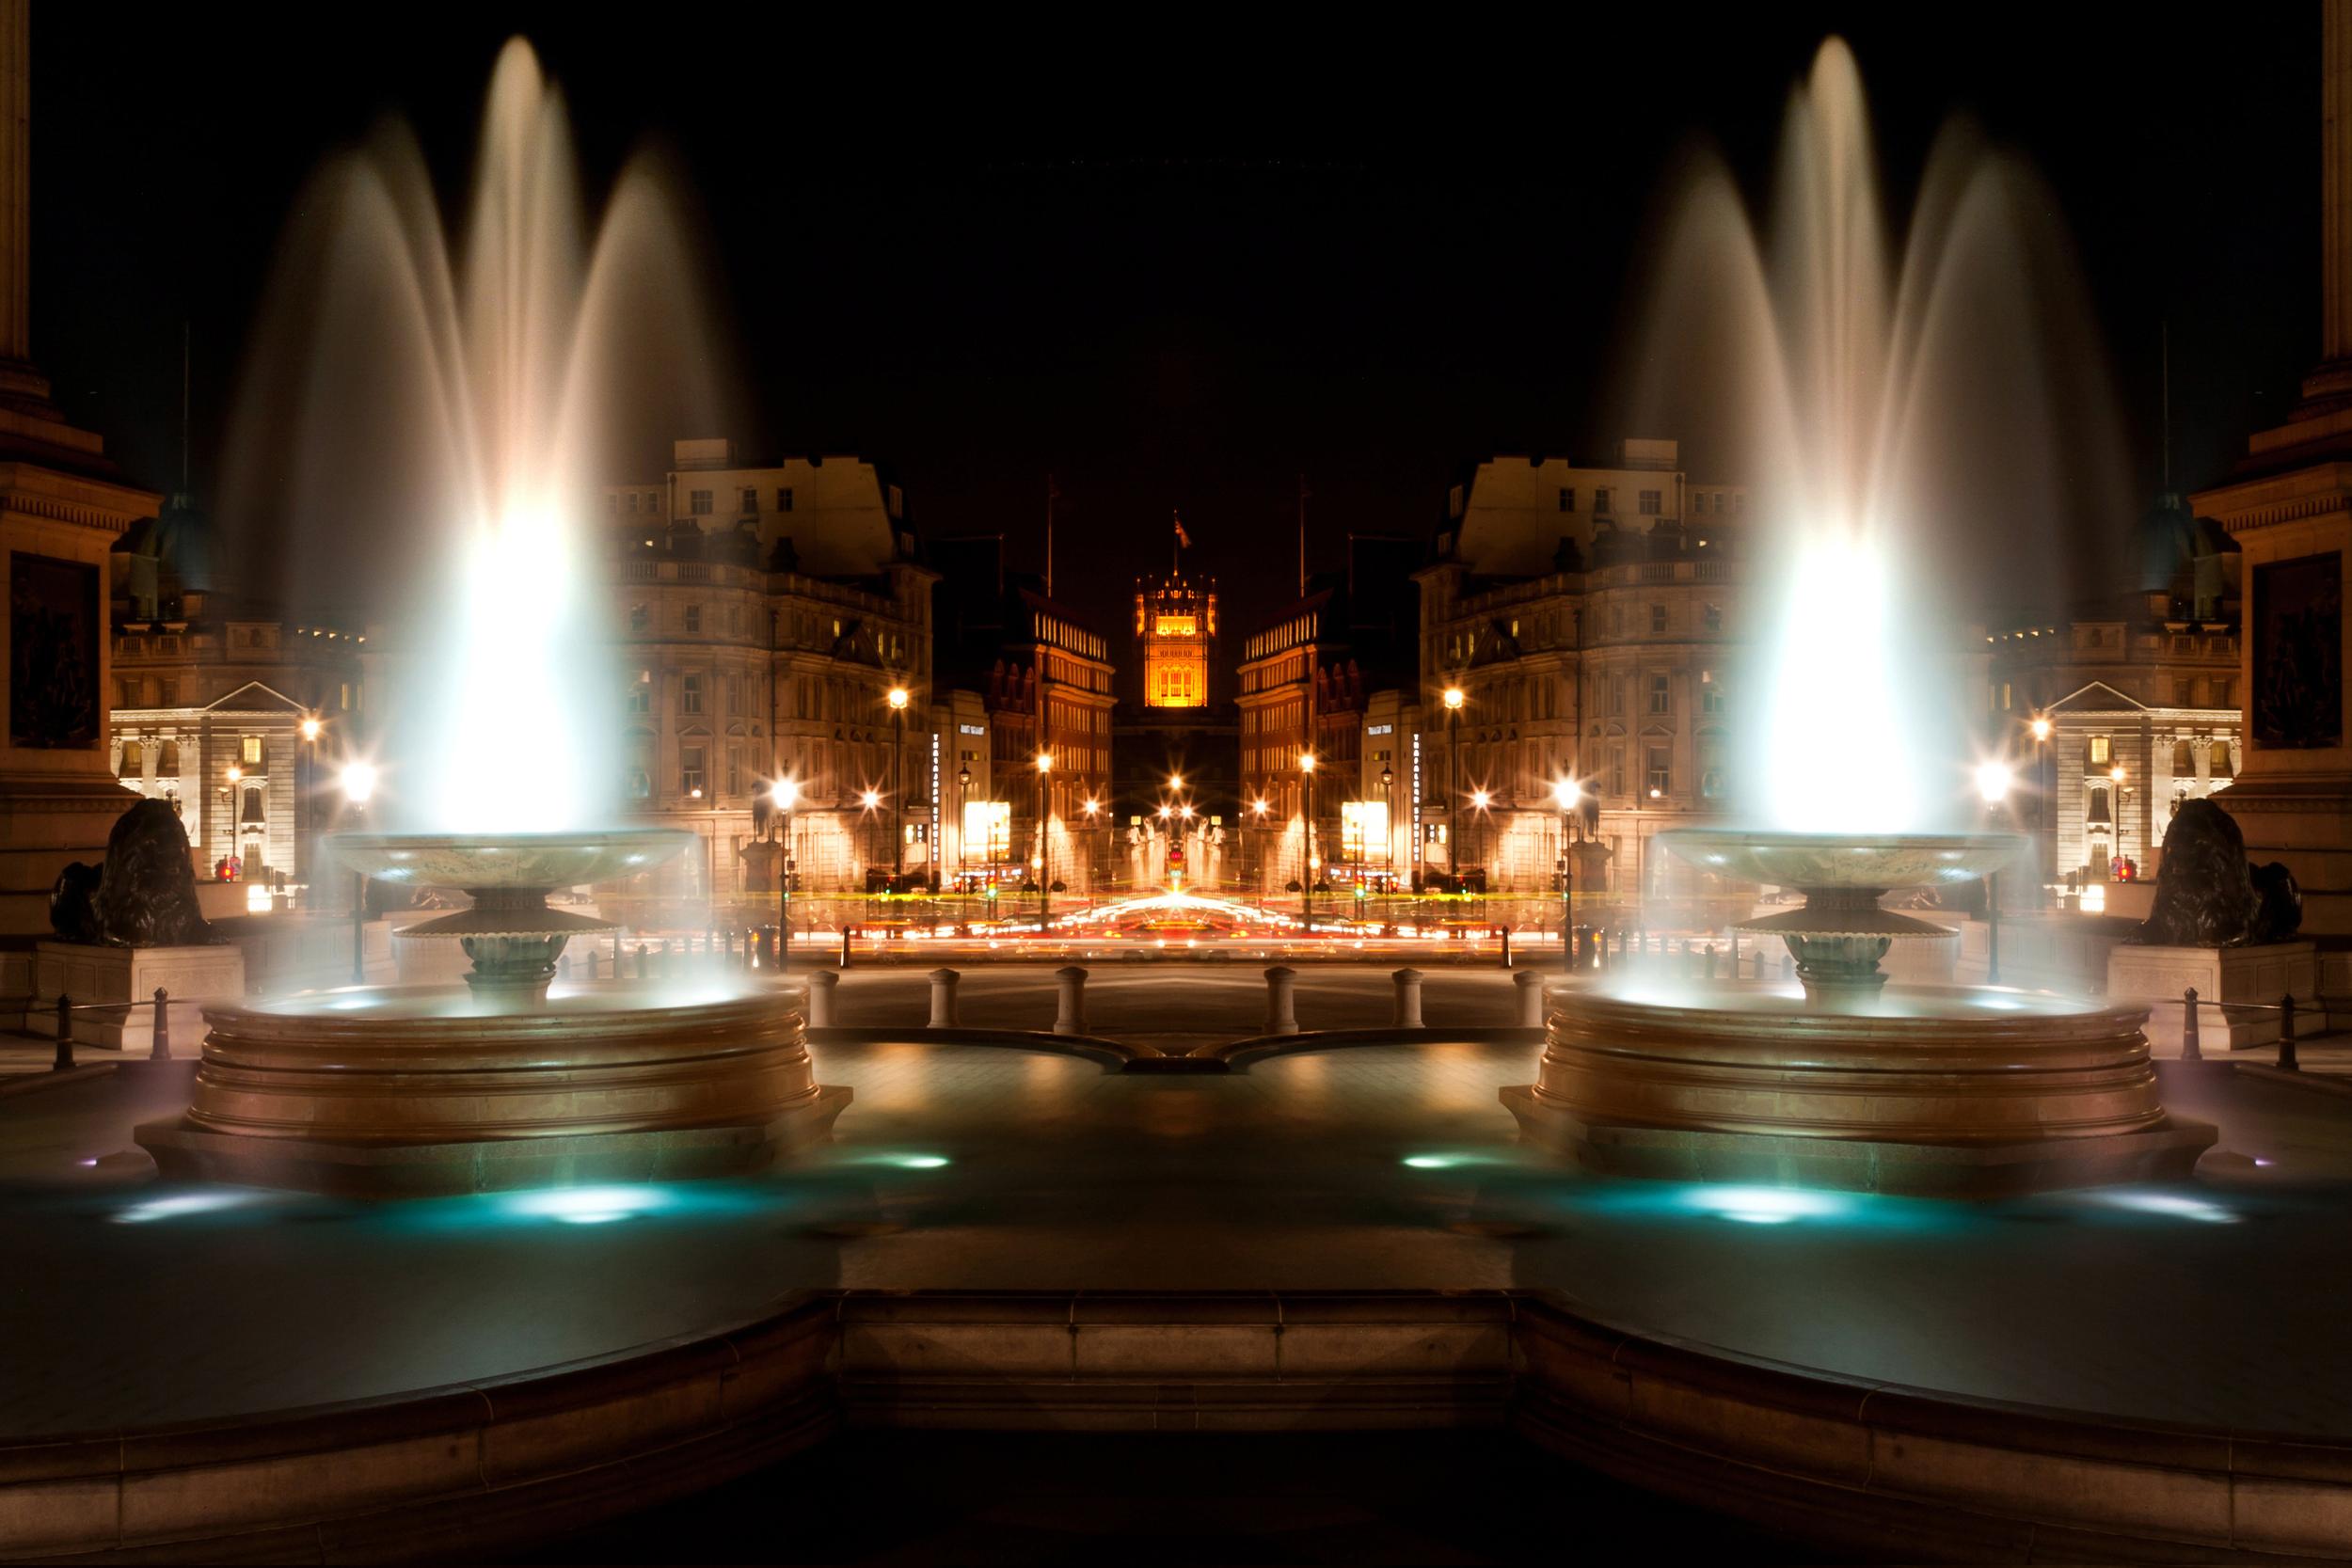
Architecture always lends itself to interesting night images. Look for interesting shapes and lines within the lighting.

Photo by Christian Frausto Bernal
Weather can also provide some interesting results for your night images.
Remember, when photographing things such as lightning, or fireworks, they are very bright and will completely expose whatever portion of your frame that sees it.
Don’t wait for too many bursts or your image will become muddled. In-between bursts cover your lens with your matte black board.

Photo by jeff_golden
Many times the light of pre-dawn, or post-sunset, will take on very unusual hues.
If it doesn’t, you can always through a filter in front of the lens, or make adjustments in post-production.

Photo by anurag agnihotri
Some tweaking of tone can really affect the mood of a photograph.

Photo by digitalpimp.
This is a great example of how moving lights can expose your composition.
This particular image probably didn’t require that long of an exposure due to the intensity of the lights and the speed of the twirling carnival ride.

Photo by Kennymatic
We talked earlier about how the color of night photography was fun. But, it also lends itself to “old school” black and white images such as this one.

Photo by William Cho
HDR is a very popular look in photography right now.
Night photography lends itself well to the technique because it plays right into its strengths.
HDR is about exposing and capturing details in an image from the darkest areas to the brightest areas.
This image is a perfect example of a night application.
Recommended Reading: If you don’t know much about HDR photography, we have a free beginner’s guide here: Short Guide on HDR Imaging.

Photo by illum
One of the neatest tricks in night photography is painting with light.
It’s pretty easy to do, but does take some experience to get predictable results.
Here is how it works- You set your equipment up for a long exposure.
Then during that exposure, you (or a companion) go into the scene with a flashlight, sparkler, or some light source, and wave it around. This paints exposure, just like the image above!
And below is another outstanding example of painting with light.

Photo by Johan J.Ingles-Le Nobel
We will leave you with one last creative idea for your night images.
Experiment with changing your focus. You can shoot an image that is completely out of focus, such as this one, or, during long exposures you can vary your focus, or zoom, for some really interesting results.

Photo by dell
We hope this guide has given you the basic knowledge that you need to begin night photography.
Night photography is a lot about experimentation, so, have some fun with it!


