


Photo by sleepyjeanie
About this Guide
Although not limited to people, majority of the example photos in this guide are portraits because three-point lighting is easier explained this way. Also, when referring to left or right sides, it will always be at your reference – right side will be your right (subject’s left if facing front) and left side will be your left.
The best way to understand lighting is to actually see how light works. With light,
we learn by seeing. I urge you to go beyond reading this guide and actually do the exercises available including the seemingly simple ones. Print out the PDF version of this guide or load it in your mobile device and use the activities for practice. Experience is, in fact, still the best teacher. This guide works best with those who have an understanding of the characteristics of light and basic knowledge of how to control light. For the shooting exercises, knowledge of manual or semi-auto modes as well as proper exposure and metering is recommended.
Finally, don’t forget to have fun. Let’s go!
The Importance of Three-Point Lighting
Reflective vs. Incident Light Sources
Reflective Light Source
Light bounces or reflects on reflective surfaces. When we try to point a flashlight on a mirror, you will see that the light hitting the mirror bounces back to an adjacent direction. Therefore, the light that bounced back from the mirror is called reflected light. The mirror then becomes a light source – a reflective light source.
Anything that bounces light can be a reflective light source.
Aside from mirrors and other metallic objects, colored things can be used as a reflected light source. Here’s a rule – white reflects, black absorbs.
"Here's a rule - white reflects, black absorbs."
The lighter the color of a solid object, the more it bounces light. The darker it is, the more it absorbs the light rather than bounce it off.
Try wearing black on a hot sunny day. It will seem hotter compared to when you wear why. This is because black absorbs the light instead of reflecting it away.
Also, solids reflect more light than translucent and transparent objects.
Incident Light Source
It is easier to understand incident light. An incident light source is the actual source of light – a lamp, a bulb, fire, the sun, a flash gun. The light it emits is called incident light.

Diagram by Karlo de Leon
A Learning Exercise
Take this time to observe the difference between incident and reflective light. Get a flashlight or any portable device that emits light continuously like a spotlight. Go to a dark room or any indoor location where light is limited. Get close to a white flat surface, like a wall, and point the light at that surface not more than a foot away. Try to make the light bounce from the surface to your other hand.
Observe how much light bounced back. Did you notice the light bounce? Try moving the light source farther, then closer. Did anything change when you did that?
To see the effects clearer, bounce light at different flat and solid surfaces – white, black, neutral, and colored surfaces. Try mirrors, metallic, and translucent objects too.
Take note of your observations.

Photo by vicbergmann
The Three Point Sources
The three-point lighting system is a system which uses three different point sources, each with a specific function. Each function has a specific purpose, characteristic, and effect.
The role of each point source is determined and assigned by the photographer. These three assignments are – key light, fill light, and edge light.
Let us understand what each does.
Key Light
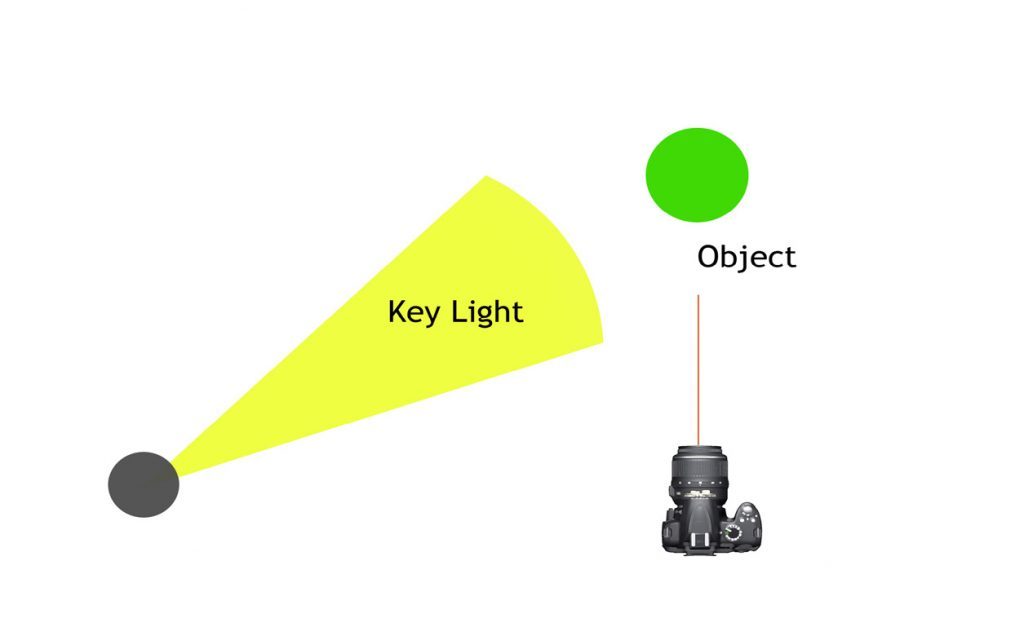
Diagram by Karlo de Leon
On the other hand, light from the sun is an example of key light in the natural environment. Another is window light. At night, it can be anything from car lights, light from lamp posts, building lights, etc.
Just remember that the key light is the main source of illumination for your subject.
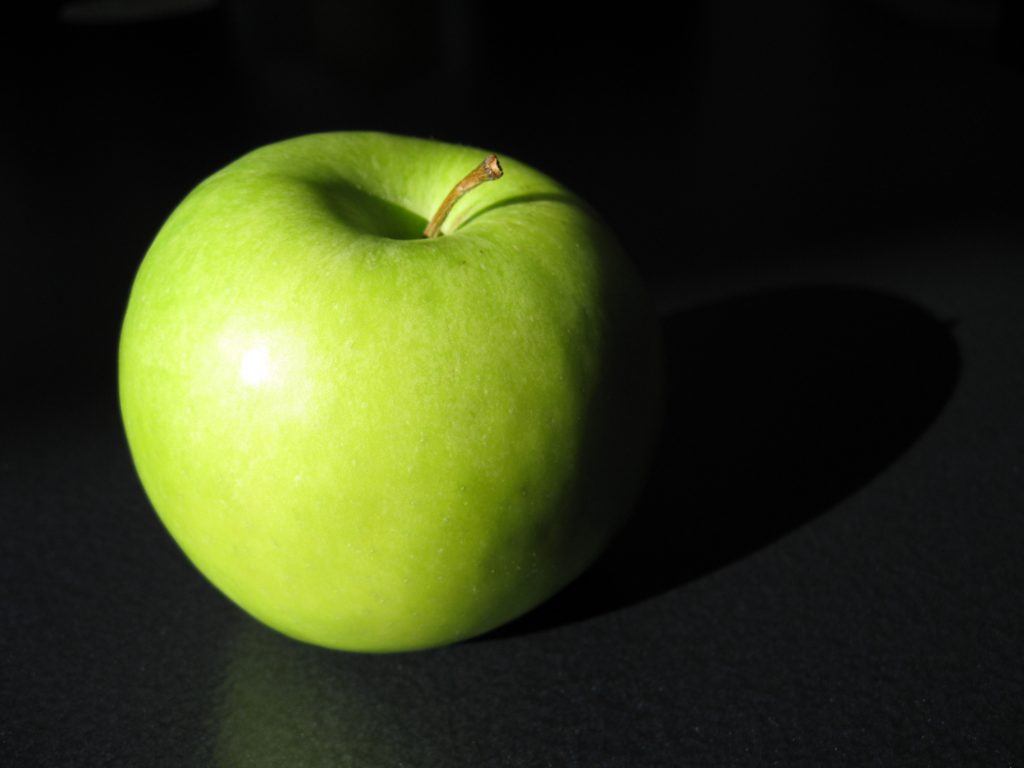
Here is an example of key light on an apple. Notice that the left side of the apple is well light while the right side, towards the back, has shadows. You can also see dark shadows on the top curve of the apple where the stem is located as well as the shadows on the surface of the table. Photo by selma90
Shooting Exercise: Find a dark place where there is only one light source available. It may be a room, basement, or garage with a single window or door
light. Alternatively, you can use a portable light source if you want – a hot shoe flash, an emergency lamp, or flashlight. You can also do this in a studio. Don’t use your on-cam flash since it becomes an added light point source.
Setup your subject where light hits it at a 45 degree angle, similar to the apple photo and diagram on the previous page. Observe the light and the shadows. Take your best shot. Try moving your subject from side to side. See what that does.
Extra Challenge: Try to imitate the photo below. It doesn’t have to be exact. You only need to understand the technique.
The single light source will be your key light. Position your subject where the light hits from one side. Use the diagram here as reference.

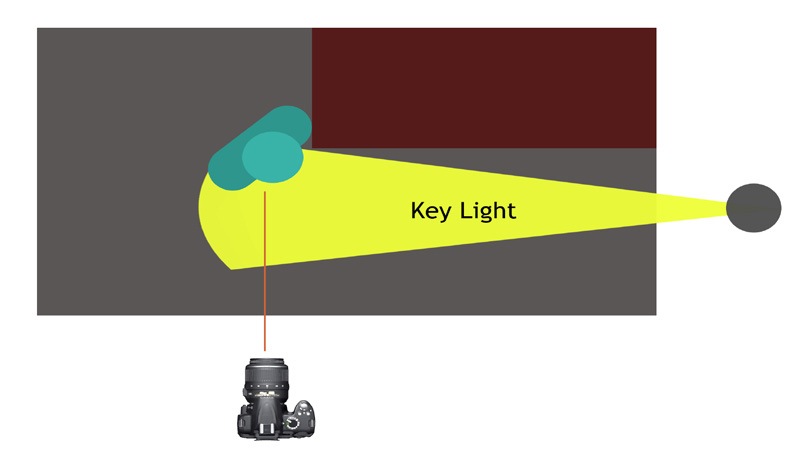
Diagram by Karlo de Leon
"If you have only one light source to light up your subject, that is your key light. This light point source is the basis of all your other point sources."
Fill Light
The second type of light point source is the fill light. The fill light does what it’s called to do – fill with light.
When do you use fill light?
Remember that where there is light, a shadow exists close by. Sometimes there are instances where the key light casts a shadow in a portion where you feel you would want to have more light than shade. This is where fill light comes in. What you do is have another light point positioned to “fill in the shadows”.
It is therefore used to add more light to lighten or soften the shadow in an area of your subject.
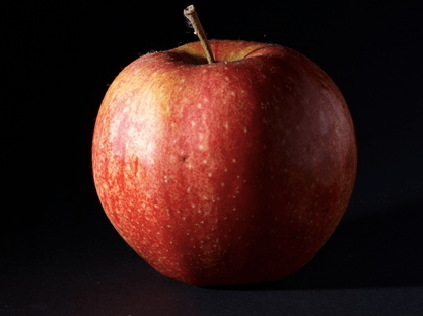
Here’s another apple photo, but this time with fill light available. Notice the light on the right side of the apple. That’s your fill light. It lessened the strength of the shadow. Compare this with the first apple photo that only had a key light. Photo by wjlonien

Here’s another example used in a portrait. There are 2 point sources – a key light and fill light. The subject is lit by the key light mostly the left side. The shadows on the right are softer due to fill light used on the opposite side of the key. Photo by bigmikeyeah
The strength of the fill light varies depending on your preference, but as a guide, fill light is always weaker than the key light.
In studio lighting where ratios are used, it is common to have a lighting ratio of 2:1 which means the fill light is only half as strong as the key light (2 parts key light, one part fill light), and also 4:1 which means it is only a quarter strong, compared to the key light.
If you have a hand-held incident light meter, the difference of the key light from fill light should be one f-stop for a 2:1 ratio and two f-stops for a 4:1 ratio.
Fill light does not necessarily have to come from an incident light source. It can also be from a reflective surface like a silver reflector or a white wall, since light can bounce back on it and fill in the shadows.
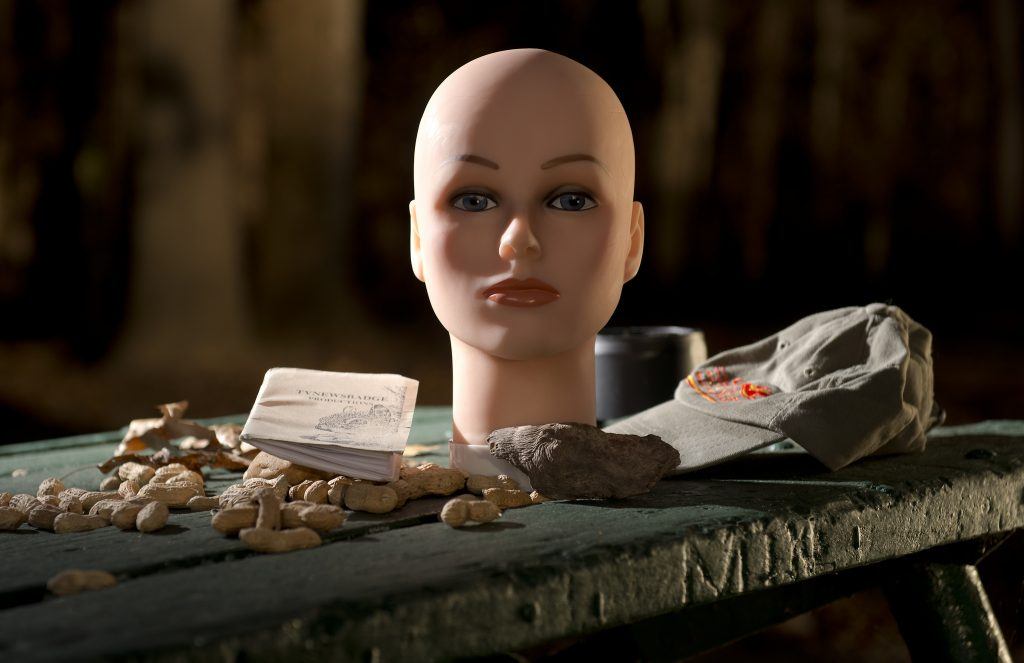
Photo by tvnewsbadge

Photo by tvnewsbadge
Take a look at the images above. Key light is illuminating the left side of the mannequin head. Fill light on the other hand is illuminating the other side using reflected light from a gold reflector.
Some of the incident light from the key point source (a hot shoe flash with a shoot-through umbrella) hits the gold reflector creating the fill light.
Take a look at the diagram below for reference.

Diagram by Karlo de Leon
Gear Talk: Reflectors
Let’s talk about gear.
One very handy piece of equipment for lighting portraits, whether indoors or outdoors, is a portable reflector. A reflector is a very good source of fill light.
It is available for sale in photography shops online and offline. Nowadays, they come in sets, normally a 5-in-1 reflector kit. This includes an invertible cover which acts as the reflective surface. It has 4 sides with different colors – white, black, silver, and gold each with a different effect and purpose. In the center is a translucent fabric on a solid frame that acts as a diffuser that can be used to soften light. It is also what keeps the reflector sturdy. This gives five functions in one kit.
Reflectors come in different shapes and sizes but the most common are circular ones from 12” to over 40” in size. The big ones fold up to a third of its original size making it portable.
If you don’t own a reflector yet, learn more about it and grab one when you can.
"One very handy piece of equipment for lighting portraits, whether indoors or outdoors, is a portable reflector. A reflector is a very good source of fill light."
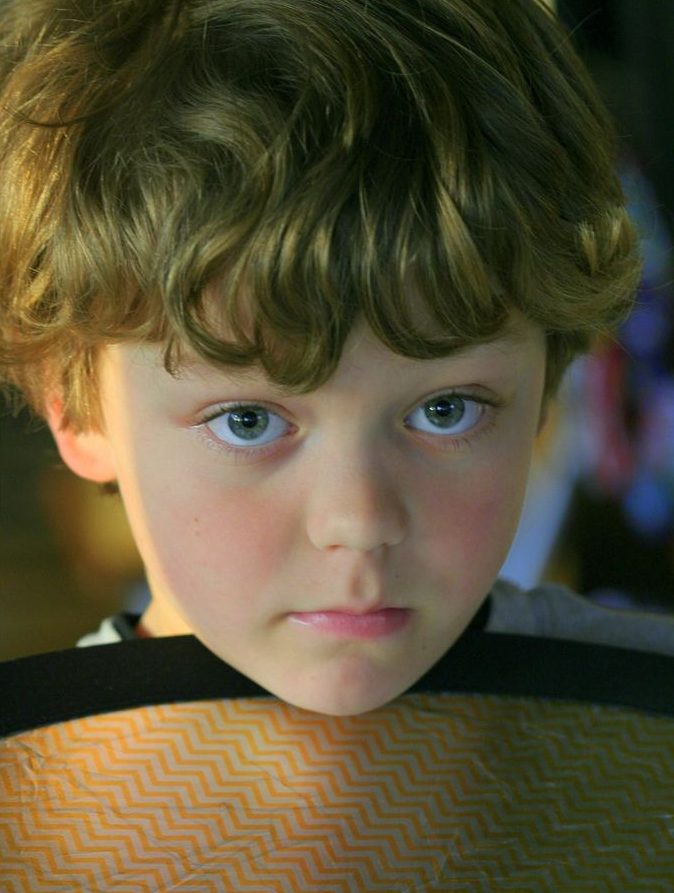
Photo by aidanmorgan
Shooting Exercise: Get a reflector, It can be a portable one you own, a white board or a DIY reflector using a white cloth or foil-covered board. For best results, the size should be more than 12” x 24” to be big enough to light up the face.
In the morning or afternoon, when the sun is at your 10 o’clock or 45 degrees above you, have someone stand where you will find shadows on one side of the face. Using a reflector, try to bounce back some light to the other side of the face. Observe what that does to the shadows. Go ahead take shots with and without the reflector.
Can you see the difference?
Extra Challenge: Other than a portable reflector, think of other ways you can get reflected light as fill light while keeping sunlight as your key light source. Be creative. There are lots of options out there. Make a portrait using your alternative source of fill light.
Edge Light
Edge light is a point source where light directly illuminates the subject from the back. The light intensity varies on the desired effect. It can be less than, equal to, or stronger than the key light. The position of this point source creates an outline of the subject made of light.
Originally, edge light is called backlight because it is light coming from the back of a subject. Other terms include rim light and hair light because it was commonly used to create highlights on the edges of a person’s hair, and also because the light it creates is thin and hair-like in nature. To emphasize the effect rather than the position of the point source, we will be using the term edge light or hair light more often.
Edge light has several purposes. The hair-like effect created by this point source creates a three-dimensional lighting illusion to a photograph. Since photography is a two-dimensional art, effects in lighting can help create that 3D visual experience.

This photo would look flat without the highlights on the edges of the petals and stem. Photo by aidanmorgan
Another purpose of edge lighting is that it helps define the shape of an object or a person. This is helpful in separating elements whose tone and/or color tends to blend together. The hair-light effect gives that distinction.
With the absence of a key light, silhouettes can be created using this point source because it is positioned behind the subject.
Photo by nicoleleec
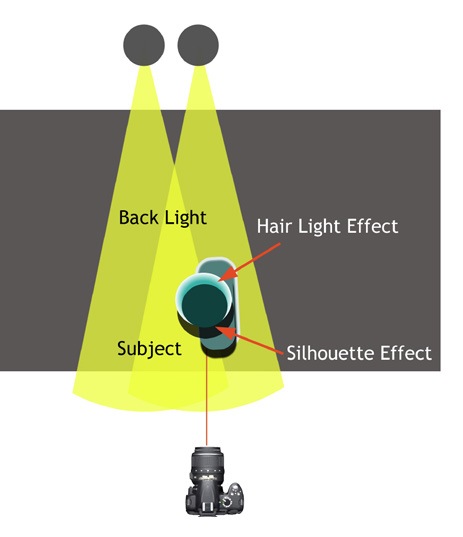
Diagram by Karlo de Leon
Shooting Exercise: Without a key and fill light, the hair-like effect of edge lighting can easily be seen.
Take a look at the silhouette photo of a person above. There is barely any light falling on the camera side of the face. Because of this you will notice the strong hair-like outline created by strong back lights.
Using the top-view diagram as reference, create a photo similar to the image.
Take note that the light sources are part of the frame. Create two photos, one where the light source is part of the photo and one where it’s outside the image.
Extra Challenge: Try creating the hair-like effect of edge light without creating a silhouette. You can do this outdoors during the day.
"The KEY lights the subject, FILL lightens shadows, EDGE adds shape."
The three-point lighting system is a combination that can be used to create beautiful portraits. It can also be used to illuminate and give character to different objects.
As a guide, remember this: The key light is used to illuminate the subject, a fill light to lighten unwanted unflattering dark shadows, and edge light to add shape.
Point sources however are not limited to key, fill, and edge light. There are also point sources with other specific functions.
Examples of which are kicker light and background light.

Three-point lighting in one image – key light on the left side, fill light on the right side and edge-light seen on the hat, right ear, and right side of the trench coat. Photo by joostassink
Some Considerations for Three-Point Lighting
The Basis for Exposure
Exposure can be tricky when there are different light sources, the best rule of thumb to follow is to expose based on the key light.
Since key light is your main light source and is the prime source of illumination of your subject, the key light is almost always the basis of correct exposure.
At times, it may be that the background light is stronger than the key light, in these instances, it is still best to determine correct exposure based on the key light.
In the absence of a key light, expose based on the lighting effect you want to highlight.
Even with very strong back lights, the basis for exposure here is the key light hitting the front of the subject. If light from the back was the basis, this photo would look underexposed. Photo by Karlo de Leon
Do I Have to Use Three Lights?
The point of three-point lighting is that light sources have three main functions – one that serves as main light, one that is used to lighten shadows, and one that highlights the shape of a subject.
While using all three can be used to create stunning images, using all three in all situations is not ideal. It all depends on the result you want. When using just one light source (One-light setup), generally, a key light is used.
Sometimes, just a back light is used. With two lights, you can use a main and fill, main and edge, or in some occasions edge and fill.
"While using all three can be used to create stunning images, using all three in all situations is not ideal. It all depends on the result you want."
Avoiding Silhouettes
Have you ever had a time when you wanted to take a photo of someone while having the sun at the back? The common problem with this lighting setup is that the light is too strong that the subject becomes underexposed or turns into a silhouette.
Some call this “shooting-against-the-light”.
What do you do in a situation like that?
You can do one of two things. First you can increase exposure compensation so that the front will have correct exposure. However, this can cause blown out highlights, or overexposure in the background. While this technique is acceptable in some situations, this won’t allow you to capture the details of elements in the background.
To keep the subject illuminated well while keeping the background still exposed to our desired level, we will use solution number 2 – adding a second point source.
When you’re in an outdoor situation where you want to take sunset backgrounds, you can use a flash to fill-in the shadows on the face with light coming from the front. This is called fill- in flash. A hot shoe flash or even an on-cam flash can be used for this purpose. If you don’t have a flash, you can use any light source that fulfils the same result.
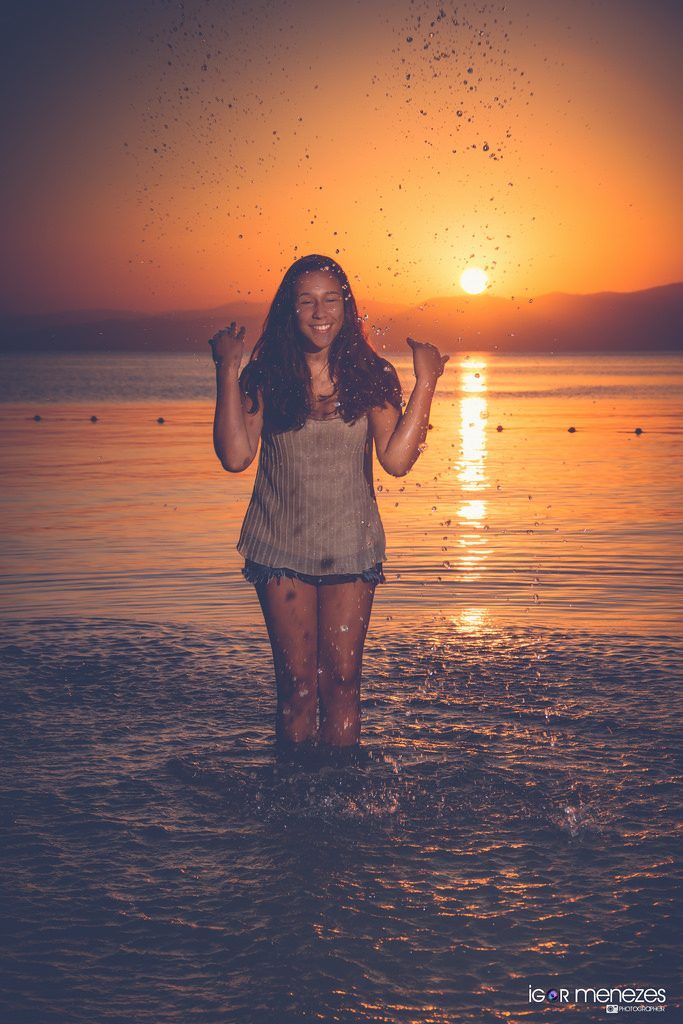
This photo of girl should have been a silhouette if not for the fill-in flash coming from the front. Photo by igorrmenezes
Fill Light As Key
Some of you may be thinking, if adding fill-light illuminates the subject then isn’t that also the function of key light? If these are your thoughts, you are correct.
The key light is the basis for setting up other light points. But there are instances common to outdoor photography where natural light, being more difficult to control becomes the basis.
It doesn’t mean however that you have to use it as key light.
The photo of the girl above and the photo of the boy below show that natural light is coming from the back. That being constant, both photographers decide to add light from the front. The point source added functions as fill-light since it lightens the shadows created by the light from the back. However, it is still essentially a key light function since the same point source is the main source of illumination for the subject.


Diagram by Karlo de Leon
When you have 2 source points – a key light and a fill light, your key light should be stronger than your fill light. What happens when the fill light becomes as strong as the key light? Essentially it’s no longer fill light but rather, you will now have two key lights.
How about when the fill light becomes stronger than the key light? In that case, the key light essentially becomes the fill light and the fill light becomes the key light.
Again, as a rule, the key light should always be stronger than the fill.
Gear Talk: Portable Flash
Before we continue, let’s talk about flash units for a bit..
A portable flash unit, also called hot shoe flash or electronic flash, is a lighting device that emits artificial light.
Unlike studio lights, hot shoe flashes are portable enough to be part of your everyday shooting gear. Event photographers normally attach it to the hot shoe connector on top of their DSLRs. Portrait photographers, however, prefer to use this device off-cam using a remote trigger initiated by the camera.
Unlike a DLSR’s on-cam flash, portable flash can be used from any direction making it possible to be used for either key, fill, or edge light.
Flash accessories like stands, umbrellas, and even soft-boxes are available as flash attachments to help you in controlling light.
Try to learn more about portable flash units and how you can use it in lighting. If you already own one, learn how to master off-cam flash for better results.

Photo by eliotmarc
Back light as key light
Although alternatively called edge light, back light is not always used to create that edge effect. Back light is simply light coming from behind the subject.
There are instances when you only have one incident light source available and it’s a back light. Since back lights tend to underexpose subjects or create silhouettes, you still need light coming from the front to illuminate the subject.
Although you have an on-cam flash, there is another solution to this scenario.
If light from behind the subject is strong enough, you can use a reflective light source to bounce back that same back light to illuminate the front side of the subject. With the absence of a proper key light, fill light again acts as key light in this scenario.

Photo by barbroandersen
This photo above shows strong light coming from the back. It is positioned a little to the side as it illuminates part of the woman’s shirt on the left although most of the light is hitting the back. Can you see the hair light effect on the edges of the hair and shoulders? However, the front is illuminated with soft light reflected from a surface.
Take a look at the two diagrams below. One uses a white wall and another uses a reflector. Both options can create the same effect.
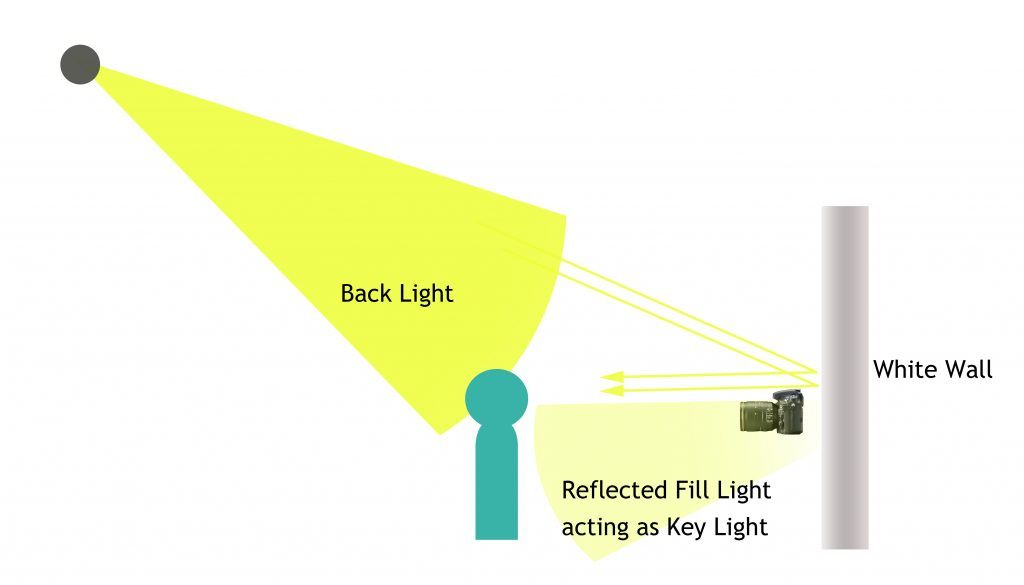

Diagrams by Karlo de Leon
Direct Sunlight vs. Skylight
One other thing you have to understand about natural light is that there is a big difference between direct sunlight and sky light.
Whether we see the sun or not, we normally call natural outdoor light as sunlight. However, in a point source perspective, sunlight has two categories – direct sunlight and indirect sunlight. Indirect sunlight is what we can call sky light. The main source of the light is still the sun but the point source isn’t directly from the sun.
Aside from objects reflecting back the light coming from the sun, the earth’s sky acts like a gigantic diffuser that spreads the light to earth. Take a look at the diagram on the right.
"... there is a big difference between direct sunlight and sky light."
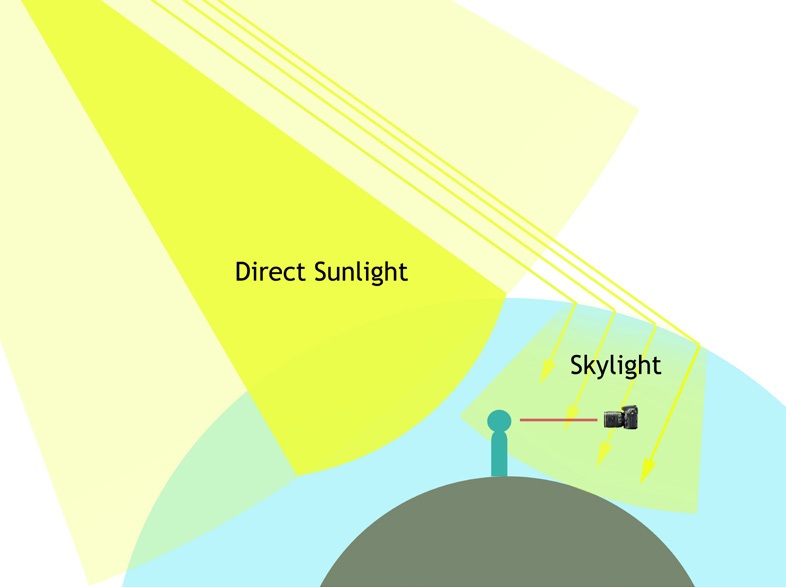
Diagram by Karlo de Leon
Shooting Exercise:
Using the considerations and techniques you have read, create an image shot outdoors similar to this photo below where you have a strong back light from the sun but the subject is still well lit. Make sure that the details in the background can still be seen.
You may use any point source for your key and fill light, but back light has to be either direct sunlight or strong skylight.
Extra Challenge: Try doing this exercise without the use of portable light sources – no portable reflectors, no hot shoe flashes, and no portable strobes.

Photo by robnas
Sources of Light Points
Studio strobes and portable flashes are used as source points in three-point lighting in a controlled environment. Since you can adjust the intensity of the light and placement of these point sources, it is more precise to use these devices than natural light.
However, some photographers prefer to use natural light. Others try to combine both controlled light sources with natural light sources. This is very common in editorial portraiture and fashion photography.
Of course, with the absence of studio strobes and hot shoe flashes, setting up point sources are much more difficult because they tend to be fixed and at times immovable.
In these situations, the photographer should have the skill to find the right places that have the right types of point sources they need.
Here is a list of some point sources you can use for key, fill, and edge lighting:
Example Sources of Key Light
Strobe or hot shoe flash
Sunlight from an overcast sky
Direct sunlight softened by a diffuser or skylight
Window light
Light from a lamp post
Example Sources of Edge Light
- Strobe or hot shoe flash without diffuser
- Direct Sunlight
- Skylight
- Light from a lamp post
- Car headlights or spotlights
Example Sources of Fill Light
- Strobe or hot shoe flash
- A portable reflector
- A white or light-colored wall
- White or light-colored floor
- Window light diffused by a thin white curtain
More Shooting Exercises
Window Light Shooting Exercise:
One of the best ways to get key light is window light. Window light is simply direct sunlight or skylight coming inside a room.
Normally, direct sunlight can be harsh so when the light goes directly through the window, try covering it with thin drapes that softens the light.
On the other hand, skylight is softer and you can use it directly as a light source without the need for a diffuser.
Play around with window light. Use it as your key light. Take a portrait, put objects near a window. See what images you can create using light from a window. Try using a door instead or other similar openings.
Try glass panels too.
Extra Challenge: Try doing this at different times of the day. Try it in the morning, try it at noon, and try it in the afternoon.
See the difference.

Photo by joestpierre
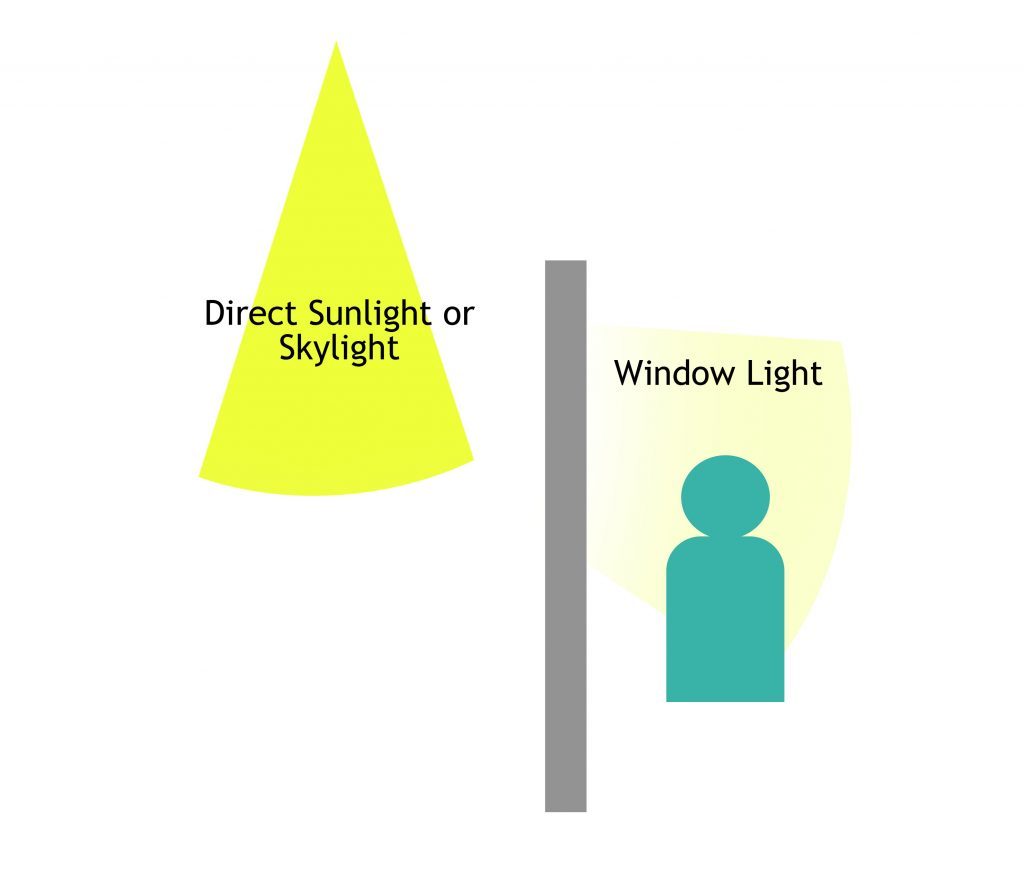
Diagram by Karlo de Leon
Wall Light Shooting Exercise:
Large white or light-colored walls are great reflectors. They bounce a lot of light since they cover a huge space. Find a wall that is positioned directly against the sun that you can use as a reflector.
Position a subject near or against the wall. Light coming from the sun will be your key light and light bouncing back will be your fill. Make sure to observe how the light falls on your subject. Move your subject closer or farther from the wall. See what that does.
Extra Challenge: Try doing this activity at night where you don’t have the advantage of the sun as your key light. You can be creative and find other light sources as you key.
Experiment on adding other light sources bouncing off the wall.

Photo by tremapictures
Multiple Window Shooting Exercise:
The presence of multiple windows is a three- point lighting opportunity. Since sky light covers a lot of area, light can come from different directions at different intensities.
In the example photo, the subject is in the driver’s seat. Light from the windshield serves as key light based on the amount of light hitting the subject from that side. Hair light is also seen coming from the driver-side window. There is also light hitting the subject’s back, possibly coming from the rear car window. The left side of the woman’s face has a bit of fill.
Can you create a photo using the same scenario? Get your car out and see what you can do.
Extra Challenge:Other than a car, there are similar situations where you can find light coming from different directions in a natural setting. Try to find a location like that and fire away.
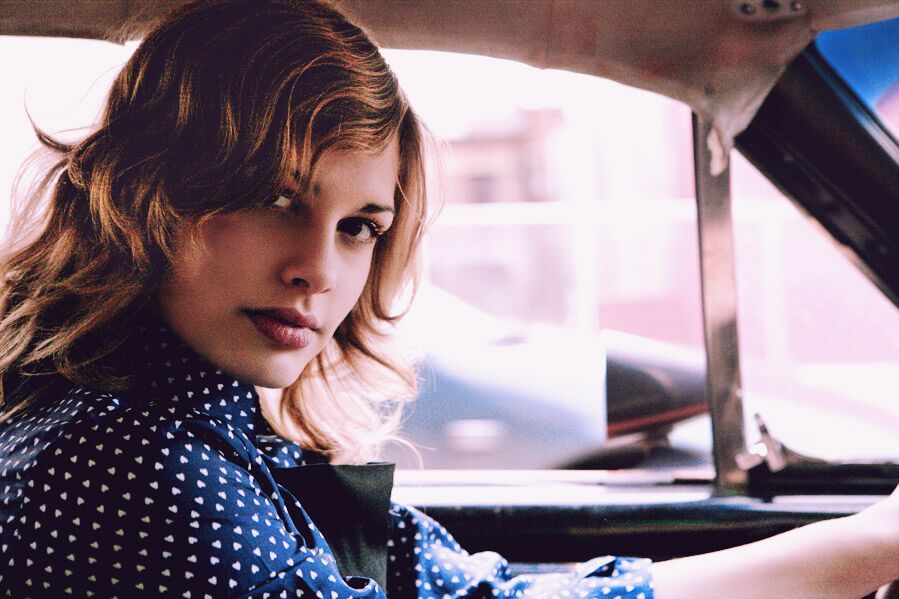
Photo by kk
Mixed Light Shooting Exercise:
Can you create a photo like this? One that looks natural by using a portable flash or similar key light source and mixing it with natural light?
Since the background uses natural light, the trick is to get the right amount of key light with the natural light as reference to make it look natural.

Photo by zebranete


