


Landscape Photography
Depicting the landscapes of the world has long been one of the most sought after expressions of art. It was a common subject for many of the masters of painting, such as Monet, and later became a jewel to the eyes of photographers.
Think of Ansel Adams as he went through the grueling effort of hauling his gigantic bellows camera into the foothills of Yosemite Park, and you begin to understand the excitement that a beautiful landscape photograph can create.
Many of Adams landscape photographs are still some of the most recognizable photographs in the world.
Beginning photographers often gravitate towards landscape photography because it seems like an easy subject. After all, it doesn’t move does it? We don’t have to tell it what to do. And, there is an abundance of subject matter all around us.
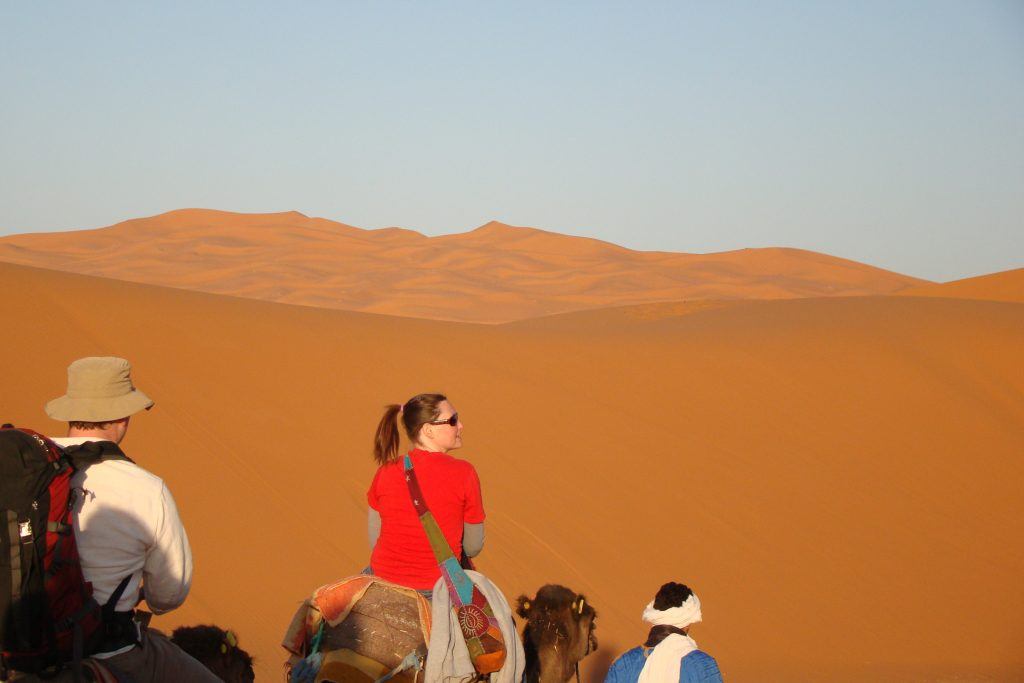
Photo by Brandon Prince
But let’s be honest, haven’t we all been a little disappointed with a photograph we took at some unbelievably beautiful location.
The magnificent Rocky Mountains just didn’t look quite so magnificent in our final photograph, or, the vast desert landscape of the Sahara didn’t seem quite so vast and lonely.
There is a reason for this. It’s called depth perception. We “see” in three dimensions. Our brain has the ability to calculate depth based on data that is input by our eyes. But a photograph is a two dimensional medium.
When we look at a landscape such as the Rocky Mountains our brain interprets the information, and we perceive the vastness of what is in front of us. When taking photographs of these vast landscapes we must learn how to “create” the information that the brain is looking for.
We have to trick the brain. We do this through composition.

Photo by Julio Gago
Let’s talk about a tool that is available to us in any landscape situation – our lens.
Lens choice can affect the outcome of your efforts in many ways. For this guide – we’re going to focus in on two basic concepts regarding your lens choice.
- A wide angle lens pushes your subject matter back creating a sense of wide space.
- A telephoto lens pulls your subject close creating a sense of intimacy, compression, and size.
There are all sorts of different focal length lenses and each of them will push or pull your subject to some degree. That’s the fun part – learning what each lens will do.
For our point and shoot camera users, when we’re talking about lens focal length, in your case, we’re talking about the X factor of your zoom. 1X is as wide as your lens will go and the higher number, such as 4X, is the most telephoto your lens will go.
"Lens choice can affect the outcome of your efforts in many ways."
For our DSLR users a wide angle lens range is typically around 14mm to 28mm. A normal lens range is around 35mm to 85mm, and a telephoto lens range is 100mm up to 1000mm or more.
Let’s look at our Sahara Desert example and see how the lens can have an effect our picture.
We are standing at a way station getting water. Our guide leads his camel away from us. As we observe him we see many mountains of sand, one after another, leading our eyes into the distance; about a mile away we see a caravan of camels cresting a large hill of sand.
First, we choose a wide angle lens. We place our guide and his camel close to the camera and to one side. The mountains of desert sand recede into the background creating a vast open landscape. We snap the shutter. We’ve created depth through expansion.

Photo by blmiers2
Now we change to a telephoto lens. We position ourselves so that the caravan of camels is large in our frame and sand mountains become compressed behind it giving a sense of distance.
The telephoto lens compresses our scene bringing the caravan closer than our eyes could see it on their own.
The mountains of sand (which are very far apart) meld into a diorama of one; creating a pattern of light and shadow behind the caravan.
Our example creates two very distinctly different landscape photographs with the simple choice of which lens to use.
Let’s look at some elements of composition that can fool the brain into thinking that it is seeing three dimensions on a two dimensional photograph.
Elements of Composition
- Leading Lines
- Receding objects of a known size
- Shadows and highlights
- Diminishing contrast
- Scale of known objects
- Use of a focal point
- Color temperature variations
Let’s examine each of these elements and learn how you can incorporate them into your landscape photography.
Leading Lines
Leading lines are an excellent tool for adding depth to your landscape photographs as they literally carry your viewer’s eyes into the picture.
They also add distance perception as the object used for the leading line becomes smaller the further away from your camera it becomes. Some excellent examples for leading lines are fences, a row of trees, a mountain range, a river, or a path/trail.
When you’re composing your landscape photograph, look for something repetitive that creates a cohesive line leading into your shot.

Photo by Charles Knowles
Receding Objects of a Known Size
Receding objects of a known size are a lot like leading lines. Here is the difference. A leading line is an object that repeats, or is continuous, going into the photograph. You could literally take a pen and draw a line from one end of the object(s) to the other end.
Receding objects of a known size can be randomly placed within your composition. They create depth and scale because your brain interprets that they should be the same size, but aren’t. Therefore, (your brain determines) the larger the object, the closer it is to you. Some good examples of receding objects of a known size are farm buildings, vehicles, people, trees, etc.
When composing your landscape photograph look for something within your scene that repeats randomly from very close to you to much further away from you.

Photo by Janet Ramsden
Shadows and Highlights
When we take photographs, the light across our subject is what creates a sculpted structure. Our brain is wired to see highlights and shadows, and it then interprets that into a three dimensional object.
If possible, try to shoot your landscape photographs when the sun is low in the sky (either morning or evening). This will create stronger highlights and shadows which will add to the drama and visual interpretation of depth. Shooting mountains
in midday sun is just not the way to go.
If you have no choice as to the time of day to shoot your landscape photograph, (such as on a vacation tour,) then compensate by making better use of the other compositional
tools available to you.

Photo by Stig Nygaard
Diminishing Contrast
The nature of landscape photography dictates that we are often photographing over great distances. Atmospheric haze is almost always a factor. In some cases you may try to get rid of it through the use of filters or in post-production.
However, it can also be one of your creative tools. Once again, we are trying to fool that brain into believing it sees distance. From birth, we have become accustomed to seeing atmospheric haze. Most of the time, we don’t even notice it.
Have you ever looked at one of your landscape photographs and wondered why it looked washed out (without contrast and color saturation).
The reason is most likely atmospheric haze. But, you can put it to work for you by including something close.

Photo by Antonio Bovino
A good example might be to place a silhouetted tree just a few feet in front of you when photographing that gorgeous mountain range that is miles away.
This scenario does several things. The close object (the tree) will add contrast. By doing this, it tells the brain that those mountains are a long way off because their color has been affected by atmospheric haze.
You could then do a few tone and saturation adjustments in post-production to pull out some of the color on the mountains that your eyes perceived (without over doing it, of course, and
making it look unreal).
"The nature of landscape photography dictates that we are often photographing over great distances."
Scale of Known Objects
Nothing lends itself to the depiction of immensity better than a shot showing an object of a known proportion that appears teensy-tiny in your landscape photograph.
A good example of this technique would be a castle nestled in the mountains and the castle looks to be about the size of an eraser-head.
Our learned memory tells us that the castle should be large. But it doesn’t appear that way in the photograph. So then our brain says that those surrounding mountains must be REALLY HUGE.
When looking for your landscape photographs, try to find some object in the distance that says, “I’m big, but I appear small.”
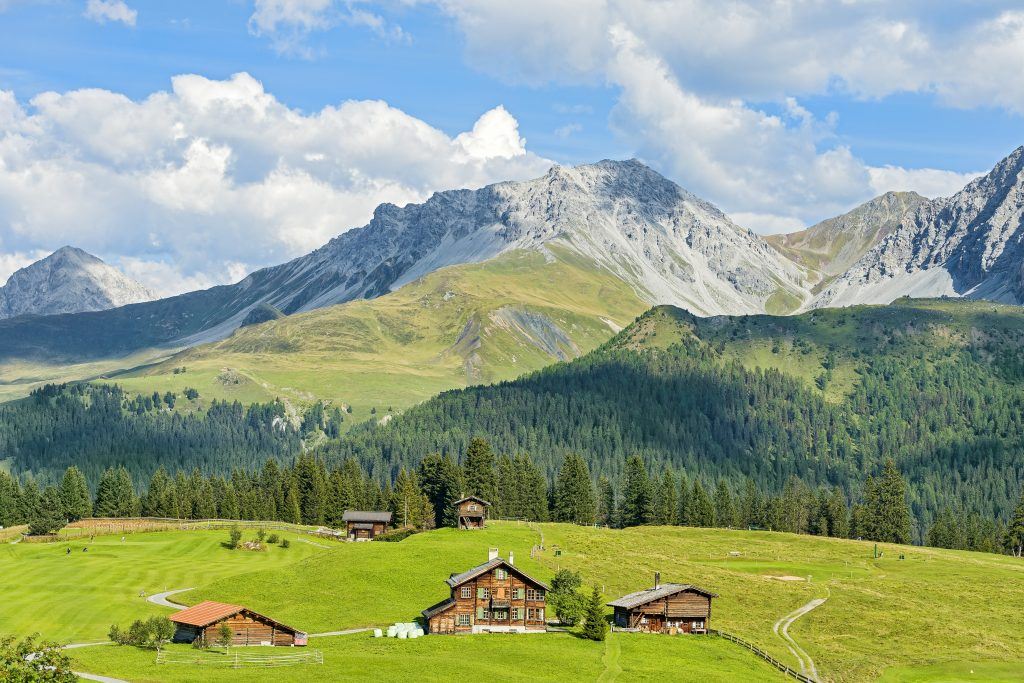
Photo by Tambako The Jaguar
Use of a Focal Point
This is a common mistake for many beginning landscape photographers. No matter how spectacular that scene in front of you is, you must still create a pleasing composition so that the image will transfer well to the two dimensional art of photography.
There needs to be some element in your composition that will lock the viewer’s eyes to your photograph.
Have you ever looked at a beautiful landscape photograph, or painting, and thought to yourself that it was nice… but seemed like something was missing?
That something was most likely a focal point. Without a focal point to anchor the viewer’s eyes, their vision will tend to wander around the image like an old in a pasture filled with grass.

Photo by Kent DuFault
Look for something, (or create something), in your scene that will lock the viewer’s eyes to a place of your choosing within your picture.
Objects that work well generally stand out because of their shape, color, or pattern.

Photo by Kent DuFault
Color Temperature Changes
Our minds are used to the color temperature changes around us, so, unless we’re looking for them specifically, we don’t even notice them.
The camera, however, will always record them. That’s why we have a white balance setting on our cameras. Color temperature changes can indicate “distance” in your landscape photographs.
The atmosphere contains a great deal of ultraviolet light.
When we photograph a scene that covers a great distance we are in fact looking through more ultraviolet light than normal.
This will cause objects in the distance to appear bluish, (or in the blue-cyan spectrum). Our brain interprets that as meaning, “Far Away”.

Photo by blmiers2
When setting up your landscape photograph include something in the foreground that is closer to natural color, or, even in the warm end of the light spectrum.
The change from warm color temperature to cool color temperature will be a great indicator as to the distance you were photographing.
"Color temperature changes can indicate "distance" in your landscape photographs."
Be Prepared!
Let’s close out our discussion on landscape photography with the subject of being prepared. Landscape photography often lends itself to some effort to get there. In general, it won’t be out your backdoor.
If you’re going to spend time and money getting to your location, you want to make sure you’re prepared to stay until you’re ready to leave.
Let’s talk about photographic equipment. These are things that you’ll want to have along no matter what your situation is (a bus tour vs. a hike alone) – extra batteries that are fully charged, extra cards (it’s better to have several several smaller cards in the 2Gb to 8Gb range rather than one large capacity card.
Cards can fail. You won’t want to spend half a day hiking up a mountain only to have your only 32Gb card fail on you.) Lens tissue and fluid to clean your lens, plastic bags (to cover your gear in case of a downpour), and a tripod is recommended (but optional).
If you will be shooting in early morning, or twilight situations, you will want to have a tripod along. It’s tempting to buy a super light tripod, but, that can be self-defeating if there is a good wind blowing.
For your personal safety be sure to bring water, sunscreen, bug spray, energy bars, cell phone (with a charger), rain gear, extra clothes and shoes, GPS (if you will be hiking into the woods), and finally let someone know where you are going and when you intend to be back.
We hope that you have found this beginner’s guide to landscape photography helpful. Good luck on your adventures as you photograph the beautiful world around us.


