

Camera manufacturers have gone to great lengths to make it easier for photographers to create photographs. Unfortunately, it’s often much like the remote control for our televisions; it can do 50 things, but we only use 4.
The abundance of shooting modes is a case in point.
Through conversations with photographers from around the world, I have come to the conclusion that many either don’t understand how the different shooting modes work, or even more importantly, why, when, and where they should choose a certain mode.
Many photographers report an affinity for aperture priority. I wonder why. It certainly has its place. But if I look at their work and many of the images were created with an ultrawide- angle lens, aperture priority should be the least of their concerns.

Photo by Jocelyn Konghorn
When shooting with wide lenses, aperture priority is less of a concern. The wide-angle lens provides a high level of apparent sharpness, even if the photograph is created with the largest aperture.

Photo by Ian Muttoo
Every manufacturer has their own acronyms and terminology relating to shooting modes, which adds to the confusion.
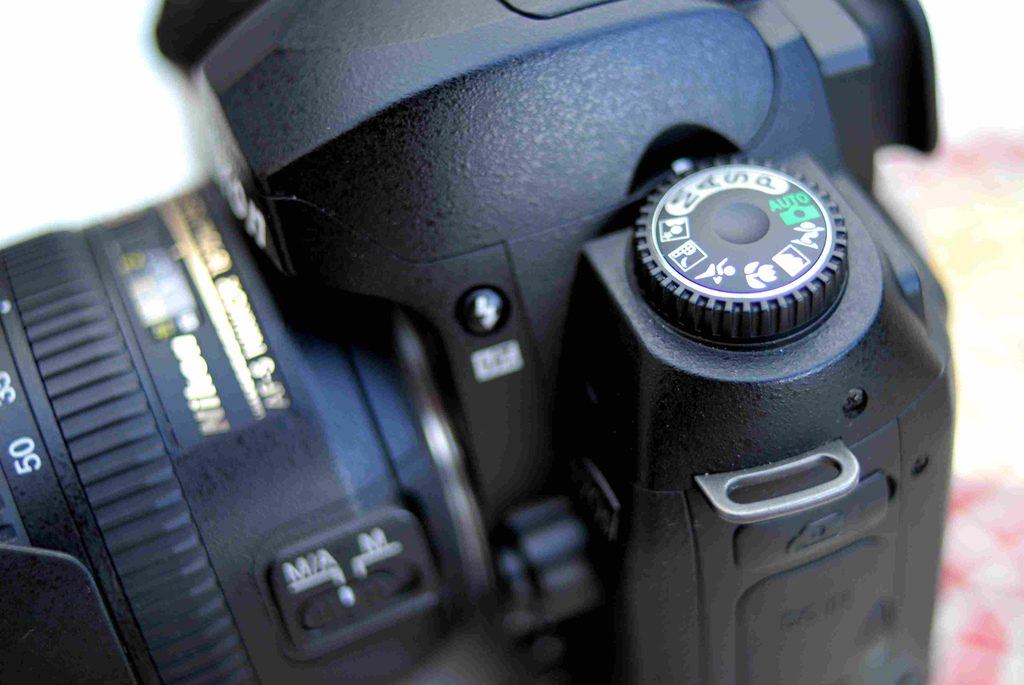
This (above) is an example of Canon’s shooting mode dial.
All DSLR cameras (to my knowledge) offer the following shooting modes: manual, aperture priority, shutter priority, and program.
Cameras that are geared toward beginning photographers will include a ‘full auto’ mode as well as ‘scene modes’ such as: portrait, sports, landscape, macro, and night.
Other possibilities on your camera’s shooting mode dial could include custom settings and video.
I am about to give you a personal opinion… Do not use the ‘scene modes’. I assume that you’re reading this guide because the creation of your photographs means something to you.
The use of ‘scene modes’ removes the thought process.
If you want to, or need to, shoot fast and without much thought. There are also other options, which we will discuss momentarily.
Most manufacturers make the ‘AUTO’ setting a vibrant green color. Sometimes, on Canon cameras, it is simply a green box. Sony is an exception (as they always like to be
different); they use a blue-green color for their nomenclature.
"The use of ‘scene modes’ removes the thought process."
I believe the purpose of making this setting so visible is to encourage photographers to just go there and use it. The manufacturers are placing the bet that their engineering can make a better decision than you can!
Many a photographer has struggled trying to figure out why they can’t set their ISO or properly adjust the output of their flash unit. Inevitably, whenever I’ve stepped in to help, I discover that they are in the ‘AUTO’ shooting mode.
This (above) is the shooting mode dial of a Nikon camera. Take note that the ‘AUTO’ setting is colored green. Photo by Sallm Fadhley
When you put your camera into ‘AUTO’, it takes over everything. About the only choices left to you are focus and releasing the shutter. (The ‘smile detector’ on newer cameras even takes that ability away from you.)
My recommendation- NEVER set your camera to the green full auto-shooting mode.

Photo by Pavel P.
I can hear many of you saying, “But wait a minute! What if I have to shoot fast? What if I don’t have time to think about the exposure? What if I just have to get the shot and then think about it?”
This is what the ‘Program’ mode is for, and here is how you prepare for that moment…
- Keep your camera’s ISO setting at a sensitivity level that is most universal for indoor and outdoor work. I recommend ISO 400.
- Shoot in the raw file format. This gives you the most flexibility for ‘fixing’ the photograph in postproduction should your exposure be off. Remember that raw is a generic term for ‘digital negative’. If your camera is a Canon, the file format is .cr2 or .crw; Nikon is .nef or .nrw, and Sony is .arw or .srf or .sr2. The point is- each manufacturer has their proprietary file designation, so you need to know what yours is.
You’re probably wondering, what’s the difference between the ‘Auto’ and ‘Program’ modes?
As I said earlier, ‘Auto’ sets everything and locks you out. ‘Program’ chooses a shutter speed and f/stop combination and that’s it. You still set your ISO, color balance, flash settings, and exposure compensation.
There are moments when getting the shot supersedes trying to set your exposure manually.

Photo by Emery Way
So, why wouldn’t you use ‘Program’ mode all the time?
‘Program’ mode is predisposed to pick an average setting for both shutter speed and aperture based on the meter reading.
Let’s use the above photograph to determine why that won’t always be the best option.
- You’re outside throwing a ball, and trying to get some action shots of your dog
jumping into the air. - The day is overcast – cloudy bright – your ISO is set to 400. This is a good sensitivity level to allow you to stop the action without creating electronic noise problems.
- In ‘Program’ mode the camera is looking for those average settings, so it picks a shutter speed of 1/250th of a second and an aperture of f/8.0.
- Given the activity, 1/250th of a second may not freeze the action. You’re using a wide-angle lens so depth-of-field is less of an issue. Your primary concern here is freezing the action. You decide that you need a shutter speed of at least 1/500th of a second.
- You now have a choice. In ‘Program’ mode you could set your shutter speed to 1/500th and the camera would automatically choose an appropriate f/stop. But you don’t want to do this. Why?
- If the sun goes under a cloud, and the level of light begins to drop, the camera is going to lower BOTH the shutter speed and aperture. ‘Program’ mode has no bias. In this case, you would want to use ‘Shutter priority’ mode. The shutter stays set, no matter what happens with the light level. If the light changes, only the f/ stop adjusts. If the light level drops to the point where your maximum aperture isn’t allowing enough light to create the photograph, your camera alerts you that you must lower your shutter speed or raise your ISO.
"Program mode is predisposed to pick an average setting for both shutter speed and aperture based on the meter reading."

Photo by Glyn Lowe
We now realize that ‘Program’ mode is pretty cool- for average shooting situations.
This image above is a perfect ‘Program’ mode situation. There is some motion- but nothing extremely fast. Some depth-of-field is needed- but it’s not critical. The moment most likely happened in a split second, so if the photographer was ready with their ISO set and shooting raw images, ‘Program’ mode was a good choice.
It’s worth mentioning that every camera manufacturer uses their own acronyms and nomenclature to express the shooting mode settings. For example, Nikon expresses shutter priority as ‘S’ while Canon expresses it as ‘Tv’. You want to make sure that you understand your camera’s nomenclature.
We are going to wrap up this guide by reviewing a number of photographs and making a decision as to what shooting mode would have been the best choice
But before we do that, let’s talk about manual mode and metering modes.
In my lifetime, I’ve encountered numerous photographers who were attempting to take a photograph but who were having a problem. I saw how they frantically switched buttons and kept taking the same image over and over again.
When asked what the problem was, they would often say something like, “The picture is too dark (or too light) and no matter what setting I use it doesn’t fix it.”
Upon closer examination, I’ll see that they are switching ‘shooting modes’. I would then tell them that they are switching the wrong setting. They should be switching the metering mode (pattern).
This was often followed by a perplexed expression.
This guide is not about metering modes. But let’s define the difference between ‘shooting’ modes and ‘metering’ modes so that you have a clear understanding.
- The shooting mode is only going to determine how the camera sets the shutter speed and aperture (and in some cases the ISO) (and this is excluding the ‘scene’ modes which will also set the color balance). It does not make a determination as to how much light is present within the frame and where that light is located. You can change shooting modes all day (excluding ‘Manual’ and ‘Scene’ modes) and it isn’t going to change how light or how dark your image is. But more on that in a minute.
- The metering mode determines how much light is entering the camera, and depending on how you set the metering mode, it also helps the camera to determine where the intensity of the light is located. Typical metering modes (or sometimes referred to as ‘patterns’) are spot, center-weighted, and matrix or evaluative.

Photo by photophilde
This bird was photographed in a zoo where the background was in complete shadow, and a sliver of sunlight illuminated the bird’s head. You could switch back and forth between the ‘Program’, ‘Shutterpriority’, and ‘Aperture priority’ modes and it would not change exposure value for this image. The metering mode is what makes the difference. The matrix, or evaluative setting, would cause the bird’s head to become overexposed. The centerweighted setting would be better, but it would still overexpose the head as it tries to lighten the background. The correct metering mode would be spot, so that the camera was measuring the light from just the bird’s head.

Photo by Linda Tanner
So, now we know that changing the shooting mode will not affect the exposure- unless you’re going to ‘Manual’ mode or using one of those stinky ‘Scene’ modes.
Some subjects present such a technically challenging situation that ‘Manual’ mode is your best option.
‘Manual’ mode is the ultimate photographer’s tool. It leaves the entire decision making process up to you.
Does this mean that I believe there is no place for the automatic modes?
Absolutely not!
There is a proper time and situation for automatic modes. My concern is that I believe the automatic modes tend to make photographers lazy. (I include myself in this group.)
Unlike the majority, I believe that ‘Shutter Priority’ mode is the useful automatic shooting mode.

Photo by Miki Yoshihito
Camera shake boo-boo number one! (See above image)
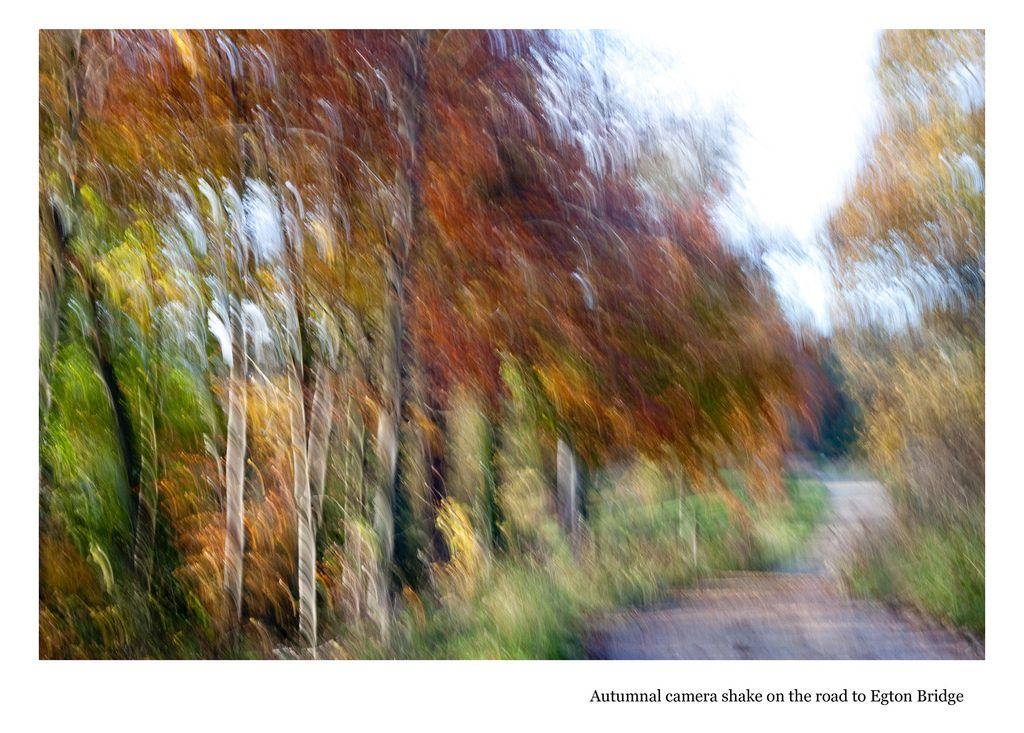
Photo by deargdoom57
Camera shake ruins far more photographs than depth-of-field issues- which is why I prefer the ‘Shutter-priority’ mode.
There is one exception to my above statement. When shooting with longer lenses, and there is ample available light, and I wish to maintain minimal depth-of-field, I will use ‘Aperture-priority’ mode.
Whenever possible, I recommend using ‘Manual’ mode. Making this a habit will turn you into a better photographer. You will get a better understanding of the process, and you will get faster at making creative decisions on the fly.
"Whenever possible, I recommend using ‘Manual’ mode. Making this a habit will turn you into a better photographer."
That being said- I will go to an automatic mode under the following conditions:
- The light is constantly changing, such as the sun moving in and out of cloud cover AND…
- My subject is not fixed; it’s moving. An example might be a child playing on the
beach and the sun is going in and out of cloud cover. You don’t want to miss the
shot, and you want to concentrate on what the child is doing.
In the above scenario (child photograph) what would be the proper automatic shooting mode?
- I would not use the ‘Program’ mode.
- If the child were running around and moving quickly, I would use the ‘Shutter Priority’ mode.
- If the child were sitting still building a sandcastle, I would use ‘Aperture-priority’
mode. - Do you understand why I made those choices?
Let’s explore some photographs and make a determination as to what shooting mode
would have been the best choice.

Photo by Tambako The Jaguar
These were the particulars for this photograph: 500mm lens, ISO 800, 1/200th, f/5.6, and ‘Aperture-priority’ shooting mode. This image- while quite cute- suffers a bit technically. With a 500mm telephoto lens the photographer was faced with a minimal depth-of-field situation.
The light was apparently low as they raised their ISO to 800. Do you think the choice of ‘Aperture-priority’ shooting mode was correct? I would say, “No.” The point of focus was placed on the cubs face. This is evident because the fur along the mother’s chin is sharp. But the cub is not in focus as a result of movement. Choosing ‘Shutter Priority’ and adjusting the ISO and shutter speed ‘up’ would have been a better choice.

Photo by Charlle Stinchcomb
Here are the particulars: 17mm lens, ISO 100, 1/20th, f/10, and ‘Manual’ mode. We can determine several things from looking at this photograph. There was plenty of light. The photographer didn’t care (or perhaps was even looking for) the water to be somewhat blurred by movement. The primary consideration here was depth-of-field. The photographer wanted everything to be in focus, from the rocks in the foreground to the clouds in the background.
Although, it wasn’t mentioned in the photographer’s description, I’m quite sure the camera was mounted to a tripod due to the slow shutter speed. Do you think ‘Manual’ mode was the correct choice for a shooting mode? I do, as the photographer had plenty of time to set this up and make decisions. Now, what if a sailboat were passing by, and the photographer wanted to capture it right in the middle of that opening? I would have switched to ‘Aperture-priority’ mode to maintain depth-of field and get the shot quickly

Photo by Misty
This photograph was created using a zoom lens set at 77mm, ISO 400, 1250th, f/5.0, and ‘Aperture-priority’ shooting mode. Do you think ‘Aperture-priority’ was the right choice? Because the subject is action-oriented our first urge would be to go to ‘Shutter-priority’. But in this case, I think the correct choice would have been ‘Manual’ mode or ‘Aperture-priority’ mode. I say this because the light, while bright, appears fairly flat; it was probably a light overcast day. Manual mode would have worked perfectly if the light intensity wasn’t changing.
If the sun was going in and out of cloud cover then I agree with the choice of ‘Aperture-priority’ mode. Even with the cloud cover, the shutter speed was at 1250th which is fast enough to stop tennis action. The photographer was probably more interested in maintaining a proper depth-of-field to provide some separation between the tennis player and the crowd in the background.

Photo by Daniel Lee
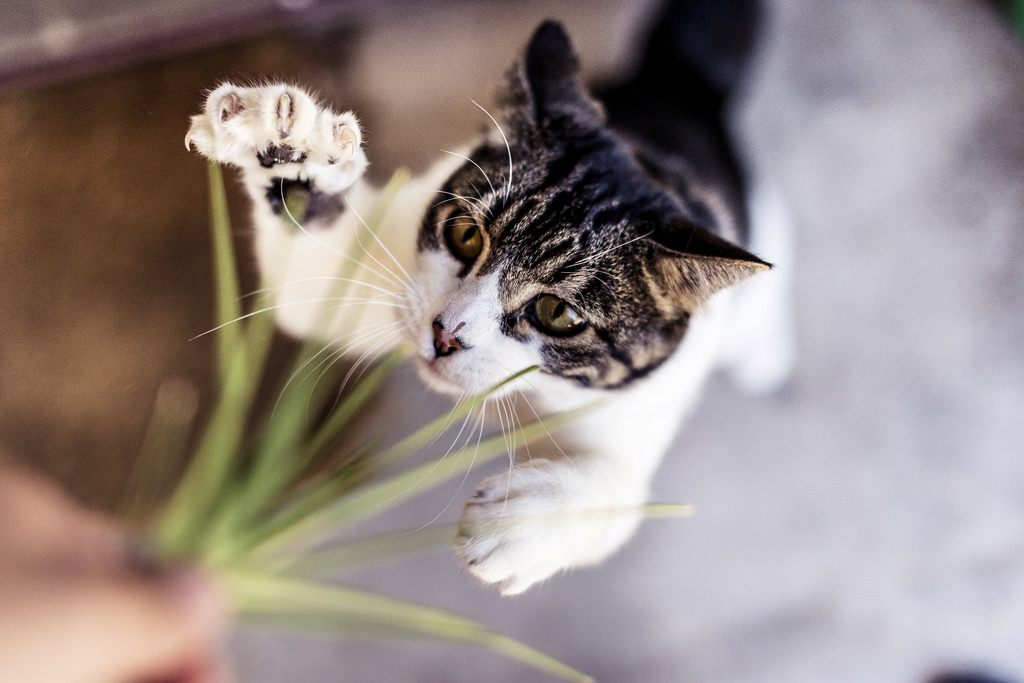
There is so much that you can learn by studying existing photographs. The technical details of this image tell us exactly what happened- 50mm lens, ISO 1250, 1/4000th, f/2.0, and ‘Aperture priority’. This image has all the telltale signs of someone grabbing a camera and snapping a picture without much thought as to the settings. They’re lucky it turned out as well as it did. The high ISO indicates that there wasn’t a copious amount of light.
However, there was enough light to generate a shutter speed of 1/4000th. This indicates that the ISO could have been cut down to 800 possibly even 400. But that aside- what about the choice of ‘Aperturepriority’ mode? It was a poor choice in this case because the f/stop was left wide open, creating minimal depth-of-field, and therefore causing parts of the cats face and paws to go out of focus. This is a situation where ‘Program’ mode would have been a great choice. A midrange shutter speed, along with a midrange aperture, while utilizing a 50mm lens, would have worked well.

Photo by Laszlo Ilyes
This photograph was created using a 105mm lens, ISO 50, 1/50th, f/7.1, camera flash fired, and ‘Manual’ mode. First of all, manual mode was a good choice because this photographer had all the time in the world and complete control of the situation. Using an automatic mode in a situation like this doesn’t bring any value to the process. Learn to recognize when the automatic shooting modes are helping you- not enabling you.
I hope this guide helps clear up any confusion you may have had regarding shooting modes.
I also hope that it influences you to make more cognizant choices as to which mode to turn to.
Keep shooting!


