I have something to admit to you: I love editing with smartphone apps. I’m particularly in love with Snapseed.
I’ve become such a fan that I no longer restrict my Snapseed editing to just my cell phone photography.
I also use it to edit pictures taken with my LUMIX mirrorless camera, as well as my Nikon DSLR camera. I will import pictures taken with these cameras onto my iPhone 8+, process them using my app editing software (primarily Snapseed), and then transfer them back to my desktop iMac computer for final touches.
Why would I do this? You may wonder…
I have much of the computer editing software that one might desire. This includes Photoshop, Lightroom, Adobe Elements, Affinity Photo, Luminar, Photomatix Pro, The Complete Topaz Suite, The Complete Nik Suite, Aurora HDR Pro, The Complete (old) Macphun Suite, Landscape Pro Studio Max and Portrait Pro Studio, and Portrait Pro Body Studio.

Screen Capture by Kent DuFault
Yet, I find myself constantly migrating back to app editing – using Snapseed in particular.
Why do I do this?
- Speed! When something works really well, and it’s really fast, why putz around doing things the old way?
- Snapseed creates cool and exciting visual effects, which I haven’t been able to mimic in Photoshop (or any other program or filter).
However, a question has lingered in my mind.
Does editing in a cell phone app degrade image quality?
If I import a 16MB mirrorless camera image file onto my phone and then edit it using Snapseed (or another app), does the process degrade the image quality?
Now, I’ll tell you flat out that with some image editing apps it most certainly does.
Some image apps automatically reduce image resolution, so that they can process the file.
So, you must check out the app that you’re using.
This guide will focus on Snapseed, which is my ‘go to’ editing app. However, I can verify that the reported results also apply to the editing apps Instaflash Pro, Polarr, Warmlight, and TouchRetouch.
Here is what you will learn today:
- Does editing in a phone app degrade image quality?
- If image quality is degraded, how so?
- Is the color representation accurate on a phone screen?
- How to control black and white points when converting to monochrome.
- How to evaluate your app editing results using traditional software.
- A close look at how Snapseed can even outperform a program like Photoshop.
- What image editing procedure is best left to desktop software?
Recommended Reading: If you’re interested in improving your post-processing workflow, check out Photzy’s Understanding Masking premium guide. It has a section for Lightroom and Photoshop, as well as Snapseed for mobile users too.
Let’s begin by looking at some mobile photography (shot with an iPhone 8+) that were app-processed images, and let’s see how they look when evaluated by a traditional method such as the Adobe ACR window histogram.
These images were transferred to my iMac computer via ‘Airdrop’ after being edited with Snapseed.
I've become such a fan that I no longer restrict my Snapseed editing to just my cell phone photography.
I recently took a camping trip, and I took quite a few images that I will be using professionally. I will be selling these images through stock photography agencies, as well as using them in my books and publications.
The photographs that we are going to examine first were all taken with my iPhone 8+ cell phone camera, which produces a 12MB file. They were then post-processed in Snapseed using my phone.
I imported these five example photographs (image below) onto my iMac computer.
We are going to evaluate the Snapseed processing, first using the Adobe ACR window and then looking at the images at full size on my high definition iMac screen.

This image depicts four young women taking a selfie in a picturesque location. This image has great potential for stock photography sales. I processed this photo in Snapseed, while keeping the image as close to reality as possible. No special effects here! Screen Capture by Kent DuFault
If you take a look at the image on the left, you can see that the histogram displays a wide range of tone, without any clipping, on the image of the four women.
Snapseed has a histogram function that allows you to set white and black points.
However, the accuracy (while good) isn’t as perfect as setting these points using the Adobe editing products such as Photoshop, Lightroom, or the ACR window (Adobe Camera Raw).

Snapseed handled this post-processing without needing any help from another editing program. Photo by Kent DuFault
The reason for this is simple semantics. The histogram in Snapseed is very small, so you can’t see a detailed view of it like you can with the ACR, Photoshop, or Lightroom histogram.
I use the Snapseed histogram all the time. I use it on virtually every picture that I edit, really.
However, if an image is very important, such as this ‘Nature Selfie’ picture, I will import the photo onto the iMac and check the histogram using my Adobe software.
In this case of the four women taking a selfie, the Snapseed setting was perfect.
Key Lesson: It is possible to do critical editing using a cell phone editing app like Snapseed. The key to success is to not push any particular setting too far. Starting out with a well-composed, nicely lit image that portrays a balanced contrast across the entire frame helps a lot. Snapseed has a histogram in the ‘Tune Image’ tool. This is extremely valuable in determining how ‘not to go too far’ when making image adjustments.

Screen Capture by Kent DuFault
The image above was processed in the ‘Noir’ tools window of the Snapseed app. This is an example of the creative options that a photographer can achieve quickly with the Snapseed app. These creative options can be difficult, or impossible, to create in traditional editing software. I’ve tried. However, even if you can recreate the look, it takes a lot of effort. In addition, I haven’t discovered any of the traditional ‘Actions’ or ‘Presets’ that can accurately reproduce some of the Snapseed effects.

The ethereal effects that one can create with app editing software are mindboggling. This is especially true when you consider how quick and easy it is! Photo by Kent DuFault
Color management can be an issue with app software depending upon the final use for the photograph. This has little to do with the app itself. It’s a function of the cell phone screen.

Screen Capture by Kent DuFault
When pre-visualizing the composition for the image below, I wanted to highlight the three birch trees that were framed by the surrounding forest. I wanted to lead a viewer’s eyes directly toward them.
This was a fairly dark situation, with strong backlighting and a lot of contrast.
Color management can be an issue with app software depending upon the final use for the photograph.
I fiddled around with all of the various functions within Snapseed to arrive at the version that you see in the image below.

Photo by Kent DuFault
I uploaded this version (see below) to my Instagram account.
You can see that the color is pretty exaggerated. This is fine for an end use, such as Instagram, where exaggerated color is applauded and welcomed.
However, for stock photo sales, I needed to make some adjustments to the color, which needed to be done back at home on my iMac computer. I needed to bring the color back closer to a normal state.

The color saturation levels and the color balance in this image have been tweaked back to a more normal perspective using Photoshop. Photo by Kent DuFault
The image above illustrates the post-processing accomplished on the iMac to bring this shot back to a more saleable file for stock photography sales.
Notice that the overall mood of the photograph hasn’t really changed. I’ve merely pulled the color back into submission.
You can even ‘Revert’ an image file back to its original state!
Key Lesson: Critical color saturation levels, and color balance, are difficult to accurately assess using a cell phone editing app. The cool feature on Snapseed is that all edits are non-destructive. You can go crazy and create a supersaturated photo like the image on the previous page and then bring it back to reality for other useful purposes like the image above.

Screen Capture by Kent DuFault
This color image file was converted to black and white using one of the tools in Snapseed. Overall, the image looks pretty good. The highlight end of the histogram did reveal some clipping when checked in the ACR window.

Photo by Kent DuFault
The Snapseed app did a pretty good job of converting to a nice tonal range for this black and white image. I will say that depending upon the situation, the black and white conversion tools within editing apps that I’ve tried can be limiting. I’ll mention that I’ve tried most of them, even the apps that are solely purposed for black and white photography.

Screen Capture by Kent DuFault
Here is the original color file from my iPhone 8+. I made a few adjustments in the ACR window. I will now import the file into Photoshop and create a black and white image utilizing the techniques discussed in my Photzy eBook “Better Black and White.”
Recommended Reading: Learn how to effectively transform your color images into black and white by grabbing a copy of Photzy’s Premium guide, Better Black and White.

Photo by Kent DuFault
Here is the post-processed black and white photograph. It was processed in Photoshop CC using the “Better Black and White” techniques.

On the left is the Photoshop processed image. It was converted to monochrome and a warm tone was added. On the right is the Snapseed processed image. The conversion and warm tone were added in Snapseed. Screen Capture by Kent DuFault
Looking at both versions of the photograph depicted in the below above, neither version appears particularly better suited than the other.
They do have some minor differences in brightness, contrast, tone conversion, and color balance.
Key Lesson: An editing app, such as Snapseed, can do an admirable job of black and white conversion in many cases. However, you will always have a greater degree of control doing the conversion on your desktop or laptop computer while following the techniques outlined in the “Better Black and White” eBook. One situation that creates problems for an editing app converting to monochrome (versus a traditional conversion) would be a scene with many similar colors and brightness values; the ability to control color conversion to tone is limited within apps.
Screen Capture by Kent DuFault
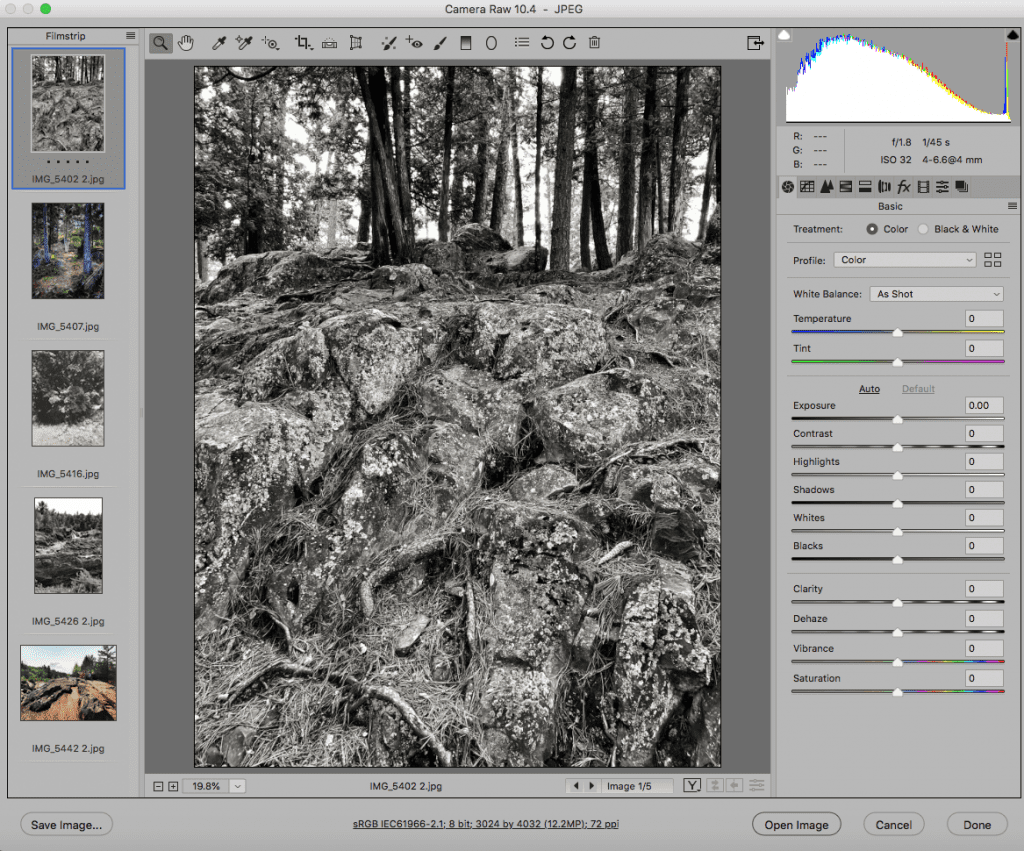
This example was also post-processed as a monochrome image in Snapseed. However, my pre-visualization for this picture was not only the overall scene but, in particular, the texture of the landscape. You can see that the Snapseed processing created clipping on the shadow and highlight ends of the histogram.

Photo by Kent DuFault
The clipping that occurred here (image above) is primarily in the background, and I’m okay with that. I think it actually helps to add to the mood.

Screen Capture by Kent DuFault
Whites and blacks being clipped off aren’t always a bad thing. It often depends on where they fall within the image.
However, if an image is going to be printed, it’s very important that the black point and/or the white point be set to a minimum level.
You can’t accurately accomplish this using an editing app.
Key Lesson: If you are going to print a photograph that has been edited in a cell phone app, you will want to check the black point and the white point using traditional software. If one or both are clipped, you will want to set the ‘Output Levels’ to a minimum of 8 on the black end (if clipped) and 248 on the white end (if clipped) (see the image above). This prevents inky blacks and/or bleached-out whites in your print.
The other monochrome conversion setting that doesn’t have a lot of control within editing apps is setting a color tone such as sepia. Snapseed is very limited in this respect.
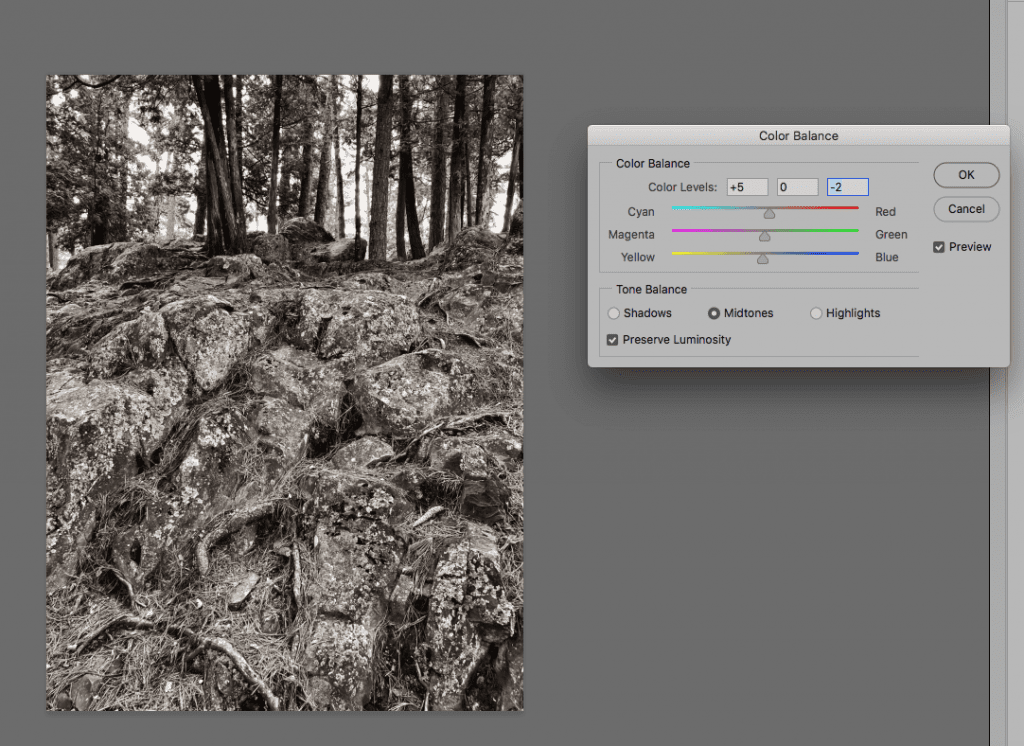
Screen Capture by Kent DuFault
Key Lesson: Snapseed is my go-to editing app. However, another editing app that you definitely want to own is “Instaflash Pro.” Instaflash Pro offers a greater degree of control than Snapseed when it comes to color, brightness, and tone adjustments. The problem with Instaflash Pro is that is does not offer a histogram, so you have no way of measuring your adjustments – you judge your edits strictly by eye. Adjusting the color balance within an editing program such as Photoshop or Lightroom allows you a greater degree of control as to the hue and brightness.
Trying to maximize texture in an editing app can be tricky business. It’s very easy to go too far and then create a phony looking artifact-filled photograph.
Key Lesson: When making adjustments in an editing app, such as clarity or details or sharpness, use VERY light movements.
The reason for the above Key Lesson is that a cell phone screen can’t provide an accurate rendition of what an image will look like when viewed really large on a high definition screen, or when it is printed.
For this reason, I’ll make small adjustments for texture and sharpness using an editing app. If texture or sharpness levels are critical to my end result, I’ll take the picture into Photoshop or Lightroom for those final touches.

I mentioned earlier that my pre-visualization of the image earlier was the texture of the forest. Photo by Kent DuFault
Within Photoshop, my favorite technique for revealing texture and sharpening is the “High Pass Filter” technique. If you’re unfamiliar with the technique, you can probably find something about it online. Also, I discuss it thoroughly, step by step, in a bonus video that comes with the Photzy premium guide, Effective Storytelling with Photography.

The final photograph reveals wonderful texture without any artifacts. Photo by Kent DuFault
Key Lesson: Critical adjustments to texture, clarity, and sharpness are best left to the desktop editing suites.
So far, everything that we’ve discussed has originated from a cell phone camera.
However, the real question in my mind was: If I take a full-sized camera file, import it into the phone, edit it using an app, and then export it back to the desktop, will the image file be degraded?
That seemed like a very legitimate question.
To test this, I took two photographs that I created with my LUMIX GX-85 mirrorless camera and I imported them into Photoshop.
This camera produces a 16MB camera raw file.
I then proceeded to post-process the images to match my pre-visualized end result.
It’s important to note here that ALL camera raw files need some editing to bring out their full potential. It’s the nature of the format. Also, to import the images into my iPhone, I need to convert the camera raw files into .jpeg or .tif. I use .jpeg.
All camera raw files need some editing to bring out their full potential.
I then imported both images into Snapseed, on my phone, and post-processed them to see if I could improve upon my pre-visualization over the Photoshop version.
Finally, I compared the results.
Let’s take a look.

This is the camera raw image as it emerged from my Panasonic LUMIX camera. Photo by Kent DuFault
When I created the image above, I already had the title of the photograph in my mind. The title is “Yellow.”
My pre-visualization was to depict a field of repetitive yellow color against a much darker field of green, and a white leading line pushing a viewer’s eyes up into and through the field of yellow.

Photo by Kent DuFault
This image is how the raw file presented itself right out of the camera. It’s not too exciting. However, the bones of my pre-visualization are there.

Photo by Kent DuFault
I took the photo into Photoshop, and I spent about 18 minutes making adjustments to try and bring the image closer to my pre-visualization. The image above is the end result. It’s much closer. However, it still lacks the visual impact that I had hoped for.

On the left is the Snapseed version and on the right is the Photoshop version. The Snapseed version better depicts my pre-visualized composition and story. Plus, it shaved 17 minutes from my editing time. Photo by Kent DuFault
I imported the un-retouched version of the image (from earlier) into my phone, and within a minute or two I edited the photo into the image you see (above) using Snapseed.

So far, Snapseed is winning. However, it’s a moot point if the app has degraded my image file! Photo by Kent DuFault
This image shows the Snapseed file on the left and the Photoshop file on the right, as viewed at 100% magnification.
I could see no discernable degradation between the two files.
However, I have two important points:
- I didn’t push the file to the limits in Snapseed. My adjustments were fairly minimal.
- I still didn’t think that the result had the drama and impact that I was looking for in my pre-visualization.
Snapseed has a section called ‘Looks.’ These Looks are the equivalent to Photoshop Actions or Lightroom Presets.
When you click a Look, the app runs a series of adjustments automatically. You go back later and change or eliminate each adjustment, after the fact.

I pushed the file even further using Snapseed to achieve my pre-visualization. Photo by Kent DuFault
For the image above, I applied the ‘Look’ titled ‘Portrait.’
The end result was exactly what I had pre-visualized for my picture!
At this point, I had pushed the image file pretty far. What have I done to my image quality?

Screen Capture by Kent DuFault
In the image above, you can see the file at a 100% magnification after all of those edits in Snapseed. There is no discernable image degradation at all!

Screen Capture by Kent DuFault
The image on the left shows my final shot, as pre-visualized at the point of creation. It took less than two minutes of post-production in Snapseed. On the right, you see the same image at a 100% view. There is no image degradation!
After working with Snapseed for quite some time, I have come to realize that certain tools or options are more likely to create image degradation than others.
Let’s take a look at one example.

Photo by Kent DuFault
This image is the camera raw image as it emerged from my Panasonic LUMIX GX-85 camera. My pre-visualized image was a semi-abstract. It utilized layers to create a path into the composition, and my landing spot for a viewer was the row of white and yellow wild flowers at the top of the bottom third of the frame.
Once again, the image needs work to bring out my pre-visualized intent.
I will make this attempt first in Photoshop.

By viewing the two image files side by side at 100%, I cannot see any image degradation caused by Snapseed at this point. Photo by Kent DuFault
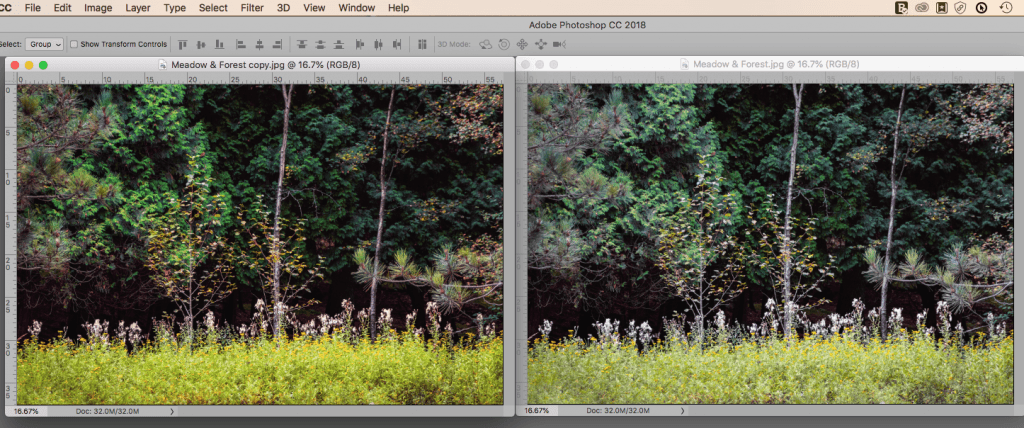
Photo by Kent DuFault
The Snapseed version is on the left, and the Photoshop version is on the right. I spent 23 minutes on the Photoshop version and less than 1 minute on the Snapseed version. So far, I have witnessed no image degradation. Truthfully, I’m still not happy with my final image. I pre-visualized something more abstract. I’m going to use Snapseed to really push this file to the limits.

Screen Capture by Kent DuFault
Snapseed has a ‘Look’ called ‘Accentuate.’ It applies the ‘Portrait Filter,’ the ‘HDR Scape Filter,’ the ‘Tune Image Filter,’ the ‘Details’ tool, and finally a ‘Curves’ adjustment. In other words, it pushes an image file pretty far! On the left is the full image, and on the right is a 100% sectional view.

Photo by Kent DuFault
This view is at 100% after applying the ‘Accentuate’ Look in Snapseed. A little bit of noise is now visible. However, it is certainly within a correctable range. At this point, I would import the file back into Photoshop. I would then use the ACR window to do a slight noise reduction and the High Pass Filter technique for a final sharpening.

Photo by Kent DuFault
After about 23 minutes of tweaking the shot, this is where I ended up in Photoshop. It’s okay. It’s not where I pre-visualized my final result.
Now I’m going to take this into Snapseed. I’ll go light with my adjustments at first.
However, I am pretty sure that I’m going to end up doing some heavy-handed editing to get this shot onto my happy list.

Photo by Kent DuFault
Here is my initial result from editing in Snapseed (above). I’m much happier than I was with the Photoshop version. The layering is more visible, and it’s beginning to take on the semi-abstract look that I was hoping for.
Let’s do a quality check at 100%.

Photo by Kent DuFault
Here is my final result. It now reflects my pre-visualized image with easily discernable layering, a semi-abstract look, and a finish for the viewer experience that occurs along the line of white flowers.
Conclusions
- App editing does not degrade image quality within certain limits.
- If image quality is degraded when pushing a file to the extreme, it is generally correctable when moving the file back to a traditional editing software suite.
- Using apps for photo editing can provide creative alternatives for your images that may be difficult, or impossible, to create in traditional software such as Photoshop or Lightroom.
- Transferring files is extremely easy on Apple products by using the Airdrop feature. An alternative for Windows users, and/or Android users, would be to transfer the file back and forth as an attachment to an email or a message.
- Editing in app software can increase your creative options, but also save you a lot of time sitting in front of a computer!
Self-Check Quiz:
- How do you transfer an image file from your computer to your phone and back again?
- What are the benefits of app editing?
- When editing, what does the histogram help you to determine?
- Which editing app has a histogram included?
- Is it better to judge color saturation and color balance with app software or with your full editing suite on a desktop or a laptop?
- True or False: You cannot get good black and white conversion results with an app.
- When adjusting texture and sharpness, it’s best to use which method: app or traditional software?
- True or False: Camera raw image files generally do not require post-production editing because you’re very careful to get the exposure right.
- True or False: App editing is generally much faster than traditional editing.
- True or False: Traditional editing provides higher quality photos because app editing degrades the image file.
Editing Assignment:
- Spend an afternoon photographing a favorite subject with a traditional digital camera. Do not use your cell phone.
- Practice pre-visualizing. If this is new to you, think of how I pre-visualized the yellow leaves of the birch tree against the dark forest background.
- Select two of the best images from your shoot.
- If you don’t already have it installed, install Snapseed onto your cell phone or tablet. It’s free.
- Transfer the original files to your cell phone using Airdrop for Apple or an email attachment for Windows and/or Android users. If you shot your images in camera raw, you will have to make the transfer as a .jpeg.
- Edit your two images using your traditional editing suite. Try to reach your pre-visualized result.
- Now edit your two images using Snapseed. Again, try to reach your pre-visualized result.
- Transfer your Snapseed files back to your traditional editing computer.
- Compare the results side by side, just as I did.
- How does the creative output compare?
- How does the image quality compare?