I didn’t really understand the expression, “suffer for your art” until I was approaching hour two, at subzero temperatures, while taking snowflake photos. Frozen toes, failing light, and numb fingers forced me to call it a day. I can say that all that suffering was 100% worth it, as I have learned a thing or two from it; and if you can’t learn from your mistakes, then you aren’t progressing.
I’d like to share a few tips and tricks that I have learned in the hopes that you can suffer a little bit less and get some really great snowflake macro photographs into your collection.
Photographing snowflakes is an exercise in patience, preparation, and more patience. Snow days don’t come along every day, and even when they do, they might not have the right kind of snow for great photographs.
So, while you wait, it is important to get to know your subject, have your equipment ready, and have a plan in mind to make the most of your time.
I’d like to help you do that so you can avoid the “learning through your mistakes” process that I had to go through.
After reading this quick guide you will:
- Have a better understanding of snowflakes and their properties
- Have learned what kinds of items you will need for taking snowflake macro photos and how to prep them for the photo session
- Know how to prepare yourself to stay comfortable, and warm, while taking photos outdoors in the winter
- Know how to make the most of your camera settings, so that you get great macro photos of snowflakes
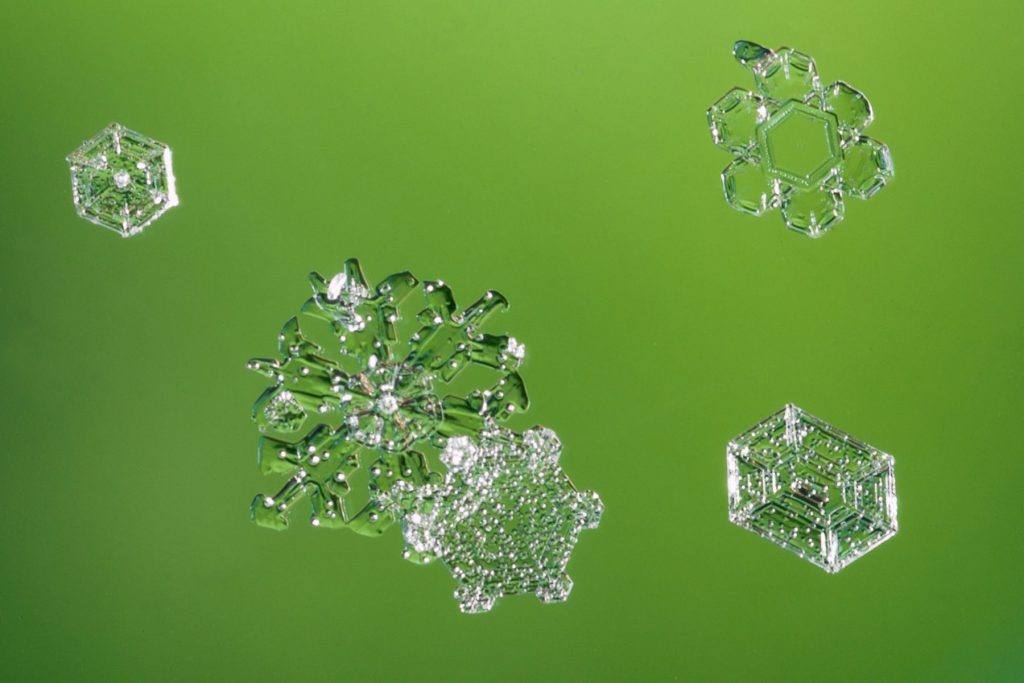
Photo by Leanne Cleaveley
Know Your Subject
Getting to know your subject is very important when taking any kind of photograph. As I mentioned above, snow days don’t come along often, and “perfect snow days” (as I like to call them) come along even less often.
I live where there are seasons. We get full on winter from November to March (and it spills over a bit, sometimes). We get a fair bit of snow. However, those days when you can catch a snowflake on your mitten and say, “Oh, look! A perfect flake” are not that common. We have had four days so far this winter.
Key Lesson: A perfect winter day for photographing snowflakes is rare. Being prepared in advance is a key element to your success.
I asked myself, “Why is it that we don’t have more days with those perfect little snowflakes?” and the answer surprised me.
It turns out that snowflakes take many different forms: from long, thin needles to small, thin plates. As a snowflake grows, it is influenced by temperature changes and humidity. Many small changes in these factors can influence the fluctuations in the growth, and eventually the structure, of a snowflake.
It turns out that those “perfect snowflakes” are kind of rare.
Depending on who you talk to, there are anywhere between 35 and 100+ different types of snowflakes, from long, thin “needles” to flat plates, with most of them far from resembling our paper cut-out varieties that we made in grade school.
Don’t let the numbers discourage you.
Instead, resolve to prepare and lie in wait for that perfect snow day to come. It is worth it!
...Snowflakes take many different forms: from long, thin needles to small, thin plates.
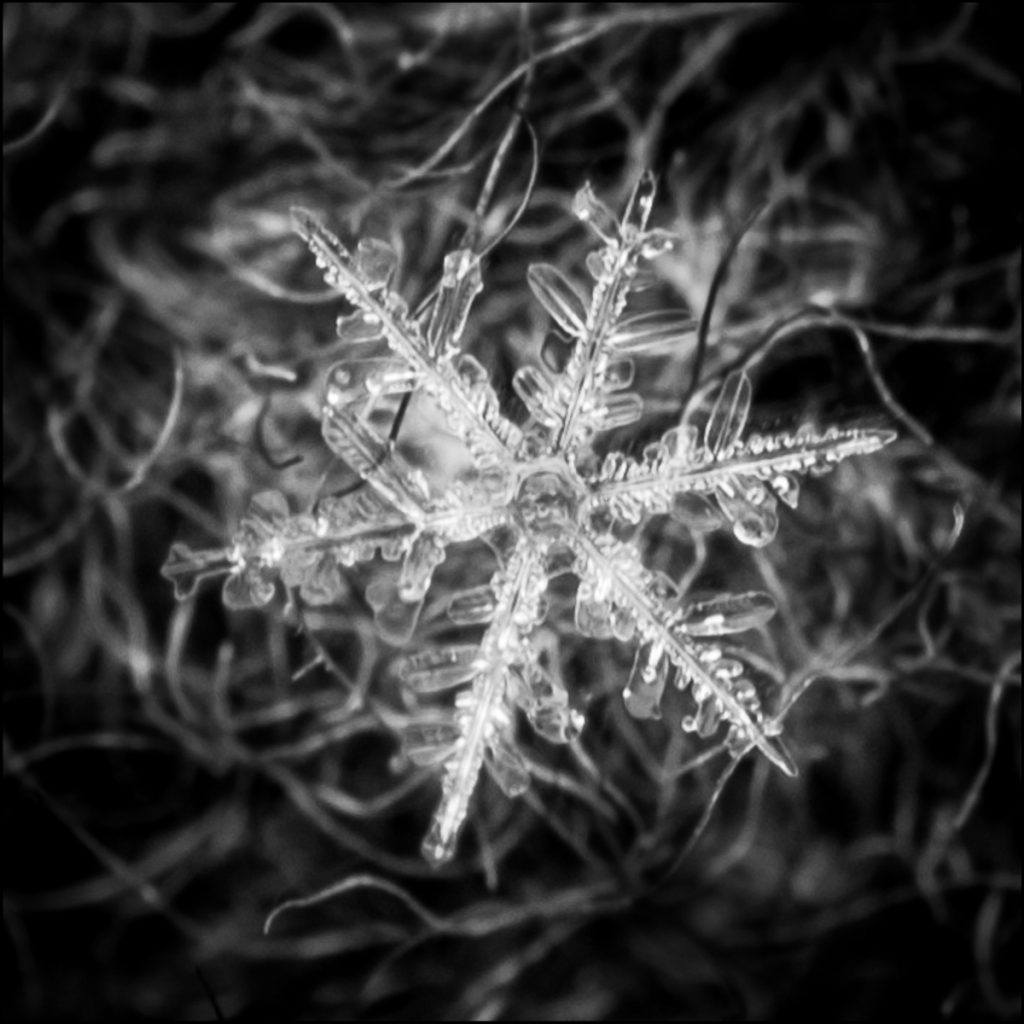
Photo by Leanne Cleaveley
What else should you know about snow? Well, many people think that snow is white, but that isn’t quite true. It is ice. Ice is clear, and if you look closely at a snowflake photo you can see that this is true (as in this image on the left).
It is the reflective surface of snowflakes that leads to the mistaken impression that snow is white.
It reflects light very nicely. And, as it falls, there is a lot of reflection and refraction going on, making the snow look very white.
This is an important fact to a photographer.
Recommended Reading: Improve your photography by working better with light. Grab a copy of Photzy’s best-selling premium guide, “Understanding Light Book Two”.
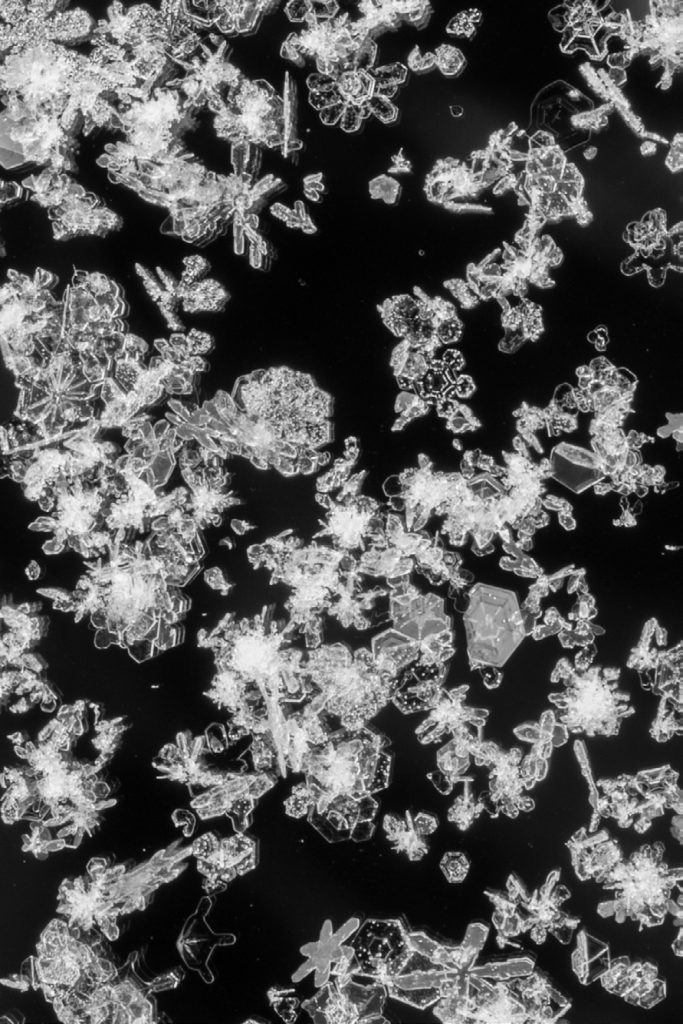
Photo by Leanne Cleaveley
You will want to consider what aspect of the snowflake you want to show off in your photos. You’ll also need to decide if you want to use an artificial source of light and how you will use it. (I will talk about this more later.)
Another important thing to understand about snowflakes is that they are not often truly perfect.
Remember when I mentioned all of those changes in temperature and humidity?
Well, they can also influence the growth of the snowflake in odd ways, including some arms or branches being longer than others, partially formed flakes, and snowflakes that have fused together.
Don’t become overly consumed with finding the perfectly symmetrical flakes. It turns out they are very rare. Most of us won’t notice the tiny imperfections, so snap away at the good, the bad, and the interesting bits!
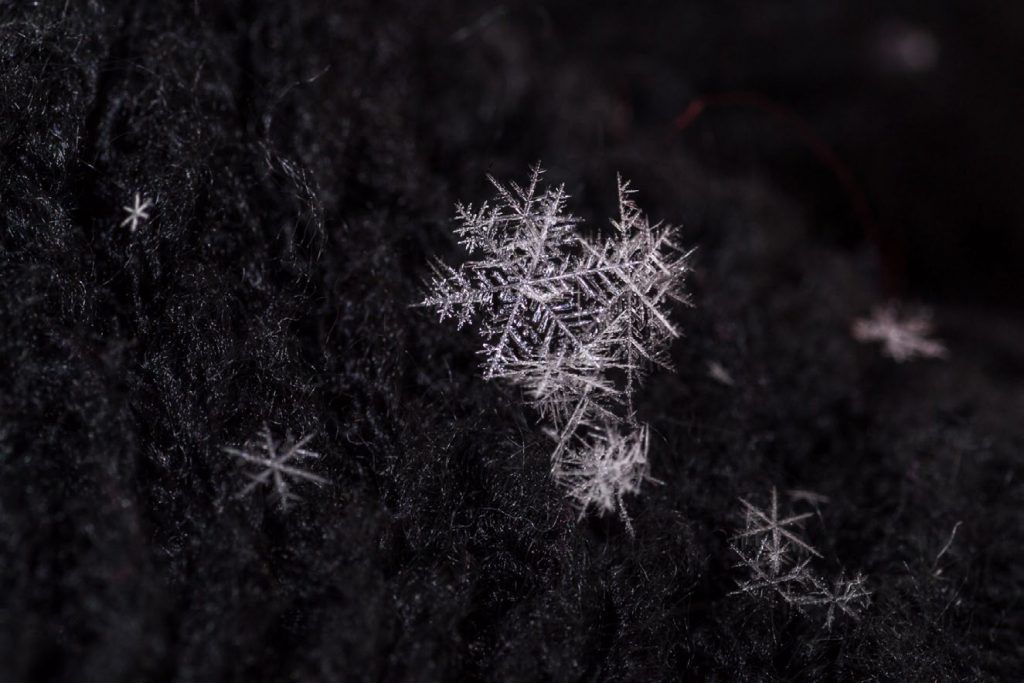
Photo by Leanne Cleaveley
There are a couple more important points about snow that you should consider.
One, it melts. I know, that is obvious!
However, it is so very important when it comes to prepping your surfaces for catching the snowflakes.
Also, snowflakes are light. The slightest breeze can cause movement. Again, this has implications for preparing and protecting the surfaces that you will be photographing them on.
Let’s talk about preparation.
Preparation
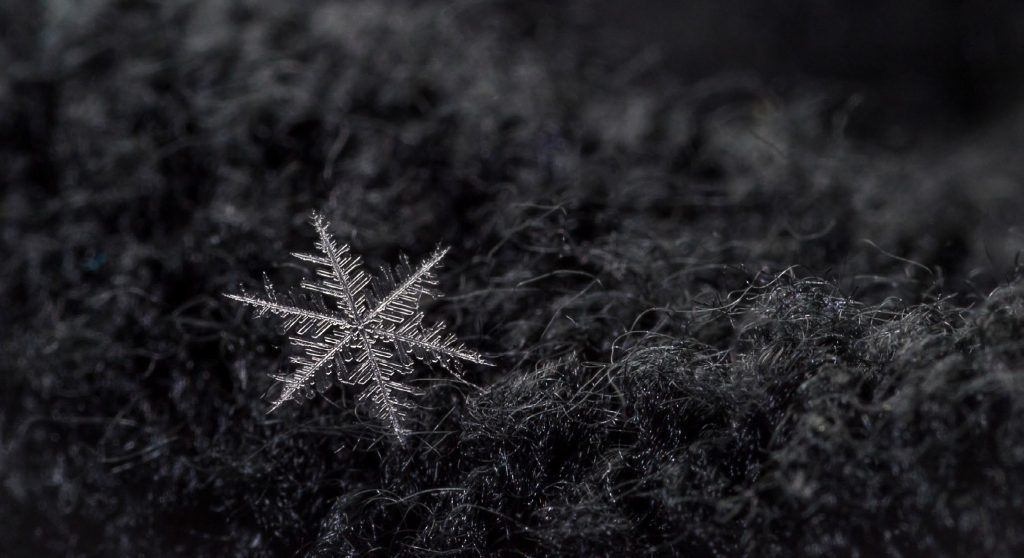
Using dark colors and fibrous materials helps to showcase a snowflake nicely. Photo by Leanne Cleaveley
What do you need to catch, and snap, those pretty little ice crystals?
Through trial and error, I have discovered some materials that work well.
The first time I photographed snowflakes my deck was covered with random scarves, jackets, toques, and blankets in an attempt to capture as many as I could.
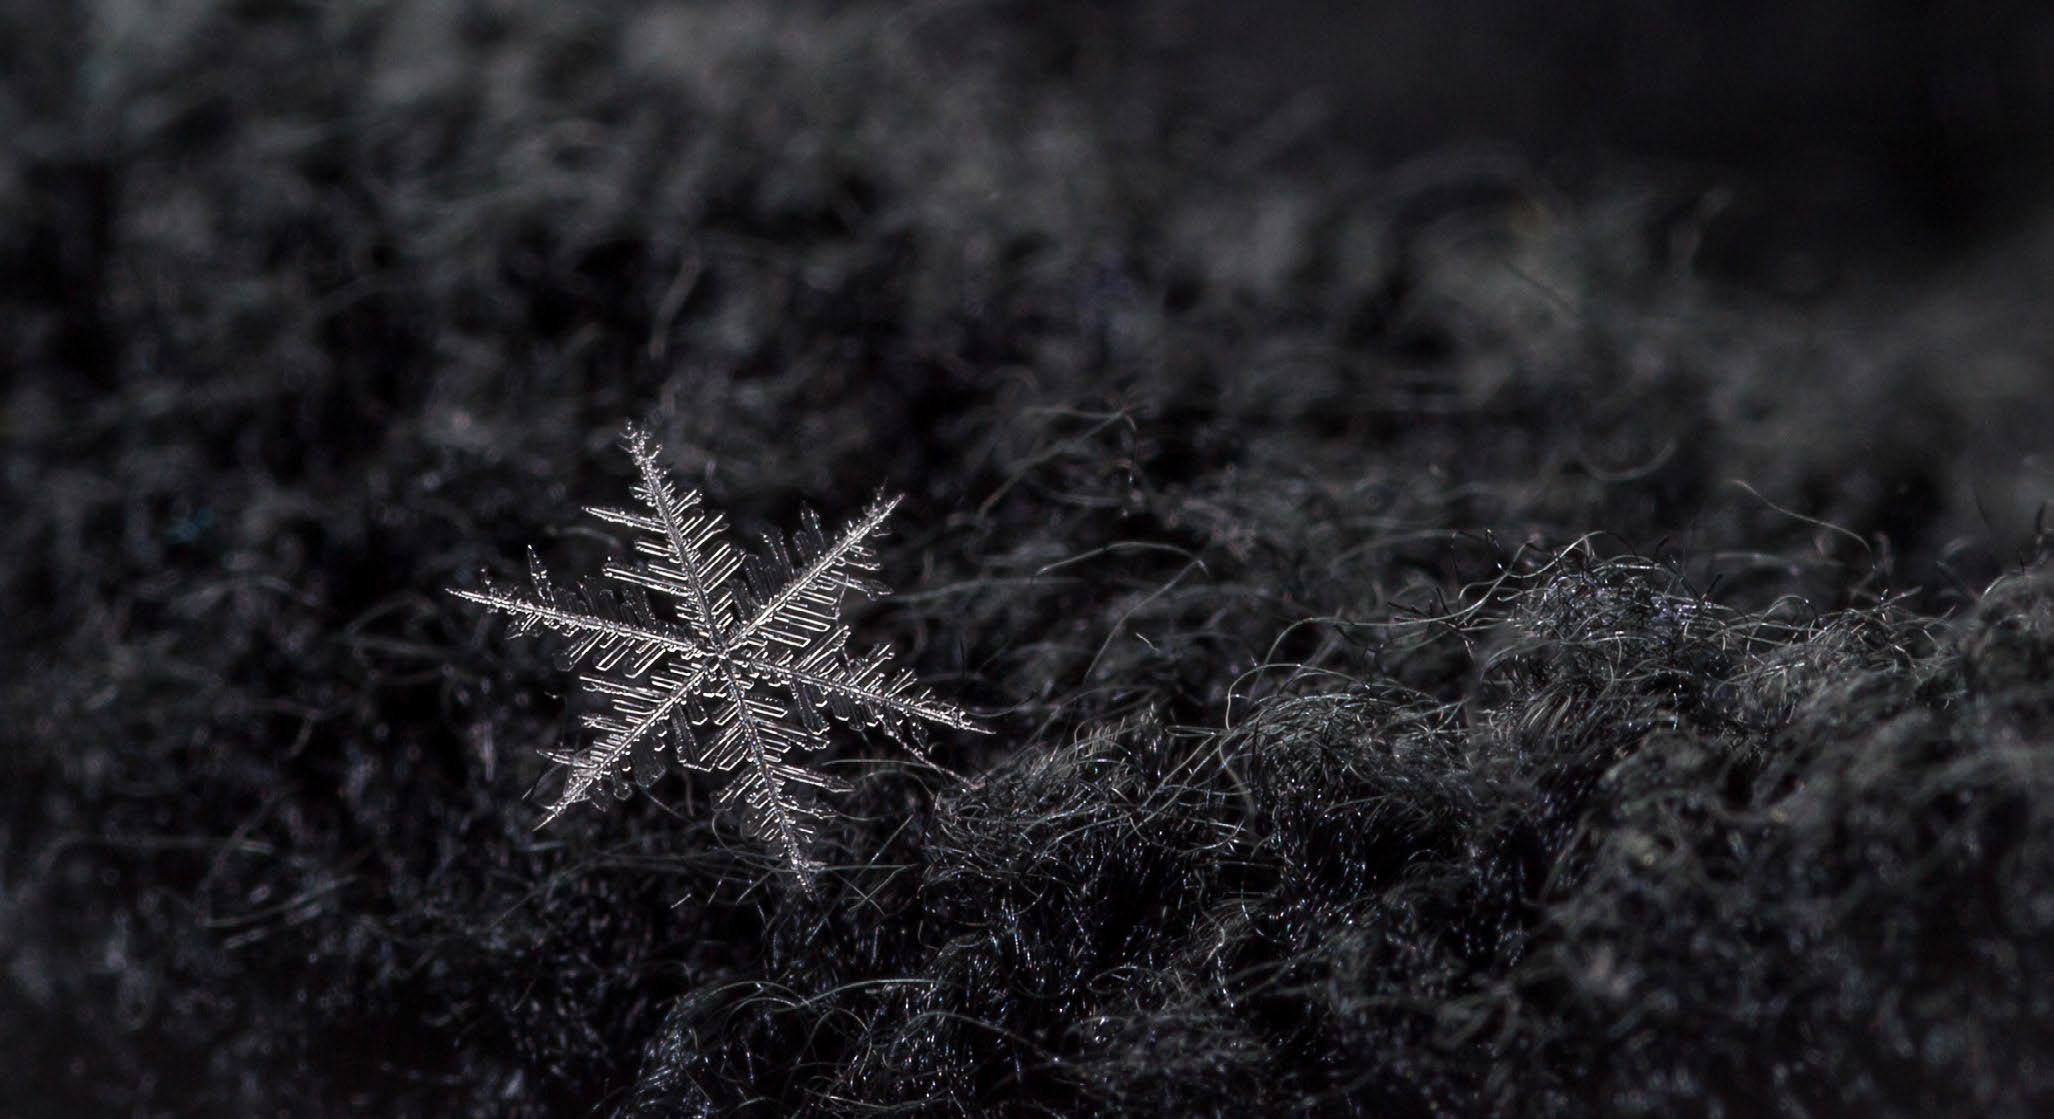
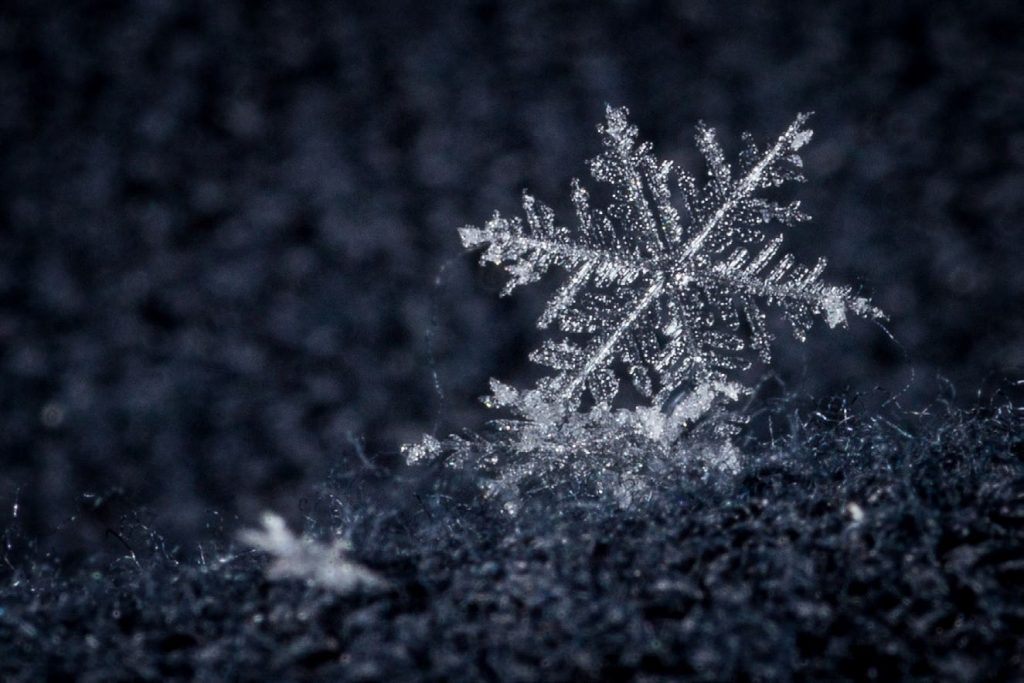
I discovered that darker materials really showcase the flakes nicely. Also, materials that are fibrous are a good thing, as the tiny arms of the flake get caught on the fibers, helping it to stand up.
This can also prevent the flakes from moving around, thus avoiding blurry photos.
The only drawback with using a fibrous material as a background is that the fibers themselves may get in the way of a good shot. At times, you may have to do some work in post-processing to remove those pesky strands.
I discovered that darker materials really showcase the flakes nicely.
Key Lesson: Working with a dark, fibrous material can be extremely helpful by keeping the snowflake upright and also allowing it to stand out from the background.
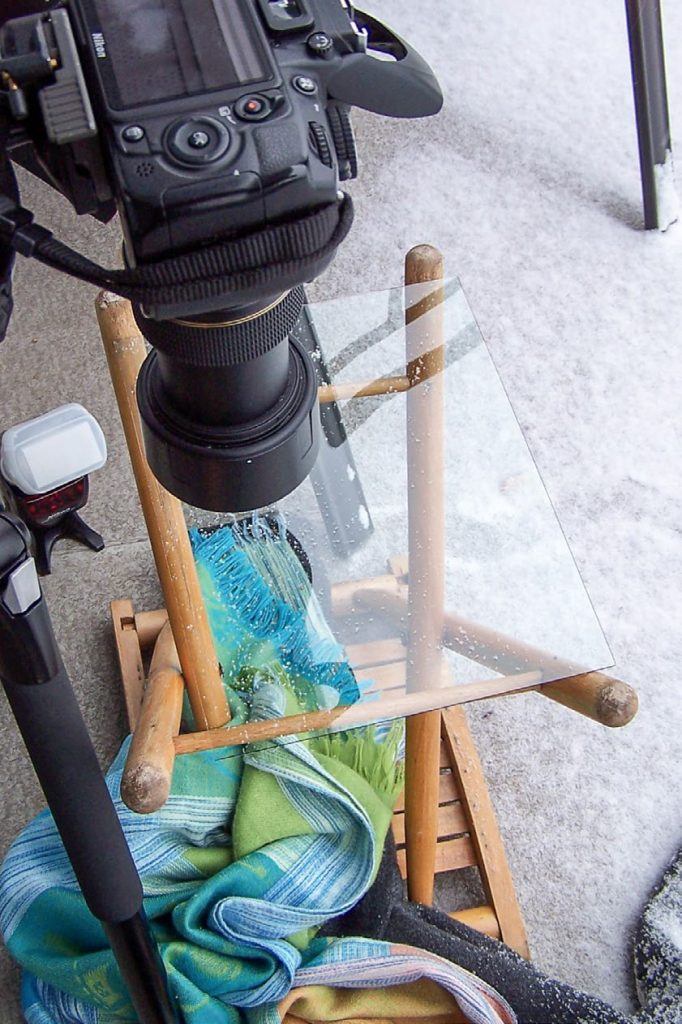
Photo by Leanne Cleaveley
Another technique, which I like for shooting snowflake macro photos, involves collecting the snowflakes on a glass surface.
You will want to set up the glass surface so that it is open underneath. I use an old glass sheet from a photo frame that is placed upon the legs of a stool, which is flipped upside down.
- Put a colorful background below the glass (a nice scarf works well).
- Set up your tripod so that the camera is directly over the glass, and get the lens nice and close.
- Shooting the flakes through the glass gives you a nice outline of the flake, with details, and a nice, softly colored background.
- Once I find a good flake, and I am set up, I enjoy changing the background to create different colored reflections on the flake.
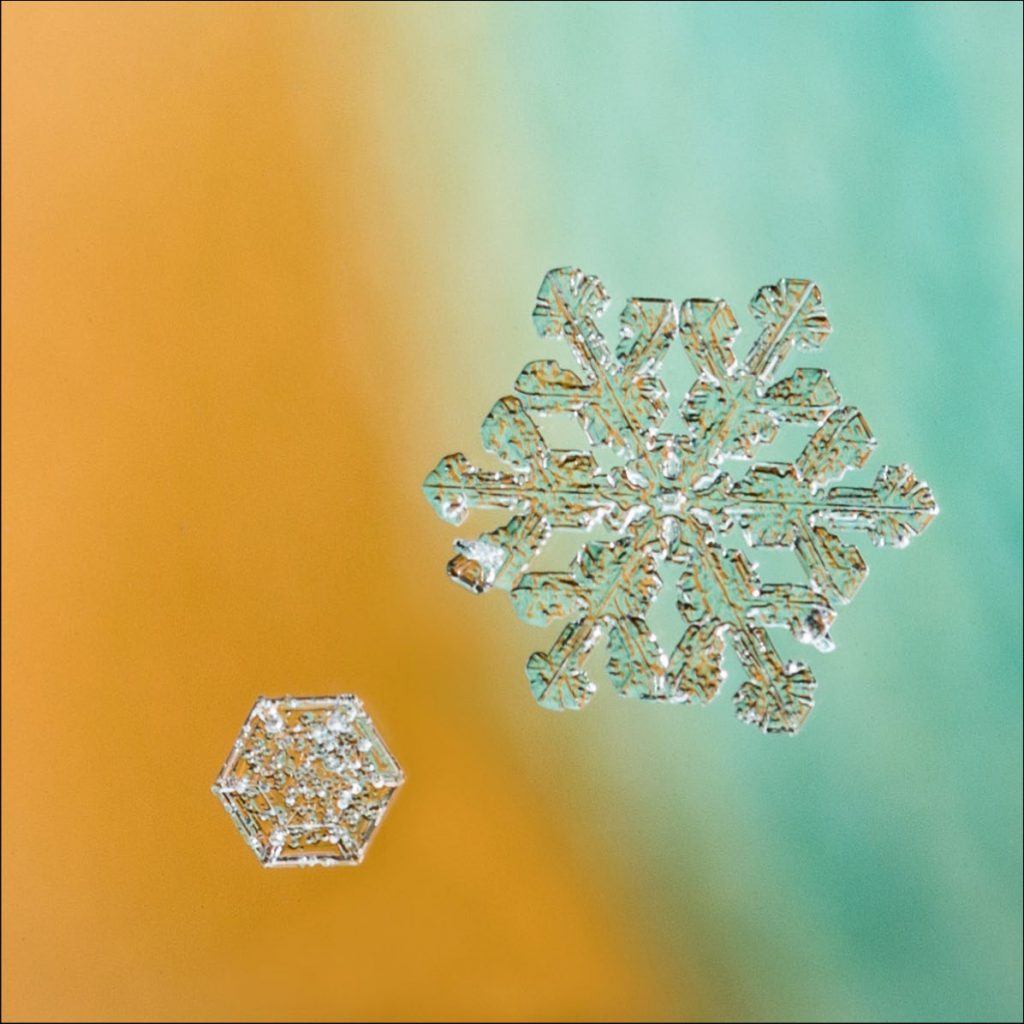
Photo by Leanne Cleaveley
The photo above and the one below show how different backgrounds can really enhance your snowflake photographs.

Photo by Leanne Cleaveley
Key Lesson: Working with a sheet of glass, and different colored backgrounds, can provide you with quick, fun, and surprising creative options.
I use an external flash, set up underneath the glass, for this particular technique.
One downside to this approach is that you will catch lots of debris in the form of snowflake bits in the photo. However, you can clone them out later, during postprocessing.
Another drawback to this technique is the potential for movement in the flakes. A calm, windless day is necessary if you want to use the glass approach.
On the plus side, you can move the flakes around on the glass and have control over their positioning to get a better shot. A toothpick works well to gently push the snowflakes around, and it also helps to separate overlapping flakes.
Key Lesson: A toothpick makes an excellent tool for positioning your snowflakes on a sheet of glass.
Now, because of one of the characteristics of snow (which I mentioned above – snowflakes melt), it is best to get your background materials cooled off before you begin photographing. Do this by laying them out in an area where the snowflakes are falling.
I happen to have a deck with a large overhanging roof. I place the background materials on a chair and under the cover of the roof. I leave them there for 10 or 15 minutes until they have cooled off to the outside ambient temperature.
Alternatively, you could put the materials inside a bag and then place them outside.
If using a glass surface, keep it wrapped inside a bag when you first bring it outside; it decreases ‘fog’ on the glass and keeps it clean.
Once cooled off, you can spread out your background materials and begin to catch those beautiful chunks of ice crystals.
Key Lesson: You need to bring your background materials to the ambient temperature outside so that the snowflakes won’t melt when they land. Plus, while you’re letting those background materials cool down, you want to keep them clean. You accomplish this by placing them inside something or under the cover of a roof.
I recommend putting your background materials on top of something that is at a comfortable height for photography (a table or a chair works well), as you don’t want to wreck your back (and my muscles seem to tense up, and cramp up, much quicker in the cold).
Also, consider a height that works well with your tripod, as you will want to use it!
Yes, you will want to use your tripod.
Remember when I mentioned earlier that those snowflakes are light and move around easily with the slightest air disturbance?
For that reason, you want to make sure that anything that can be made stable, is made as stable as possible.
I have taken macro shots without a tripod.
...You can move the flakes around on the glass and have control over their positioning to get a better shot.
Sometimes they work, and sometimes they do not. It is best to just increase your chances of success by using a tripod.
I have also stabilized my camera on the table when taking shots of snowflakes, and this technique can work quite well, so long as the table is sturdy, and you have had your caffeine fix for the day (less ‘handshake’).
Key Lesson: When putting your “set” together for snowflake photography, set it up at a comfortable height. Don’t strain your back. A tripod will help you succeed; use one if you can.
You will want to make sure that you have all of your camera gear ready to go. You will need a camera and a macro lens.
Key Lesson: Leave the lens cap on when exiting and entering from the indoors during cold weather photography. This can help reduce fogging on your lens.
Other equipment that can come in handy includes a wired, or wireless, shutter release (if you don’t have one, use your self-timer set at 2 seconds. This will allow you to get your hands clear of the camera and avoid camera shake).
One more thing that you need to consider is any battery that you’re using.
I recommend you put a new (fully charged) battery into your camera and electronic flash before heading outside.
Cold weather wreaks havoc on batteries.
I have read that battery life drops off considerably when they are used in cold weather, and I have witnessed this first hand.
If you are using a speed light, use fresh batteries. There is nothing worse than spending an hour prepping for that perfect snow day, catching a batch of lovely snowflakes, and then having your battery die after only a few minutes out in the cold.
Staying Comfortable and Warm
Anyone who has taken photos outdoors in the winter knows that the cold weather presents special challenges.
Challenges include the above-mentioned issues with equipment, but also challenges to our own bodies.
I have found myself with frozen toes and fingers, hardly able to put the lens cap back on, let alone fold up my tripod. This usually resulted from staying those few extra minutes to catch that last great shot.
Rather than putting your body into this situation, head out prepared for the “long haul.”
First, consider your hands. We need our hands for taking photographs. All of those minute adjustments feel a little trickier at -15 °C/5 °F (or colder!). Get a pair of good gloves.
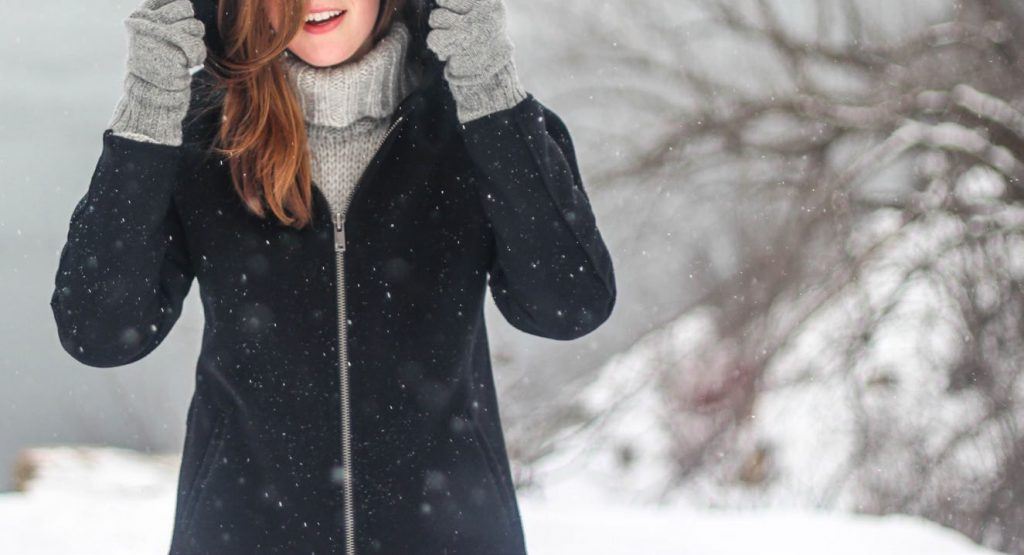
Photo by Kristin Vogt
I recommend layering with fingerless gloves, and then mittens over the top. Or, you can acquire some of those great mittens that fold back to reveal your fingers. Try to avoid anything that is excessively fuzzy.
Fibrous materials used to collect your snowflakes are a good thing, but there is nothing worse than a ball of red fluff in the foreground of your image that was caused by your mitten. Choose gloves, or mittens, that are of the non-shedding variety.
Dress the rest of your body in warm clothes that allow for movement.
I always wear my snow pants, as I inevitably find myself lying on the ground trying to catch a shot.
Wear warm socks, boots, and your warmest winter jacket.
Anyone who has taken photos outdoors in the winter knows that the cold weather presents special challenges.
I made a wonderful discovery the last time I was shooting in extreme cold: heat packs. For those of you that are not familiar with these chemical wonders, they are small packets that you can place inside your gloves or boots. Once activated, some mysterious scientific chemical reaction takes place, and they warm up. They stay warm for several hours.
I put them in my boots, and I was very comfortable the entire time I was outdoors. No more frozen toes for me.
Camera Setup
I tend to work in manual mode and shoot in the RAW file format when taking snowflake macro photos.
This is the order that I like to use when setting up:
- Set the ISO to 200 (my personal preference – you may have to increase it if the level of light is poor).
- Set your white balance (most likely a cloudy day).
- Decrease the aperture to get maximum DOF. Most of my snowflake photos are taken between f/20 and f/40 (I’ve gone even higher, but be aware that diffraction occurs at higher f-stops, which means you lose some sharpness in your photograph).
- Move in as close as you can to the snowflake that you are photographing. (Sometimes, I like to pick up the material that the snowflake is resting on and move it closer as well.)
- Adjust your shutter speed to compensate for decreased aperture. If it is too slow, you may want to increase your ISO, or use your flash.
- Adjust your settings for a two-second timer delay (or use a shutter release as discussed earlier).
- Take a shot and check your histogram and “highlights” to see that your snowflake isn’t under or overexposed.
- Adjust the shutter speed/ISO if necessary (alternatively, you can use your exposure compensation button if you’re using an auto exposure shooting mode).
Recommended Reading:
When taking photos with a macro lens, you don’t have to worry too much about achieving that nice blurry background (so that your subject pops out) as the inherent shallow DOF (in macro photography) does that for you.
On the flip side, you will want to consider getting enough DOF so that your snowflake is crisp and clear.

Photo by Leanne Cleaveley
For this reason, I tend to decrease my aperture to get the maximum DOF that I can (remember, we are talking about ice crystals that are a few mm wide).
I set my aperture. I get as close as my lens will allow. I adjust my shutter speed for correct exposure. (Because I am working with a tripod, I don’t worry too much about having a slightly slower shutter speed to compensate for the decreased aperture.)
I prefer to not use the flash when possible, but with the decreased aperture you may find you have to provide an alternative light source.
When necessary, I use a speedlight with a diffuser. I place it roughly a meter away (or underneath, if shooting through glass), and I try to reflect the light off of a nearby surface to help spread that light out a little more evenly.
Using a flash, sensibly, can lead to great results. Just be conscious of how easy it is to overexpose the snowflake when doing so.
Key Lesson: The histogram may be skewed due to the nature of snowflake photography. The key is to check the highlights to make sure your snowflake isn’t overexposed.
Recommended Reading: If you’d like to learn how to use your flash unit for better photography, grab a copy of Photzy’s Electronic Flash – Parts and Practices premium guide.
I mentioned earlier that to avoid blurry shots from camera shake I often use the two-second timer on my camera.
Here is how to set that up:
In your camera menu, under the timer setting, adjust for the lowest possible time (I find two seconds more than enough time to get my hands out of the way).
Press the shutter release button, move your hands and body clear of the tripod, and wait.
(Remember to change your settings back later on, or you will find yourself trying to get a shot of a rare bird that has flown away in the two seconds that you were waiting for the shutter to release – true story.)
Something to keep in mind when you are setting up your snowflake shots is the focal plane.
Definition of “focal plane”: The focal plane, in a camera, is the flat surface onto which the light is focused after it has passed through the photographic lens. In digital cameras, the focal plane is the same as the flat surface of the digital camera sensor, hence an alternative name that is often used is called the sensor plane.
If you are shooting the snowflake straight on, then it will be easy to achieve a crisp, clear focus across the entire flake.
However, if you are trying to get a shot of the flake, and it is at an angle to your focal plane, you may have parts of the flake that are in focus and other parts that are not.
This can actually look quite interesting, and it can be used for effect.
However, if you are trying to get the entire flake in focus, you may want to move your camera back a bit (this increases your DOF), or change your camera position, so that the focal plane is square to the flake (think of parallel lines).
If you are shooting the snowflake straight on, then it will be easy to achieve a crisp, clear focus across the entire flake.
Conclusion and Self-Check Quiz
I hope that by better understanding your subject, knowing what items you will need, and having some ideas for how to stay comfortable in the cold, it will help you capture some fabulous snowflake photographs. Obviously, these techniques are not the only way to get great snowflake shots, and you will most likely want to experiment with different materials and strategies.
Once you have a setup that works, try different background materials. Play around with it! It is the best way to learn.
Self Check Quiz:
- What are the three characteristics of snow that you should keep in mind when photographing snowflakes?
- As snow melts, what is an important preparatory step to do with your collection (background) materials before you use them?
- True or False: Keeping glass materials uncovered, when moving from the indoors to the outdoors, reduces fogging.
- List one advantage and one disadvantage for each of the following surfaces when photographing snowflakes: A) a woolen scarf B) a glass pane.
- List three things that you can do to help reduce the possibility of out-of-focus shots.
- What are three important items to help you stay warm and comfortable when shooting outdoors in the winter?
- True or False: Battery life extends when shooting in cold weather.
- What are two things that you can do, when using an artificial light source, to avoid overexposing the snowflakes in your shots?
- What camera tool can you use to check for overexposed snowflakes in your shots?
- If you are struggling to get the entire snowflake in clear focus, you may have to adjust your ______________________ or_____________________.
- True or False: Moving farther away from your subject will increase your depth of field.