


Understanding exactly what the camera meter is, and what it does behind the scenes, can indeed be challenging.
In your quest to produce the very best photographs that you’re capable of, you must have an understanding of the camera metering system.
Granted, it’s a bit easier today with the camera RAW file format. You can miss the exposure mark by quite a bit, and in many cases you can still recover a decent image file.
However, this is fact.
If it’s necessary to recover huge amounts of data (from the RAW file) due to gross over or underexposure, your image will look “off.” It will never look as good as an appropriately planned and exposed shot.
Sure, small adjustments are no problem, but accuracy should be your goal.
In your quest to produce the very best photographs that you’re capable of, you must have an understanding of the camera metering system.
Today, we are going to discuss some potential situations that can throw your camera light metering system way off track. We will also look at why that happens.
Here is what we will cover:
- What is the camera light meter?
- How does the camera light meter “read” a situation to determine exposure?
- How does the camera metering mode change what the camera light meter is going to do?
- How do we analyze a scene to determine if we need to override the camera light meter?
What is the Camera Light Meter?
The device that is built into your camera is often referred to as “the camera meter,” or “the exposure meter,” or “the light meter,” or the “the camera light meter.”
In actuality, the device described in the previous paragraph is a “reflectance light meter.”
In the very old days, before light meters were integrated into camera bodies, photographers had a separate device in their equipment bag called a “handheld light meter.”
The handheld device worked similarly to what we have today, except the photographer took the light reading with the handheld light meter and then transferred the information by manually setting the exposure on their camera.
Some purist photographers – especially professional commercial photographers – still use handheld light meters today.
The handheld light meter comes in two varieties: the reflectance model and the incidence model.
The reflectance model measures the amount of light reflecting off of an object.
The incident model measures the intensity of the light as it arrives at the subject.
The light meter built into your camera is a reflectance light meter. This guide will concentrate only on the reflectance light meter built into your camera.

Zone System Grey Scale (Zone 5 is 50% Grey).Illustration by Kent DuFault
The reflectance light meter does not look at the physical scene displayed in your viewfinder.
It also does not see the colors displayed within your scene.
What it sees is the amount of light reflecting off of the objects within your camera frame, otherwise known as “Luminance,” and then it converts that amount of light reflectance into varying shades of grey.
At this point, everything happening within your camera light meter is occurring in the background.
How Does the Camera Light Meter “Read” A Situation to Determine Exposure?

Illustration by Kent DuFault
In order to establish the various levels of light reflectance, there needs to be a baseline. That baseline is 18% grey.
This is kind of confusing, so pay attention. The ‘color’ isn’t 18% grey; the ‘color’ is actually 50% grey – exactly half way between pure black and pure white. However, 50% grey reflects 18% of the light that hits it. This is how it came to be known as the “18% Grey Standard.”
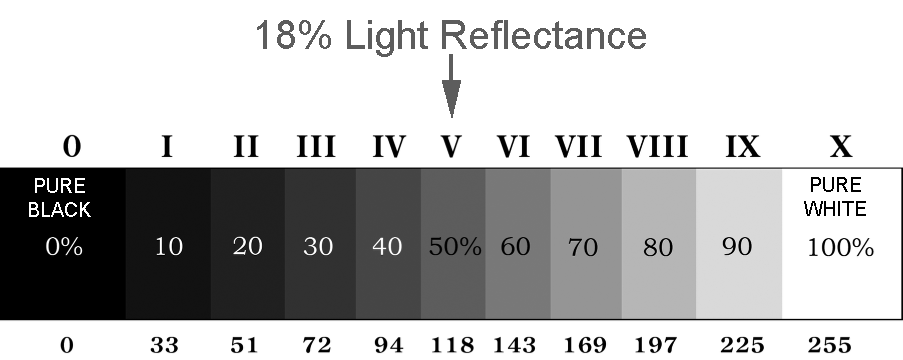
Illustration by Kent DuFault
When your camera meter analyzes a scene, essentially what it is doing is taking light reflectance readings from the “area that it sees,” throwing those readings into a pot, stirring them around, and outputting an exposure setting (aperture and shutter speed) based upon the light sensitivity of the imaging source (digital sensor or film) that will produce an overall average of 50% grey that reflects 18% of the light.
18% light reflectance is the baseline for the light meter to determine the light reflectance variations from white to black.
However, in order to convert that into an exposure, it needs to know the light sensitivity of the imaging source.
In other words, the light meter needs to be calibrated in order to take the light reflectance data and convert it into a real-life exposure setting.
This calibration is what is known as the ISO setting.
The ISO setting on your camera tells the light meter how sensitive your camera is to light so that it can calculate the collected data into an exposure setting!
How Does the Camera Metering Mode Change What the Camera Light Meter is Going to Do?
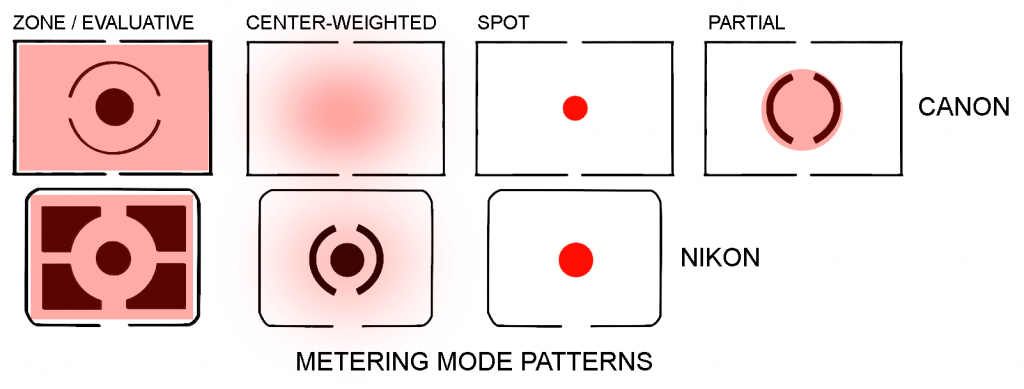
Illustration by Kent DuFault
The camera metering mode tells the reflectance light meter where to look when gathering its data. This is called the metering pattern.
In the zone/evaluative metering mode, the reflectance light meter takes its readings from the entire frame. It then does a calculation, with all of that light reflectance data, to come up with what it believes is the best exposure combination of aperture and shutter speed (based upon the ISO baseline) to capture as much detail as possible from white to black with 18% grey as the center baseline.
The center-weighted metering mode places an emphasis on the central part of the frame to gather the light reflectance data.
The spot metering mode measures the data from a small area within the frame. Some cameras allow that small area of measurement to be moved around inside the frame.
Canon has an additional metering mode called Partial. It is a larger measuring area than the spot metering mode, but has a more defined line of demarcation than the centerweighted metering mode.
Key Lesson: The light meter built into your camera is a reflectance light meter. It requires a baseline ISO setting so that it can calculate exposure settings. The baseline for a reflectance light meter is 18%, which is actually a 50% grey color reflecting 18% of the light that hits it. The camera metering mode tells the reflectance light meter where to look when gathering its data.
You’ll notice that so far I have said nothing about manual mode, or aperture priority mode, or shutter priority mode, or even auto mode.
Do you know why?
It is because these functions of the camera have absolutely nothing to do with determining exposure! These functions take the data supplied by the reflectance light meter and generate how the camera will function for the exposure based on that data.
Now that we know what the camera meter is and how it functions, we must ask…
Why are my camera’s exposures off at times?
It’s simple really.
The camera reflectance light meter does not have a brain. It simply gathers data and then pushes that data along to the next step in the camera function process.
The zone/evaluative metering mode is the closest that camera manufacturers have gotten to giving the camera a brain to think through exposure. However, it’s far from foolproof.
The camera reflectance light meter does not have a brain. It simply gathers data and then pushes that data along to the next step in the camera function process.
Recommended Reading: Want to learn how to make your photos stand out from everyone else’s? Grab a copy of Photzy’s premium guide: Effective Storytelling.
How Do We Analyze a Scene to Determine if We Need to Override the Camera Light Meter?

This image depicts a full range of light and tone. However, the camera meter does not see color.

This is what the reflectance camera light meter sees. It sees values of grey tone based on light reflectance and using a baseline of 18% reflectance.

This scene is a great scenario for your camera reflectance light meter. It has a full range of tone from black to white and everything in between.
In this scenario, your camera light meter is not likely to be fooled. The best metering mode would be the zone/evaluative setting.
Given that previous statement, would your camera capture full detail from the deepest black to the brightest white? Maybe not; that becomes a function of the camera’s dynamic range, which is a completely different subject.

This is one type of scene that is going to fool the pants off of your reflectance light meter.
Remember, the camera light meter sees in reflectance of tone. It uses 18% reflectance as the baseline to determine exposure. The meter wants to create 18% grey reflectance.
Since this scene is predominantly white in tone, the reflectance light meter is going to pass along exposure data to the camera that will result in underexposure.
Why?

It’s looking to turn the majority of the white tone into 18% grey reflectance.
Changing the metering mode would do little to help in this situation.
Key Lesson: When you are photographing a scene that is predominantly white, or light, in tone, you will need to override the recommended exposure setting by increasing exposure 1 to 5 stops depending on the lighting and tonal range. This is true no matter if you’re using manual mode, aperture priority mode, shutter priority mode, or program mode. In “auto” mode, you cannot override the camera meter, so that would be a terrible choice for this situation.

This is another situation that will wreak havoc with the reflectance light metering process. A spot of very bright light, or strong backlighting, anywhere within the frame can skew the light meter data significantly.

With a strong backlight, use the spot metering mode and take your light meter reading from an area in the scene that is close to a mid-tone and excludes the bright spot.
Key Lesson: In order to correct for backlighting, which will skew the camera meter’s ability to provide a correct exposure reading, you must turn to your camera metering modes! That’s right; this is where the camera metering modes come into play. For this situation, you would want to use the “spot” or “partial” light meter mode settings. Reposition the camera so that the area where the data is going to be collected is outside the area of bright light (see the image above).
Note: You can try the zone/ evaluative mode. It may function properly, depending on how bright and intense the backlighting source is.
If you follow that key lesson, what happens when you reposition your camera to the correct composition? It’s going to change the meter reading, and thus also change the exposure data that the light meter wants to pass along to the next step in the camera’s operation.
This is where the shooting mode, or exposure mode as some refer to it, comes into play.
This situation would work best in manual mode. When you take your camera meter reading off to the side (as explained in the Key Lesson and the image above), you would manually set the aperture and shutter speed based on that light meter reading.
When you reposition the camera, it doesn’t matter if the meter suddenly indicates that you have way too much light reflectance, because you’ve already set the exposure based on the light meter reading from the correct area. In manual mode, the camera cannot override this setting.
If you’re using aperture priority, shutter priority, or program mode, what happens when you reposition the camera? It’s going to automatically change the exposure settings back to being incorrectly skewed due to the backlighting.
You’re going to have to override this using the Exposure Compensation setting.
How much do you override the setting? It depends on how much it changes.
This is why in this particular situation manual mode is far easier to use than the auto modes. There are no concerns for additional calculations.
In an auto mode, you would have to take your light meter reading from the correct spot in the scene, take note of the exposure settings recommended by the camera light meter, reposition the camera, take note of how much the recommended settings have changed, and then adjust for that bias using the Exposure Compensation setting. See! Manual mode is easier.

This is another situation that will send your camera’s reflectance light meter into a tailspin. Any shot that you attempt that contains predominantly black or very dark tones requires special consideration, just like a scene that is predominantly white in tone (like the first white fox image earlier).

When your camera’s reflectance light meter attempts to evaluate a very dark scene, it wants to create a baseline of 18% grey reflectance. It’s going to take those dark areas and turn them into a grey area – not so nice. The result is an overexposed image that looks washed out, with blown highlights and weak shadows.

Key Lesson: In a situation, such as this, where the vast majority of the tones (dark or light) will skew the data collected by the light meter, you need to tell the meter where to go to get the data. That’s the first step. Typically, you would set your meter mode to spot, partial, or center-weighted depending on the situation. In this situation, with so much dark area, we would recommend using the spot mode. Place the “spot” in an area where you have some range of tone. Take a reading, use manual mode, set the exposure, take a test shot, and you may have to adjust depending on the situation.
Recommended Reading: Want to learn how to make your photos stand out from everyone else’s? Grab a copy of Photzy’s premium guide: Effective Storytelling.
Conclusion
There are three situations that are likely to make your camera light meter go bonkers:
- All white or light tones
- All black or dark tones
- Strong backlighting
There are three steps to correct for these situations:
- Your choice of metering mode
- Where within the frame you tell the camera to collect the light metering data
- Setting the exposure manually or using exposure compensation
Three Important Concepts
- The ISO setting is the calibration that tells the camera light meter where to set exposure, based on its gathered data.
- 18% grey reflectance is the baseline that the camera light meter attempts to establish as a median point, with the dynamic range then radiating equally toward the white and black ends of the scale.
- The shooting mode (exposure mode) has nothing to do with determining exposure. It takes the exposure data, supplied by the camera metering system, and then sets the aperture and/or shutter speed based on the shooting mode parameters.
Self-Check Quiz:
- When shooting in camera RAW, why is it still important to get the exposure right?
- The light meter built into your camera is what type of light meter?
- In the zone system, which zone is 50% Grey?
- Describe the “18% Grey Standard” and how it is relevant to your camera light meter system.
- How does the ISO setting fit into the camera meter system? Why is it important?
- Name three of the four meter modes discussed in this guide.
- Is there a difference between a meter mode and a meter pattern?
- How much light does the color black reflect?
- In a scene that is predominantly white in tone, what should you do to the exposure?
- What metering mode would you use for strong backlighting?
Shooting Exercise:
- Take a day for a photo shoot.
- Select a subject dominant in white tones and another subject dominant in black tones.
- Using what you have learned in this guide, take your metering readings and use the appropriate metering mode and the correct exposure mode.
- Create another shot with strong backlighting at the end of the day. Use the metering method for backlighting described in this guide. Also try using the evaluative metering mode. Practice overriding the meter using manual mode and using exposure compensation in the auto modes.


