
Photograph by Aaron Seefeld
We’ve all heard that the best times to shoot outdoors are during the golden and blue hours. The advice is hard to argue with. After all, who doesn’t love the soft golden light falling on a subject just after sunrise or the deep blue sky in the background after sunset? But what if you’re like me – someone who thrives on being out and about while most are sleeping? Someone who likes to capture things that just can’t be seen while the sun is up? Someone with a day job and family commitments who is busy from before sunrise until after sunset, yet still yearns to get out and shoot? Fear not! The dark of night offers many opportunities for captivating photographs.
One area that offers incredible potential at night is architecture. Buildings and bridges take on a different personality when the sun goes down and the streetlights come on. They can be incredibly beautiful, but the immense dynamic range of night scenes makes them very challenging to photograph.
In this guide, we’ll discuss:
- How to plan for a successful night shoot
- What gear is needed to capture the scene
- How to set your camera to capture a stunning night photograph
- What to look for while shooting
- Post-processing ideas for your images

Photograph by Aaron Seefeld
Planning
Shooting at night is time consuming, so you’ll want to have an agenda to keep you on track. Identify what you want to photograph and from where you want to photograph it. Don’t try to cover too much ground in one outing. It’s easy to rush and not capture the scene adequately when you’re thinking about how many more stops you want to make. I’ve had to toss out more images than I’d care to admit because I rushed myself and had technical problems with the shots. Most of these issues could have been avoided if I had come in with a better plan of attack and slowed down.
Key Lesson: When you’re planning your night, think about logistical hurdles you may need to overcome. Will the area you want to shoot from be open when you want to go out? Is the scene lit, dark, or both? Will any lights turn off at a certain time? Are there any events in the area that may clutter your scene or prevent you from getting there? How’s the weather? Any number of things may force you to shoot from another location or at a different time.
Think about how you want your sky to look. If you want it to be pitch black, shoot when the moon is closer to new. Conversely, for a brighter sky and foreground, shoot under a full moon. If you want the moon in your shot, use a sky-charting app to find out when it will be in that part of the sky. Be set up and ready before that time.

Photograph by Aaron Seefeld
At the risk of sounding like an overprotective parent, keep safety in mind as you prepare to head out into the field. Be careful, especially along roadways, uneven ground, and water. It will be dark, so you’ll have a harder time seeing where you’re going and others will have a harder time seeing you. If you’re not comfortable around strangers, or are going into rougher neighborhoods, bring a friend along to keep you company. Let someone else know your plan for the evening.
Be careful, especially along roadways, uneven ground, and water. It will be dark, so you’ll have a harder time seeing where you’re going and others will have a harder time seeing you.
Gear
Once you have your itinerary for the night, make a checklist of the gear you want to bring with you. Pack what you might realistically use and leave the extra stuff at home. This will minimize the extent of any damage or loss if something happens while you’re out.
Here’s what you need to capture an image in the dark:
- A camera capable of taking long exposures. Exposures can range from seconds to minutes!
- A lens with adequate focal length for your subject. You don’t want to cut off part of a building, unless it’s part of your vision to do so.
- A tripod, or another means to stabilize your camera. It’s almost impossible to hand-hold a camera steady enough for exposures this long.
- A remote shutter release. This will help eliminate camera shake. If you don’t have a remote shutter release, your camera’s self-timer can work.
- Spare batteries. Long exposures drain batteries quickly.
Optional, but useful things to bring along include:
- A flashlight. This will help you to see where you’re going, can help you with focus, and can be used for light painting if you so desire.
- A soft lens cloth. Dew can appear on the lens, especially on humid nights. You’ll want to be able to clear it off.
- A friend. You’ll have some time to kill while waiting for exposures to finish. Having someone to talk to can help pass the time. They can also assist with the shoot and watch your back.
Recommended Reading: If you’d like a comprehensive guide on producing gorgeous long exposures, grab a copy of Photzy’s The Complete Guide to Long Exposure Photography.
Camera Setup
Some of your camera settings can be done before you leave your house. Taking care of them ahead of time will reduce how much you have to set up in the dark, and lessen the chance of making a mistake.
- Shoot RAW files. The vast contrast of night scenes will easily clip both the highlights and shadows. Using a RAW file will allow you to recover the maximum amount of data possible while keeping the image clean.
- Set your LCD’s brightness to the lowest setting. When your eyes are adjusted to the dark, the camera’s display will trick you into thinking the preview image is brighter than it really is. Rely on your histogram to determine the correct exposure instead of the LCD screen.
- Start with your metering mode set to matrix or evaluative. Spot metering can also be used to expose for highlights.
- Try auto white balance first. If the color looks off while you’re shooting, set a custom white balance. With RAW files, you’ll also have more flexibility to adjust color in post-production.
- Shoot in Manual. Extreme contrast between highlights and shadows at night can trick your light meter and result in either over or underexposed shots. Manual mode will allow you to fine tune the exposure based on what the histogram tells you.
- Set your ISO to the lowest value your camera offers. This will increase exposure time, but it will reduce noise and improve the contrast and color range in your image.
- Choose a narrow aperture that still results in a sharp image. Somewhere between f/8 and f/16 should suffice. Lenses can exhibit softness due to diffraction when closed down farther than that. Every camera and lens combination is different, so take time to learn what works best for your configuration.
Get Out In The Field
The fun really begins once you arrive at your location. Take a moment to observe the scene in front of you. Study your subject. Look for highlights and shadows. Look for leading lines, textures, and areas of interest, and then frame your subject accordingly. Don’t forget about the basic rules of composition.
The fun really begins once you arrive at your location.
Pay attention to perspective distortion, especially when shooting upward with a wide to ultra-wide angle lens. For less distortion, back up and use a longer lens. Frame your shot looser that you think you need to, and get your horizon and verticals as straight as possible. If you need to correct an uneven horizon or distortion in post-processing, you’ll need the extra space around the edges of the frame to avoid cutting off your subject.

Photograph by Aaron Seefeld
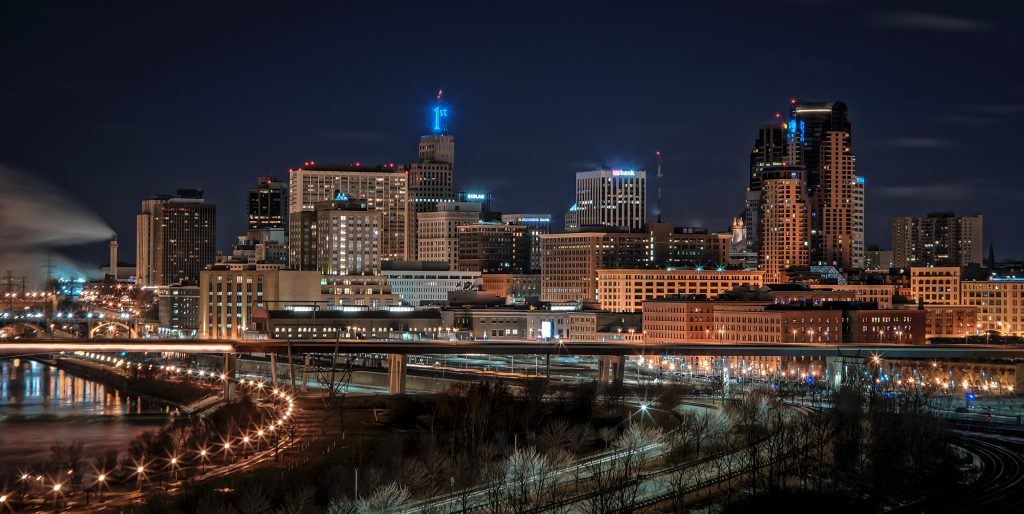
The image above shows an instance where I didn’t leave enough room to correct the distortion and avoid cutting off the buildings on either side of the image. It was a consequence of the lens choice I made when planning. I had just picked up a 35-105mm lens and wanted to test it out, so I left my older 28-105mm lens at home. I was zoomed out to 35mm, couldn’t back up any farther, and didn’t want to stitch multiple shots together, but the shot was too tight. I chose to let the buildings lean in slightly and at least have a little bit of space on the edge of the frame. Next time I visit this spot, the 28mm lens is coming with me.
Once you have your subject framed, acquire focus. This is much easier said than done in the dark. Many scenes will allow you to use auto focus, but you will have to focus manually if there isn’t enough ambient light for your auto focus system to function properly. When focusing manually, using Live View may give you more accurate results than looking through the viewfinder. If there’s not enough light to see your subject through the lens, shine a flashlight on it to help get a sharp focus. Be mindful of building occupants or bystanders if you decide to do this. Unexpected light coming in through a window at night can irritate and alarm those inside.
Photograph by Aaron Seefeld
Now that you’re framed and focused, set the shutter speed so your camera’s light meter reads 0. If you hit the maximum exposure time and the scene is still underexposed, you have a few options. Switch to Bulb mode if you have it. You can get as long of an exposure as you need, or that your battery will allow. If Bulb mode isn’t available, bump up the ISO until you get a balanced exposure. As a last resort, open up the aperture on your lens.
Take a test exposure and check to make sure you have achieved proper focus. If the shot is blurry, refocus and try again. A good exposure is irrelevant at this point if the scene is out of focus.
Key Lesson: Once you are satisfied with the focus, check the histogram. Look for clipping in the highlights and shadows. The histogram will be low-key. Ideally, there should be some separation between the left edge of the scale and the peak, but it’s not always possible. Depending on your scene, some clipping may be acceptable around bright lights, but it should be kept to a minimum. You want as much detail in the highlights as possible. Clipping the shadows is a little more forgivable.
If the test shot is too dark or too light, adjust the shutter speed until you get results you’re happy with. Consider bracketing your exposures to have some flexibility in post-production.

Photograph by Aaron Seefeld
This screenshot shows the histogram and clipping indicators of an image straight out of my camera. You probably won’t have the luxury of using Photoshop to assess your shots in the field (I sure don’t), so this is just for illustrative purposes. Most cameras can show you the same things on the LCD. Learn how to access the information and make it part of your routine to check it in the field.
This particular shot had very little light in the sky and foreground, so getting separation of the histogram from the left edge was impossible without severely blowing out the highlights. This exposure worked for me, though, because the highlights were mostly recoverable and it faithfully represented what I could see with the naked eye.
Changing Locations
When it comes time to change locations or head home, use your flashlight to help make sure nothing is left behind. I’ve had a few occasions where I’ve dropped lens caps or memory cards while digging for another accessory. They can be difficult to see in dark grass. One night, someone I was shooting with left a lens behind. By the time we realized and retraced our steps, the lens was long gone. It is never a good feeling to get home and realize you’re missing something.
When it comes time to change locations or head home, use your flashlight to help make sure nothing is left behind
Post-Processing
After you get home, you’ll be excited to review and process your awesome new nighttime photographs. If it’s late and you’re exhausted, resist the urge to stay up longer to work on your images. Get some sleep and come back to them the next day. I’ve been guilty of shooting until the wee hours of the morning and being so excited that I processed and shared my images right away, thinking they were the best photographs I’ve ever taken. When I looked at them on social media later, I was horrified to see things like the white balance being way off, or what I thought was a nice shadow with plenty of detail is really a hideous blob. Learn from my mistakes and process with a fresh mind.
Since you have now captured a good RAW exposure with the highlights under control and some detail in the shadows, you will be able to come away with an outstanding final image using your normal post-processing routine. If you have bracketed exposures, you can get more creative. HDR, or other blending techniques, can be utilized to enhance the details in areas that would otherwise get muddled in even the best single exposure.

Photograph by Aaron Seefeld
The image above is the final result of the previous screenshot. It was a single frame processed mostly in Camera RAW. I did clean up a few rogue pixels in the “1st” sign after bringing it into Photoshop, but everything else was done within Camera RAW. It may be very dark in the foreground and sky, but that’s how the scene was. I wanted to capture what I saw, and I feel like I succeeded.

Photograph by Aaron Seefeld
The photograph above was processed using HDR and exposures of -2, 0, and +2 according to my camera’s light meter. There wasn’t enough detail in the shadows of the base exposure to bring out the rocks in the shoreline or the unlit parts of the bridge on the left. The highlights in the bridge on the right were also a bit blown out, so blending the three exposures made sense.

Photograph by Aaron Seefeld
Night architecture photography also has great potential for monochrome images. There’s great contrast to work with and most buildings and bridges have some texture and details that add interest to the scene. You may not have a full range of mid-tones to work with, but the results can be rather striking. The photograph above is a black and white conversion of the cover image.
Recommended Reading: For step-by-step instructions on converting color images into black and white, grab a copy of Photzy’s Better Black and White premium guide.
Try It Out!
Now that we’ve talked about what it takes to successfully capture architecture at night and some pitfalls to avoid, your mission is to find a building, bridge, or skyline that fascinates you and make a plan to capture it in the dark.
- Scout out a good vantage point and visualize how you want to frame your subject.
- Make sure you’ll have access to that vantage point when you plan to shoot.
- Bring the necessary equipment, and study the scene when you arrive.
- Capture the subject by exposing the highlights properly and getting some detail in the shadows.
- Bring it all to life the next day after recharging your batteries, both camera and mental.
Most of all, have fun and enjoy the scenery that not many people take time to observe.
Self Check Quiz
- Why is planning important?
- What hurdles might get in the way of executing your plan?
- Why should you shoot in RAW?
- True or false: You should frame your subject exactly how you envision your final image.
- What should you look for in your histogram?
- True or false: It’s a good idea to process and share your images as soon as you get home from a long night of shooting.