

Photo from Pixabay
I have always wanted to write a photography guide about motion, and today, finally, I get to share this guide about motion with you. Initially, though, I was thinking of focusing on the different techniques that photographers can use to capture motion. But as I was sorting out photos that I could use for the guide, I then thought of sharing something else: conveying motion.
Is there a difference? Yes. Capturing motion and conveying motion are two different things. The former deals with being able to get the shot into the frame, making sure that the technicalities of exposure and composition are intact by using the right camera techniques. The latter, on the other hand, focuses on storytelling. It highlights the photographer’s ability to show motion in a way that they would want their audience to understand.
Motion Misconception
I’ve titled this subtopic this way for the mere reason that there are misconceptions in photography storytelling. Most of this has to do with photographers assuming that viewers know what they are presenting. Sometimes, this has to do with the idea that because we’ve used a certain technique, the viewer automatically understands what we want them to see.
But see, whether we like it or not, most viewers perceive photographs intuitively rather than technically, especially those with no knowledge of photography. The photographer who can convey a message without having to explain himself or the photograph is a better storyteller than the one where the viewer goes, ‘Ok, what is it?’ or ‘That’s not what I’m seeing.’
Key Lesson: In terms of motion, the misconception happens with how movement, speed, or momentum is presented. The photographer thinks he’s showing a photo of someone running very fast, but his audience doesn’t perceive the same speed.
I’ll give you some examples.
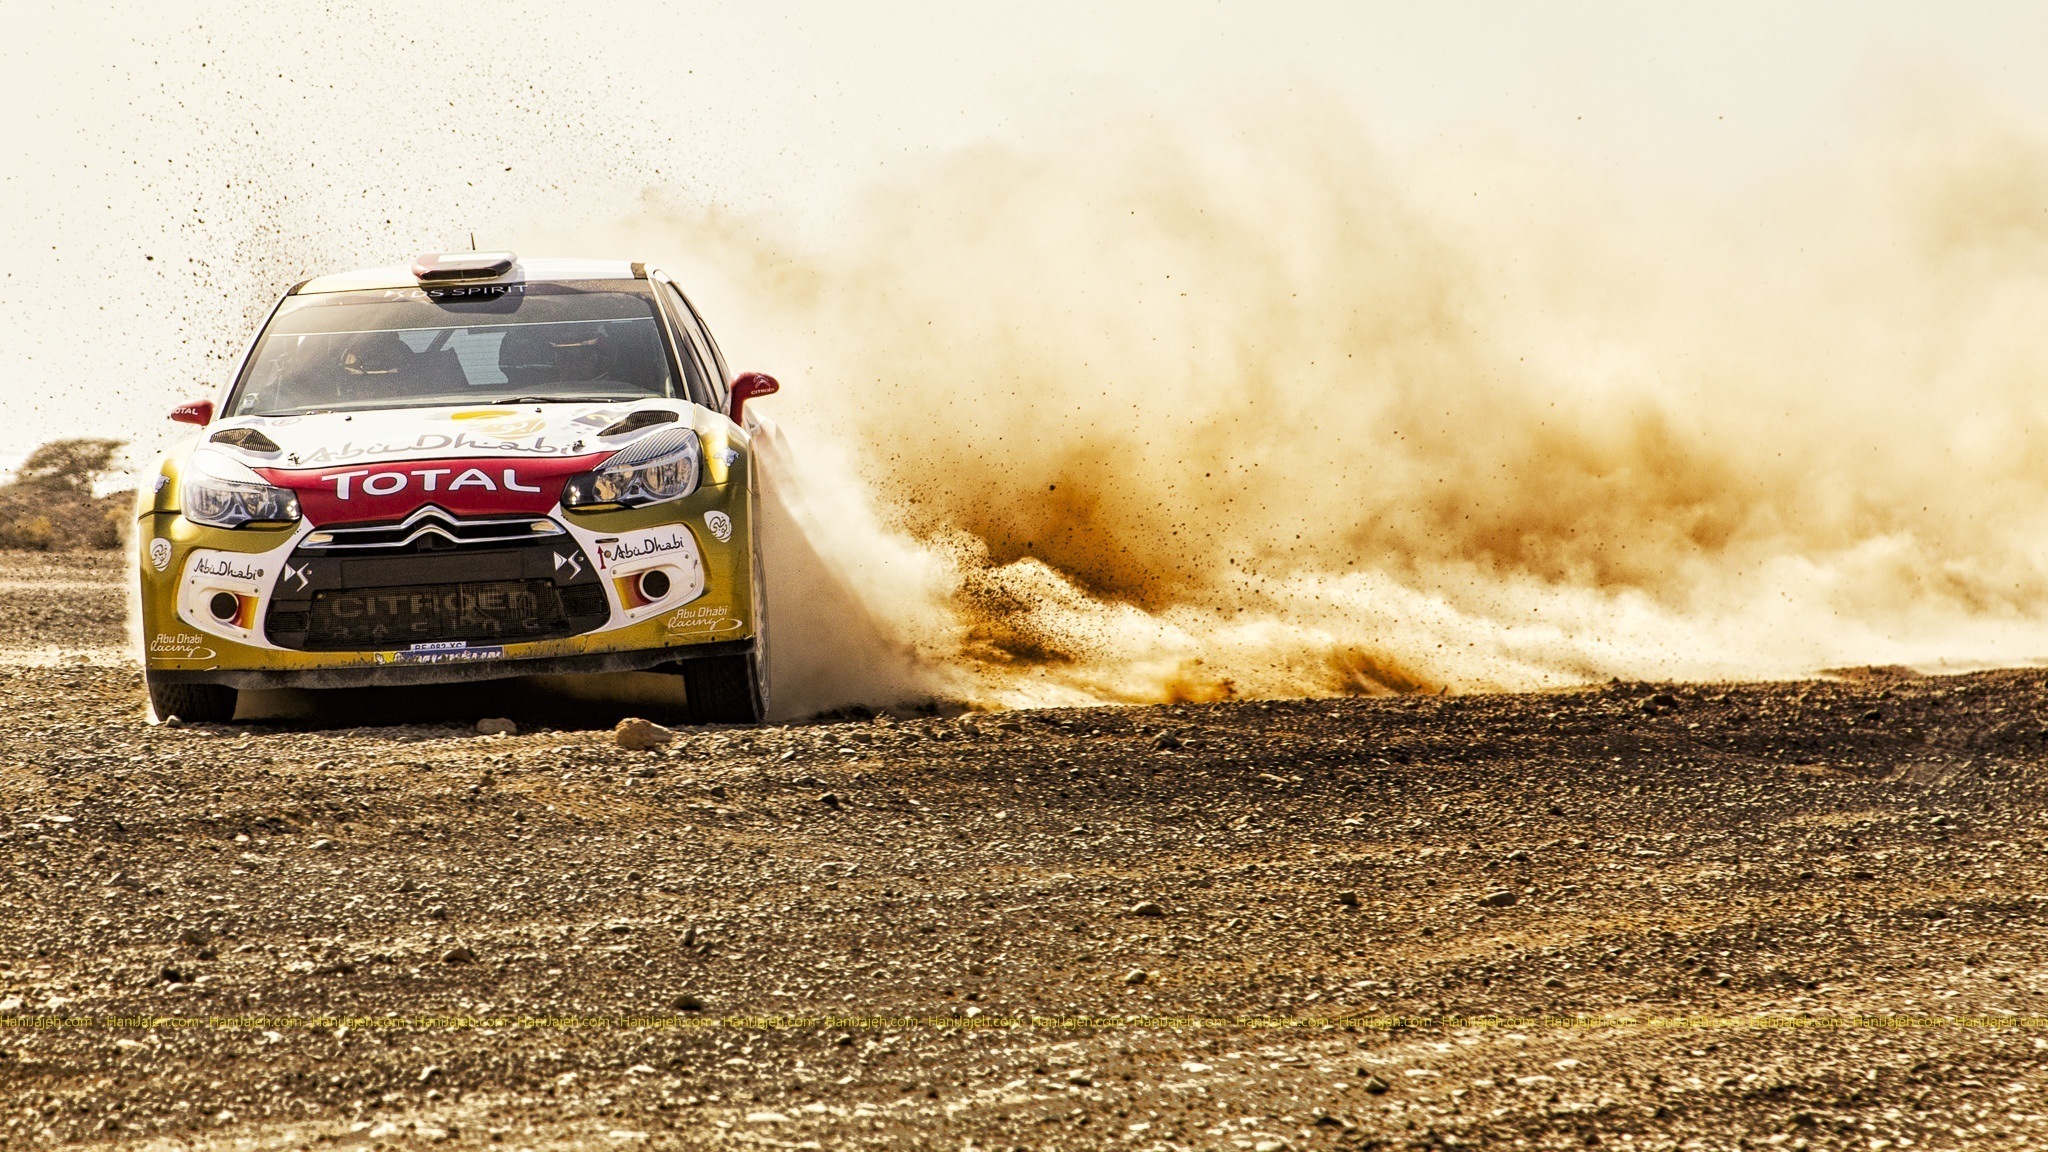
Does this photograph of a car convey motion?

Photo by Alan Bruno
You may be thinking, ‘Sure, it’s a car and it’s on the road. It’s probably conveying motion,’ right?
Let’s change the subject first. We’ll go back to this car later.
Let’s take a look at this photograph.

Photo from Tookapic
It’s a desk fan. Does it convey motion? It doesn’t, right? It seems like it’s turned off.
Do you know that you can take exactly the same photograph while the fan is spinning? All you need to do is to use a very fast shutter speed.
If I wanted to show motion, I’d create something like this.
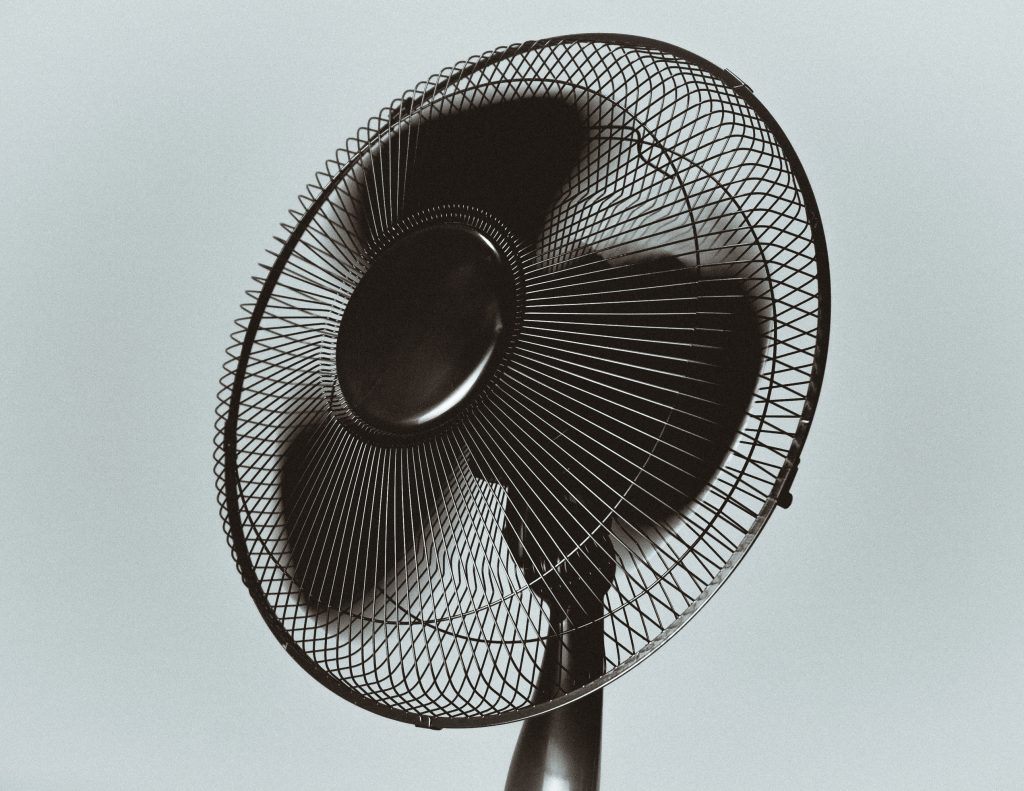
Photo from Pixabay
See the blades and how it creates a blur trail to convey motion? Without a doubt, those fan blades are definitely spinning.
Now let’s go back to the car photograph.
Does this convey motion? Probably. But some viewers may say, ‘It looks like a parked car. There’s a driver, but maybe he’s waiting for someone?’ If it was moving, though, how fast is it moving? 1mph? 2mph? Is it running quickly? Slowly? I can probably take exactly the same photograph while the car is at 1mph or at 40mph, but because we’re not quite sure about movement, speed, and momentum, it doesn’t really effectively convey motion.
Here’s another photograph.
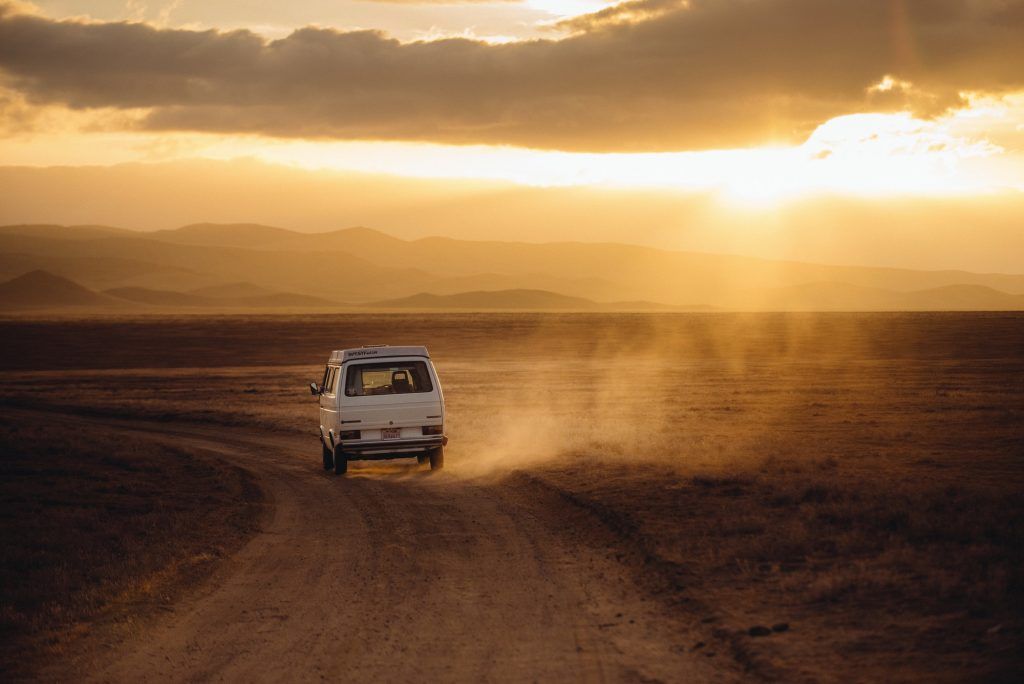
Photo from pxhere
Does this photography convey motion? Oh yeah!
How? By the dust trail created. Do we know how fast the van is going? In a way, yes. Visually, we know it’s moving quite slowly because the dust trails aren’t too thick. It also just feels that way.
We will be discussing more on how to convey speed in a little while.
Capturing motion and conveying motion are two different things.
Camera Techniques to Show Motion
There are really only two camera techniques used to show movement. Everything else are variations of those two techniques. The first is called motion blur and the second is freeze motion. Motion blur is created by the use of a slow shutter speed while freeze motion uses the opposite: a fast shutter speed. Unless you’ve only started to take interest in photography today, it’s highly likely that you’re already quite familiar with these terms.
Recommended Videos: While our discussion will involve both of these concepts, we won’t be tackling how to achieve them. I suggest you check out these Photzy resources for a better understanding of these terms, especially if you’re not familiar with slow and fast shutter speeds.
Motion Blur
Creating motion blur requires one main thing: a long exposure. This is why it’s also called long exposure photography.
The longer the exposure, the more blur that is created.
When shooting with long exposures, you can either capture a light source or a non-light source. When you capture light sources, it will create light streaks. If you capture non-light sources, it will create blur trails. Check out this example –
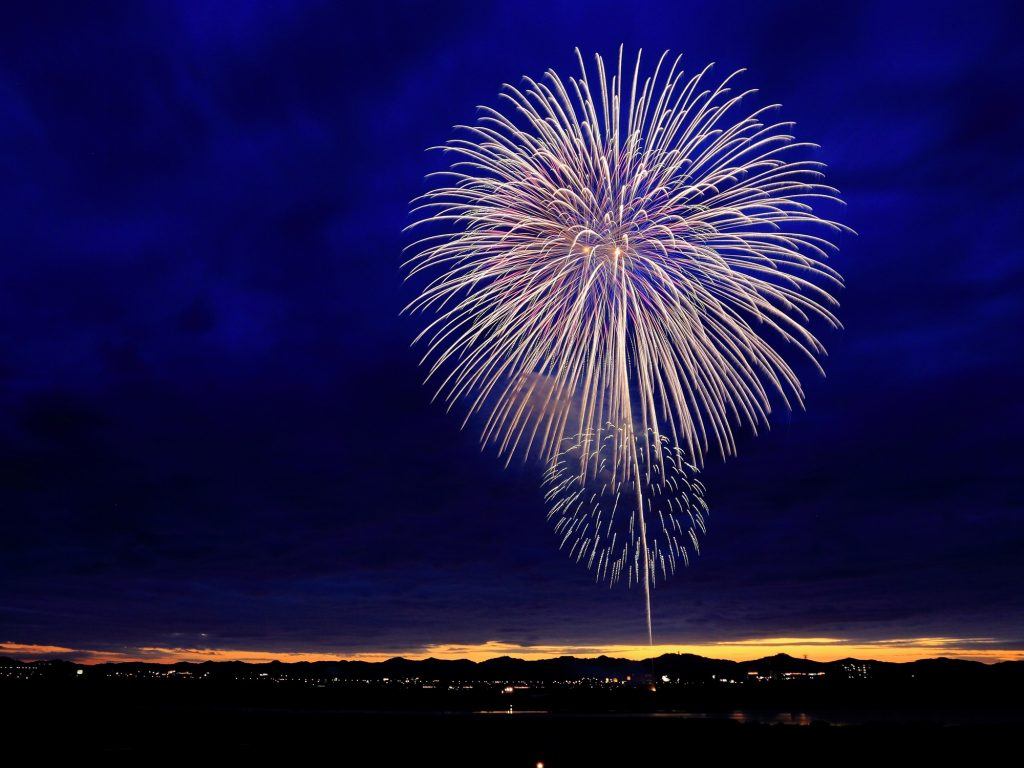
Photo from Pixabay
In this one single image (above), both moving light sources and non-light sources are captured. Fireworks are light sources and produce light streaks. Can you see the clouds? It’s a little blurry because it was also moving while the shutter curtain was open. Since it’s a non-light source, this creates blur trails.
Here’s another example.

Photo by Karlo de Leon
In this photograph, you can see reddish light streaks. These are actually fire trails from a fluid lighter. As you can see, light trails were created when I moved the fire around.
Here’s another example of motion blur on a non-light source.
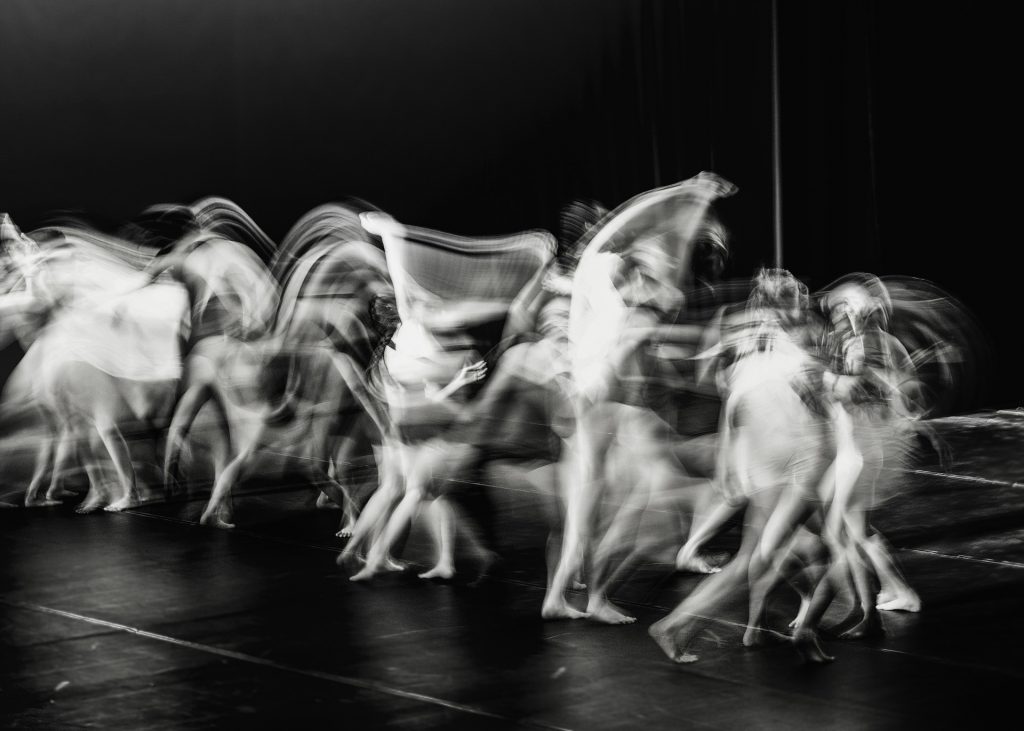
Photo by Pixabay
Here you see some performers dancing, but they’re creating blur trails because of the long exposure.
So again, light sources create light streaks while non-light sources create blur streaks. When you zoom in close to light streaks, though, you’ll see that they’re actually quite blurry too; although they look sharp from afar.
Although this is not a tutorial on long exposures, let me give you just a few pointers on how to create it effectively. Let’s use the next three photographs as examples.
Do you notice anything in common with these next three images in relation to motion?
Photo by Nicolai Berntsen
Photo from Pixabay
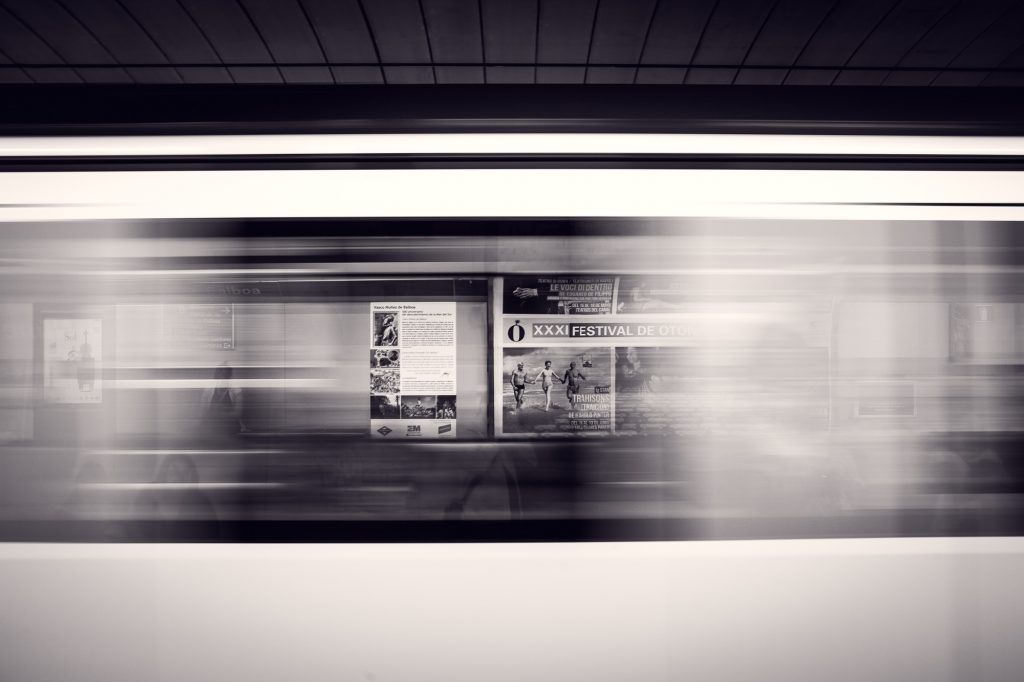
Photo by Mario Calvo
- There is something that is steady or sharp – not moving.
a. Photo 1: the surrounding walls
b. Photo 2: the rocks
c. Photo 3: the posters on the wall - There is something moving.
a. Photo 1: the people
b. Photo 2: the water
c. Photo 3: the train - The movement is obvious, but also not ambiguous or unrecognizable.
Important Note: There are, of course, exceptions to these items, as you may create a motion photograph that focuses on artistry, especially those that are abstract.
...Light sources create light streaks while non-light sources create blur streaks.
What do I mean by ambiguous? Take a look at the photograph below.

Photo by Michael Pereckas
Can you tell me what the blurry thing in the foreground is? You can guess, but are you sure? It’s quite difficult to convey, right? It could be a skater passing or twirling. Is it a kid? An adult? Is it Santa in a blue ski suit?
Had the exposure not been that long, you will still have a sense as to what it is. Unless this is the effect that you want to create or you’d like to go after an artistic look, then it’s probably best to make sure you don’t keep your audience guessing, especially if you’ve decided that it’s your main subject, like this one.
Recommended Reading: If you’d like to improve your skills in using slow shutter techniques, grab a copy of Photzy’s Complete Guide to Long Exposure Photography premium guide.
Freeze Motion
A fast shutter speed is used mainly for two things: freezing an action and preventing blur caused by camera shake. When you freeze an action, or what we call motion freeze, it doesn’t mean that the viewer will automatically perceive the shot as having no motion. Remember, all photographs are frozen images. Even photos with motion blur aren’t exactly moving as if it’s a video clip. It’s all in the perception of the viewer.
Freeze motion photographs are pretty straightforward. Here are some pointers when creating effective freeze motion photographs.
- They will not have any form of blur caused by either an element moving or the camera shaking. It is still possible, however, to have out of focus blur.
- There is something in the frame that is obviously in the act of moving, either by means of perceived motion by the subject or through a supporting element.
Let’s analyze the following photograph based on the two pointers I gave.

Photo from Pixabay
First, do we see any motion trails? None, right? Check! We do see out-of-focus blur in the background, though, which is fine.
Recommended Reading: I wrote a free guide earlier on Avoiding Blur and it talks about the different types of blur. You can check it out here: How to Avoid Blurry Photographs
Second, do we see an element in the act of motion? Yes, the kid (our subject) is obviously in the act of running. Check!
Here’s another example.
Photo by snowlion
There are no motion trails in this image, but it’s also very hard to determine if the van is in motion as it is.
A supporting element, however, in the form of shattering glass, creates the perception that the van is in motion. So this qualifies as an effective freeze motion photograph. Remove the shattering glass and this would be less effective.
Key Lesson: Whenever we’re trying to determine whether there is perceived motion on a frozen element, we want to ask the question: would the element look the same if it was in motion and if it wasn’t? If the answer is ‘yes, it would look the same,’ then chances are your viewers may not see it as something that is in motion. In this case, you need to introduce a supporting element that shows that the object is in motion; otherwise, it may be better to use motion blur techniques instead.
A fast shutter speed is used mainly for two things: freezing an action and preventing blur caused by camera shake.
Conveying Speed
We can use different photography techniques to convey speed. I’ve already shown you one using the photo of the van with the dust trail.
But did you know that you can actually control how a viewer perceives speed? What I mean is, regardless of the actual speed of a moving object, you can make something slow look fast and you can make something fast look slow. You, the photographer, have this ability.
Allow me to illustrate. What do you think about the photograph below? Can you feel the motion? Can you perceive how fast this race car is going?
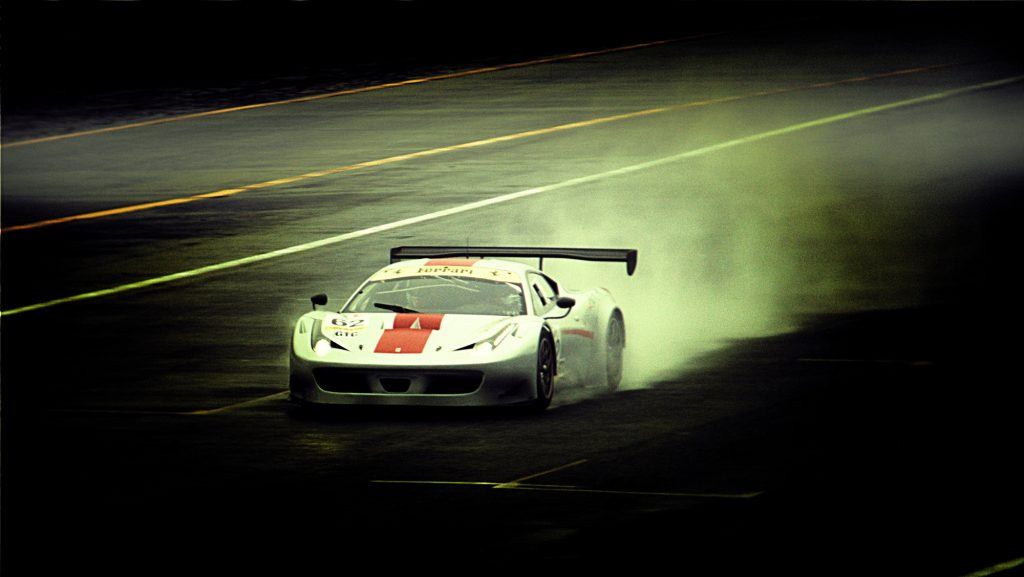
Photo from Pixabay
How about this one? How fast are the cars going?
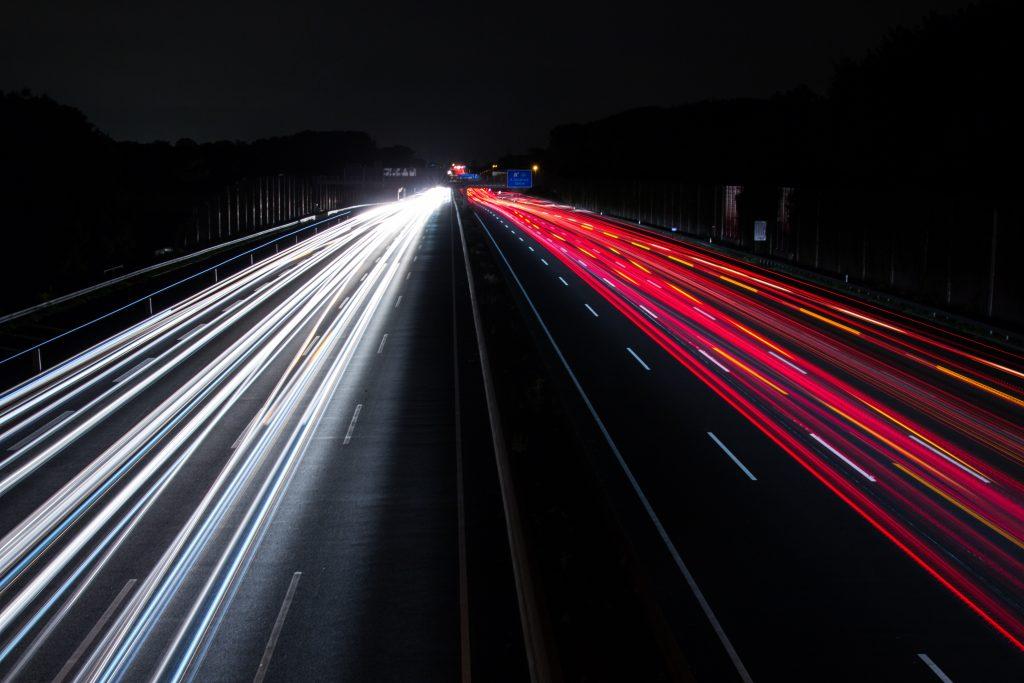
Photo by Tobias-Steinert
Now, intuitively, the viewer would say that this photo conveys faster speed than the race car photo. They would likely even think that the cars here are running a lot faster than the race car above. In fact, it’s so fast that you couldn’t see them. What’s left are headlights and tail light trails.
But all this is probably not true in reality because the race car would most likely be running faster, even if it wasn’t at top speed compared to cars on the freeway. Logically, it just doesn’t make sense.
But why is it that this photograph seems to convey faster speed compared to the race car photo, when it should be the other way around?
Let’s analyze the race car photo. Are you sure it’s moving quickly? Sure, it’s in motion, but wouldn’t a race car hitting the brakes look the same?
Here’s another example that will give you some ideas.
Photo by Jonathan Kos-Read
First, tell me which is faster: the biker or the man walking?
Now, can you see the biker’s blur trail compared to the man walking? This tells us that the biker is moving faster than the walking man. The difference is that the biker has a longer blur trail. This tells us that blur affects how one perceives speed. In this photo we can see that a longer blur trail seems to convey faster speed.
The next sections should give you more insight into conveying speed.
Exaggerating Speed
Ok. Now, don’t think. Yes, don’t use logical reasoning. Just look at the photo below and try to feel how fast that ride is.
Photo by Markus Spiske
I don’t know about you, but if my perception of the speed of that amusement park ride is the same as its actual speed, I wouldn’t dare ride it. Would you? I’d probably have a week long headache if I did!
Note: If you’re not quite familiar with this ride and you’d like to compare your speed perception with the ride’s actual speed, just check out this video to give you an idea of how fast it usually goes: Wave Swinger video.
The amount of blur didn’t only show fast speed, it exaggerated it.
Panning is another way to exaggerate speed. Panning is a motion technique involving a certain camera movement while using a bit of long exposure. The result of using panning effectively is a motion trail background and a subject that is relatively frozen. Here is an example below.

Photo from pxhere
This is an effective way of conveying motion. But more so, it’s an effective way to increase the perceived speed of something compared to what it really is.
Key Lesson: As you have already seen, photographs aren’t exactly accurate. Photographs tell the truth, and they also don’t. Photographers have the power to control what viewers perceive. That’s why it’s important that we ourselves are in touch with our intuitive side rather than just our technical side.
Understand, though, that our technical knowledge helps us translate photographs intuitively. Without skill, you will not be able to convey your message powerfully every time. Remember, it’s about controlling the intuition to create the right perception.
Let’s now look at another speed exaggeration, this time using freeze motion.
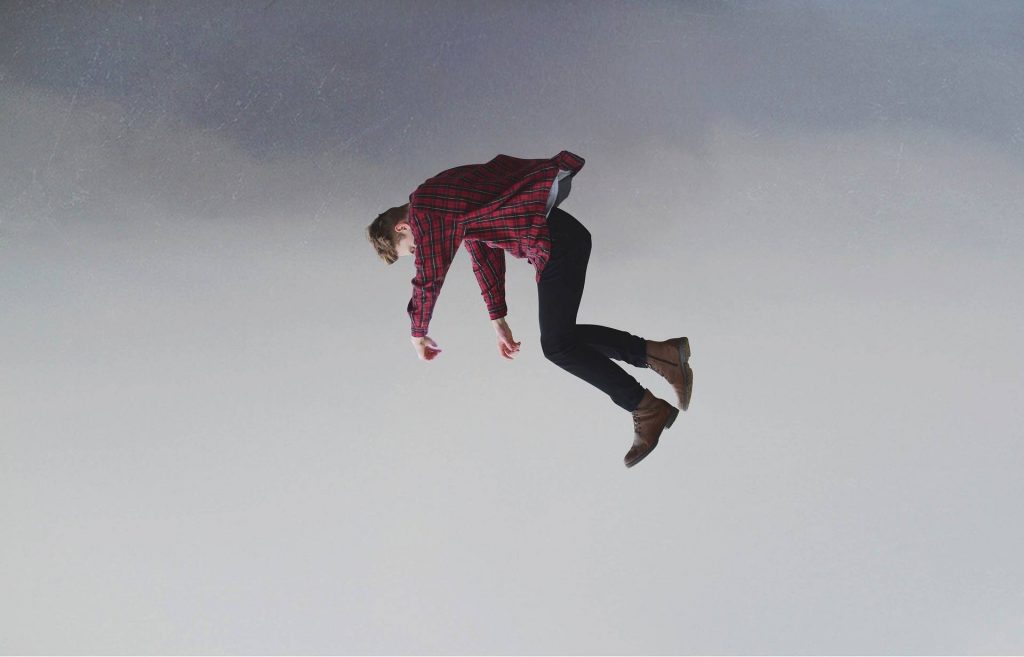
Freeze motion can slow down time. It can give the illusion that time is in slow-mo. Take a look at the photograph below.

Photo from Pixabay
Based on the scene, it seems as though the man fell off a motorcycle. Of course, it’s more likely that it’s only the concept the photographer wanted to create, but the subject probably actually just fell from something else to create a much safer shot. Surely some trick editing may have been used too, but the point is that as the movement is frozen, it makes viewers feel that time is slowing down.
Panning is a motion technique involving a certain camera movement while using a bit of long exposure.
Here’s another shot. Liquid droplets floating in the air. It’s not uncommon nowadays to create such an effect.

Photo by Annie Spratt
Again, for our review, motion blur can create the illusion of speed and momentum while freeze motion can create the illusion of slow motion. This, of course, isn’t always the case, so you shouldn’t use it as a formula. I will explain this briefly in the next section.
Take a look at this photo. Is it speeding up or slowing down time?
Photo from peakpx
You may experience a mix or you may experience one or both, but at different times depending on what element in the frame you’re focusing on. You may even find that everything is at normal speed.
Changing Form
Using photography techniques can change the form of elements and therefore change the message of the image. For example, raging waters can look much calmer with long exposure photography.
Take a look at the waterfall photos below. It’s the same waterfall, but taken at different angles and with different lighting conditions.
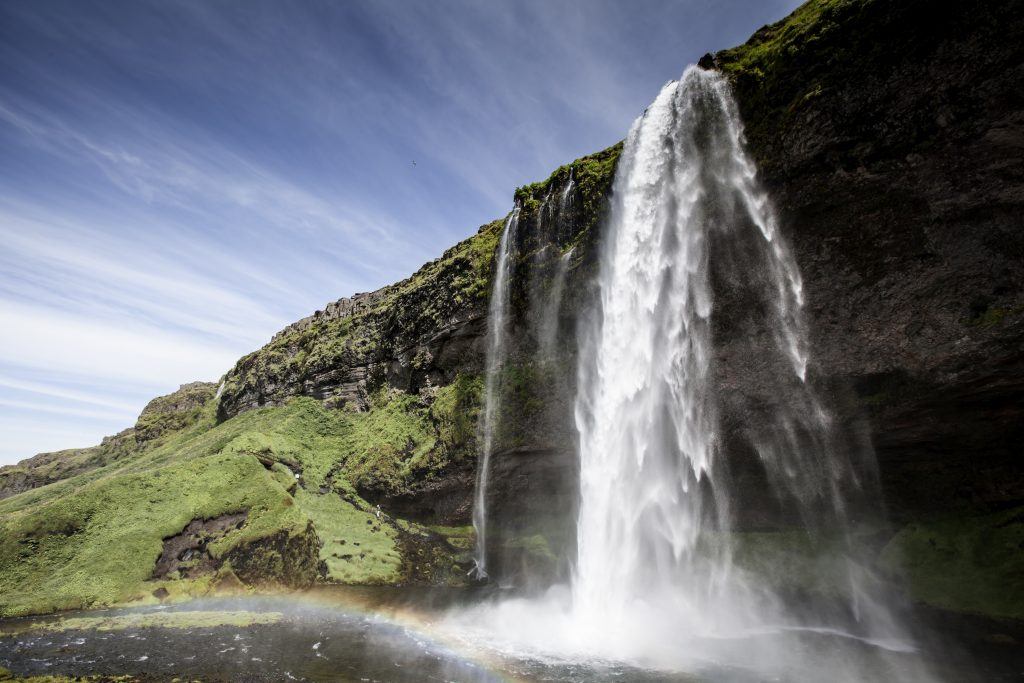
Photo by adriankirby

Photo from Pixabay
In the second shot, a longer exposure was used to create a silky smooth look, probably making it gentler compared to the first photo, which is much closer to the reality. Photography has altered how strong the impact really is.
Key Lesson: Remember I said in the previous section that although motion blur can suggest faster speed, you shouldn’t use it as a formula. This waterfall comparison is an example of that. In this instance, the one with the longer motion blur seems to fall slower since it has a calmer feel, compared with the other shot.
Chrono

Photo by stux
This is a composite image – several shots stitched into one with the same subject. While we do not normally see how a bud blooms into a full flower, photographers can capture movement using time lapse. You simply take shots at different intervals to show movement. Most people would do time lapse photography as a video, but there’s just something beautiful about composites like these that show the transition or transformation. Action sports photographers do this quite often, but it’s also great for movement that takes a long time to transition. This is another way to present and convey motion.
Beyond Natural
Photography has the ability to show us what could be if our eyes had the capacity to act like a camera. Since we don’t have that ability, it makes motion photographs interesting and exciting to create. Let me give you some examples.

Photo by InstaWalli
This is a star trail image. You will never see the stars this way with your natural eye unless you have superhuman abilities! You can achieve this effect by, again, using long exposure techniques while shooting the night sky.

Photo by Karlo de Leon
Take a look at this seascape shot. If you’ve been a shooter for some time now, you know that this slow shutter effect is caused by moving waters, but to a beginner or someone with no knowledge of photography, this looks like coastal fog hovering over a calm sea.
Recommended Reading: If you’d like to learn how to create this effect, grab a copy of Photzy’s Long Exposure Photography premium guide.
Photography has the ability to show us what could be if our eyes had the capacity to act like a camera.
This was my first ever fireworks photograph. I took this during the first year of my photographic journey. I wanted to show you this for one specific reason.

Photo by Karlo de Leon
There are two types of firework patterns in this shot: the dandelion-shaped circles up top and the low-flying white streaks at the bottom. To viewers of this photograph, they will conclude that the firework patterns were created at the same time; that as the high-flying dandelion fireworks burst, at the same time the low-flying mini streaks came up. But in reality, that’s not the case. The mini streaks came seconds later. It’s sequential but not simultaneous.
This was made possible by the use of a long exposure and a black cardboard to cover the lens during unwanted intervals. This is something that many old-school photographers shooting fireworks have been using. It looks somewhat natural to the human eye, but really, it’s as surreal as it can be. Of course, with the advent of composite images, it’s really quite easy now to combine bursts during post production to make it look grander.
Motion and Art
I did mention a few times that abstract art is an exception to the tips I have been giving because the focus is no longer in creating movement to show speed or convey action. Rather, the focus is translating motion into a more artistic appeal.
I have a personal fine art photography collection of motion blur shots that I have taken that I’m quite fond of. They’re not necessarily prized pieces, but I love how playing around with the camera, using a long exposure and some moving lights, can produce something interesting. Here’s one below.

Photo by Karlo de Leon
Defying Gravity: A Lesson on Perception

Photo by Greg Rakozy
We all know that this is a falling wrist watch. I mean, your brain is telling you it is. But no matter how hard you rationalize, most of us will look at this as a floating wrist watch, not a falling one. It doesn’t even seem like it’s falling down very slowly.
Is that even logical? There’s really no reason for us to believe that it’s floating, right? But it is our intuitive nature rather than our rational brain that’s telling us otherwise. And more often than not, intuition wins. This is the power of photography. This is what I mean by controlling the perception of your viewer by handling motion effectively.
Here’s another example. Is it falling or floating?
Photo from pxhere
If you’re having trouble understanding this concept, that’s alright, but it’s probably because you’re thinking too much. What you need to understand, though, is that most viewers, especially those who have no experience in photography or any similar craft, will rely on their intuition automatically and will assume things based on what their inner spirit is telling them.
Here’s another illustration. Hopefully it will give you more ideas. Compare these two trick photographs:

Photo from peakpx

Photo from pxhere
Ok, which one is falling and which one is floating? Yes, the girl is floating and the guy is falling. Awesome! How did you know? Because the position of the girl seems like she’s floating and the position of the guy seems like he’s falling. Now, I’ll do something cool. I’m going to flip the falling photo.
Ok, does the guy seem like he’s still falling? Doesn’t he now look like he’s floating above the clouds? Probably even rising up.
What changed? The angle, the position, and the way the elements look in the photograph. See, the photographer has control over these perceptions. It may not appeal to all audiences 100% of the time, but when you consider these factors whenever you deal with motion, then you would be able to effectively convey what you would like your audience to see.
This is quite similar to acting. An actor can show anger using facial expressions and body language even if he’s actually feeling the opposite emotion. An actress can feel loved and appreciated, but on camera, she can show loneliness and depression. If they’re good, their audiences would be able to perceive the correct emotion. If they’re not, they will see through the acting.
Conclusion
Dealing with moving objects doesn’t mean you have to create an image that shows motion. Rather, it is taking control of motion so that it will result in an image that you want to convey to your audience – whether you want to relay the true nature of a scene, or if you’d like to create something to exaggerate or reduce motion.
Below are some exercises I’d like you to work on. If you’re not quite familiar with using your camera’s shutter speed, then gain more knowledge and practice, practice, practice. I also recommend reading Photzy’s Long Exposure Photography premium guide. Although it focuses on creating motion blur, it will help you understand and better use your camera’s shutter speed settings.
Non-Shooting Exercise: Grab a sports magazine or visit a photo gallery website like Flickr or 500px. Search for five motion blur and five freeze motion photographs. Use the pointers I gave on pages 13 and 15 to determine which images effectively convey motion. Go over the ten images and briefly describe how motion in each image was conveyed. Next, briefly describe how speed was conveyed in each photograph.
Shooting Exercises:
- Using a very fast shutter speed setting, take a photo of a moving object and make it look like it’s not moving. Show it to other people and ask them to describe what they see.
- Create a photo showing speed exaggeration blur techniques.
- Create a floating photograph. Think of ways to make it look like it’s floating instead of falling. If you run out of ideas, watch Star Wars first.


