

As soon as the snow melts where I live, I begin to get excited about the opportunity to get outside with my macro lens. The shift into spring and then summer brings with it a variety of subjects to photograph, and one of my favorites by far is insects.
As a gardener and nature enthusiast, I can spend hours outside. I have learned that I don’t have to go far to find insects to photograph, though. Most of the insects I shoot are in my own backyard or a nearby field.
If you add arachnids to your list (I know, they aren’t really insects but for the sake of this guide I am going to include them), then you often need only look a few meters and you will find a critter waiting to become your next photography subject.
Once you have mastered your camera settings and gotten comfortable shooting with a macro lens, you will find yourself looking for ways to really showcase your subject. There are some ways you can improve your insect photography to give your images a greater impact, and I am going to share a handful of favorites that I incorporate into my images.
To make the most out of the following tips, I recommend you get a handle on some macro basics for shooting by checking out A Beginner’s Guide to Insect Macro Photography and the Essential Guide to Macro Lighting. These will provide a firm foundation upon which you can build your photographic strategies.
By the end of the guide, you will be able to:
- Understand how to use minimalism to make your insect images really stand out
- Capture great images of insects in action
- Incorporate the setting or environment to tell a story about your subject
- Utilize an insect’s more important features (it’s the eyes!) to improve your photographs
Recommended Reading: If you’d like to master camera settings to create gorgeous, creamy, blurry backgrounds, grab a copy of Photzy’s premium guide: Beautiful Background Blur.
How Minimalism Can Improve Your Insect Shots
Minimalism is a type of photography where an image is simplified to create isolation of a subject. This can be done by removing anything within the frame that can distract the viewer from the main subject. The objective is to bring the viewer to a single point of interest.
Negative space is an important aspect of minimalist photography. How much negative space you include around your subject can depend on the subject itself and the environment you are shooting it in.
You should aim to minimize background distractions as much as possible by carefully observing and setting up your shot so that whatever is behind your subject is simple. You can even add an artificial background to eliminate a busy one.
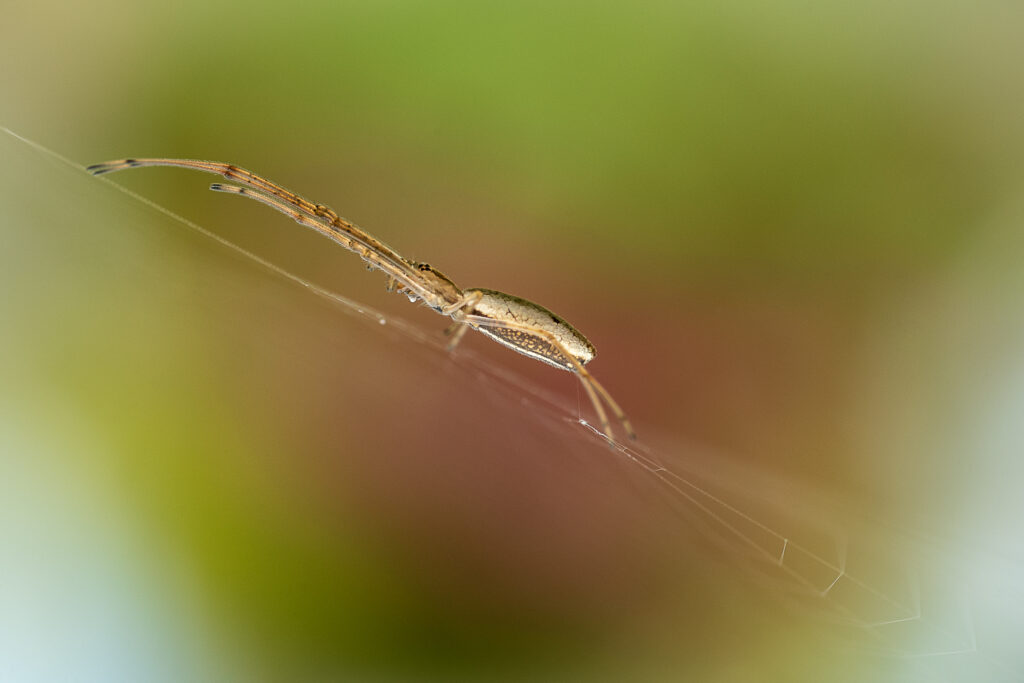
A shallow depth of field and precise focus makes for a minimalistic photo of this spider. The setting was a rose bush, but the branches, flowers, and leaves become a soft blue of color, creating negative space that allows our focus to rest on the spider. Photograph by Leanne Cleaveley
Key Lesson: To increase the impact of your insect images, eliminate background distractions and utilize negative space.
A macro lens pushes you to work with a shallow depth of field (DOF), which can work to your advantage when you want to isolate a subject. The shallow DOF can blur backgrounds and eliminate distractions, which aids greatly in minimalistic photography.
Proximity to your subject when shooting with a macro lens creates another advantage. Very small movements of your camera can change the angle to greatly impact the background of your image. This can offer more opportunities to create a negative space that will draw the focus to your subject.
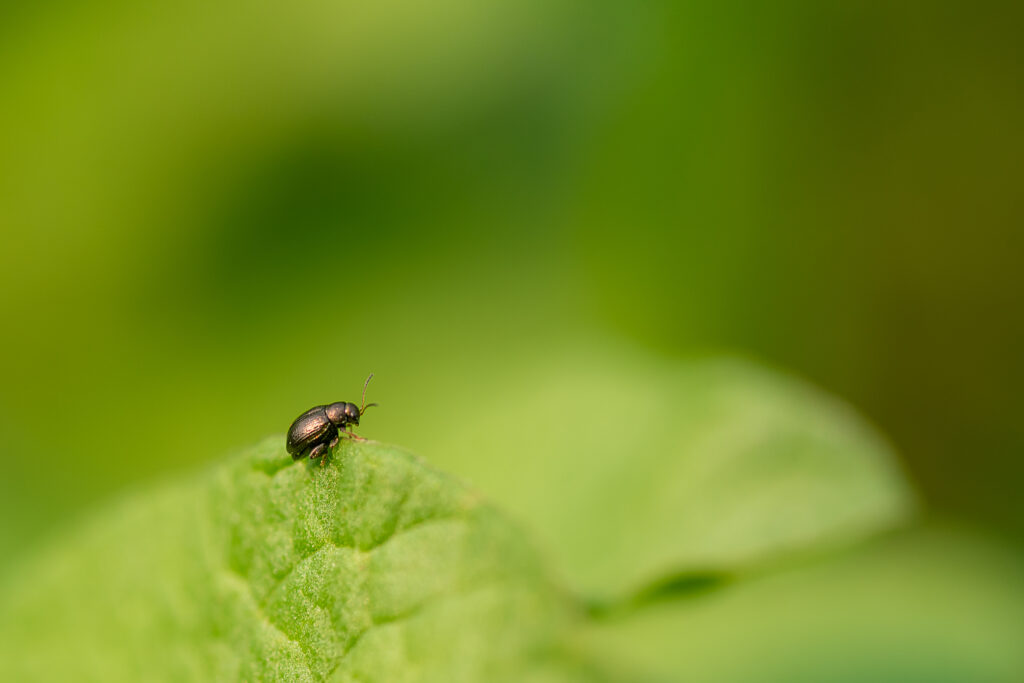
This very small beetle resting on a leaf in the garden becomes more of a focal point in a huge sea of green. Aiming my camera a few inches, either way, would have lost the effect of the negative space that the out-of-focus green leaves create. Photograph by Leanne Cleaveley
Action: To Freeze or Not to Freeze
Portraying action in your photography is a great way to increase the impact of your insect images. You have a couple of options when showcasing the action in a shot – you can freeze the action or allow for some blur to show the movement. Both can be quite effective in their own right and come down to a personal decision that every photographer must make.
You have a couple of options when showcasing the action in a shot – you can freeze the action or allow for some blur to show the movement.
To freeze your subject in action, you need a few important ingredients. A fast shutter speed is a must, especially if you are shooting flying insects or ones that move very quickly. To utilize a fast shutter speed, you will need adequate light. You may find the need to increase your ISO to enable you to bump up your shutter speed if you don’t have adequate light. Alternatively, you can use a flash or Speedlight to freeze your subject.
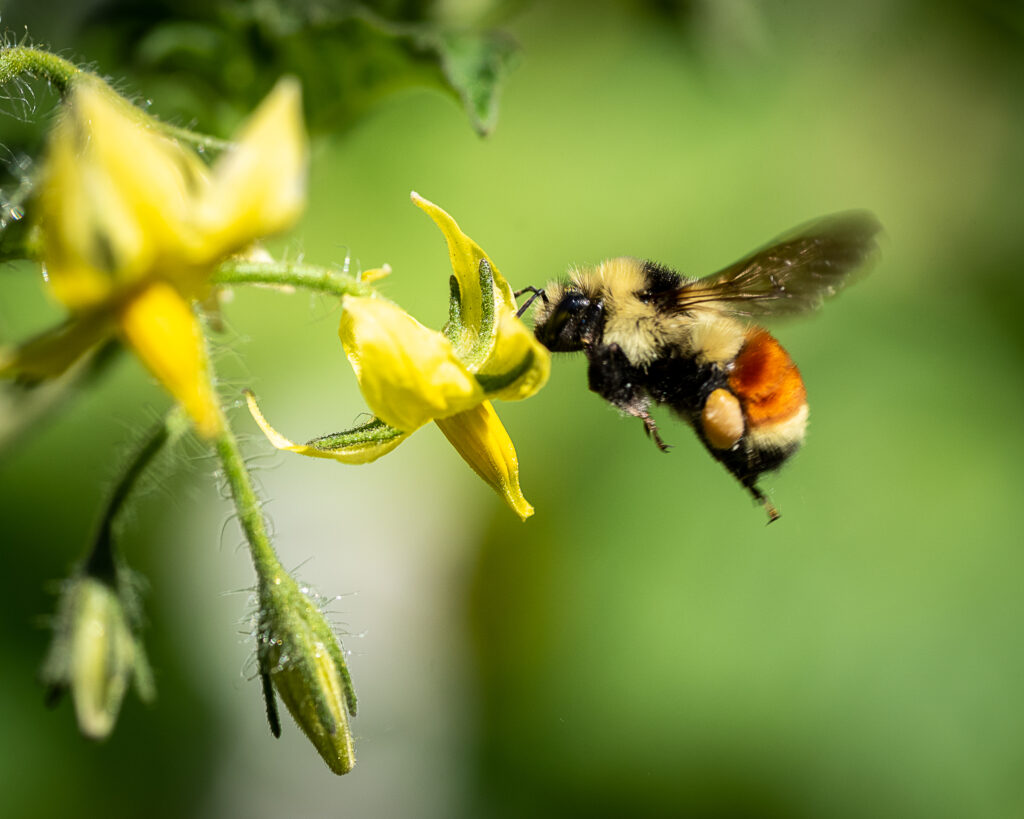
Even at 1/1000th second, this Hunt’s Bumble Bee’s wings are still a bit blurry. To completely freeze the wings, a faster shutter speed or even a flash would be necessary. Photograph by Leanne Cleaveley
What shutter speed you need to use depends on the insect you are photographing and what you are trying to achieve. For example, catching a bee in flight is significantly easier than catching one in flight while trying to “freeze” the wings (which move very quickly). You may need speeds around 1/1500th sec or faster to effectively freeze that kind of action.
Sometimes blur is what you want to achieve in an action shot. If that is the case, a slightly slower shutter speed might be required. Finding the right balance may require a bit of trial and error as you still want your subject to be recognizable while allowing for that blurred motion to demonstrate action.
Key Lesson: Ask yourself questions to determine what you are trying to achieve in your action shots. Do I want to freeze the action or leave a bit of a blur? What camera settings or equipment will I need to achieve this?
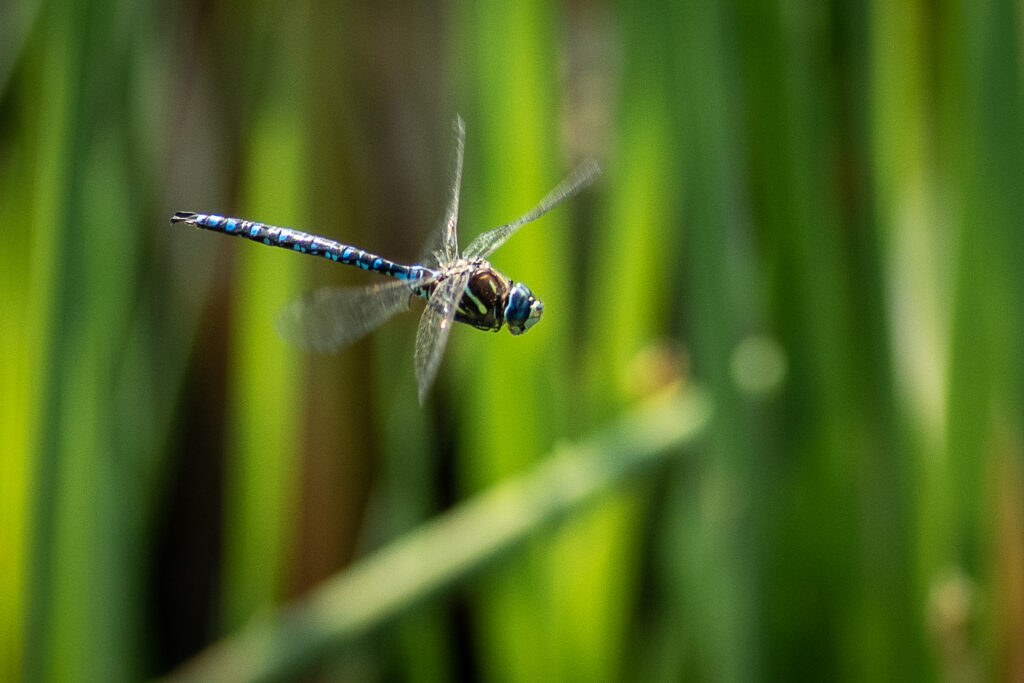
Shot at 1/800th second, f/8, and ISO 500, you can still see a bit of blur from the dragonfly’s wings, which provide a sense of motion. Would completely freezing the wings make this a more effective image? What shutter speed would I need to use to do so? These are questions you may ask yourself when capturing action shots of insects. Photograph by Leanne Cleaveley
How Capturing the Environment Improves Your Images
Including the environment in your image can be an important part of telling your photographic story about where the insect is and why it is there. By portraying your subject in its environment, you can actually increase the impact of your image. Just be sure that the setting doesn’t dominate or distract the viewer.
The environment can include the vegetation your insects are resting or feeding on, other insects (both prey and predator), and even things like wood and soil. Although getting close to a hornet’s nest is ill-advised, it can be interesting to capture an insect, such as the carpenter bee in the image below, in its unique home. Ask yourself whether the setting adds to the story you are trying to tell about your subject. Carefully consider how to incorporate it into your image while still making it clear what your subject is.
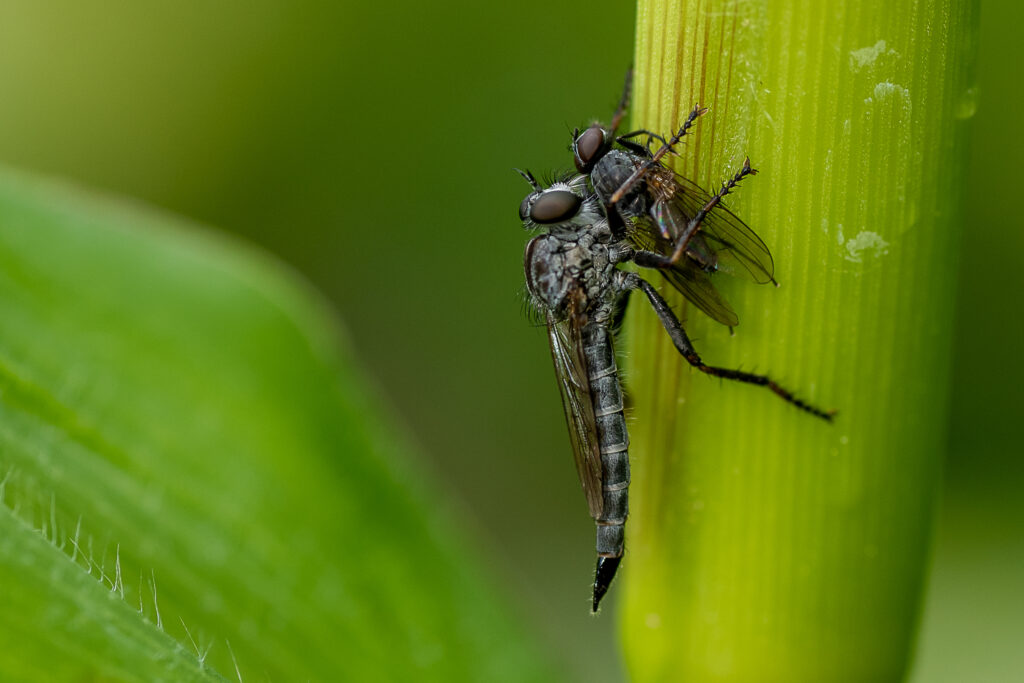
The assassin fly and its dinner in this image tell a story about hunter and prey in nature. The image shot at 1/320th second at ISO 640 and f/13, was taken in the short moment the fly landed on a corn stalk with its lunch. The assassin fly alone would have made for an interesting subject, but the image captured tells us so much more about this aptly named creature. Photograph by Leanne Cleaveley
A little background knowledge can help determine where you will find certain insects. For this, you may want to do some research. Naturalist organizations in your town or city can aid in getting the information you require. Sometimes they will make outings to observe insects in your area and this can be a great opportunity to photograph them.
By portraying your subject in its environment, you can actually increase the impact of your image. Just be sure that the setting doesn’t dominate or distract the viewer.
Key Lesson: By incorporating the environment in your images of insects, you show them as they are in nature. The environment is about so much more than just place; it can show what an insect eats, where it lives, and how it interacts with others of its own kind as well as other insects.
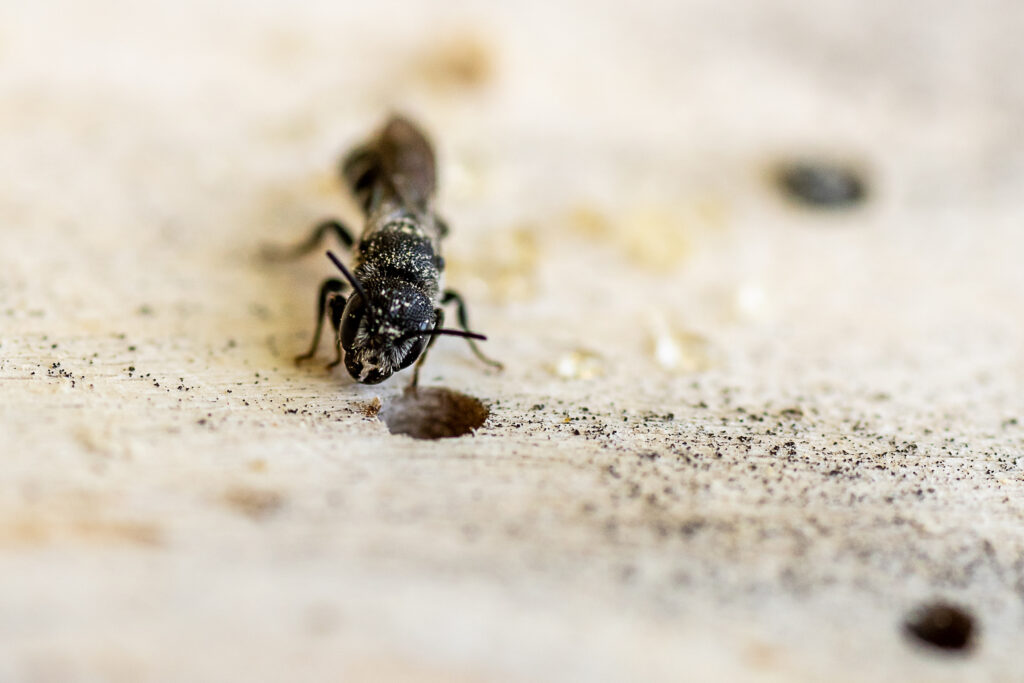
Capturing an insect in its environment, such as this carpenter bee at the “door” to its home, can add so much more to an image. I decided to include the other holes to tell the story of these industrious little bees and how they live. Photograph by Leanne Cleaveley
Recommended Reading: If you’d like to master camera settings to create gorgeous, creamy, blurry backgrounds, grab a copy of Photzy’s premium guide: Beautiful Background Blur.
Many insects are very predictable in the places they will feed and hunt. Take the time to get to know where to spot them. Don’t be afraid to get comfortable and spend some time watching and waiting for your subject to appear. Sometimes this is the only way to capture some of the shyer insects that go into hiding when larger creatures are moving around.
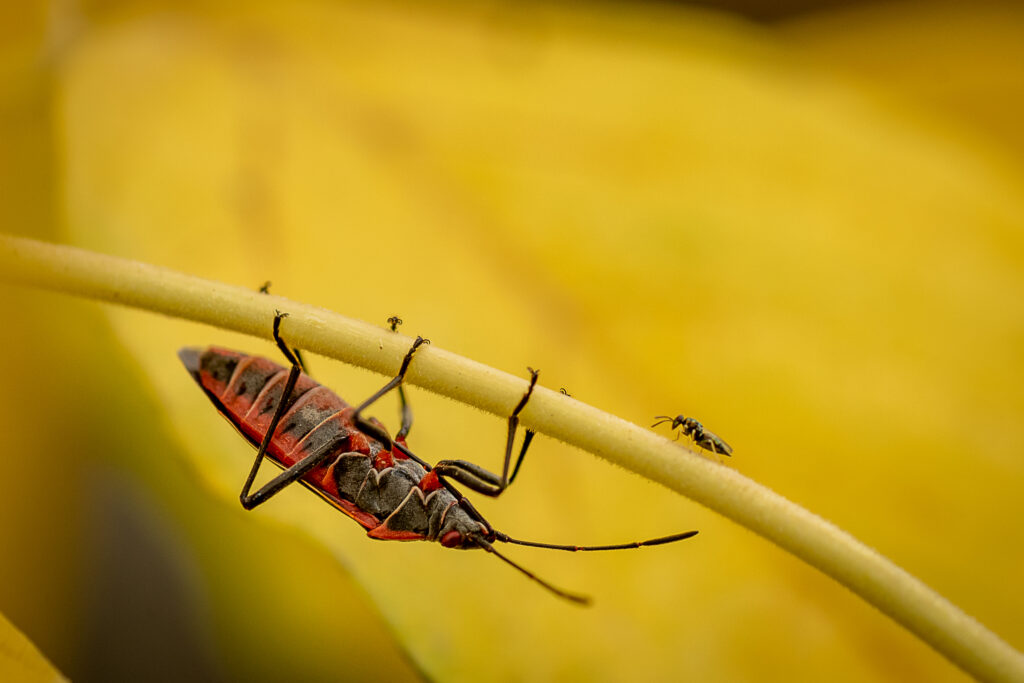
This image of a boxelder bug and a much smaller insect was about timing. I noticed the boxelder bug moving down the leaf stem and waited until it was close to the smaller insect. I liked the way the two bugs appeared to be having a chat and the sense of scale that the two different-sized subjects created. Sometimes setting is about your subject interacting not just with the environment but with other subjects. Photograph by Leanne Cleaveley

I was surprised to find this very white crab spider on my dark red rose. Typically, these spiders are all about blending in and stalking their prey. I thought the environment really made the spider “pop” in the image and decided to go for the shot. Does the setting enhance or detract from this image? Could I have shot this differently to incorporate the subject and the setting? Photograph by Leanne Cleaveley
The Eyes Have It
When shooting insects, getting the eyes in focus can make or break an image. Just like in portrait photography of people, the eyes are a strong lure for the viewer. Whether making direct eye contact with your subject or not, the eyes should be sharp.
Taking the time to get the eyes sharp is extra important because of the shallow depth of field you are working within macro photography. I recommend you don’t rely on autofocus modes for this as they can often be tricked when shooting macro, and in the precious fractions of a second you waste waiting for your camera to focus, you miss a great shot.
Taking the time to get the eyes sharp is extra important because of the shallow depth of field you are working within macro photography.
My preference is to determine how close I want to get using the lens’ manual focus and then physically move the camera (not focus the lens) closer or farther from the subject. A very little movement is required, but it is important to practice this technique so that you get a feel for it. This technique can allow you to track a moving subject and keep the eyes in focus as you do so.

Jumping spiders, like the one shown in this image, often track you with their big frontal eyes. The size and position of their eyes make them an obvious focal point, and getting them in clear focus is extremely important. Photograph by Leanne Cleaveley
Your distance to your subject will determine what aperture you need to capture the insect’s eyes in focus. Too wide an aperture may not give you the depth you need to get the entire eye or set of eyes sharp. If light allows for it, try stopping down a bit more to provide an adequate DOF to capture your subject’s eyes.

Whether you are getting the eyes, or even one eye, in focus is determined in large part by the depth of field you are working with. Shot with a 90mm macro lens at f/13, this image shows how the honeybee’s antenna and second leg quickly become out of focus. With such a small depth of field, accuracy is important for getting the eye sharp. Photograph by Leanne Cleaveley
The last thing to consider when trying to capture a sharp image of your insect’s eyes is the plane of focus. To understand the plane of focus, you first must imagine a line passing straight through your camera. This imaginary line is called the optical axis. Your plane of focus is another imaginary line that intersects the first line at 90 degrees. If the camera is titled, the plane of focus is titled too.

This image was shot with a 90mm macro lens at f/14. Using almost the same aperture as the image above, I had a little more depth of field to work with as I was shooting my subject from a bit farther away. It’s important to remember that the closer you get to your subject, the smaller the depth of field and vice versa. Photograph by Leanne Cleaveley
Plane of focus is important to keep in mind, because if your insect’s head is not looking square at you and the camera, then odds are one of the eyes will be out of focus when shooting at a lower f-stop (wider aperture) because of the shallow depth of field. To illustrate this, check out the image below.

This illustration shows the plane of focus which is determined by two imaginary lines: one passing straight through your camera and the other intersecting it at 90 degrees where your subject will be in focus.
Key Lesson: Eyes are a focal point in all types of photography. Be sure to consider the depth of field, distance to your subject, and the plane of focus when attempting to get your insect’s eyes sharp.
Recommended Reading: If you’d like to master camera settings to create gorgeous, creamy, blurry backgrounds, grab a copy of Photzy’s premium guide: Beautiful Background Blur.
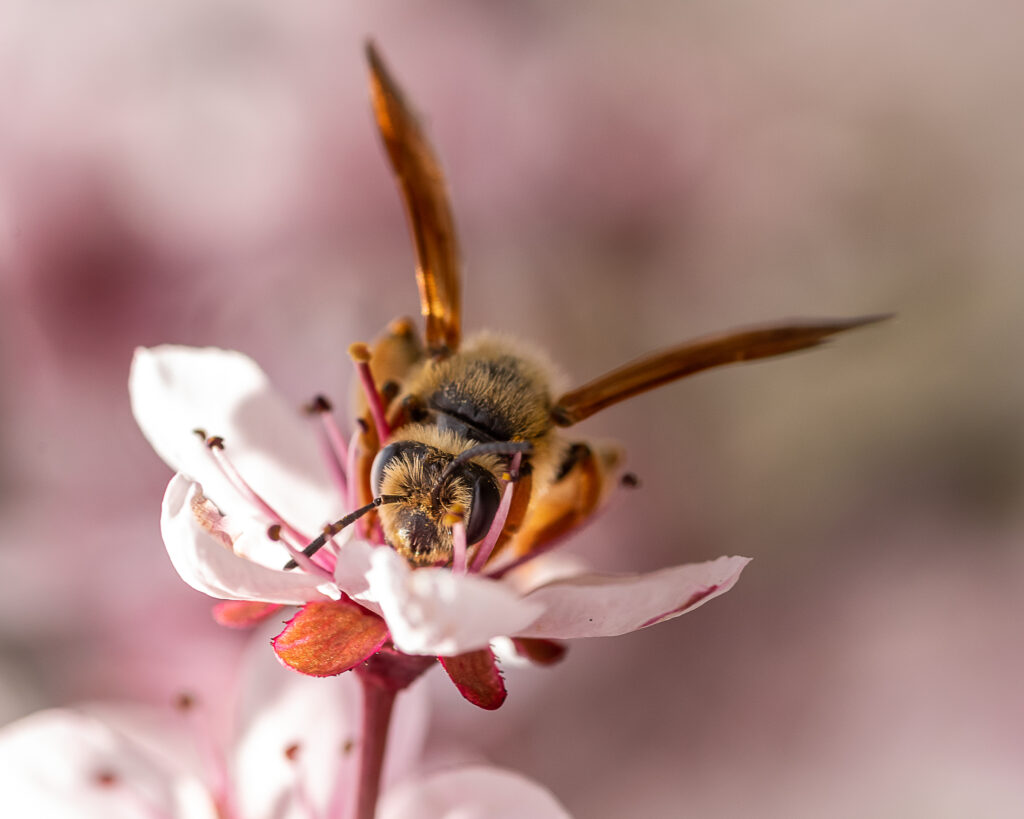
The very slight tilt of the honeybee’s head in this image ensured that it was not square to the camera. With such a narrow depth of field (shot at f/16), the slight tilt put the left eye just off the plane of focus. A small adjustment to the camera would have put both eyes on the plane of focus and allowed them to be sharp. Photograph by Leanne Cleaveley
Best Practice

Photograph by Leanne Cleaveley
Insect photography is about more than just snapping photos of bugs. You can really increase the impact of your images by utilizing minimalism, incorporating the setting, capturing action, and getting the insect’s eyes in focus. These are the four keys to success that have served me well.
I can’t share the final ingredient, though. It’s practice. It is something that you must do to get better at each of these strategies I have shared. I recommend you tackle one approach at a time, and once you feel like you have mastered each one, you can work at putting them together and making them your own.
Most of all, get out there with your camera and have fun. Happy shooting!

Photograph by Leanne Cleaveley
Self-Check Quiz:
- What are two ways that shooting with a macro lens gives you an advantage when attempting to shoot minimalistic insect images?
- To freeze the wings of an insect like a bee, you may need a shutter speed of _____________ or faster.
- Is blur good or bad in an action shot? Explain.
- What are some questions you should ask yourself when attempting to capture action shots of an insect?
- What should you be careful to avoid when incorporating the setting in your insect images?
- The environment is about more than just the place. What are some other aspects of the environment that you can include in your images?
- Be sure to consider the depth of field, distance to your subject, and ______________________ when attempting to get your insect’s eyes sharp.
- Look at this image. What could have been done to get the dragonfly’s eyes more in focus than they are?


