

Introduction
Most lenses are bought with a specific limitation, problem, or need in mind. Need to photograph the eye of a fly? Buy a macro lens. Need a versatile studio lens? Buy a 24-70 f/2.8. Need to photograph wildlife? Buy a 70-200 f/2.8. Birds? Buy a lens reaching up to 600mm.
The wide-angle lens is different. It is bought quite often because its owner feels that he/she had reached a plateau in his/her photography. It’s time to grow in a different direction. To try something new. A wide-angle lens is perfect for that. It is unique in its capabilities and in the type of problem it solves.
Whatever the reason you bought yours, I guess you are now thinking to yourself, “Well, this is it. I have it. Now what?” That is what this guide is about.
What will you learn in this guide?
This guide is not about comparing different wide-angle lenses or even looking at their pros and cons. In this guide, I will assume that you have done your homework and you have already bought your lens based on your findings and preferences.
We’re going to look at a few things you can photograph with your new lens and how to go about it. We’re going to look at three genres of photography where narrower angle lenses can never match your wide-angle lens’ capabilities:
- Narrow spaces
- Wide spaces
- Astrophotography
One can write a book about any one of these types of photography (and many authors did). We will just touch briefly on important points under each and look at a few examples.
Recommended Reading: If you’d like to learn more and improve your landscape photography, grab a copy of Photzy’s bestselling premium guide: Complete Landscape Photography.
How to Get the Most Out of Your Wide-Angle Lens
I feel that we must spend a minute looking at how you can get the most out of your lens. Or from a different viewpoint: how to shoot without a handicap.
Use a Full Frame Camera
You bought a wide-angle lens to shoot wide angles, right? Well, if your lens can fit onto a Full Frame camera then do so. Why?
You are probably aware of the fact that Crop Sensor cameras crop away some of the scenes on all four sides (top, bottom, left, and right) and only capture the center of your scene. The cropped image is then captured by a sensor that may be the same size (physically and in terms of megapixels) as a full-frame camera’s sensor. The result is a ‘zoom effect’ of 1.5x (Nikon) or 1.6x (Canon). This zooming effect is called a cropping factor. The cropping factors of other brands may be similar or vary by a long margin.
In general, any lens with a reach less than 35mm (the reach of our traditional film camera lenses) is viewed as a ‘wide-angle’ lens. The problem is that 24mm reach is effectively turned into 24mm x 1.5 (36mm) by a Nikon Crop Sensor camera (a little more on Canon), which effectively is not a ‘wide-angle’ reach anymore. The reach achieved by a crop sensor camera is generally referred to as the ‘35mm equivalent’ reach. The 35mm equivalent reach of a 24mm lens on a Nikon camera is thus 36mm.
In general, any lens with a reach less than 35mm (the reach of our traditional film camera lenses) is viewed as a ‘wide-angle’ lens.
The implicit zooming effect of crop sensor cameras is the reason why extreme wide lenses (for example, the 10-20mm Sigma) have been built for crop sensor cameras. It is still considered as ‘wide-angle’ because it has a 35mm equivalent reach of 15-30mm.
A 14mm lens on a crop sensor camera will give you a 35mm equivalent reach of 21mm, but it’s such a shame that you sacrifice that much width. If you’re in such a position, then maybe the time has come for investing in a full-frame camera.
Get a Tripod
If you do not have a sturdy tripod yet, then the time has come to buy one. It will be a close buddy to your wide-angle lens. Other than for daytime landscapes, your wide-angle lens will be used for long exposure images most of the time.

Nikon D600 + Samyang 14mm f/2.8 | f/11 | 1/40s | 100 ISO | Handheld. Photograph by Tobie Schalkwyk
Wide-angle lenses allow you to get close to large subjects and still fit them into the frame. You can also use very slow shutter speeds without worrying about camera shake (based on the reciprocal rule of photography). I could have gone as slow as 1/14s in this case.
One only realizes how big this baobab tree is when looking at the person standing at its base.
Now let’s look at a few types of photography your wide-angle lens was made for!
Landscape Photography

Nikon D600 + Samyang 14mm f/2.8 | f/11 | 1/125s | 200 ISO | Handheld. Photograph by Tobie Schalkwyk
Your wide-angle lens was made for landscape, seascape, and moonscape photography. Granted, this is one instance where you may be able to get similar results by merging several images in post-processing, but – let’s be honest – it’s so much easier to do your final composition in-camera, in a single shot.
Much has been said and written about landscape photography, so I’m not going to say much about it.
What Do You Need?
- A tripod (optional in the event of landscape photography, unless you use your camera’s timer to get yourself in the image)
- A beautiful landscape venue (of course)
- A suitable time of day (sunset/sunrise landscapes are best)
What to Do?
Keep in mind all of the common disciplines around beautiful landscape photography:
- Use a narrow aperture and low ISO to achieve a clear shot with focus from front to back
- Keep the horizon level (be on the lookout for slight distortion on very straight horizons such as with seascapes)
- Leading Lines: strong lines lead your eyes toward the main subject
- A strong foreground creates an anchor point for your eyes to settle on
- For ocean photography/waterfalls: Use a tripod and slow shutter speed if you’re aiming for a smooth water surface. Aim for +/- 1/60s or even slower. This may be difficult to do in the daytime when overexposure will be your main challenge, so choose a gloomy day or dawn/dusk. You’ll be amazed at how much light enters your lens at slow shutter speeds.
- Don’t forget composition! One of your main goals with a wide-angle shot is to crop as little as possible in post-processing, so get it right in-camera. Usually, your horizon on the bottom thirds horizontal line works best with something of interest on the crossing of that same line with one of the thirds vertical lines.
- Your wide-angle lens is perfectly suitable for lots of negative space.
- Remember that the moon is large when just above the horizon – the perfect time for moonscapes!
A strong foreground creates an anchor point for your eyes to settle on
What Will You Miss?
- The use of filters. Most wide-angle lenses are not ‘flat.’ They ‘bulge out’ to the front. A 24mm lens will be the exception to the rule.

Nikon D600 + Samyang 14mm f/2.8 | f/11 | 1/160s | 100 ISO | Handheld. Photograph by Tobie Schalkwyk
Key Lesson: A wide-angle lens adds a unique dimension to your photography. Some of its traits cannot be duplicated by other lenses. The most important trait is that it allows you to get close to your subject and still fit everything in.
Astrophotography
As I started this guide, I sat back and tried to remember why I bought my wide-angle lens yonks ago. Then I remembered. Firstly, I felt that it was time for something new. Secondly, I decided that astrophotography was going to solve that problem for me. Why? Because I knew it would be fun, it would be done outside in nature and, most importantly, it was different from all other genres of photography.
We probably could have included astrophotography under ‘Shoot Wide,’ but it is so different from daytime photography that I’d like to treat it separately.
Astrophotography is a lot of fun. It involves the capture of static stars (including the milky way), partial (broken) star trails, and full (solid) star trails.

Nikon D600 + Samyang 14mm f/2.8 | f/2.8 | 20s | 4000 ISO | Tripod | Cable shutter release. Photograph by Tobie Schalkwyk
One does not realize how many stars are in the heavens above until you’ve captured them in a slow shutter image. Be ready to be pleasantly surprised! The trees in the foreground of this image had been lit up by a split-second sideways light from a flashlight.
What Do You Need?
- A fast lens. You want to gather as much starlight as possible, so an f/2.8 (or faster) lens is recommended.
- A tripod (not negotiable). Astrophotography always requires long exposure times – sometimes to extreme levels.
- A headlamp for easy gear adjustments and other chores in the dark. A lamp with red light will reduce the chances of light spoiling a hard-worked-on, long exposure shot.
- A remote shutter release or cable (with a shutter release button that you can hold in as long as you want during bulb shooting mode).
- A beautiful foreground. You can create one of your own if needed, such as a tent with soft light inside.

The star trails in this image are not solid, implying intervals between the individual images. Photograph by FreePhotos on Pixabay
- A moonless night (moonlight will make your long exposure shot seem to have been taken in daylight!).
- A remote location (far from city lights!). You’ll be amazed at how much light gathers on your camera’s sensor during long exposures. I’d recommend shooting stars at least 100km (60 miles) from the nearest town. Even further in the case of large cities.
- Backup battery power. Long exposure times are hard on your batteries and cold night temperatures will tap them even faster. If you can have more than one backup battery or a proper battery pack, then even better.
- Backup memory cards. Long exposure shots create massive RAW files.
- Proper clothing. Long nights (especially in winter) can be unbelievably cold and harsh on your body. Don’t let it spoil your shoot! Wear long pants and keep a warm jacket, beany, scarf, and warm boots close by. A fleece jacket underneath a warm jacket will not harm you.
Recommended Reading: If you’d like to learn more and improve your landscape photography, grab a copy of Photzy’s bestselling premium guide: Complete Landscape Photography.
What to Do?
- Plan well ahead. You need a moonless night at a suitable spot. Check out the spot during daytime and/or use the Photographer’s Ephemeris to determine when the moon will rise (if at all). One would usually avoid any moonshine, but just a touch of light from a rising moon on a mountain in the background may make a beautiful scene. Include a spot overlooking a smooth water surface, if possible, as it creates a beautiful mirror effect (or a silky sea).
Experiment! Go through all the motions a few nights before the ‘big night’ – even if in the moonlight. The idea is to test the concept and be well-skilled in it. The last thing you want to do is fiddle with settings in the dark, not knowing what you’re aiming for.
- Remember to check your batteries and clear your memory cards before you start!
- Turn off all Noise Reduction settings in your camera.
Experiment! Go through all the motions a few nights before the ‘big night’ – even if in the moonlight. The idea is to test the concept and be well-skilled in it.
- If you plan on a static stars shot, use the 500 Rule to determine the optimum time for your lens to stay open (and thus capture the optimum amount of light from the stars without creating a star trail). The longer the lens stays open, the brighter the stars and the more stars you will see in your final image.
The 500 Rule works as follows: you divide 500 by your chosen reach (or the 35mm equivalent of that if you’re using a crop sensor camera) to determine the optimum exposure time. For example, let’s say you are using a 14mm prime lens on a full-frame camera. You then divide 500 by 14 to get 35 seconds. You may subtract 5 seconds just to be on the safe side.
Some people prefer the 600 Rule, but the 500 Rule is a safer option in terms of avoiding star trails.
Start experimenting with an ISO of about 6,500 and work your way down to about 3,200 on individual shots.

Your biggest challenge in an image like this will be overexposure to the light coming from the fire. Make it dim – much dimmer than you think would be needed!
- Use your lens’ widest aperture setting. F/2.8 or wider is recommended. This will capture the most possible light without creating noise in your image.
- Take horizontal (landscape) shots as well as vertical (portrait) ones. A 14mm or wider lens will capture everything from the horizon to almost right above you in a vertical shot.
- Some guys recommend setting your focus on a bright star, but I prefer rotating my lens’ focus ring to the infinity setting. The infinity symbol looks like an 8 on its side.

Photograph by Tobie Schalkwyk
- For star trails, start with sets comprising +/- 10-minute durations and work your way up to 90-minute sets.
In this case, a lower ISO (200-640) is recommended as your camera’s sensor will heat quite a lot during such long exposure times, resulting in the generation of noise.
Your camera will probably allow a maximum of +/- 30 minutes per shot in the Bulb setting. If you want to do long shots, use your camera’s Intervalometer to set up multiple shots at the maximum allowed time. If your camera does not have a built-in Intervalometer, then it may be worth investing in a remote shutter release that has one.
If you want trails with continuous (solid) lines, set the intervals between shots to 1 second or less. If you want broken lines, increase the intervals to times depending on how long you want the breaks to be. Keep in mind that if you want your breaks to be as long as your trials, then the intervals will have to be as long as your exposure times. Then increase/decrease the intervals to your liking.
Capture about 50 images per duration set. Be careful not to touch your camera in between shots as it will ruin your set and you’ll have to start a new one.
Once you are done, you will have to merge all of the images. See the Post-Processing of Star Trails section below for more detail.

This image is a good example of long intervals between captures. Look at the heavy distortion of the object on the left – a typical trait of a wide-angle shot. It’s best to avoid vertical objects that would emphasize distortion, but it’s not always possible.
- If you’d like to light up a close-up foreground in your image, run a white or colored flashlight across it for a second or two during the open-shutter period. Be careful not to do it for too long as it can quickly overexpose your foreground.
Key Lesson: A fast wide-angle lens is an absolute must for astrophotography. It allows you to photograph a wide section of stars above the horizon – or to cover quite a huge chunk of the Milky Way in a vertical (portrait) shot. Merging images to form panoramic shots is not an option, as in landscape photography.
Narrow Spaces

Nikon D600 + Samyang 14mm f/2.8 | f/4.5 | 25s | 100 ISO | Tripod | Cable shutter release. Photograph by Tobie Schalkwyk
This is where your wide-angle lens is worth its weight in gold. The only factor you will have to keep a close eye on is distortion.
In this section, I’m specifically going to look mainly at cave photography. If you have not done this yet, you have to add it to your bucket list! It’s a unique experience offering ultra-satisfaction levels if you succeed. And if you don’t, you can always try again!
What Do You Need?
- A tripod (not negotiable). Like astrophotography, cave photography always requires long exposure times – sometimes to extreme levels.
- A headlamp for easy gear adjustments and other chores in the dark. Yet again, a lamp with red light is recommended.
What to Do?
- If you’re in a group, try to lag behind a bit (or split off the group, if possible) to reduce the occurrence of people in your images.
- Caves sometimes have their lighting for the sake of visitors. Try to exclude direct lighting from your shots as you will work with long exposures. You will be amazed at how much light is gathered onto your camera’s sensor during long-duration shots!
- Use more or less the same principles as for astrophotography. Long exposures, low ISO, and wide-ish apertures.
- Explore as much as possible of the cave. Remember, this is not something you do often!
You will be amazed at how much light is gathered onto your camera’s sensor during long-duration shots!
- Don’t forget the rules of composition. That will play an important role in the success (or not) of your images!
- If you’d like to include people (friends or family) in your shot, set your camera on rear curtain sync and use your camera’s onboard flash if it has one (no need for the strong light of a Speedlite, unless you diffuse it quite heavily).

A cave of a different kind, only possible with a wide-angle lens. The distortion is only evident when looking at the guy’s posture.
Key Lesson: Yet again a wide-angle lens is an absolute must for capturing a wide setting in narrow spaces, such as in caves. It encapsulates everything around you in a kind of magical way.
Recommended Reading: If you’d like to learn more and improve your landscape photography, grab a copy of Photzy’s bestselling premium guide: Complete Landscape Photography.
Post-processing of Star Trails
Now that you have taken a bunch of images, each with the stars at different positions, each duration-set has to be merged to form a single image, right? I am not going to spend time on this as there are lots of excellent tutorials available on this matter. Yonks ago I would have recommended only Photoshop to do this, but Lightroom has made such huge improvements in the merging of images recently that it certainly is also a good option.
Conclusion

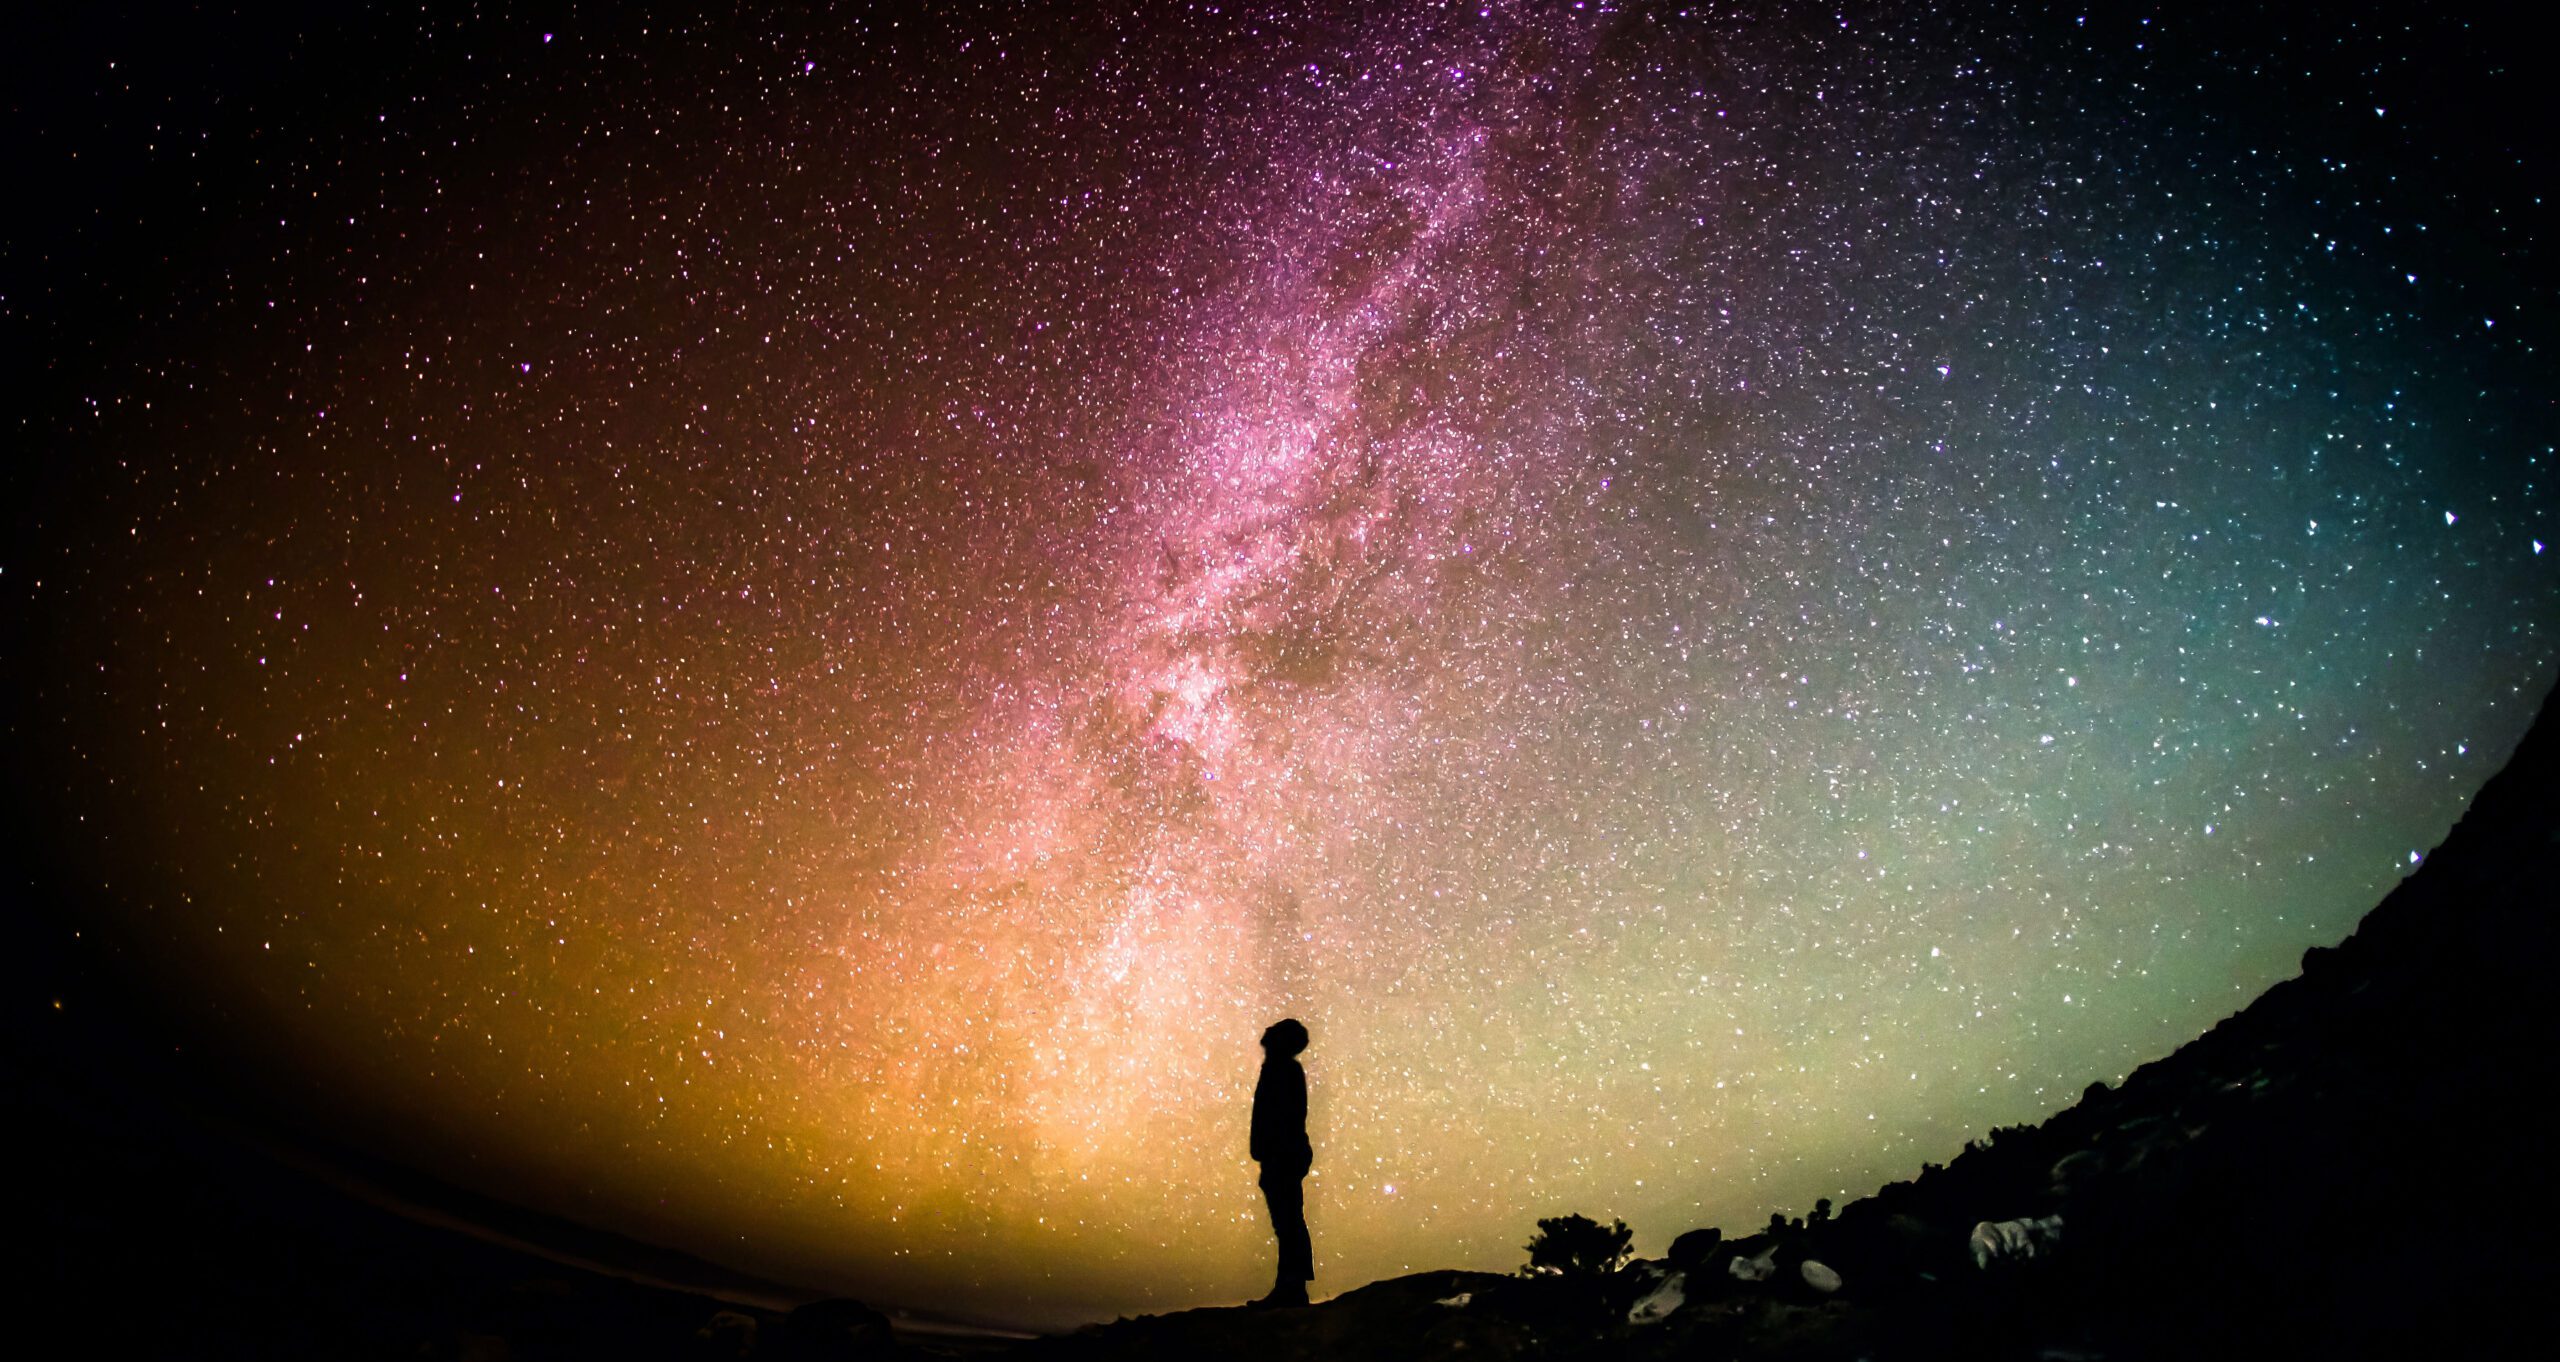
A beautiful example of a vertical (portrait) shot, covering a huge section of the Milky Way. Photograph by Jairph
A wide-angle lens adds a new dimension to your photography. It’s simply a pleasure to have in your bag when you do the outdoor shooting. Unfortunately, the distortion is too intense for indoor use, unless you’re aiming for an artistic distortion effect.
If you go shooting outdoors and you have a wide-angle lens, don’t forget to include it in your bag! Rather have it with you and not use it than wish you’d packed it!
Enjoy your wide-angle lens!

Self-Check Quiz:
- Name three areas where a wide-angle lens is one step ahead of other ‘common’ lenses.
- Name three important steps in capturing star trails.
- What makes the difference between solid and ‘broken’ star trails?
- Name one of the differences between astrophotography and cave photography.
- What is one of the most important things to aim for when looking for a location for capturing star trails?


