

Introduction
You may have taken an image of a beautiful scene or subject before, totally convinced that it was going to be a stunner, generating ‘oooh’s and ‘aah’s among your friends and family!
Then, during post-processing at home, you were gobsmacked. The image was ‘OK,’ but it was lacking something. But what?
The chances are quite high that you were lacking a beautiful foreground, or that you have not created a foreground at all.
Most ‘decent’ images have a distinctive foreground, middle ground, and background. Each of these sections plays a very important role in compiling an awesome shot. Or let me put it differently: most of the time you can raise the beauty or ‘compositional attractiveness’ of your shot by a level or two, just by including a suitable foreground.
That summarizes why the foregrounds in your photos are super important.
In this guide you’re going to learn about the following:
- The roles a foreground plays in raising the aesthetic level of your image
- How to achieve a great foreground
Recommended Reading: If you’d like to improve your composition skills for better images, grab a copy of Photzy’s best-selling premium guide: Advanced Composition.
What Role Does a Foreground Play in ‘Beautifying’ Your Image?
It is quite interesting that the ‘average’ photographer has no difficulty in understanding the importance of the background in an image. Is it clean or cluttered? Is it sharp or blurred? Does it include an interesting object? Does it add value? Should I make it more/less prominent? And so we can keep going with the thoughts running through our minds as we take a peep through our cameras’ viewfinders.
The reality is that foreground is as important as a background and one should ask all of the same questions of a foreground. The only difference is that we could exclude a foreground and it may not matter at all. There are some genres of photography, however, where a foreground plays an important role, such as in landscape photography.
The reality is that foreground is as important as a background and one should ask all of the same questions of a foreground.
In general, a viewer’s eyes enter an image in the foreground and then move to the back of the image. The foreground is the first thing we observe. Even if that is not the case, our eyes may move back from the background to the foreground and look for something to settle on.
So, let’s have a look at the roles of foregrounds in images.
1. A Strong Foreground Raises the Appeal to a Viewer
It can be the focal point of an image, pulling your viewer’s eyes into the image, leading them through the image, or to your main subject.

Photograph by Tobie Schalkwyk
In this image, the viewer’s eyes tend to enter the image in the bottom-left corner and then move along to the main subject: the pier. Without the foreground, the image would have lost its purpose and appeal.

Photograph by Tobie Schalkwyk
This image lacks a middle ground. The foreground is the focal point of the image, and the background adds a little context.
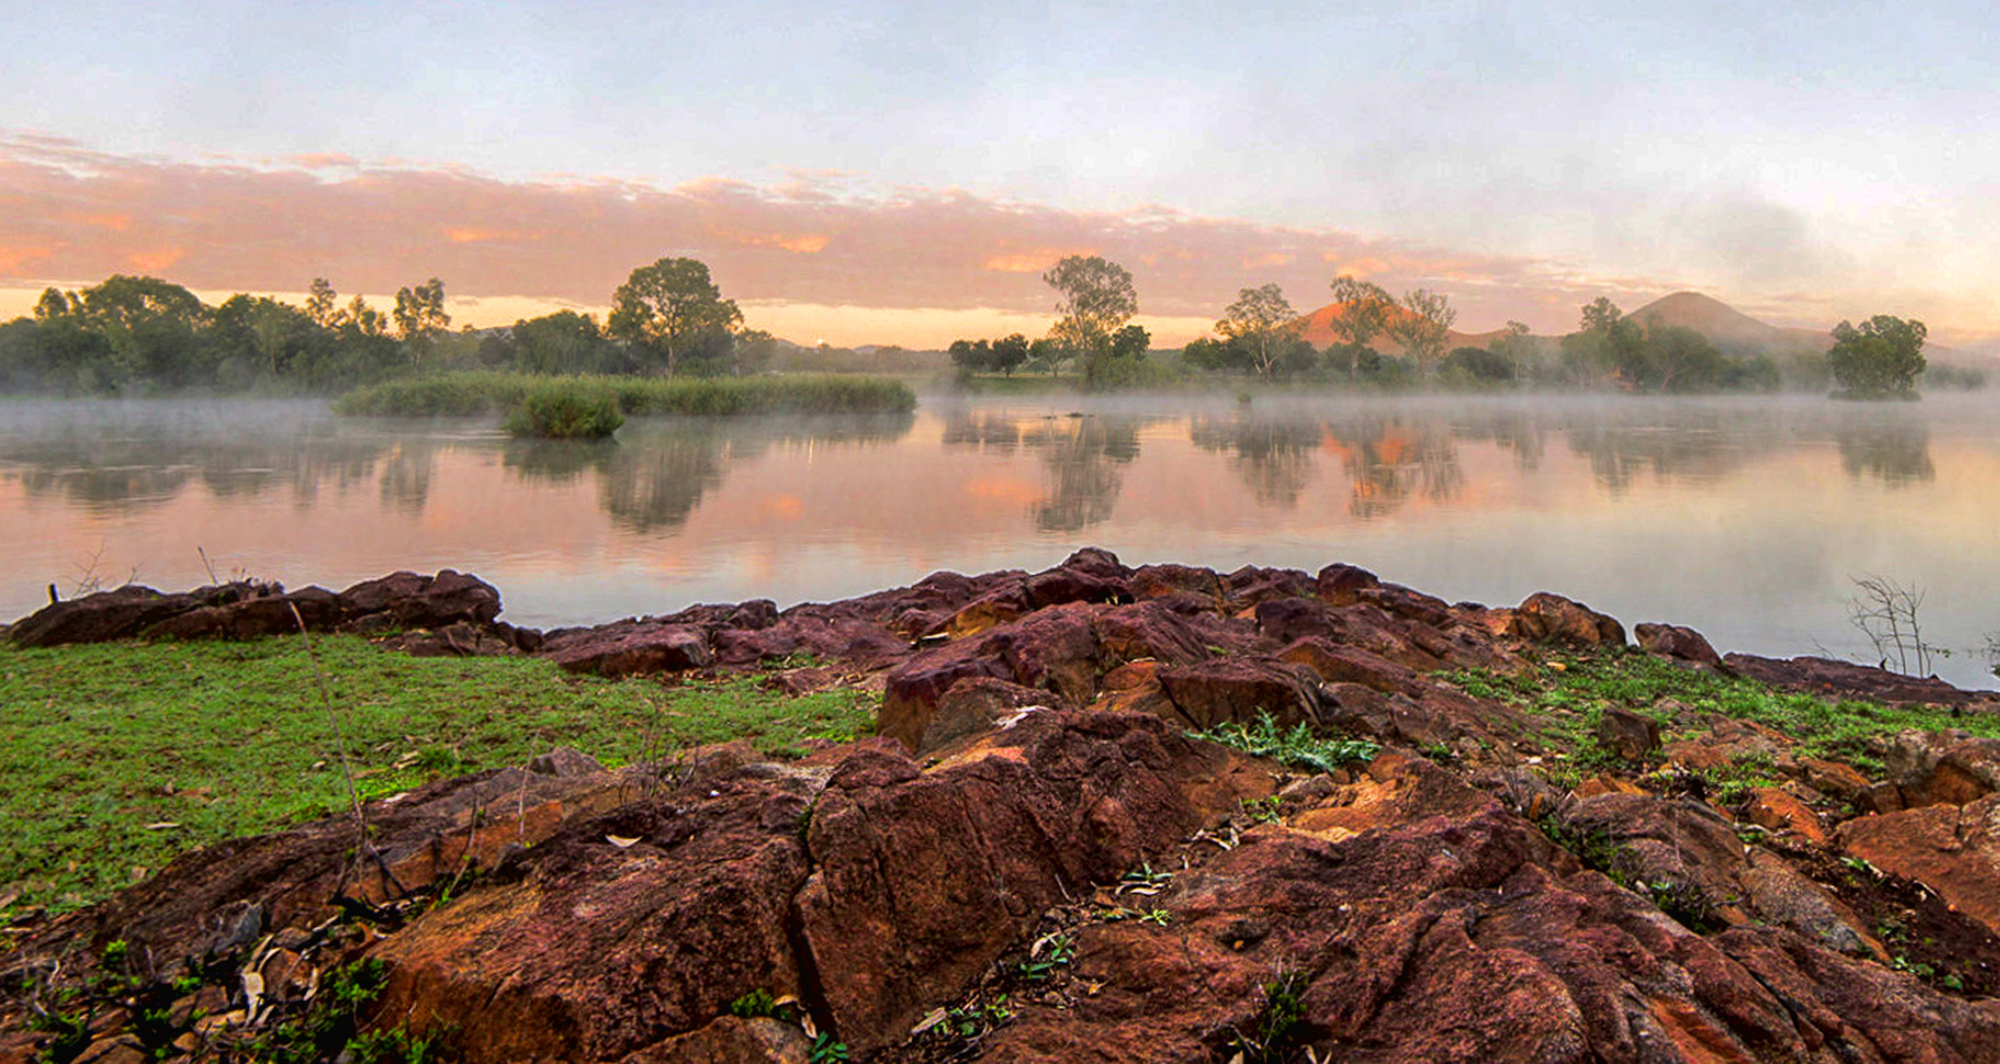
2. It Spruces up the Composition

Photograph by Tobie Schalkwyk
This image is a good case in point. The foreground helps to divide the image into a strong foreground section (the rocks), middle ground section (the river), and background section (the tree line and sky).
3. It Adds Depth or Scale

Photograph by Tobie Schalkwyk
Without the strong foreground, this image would have appeared like an aerial shot taken out of a plane. The distance/height and scale would have been difficult to judge. In this case, the foreground helps the viewer to judge the depth and scale of the canyon.
4. It Adds Interest/Affects the Mood/Tells a Story
More often than not, a foreground adds interest. It can play a huge role in affecting the mood or in telling a story.

Photograph by Tobie Schalkwyk
In this image, the foreground was kept in to create the impression that the bird was scared by its reflection in the water. Without the foreground it would still have been interesting, but not to the same level as it is now.
This foreground certainly affects the mood as it is quite funny. It also tells a story.
5. It Adds Contrast and Context

Photograph by Tobie Schalkwyk
The colorful flowers in the foreground create a nice contrast to the kind of boring colors of the middle and background. Another form of contrast may be rugged rocks in the foreground against a calm ocean in the background. This image would have been ‘dead’ and boring without the colorful foreground.
The foreground also adds depth and context.
Key Lesson: A strong foreground is a major asset in raising the aesthetic value of your image. If you’re looking for a way to move your landscape photography to the next level, start with strong foregrounds! It adds immense value for almost no effort!
Recommended Reading: If you’d like to improve your composition skills for better images, grab a copy of Photzy’s best-selling premium guide: Advanced Composition.
Tips to Find a Suitable Foreground
Let’s look at a few tips to ensure that you always have a foreground that complements your image.
1. Don’t Forget About It
Quite simply, keep a foreground in mind every time you take a shot, especially for landscapes. You may be lucky that it gets included in some of your shots during a shoot, but if you do not purposefully consider it, you may regret it afterward.
Quite simply, keep a foreground in mind every time you take a shot, especially for landscapes.
Cultivate a habit of thinking about the foreground whenever you consider your background (which happens intuitively) and ask the same questions about both of them.
2. You Don’t Have to Overdo It
You do not need a spectacular foreground to raise the aesthetic level of your image. Just do the best you can. You may be pleasantly surprised by the results.
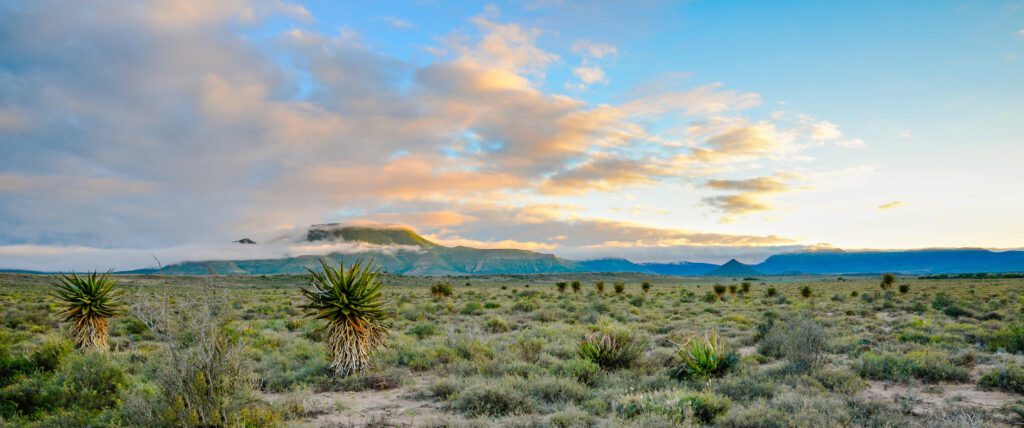
Photograph by Tobie Schalkwyk
A couple of aloes made a huge difference in adding interest and an anchor point to this image.
3. Try a Different Angle
Just a simple step to the left or right or going down on your knees can sometimes deliver awesome results. Tilting your camera up (from a low perspective) can do the same.

Photograph by Tobie Schalkwyk
You may even go lower than on your knees, LOL!
4. Look For Leading Lines
Leading lines are a major component in strong foregrounds. They are not required, but they can play a big role in the foreground to spruce up your image.

Photograph by Tobie Schalkwyk
This dirt road starts in the foreground and leads the viewer’s eyes to the rock on the right, where it settles.

Photograph by Tobie Schalkwyk
In this case, the road starts in the foreground and moves beyond the main point of interest: the tree. An image of the three alone would not have had the same impact.
5. Use Natural Frames
A common mistake is to intuitively think of the foreground as something at the bottom of your image. The fact is that foreground is simply something that is the closest to you. That may be an area at the bottom/top/right/left of your image or any combination thereof!
Keep this in mind as you look for a way to frame your subject.

Photograph by Tobie Schalkwyk
This composite image utilizes a foreground frame on the left, right, and bottom to encapsulate the valley below. The road adds some interest.
Other types of natural frames include trees and caves.
6. Use Man-Made Frames
A man-made frame may add as much interest to an image as a natural one.

Photograph by Tobie Schalkwyk
This frame adds context and immediately takes the viewer’s eyes to the river below.
7. Use Filters
Sometimes a foreground is too dark against a bright sky, or the reflection of water spoils an otherwise good landscape. Use a graduated filter to narrow the dynamic range of a dark foreground/bright sky. You may also want to use a polarized linear (CPL) filter to remove reflections from the water.

Photograph by Tobie Schalkwyk
A 2x stacked graduated filter was used to dim the brights in the sky to expose the foreground detail in this image. Without the filter, either the sky would have been too bright or the foreground just a silhouette, depending on my adjustments.
Key Lesson: There is a multitude of ways of finding strong foregrounds or of improving foregrounds. Find a handful that works for you, memorize them, and keep applying them. Most importantly, don’t get stuck in a rut – be prepared to think out of the box!
Case in point: I was not happy with the narrow-angle of the (taken from my study). So, during the next opportunity, I took from the roof of my house (using a single graduated filter this time).
change reference depending on the location of the photo after initial layout
change reference depending on the location of the photo after initial layout

Photograph by Tobie Schalkwyk
Recommended Reading: If you’d like to improve your composition skills for better images, grab a copy of Photzy’s best-selling premium guide: Advanced Composition.
Conclusion

Photograph by Tobie Schalkwyk
A foreground is not always needed to make an image pop, but it can certainly raise your image to the next level.
Consider using a foreground in every image you take, especially in landscapes. You can always crop it out in post-processing in the rare event that it does not add value, but you cannot add it afterward if you have not included it in the first place. Rather be safe than sorry.
Viva foregrounds!

Photograph by Tobie Schalkwyk
Self-Check Quiz:
Use the following quiz to test your knowledge of what you have read above:
- Name three benefits of strong foregrounds.
- Name three ways of finding strong foregrounds/improving weak ones.
- What can you do to narrow the dynamic range of a sunset/sunrise image?


