


Introduction
At the start of my photography venture I often heard the term ‘back button focus’ but I never really paid attention to it because I saw it as something to shelve for the future, used by advanced photographers only.
Today I know that I was so wrong! It is a great technique that, in my opinion, should be learned as soon as possible after buying your first DSLR! The only resistance to adding it to one’s photography arsenal is usually the natural fear (or laziness? 😉) of learning new techniques. The gains once you have done so, however, are humongous!
In this article, you’re going to learn the following:
- What back button focus is
- How it works
- How and when to use it
- How to set your camera on back button focus
Recommended Reading: Want a step-bystep guide on photography skills with your DSLR? Grab a copy of our best-selling guide: the DSLR Crash Course.
What Is Back Button Focus?
The ‘standard’ focusing mechanism dictates that your camera focuses on your subject when you have pressed your shutter release button halfway down. From then on, your camera does not re-focus unless you have set your camera to continuous focus (AF-C) mode.
To achieve that, you have to keep your finger on the shutter release button’s halfway mark. When you lift your finger slightly, the camera stops (re-)focusing. When you press the button further down, the shutter is released and you take your photograph.
With back button focus, your camera’s focus mechanism is ‘disconnected’ from its shutter release mechanism. They operate totally independently.

Nikon D600 + Tamron 150-600mm G2 @ 600mm | f/6.3 | 1/1000s | 320 ISO | AF-C | Continuous shooting mode. Photo by Tobie Schalkwyk.
How is that achieved? By assigning the focusing responsibilities to a separate button. This button is situated on the back of your camera, in a position where you can easily reach it with your thumb while your forefinger is resting on the shutter release button. Therefore, it’s given the name ‘back button’ or ‘focus back button.’
Some images are simply not possible without back button focus in combination with continuous shooting mode, as we will see later in this guide.
Key Lesson: Back button focus is a tool you can get away without, but it was developed for a reason. Millions of photographers have gained by using it, and without it we – and our portfolios –would have been poorer.
How Does It Work?
Regardless of where you aim your camera, it will only focus on your subject when you press and hold down the focus back button.

Nikon D7100 + Tamron 24-70mm @ 44mm (66mm at 35mm equivalent) | f/13 | 1/60s | 100 ISO | AF-C | Continuous shooting mode. Photo by Tobie Schalkwyk.
If your camera is set to single focus (AF-S), it will focus once. Thereafter you can actually remove your finger from the back button and the focus will remain. As long as you do not move your camera backward or forward, your subject will remain in focus.
Regardless of where you aim your camera, it will only focus on your subject when you press and hold down the focus back button.
If your camera is set to continuous focus (AF-C), then the camera will keep on refocusing as long as you keep the focus back button-down. It totally ignores what is happening with your shutter release button in the meantime, whether you are snapping away or not. The moment you release the focus back button, it will keep the last focus distance.
Key Lesson: To get the most out of back button focus, use it in combination with autofocus and continuous shooting mode. It will allow you to keep refocusing on your subject and take shot after shot, without taking your eye off your viewfinder.
How and When to Use Back Button Focus
There are quite a few applications and needs for back button focus, but let’s look at the most important/most common ones.

Nikon D7000 + Nikkor 70-200mm f/2.8 @ 200mm (300mm at 35mm equivalent) | f/5.6 | 1/1250s | 100 ISO | AF-C | Continuous shooting mode. Photo by Tobie Schalkwyk.
To Photograph Moving Subjects
I’m mentioning this one first because this is (to me) the most common need for using back button focus.
The problem: Why is it so difficult (if not impossible) to photograph fast-moving subjects in ‘standard’ mode (AF-S, without a focus back button)? Well, picture this: your camera focuses on the subject as your finger reaches the halfway mark on the shutter release button. Let’s say it takes another 0.25 seconds before your finger reaches the shutter release point as you push the button further down.
If you photograph a subject speeding at 200km/h (120mph) towards you, it will move 14m (15 yards) closer to you in that 0.25s! A Golden Eagle (traveling at 129km/h (80mph)) will have moved 9m (10 yards) closer to you. Is it any wonder then that these subjects are out of focus in ‘standard’ shooting mode?
The solution: If you set your camera on continuous focus mode (AF-C), all you have to do is track your subject in your viewfinder, or keep your focus point(s) on it, while holding down your focus back button. Obviously, the success of this will depend on your lens’s autofocus speed, but you should get quite a few in-focus images even with a kit lens. Continuous shooting mode will increase your number of hits.
To Re-Compose
This is probably the most common reason for using the focus back button by wedding and portrait photographers.

A typical case for re-composing. The focus was put on the flower on the right. Thereafter, the camera was swiveled to include the flower and space on the left. Nikon D600 + Tamron 150-600mm G2 @ 600mm | f/6.3 | 1/800s | 320 ISO | AF-C | Continuous shooting mode. Photo by Tobie Schalkwyk.
The challenge: Sometimes photographers want sharp focus on their main subjects, but they want to include other elements for artistic reasons. They thus focus on the main subject and then swivel the camera up and/or down to the required position, to include these elements.
Other times they may want to focus on the subject and then move the subject to a different spot in the frame; for example, to the thirds horizontal/vertical lines’ crossing point.
The ‘standard ’ way is to:
- focus on the subject by pressing the shutter release button halfway down;
- take your finger off the shutter release button;
- disable auto-focus manually by adjusting a swivel-button on the side of the camera without accidentally changing the distance between camera and subject;
- move the camera around until the subject/ other elements are in the required spot (without accidentally changing the distance between camera and subject); and
- take the shot
An alternative way on Nikon cameras is to:
- focus on the subject by pressing the shutter release button halfway down;
- press the AF-E/AF-L button to lock focus and exposure on your subject;
- recompose and take your shot; and
- press the AF-E/AF-L button again to release the locked focus and exposure.

Nikon D600 + Samyang 14mm f/2.8 | f/11 | 1/320s | 250 ISO | AF-C | Continuous shooting mode. Photo by Tobie Schalkwyk.
The ‘back button focus’ method:
- Focus on the subject by pressing the focus back button.
- Lift your finger off the back button (no manual adjustments).
- Move the camera around until the subject/other elements are in the required spot (without losing sight of your subject in the viewfinder).
- Take the shot.
Of course, you can always achieve the same results as above by cropping the image as needed in post-processing, but then you are throwing away pixels. Less pixels = lower quality prints. Also, some competitions require uncropped images, and your RAW files are checked to ensure that you comply with this rule.
Recommended Reading: Want a step-bystep guide on photography skills with your DSLR? Grab a copy of our best-selling guide: the DSLR Crash Course.
To Easily Swap Between Auto and Manual Focus
The ‘standard’ way to switch off auto focus is to use one or more buttons on your DSLR and your lens.
After setting up your camera for back button focus, it will not override your manual focus when pushing down your shutter release button.
To get the most out of back button focus, use it in combination with autofocus and continuous shooting mode.

Nikon D600 + Tamron 150-600mm G2 @ 600mm | f/6.3 | 1/640s | 250 ISO | AF-C | Continuous shooting mode. Photo by Tobie Schalkwyk.
Getting an in-focus shot of this juvenile Tawny-flanked Prinia was quite challenging as it was moving non-stop through the foliage. The strategy was to use manual focus when it was between leaves and autofocus as soon as it was in a clearing. Eventually one of the manual focus attempts came out best.
Key Lesson: Back button focus has a few uses. It will allow you to keep moving subjects in focus, to keep your focus as you move your subject to a different position in the frame, and to move back and forth between manual focus and auto focus without even thinking about it.
How to Set up Back Button Focus
It should come as no surprise that each unique camera brand has its own terminology (or naming conventions) for the buttons (and adjustments) to enable back button focus. The process may differ slightly on different models within the same brand as well, so I am not even going to try and cover them all.
In principle, the process is the same in all of the brands and models, so if yours is not covered below, just check your User Guide or chat to Uncle Google. It should be covered in detail by both.
Nikon
The AE-L/AF-L button fulfils the back button role.
On my Nikon D7100 (and many other Nikon models), select the Custom Setting Menu/Controls/Assign AE-L/AF-L button/ AF-ON and then select OK to save the setting.
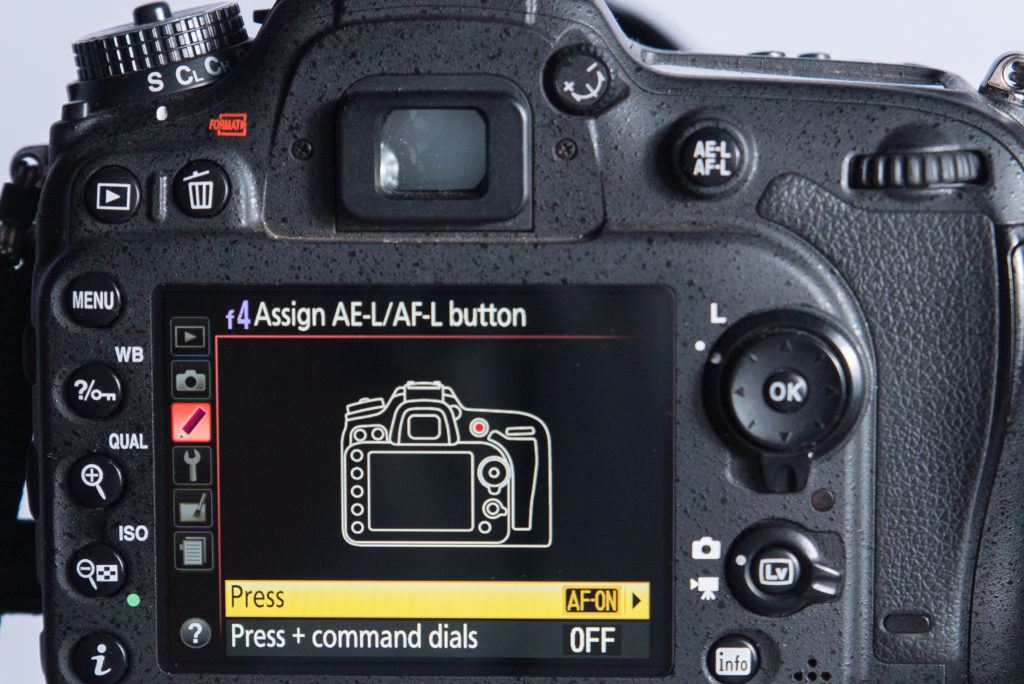
Photo by Tobie Schalkwyk
Canon
Canon was actually the first brand to introduce back button focus in 1989, and the only model that does not have it is the EOS Rebel.
The AF-ON button fulfills the back button role.

Photo by Tobie Schalkwyk
Depending on what model you’re using, the process for setting up your focus back button would be more or less as follows:
- Go to Menu.
- Find Custom Controls (C.Fn).
- Select the AF-On option.
- Select Metering Start/Meter + AF Start to turn on back button focus. Exposure (metering) will be adjusted continuously in Auto, Shutter Priority, and Aperture Priority modes.
- Alternatively, select AE Lock/ Metering + AF Lock to turn on the back button focus. Exposure will be locked in the first frame and will not be readjusted during a specific series of shots in continuous shooting mode

Photo by Tobie Schalkwyk
Key Lesson: Just about every camera brand and model is designed with back button focus capabilities for a reason. It is just too handy and too important to omit it from a camera’s features. It enriches portfolios, it adds pleasure to the hobby, and it helps to produce awesome shots. Use it, abuse it. It’s a great tool!
Recommended Reading: Want a step-by-step guide on photography skills with your DSLR? Grab a copy of our best-selling guide: the DSLR Crash Course.
Conclusion
You can get along without back button focus, but one thing is guaranteed: you’re going to miss out on shots, which you’re going to kick yourself for afterwards.
Master this technique and you will not regret it. It’s a super nice tool to have in your photographic arsenal. It takes a little getting used to in the beginning, sometimes to the point of wondering whether it’s really worth the effort. Once you’ve mastered it, though, you’ll be wondering how you ever got along without it.

Nikon D600 + Tamron 150-600mm G2 @ 600mm | f/6.3 | 1/640s | 250 ISO | AF-C | Continuous shooting mode. Photo by Tobie Schalkwyk.
This shot (above) would have been impossible without back button focus. A kingfisher chick fell into the water and the fish eagle swooped in, grabbed it, and carried it away in a split second. We did not even know that the eagle was close by!
I had no time to waste. I grabbed my camera and held in the focus back button even before I could pick up the bird in my viewfinder. By the time focus was achieved, it still allowed me a handful of respectable shots before it disappeared behind the trees.
Happy shooting! Go get those fast-action shots!
Self-Check Quiz:
- What is the relationship between the shutter release button and the focus back button?
- What are the three main reasons for using back button focus? Which of these will be most handy to you?
- Which buttons fulfill the back button focus on Nikon and Canon, respectively? If you own neither of these two brands, which button fulfills it on your camera?
Assignment:
- Set up the back button focus on your camera. Remove and reset it until you can do it without thinking about it.
- Take the following few back button shots:
- On fast-moving subjects
- Re-composing
- Switching back and forth between auto and manual focus without taking your eye off the viewfinder


