

Introduction
If you do not have a lot of appreciation for the technology built into your lenses (and their inventors from years ago), then I hope that this guide will add some. It is so easy to take your lenses for granted. I mean, all that a lens must do is focus on your subject and return a print of the scene to your camera’s sensor, right? Yeah right!
One of the main (hidden) functions of your lens is to accept commands from your camera to allow only a required amount of light through to your camera’s sensor. This amount of light is determined by your camera (when set on Auto shooting mode, for example) or by you (for example, when set on Manual or Aperture shooting mode).
What you will learn in this article:
In this article, we will have a closer look at exactly what aperture is and how it is achieved. At the end of the guide you should have a better understanding of aperture, and perhaps a little more appreciation for what is happening behind the scenes (inside your lens) to set the ‘desired’ aperture.
Recommended Reading: Want a step-by-step guide on photography skills with your DSLR? Grab a copy of our best-selling guide: the DSLR Crash Course.
What Is Aperture
Let’s first have a look at what Aperture (also known as f-stop) is in general terms and then have a look at its meaning in the world of photography.
The Oxford dictionary defines Aperture as ‘an opening, a hole or a gap.’
I guess it would be safe then to assume that, in terms of a lens, Aperture has something to do with the opening running from one end of the lens to the other. But what is Aperture specifically in terms of this opening?
The Cambridge dictionary adds a further clue to what Aperture is in terms of photography. It defines Aperture as ‘a small and often narrow opening, especially one that allows light into a camera.’
This last definition gives us a clue as to why Aperture is one of the three adjustable contributors to the amount of light entering your camera (or rather ‘exposure’ as it is known in the world of photography). The other two factors are shutter speed and ISO (the sensitivity of your camera’s sensor).

Photography by John Fowler
In star photography, the widest possible aperture setting is needed to invite the most possible light to enter your camera. That could turn almost pitch-dark (to the naked eye) landscapes into beautiful dusky scenes.
Aperture is adjustable. In other words, you can use it to allow only a desired amount of light into your camera. An interesting side effect is that the smaller the aperture is, the sharper the background will be (almost fulfilling the same function as when squinting your eyes to see better).
Aperture is adjustable. In other words, you can use it to allow only a desired amount of light into your camera.
Photograph by Tobie Schalkwyk
Let’s have a quick look at when the aperture is controlled by your camera and when it is controlled by you to achieve the correct exposure.
If your camera is set on:
- Auto shooting mode, the camera is in full control of Aperture.
- Aperture Priority (A or Av) shooting mode, you are in full control of Aperture. The camera will adjust the ISO and shutter speed to ensure the correct exposure.
- Shutter Priority (S or Tv) shooting mode, the camera will adjust the Aperture and the ISO to ensure correct exposure. You are thus not in control of Aperture.
- Program Auto (P) shooting mode, you will set the desired ISO and the camera will control Aperture and Shutter Speed to ensure correct exposure.
- Manual (M) shooting mode, you are in full control of Aperture and the ISO, as well as Shutter Speed.
Key Lesson: Aperture kind of imitates the function of the iris in your eye. Your iris grows narrower in bright lighting conditions and wider in darker conditions. Aperture is the same. If it’s set too wide, your image will be overexposed unless you compensate with a faster shutter speed or lower ISO. The opposite is also true.
Aperture is a major component in producing high-quality images. Therefore, it makes total sense to know as much about it as possible and to know how to use it to achieve specific results in all situations. Study it and experiment with it until you are 100% confident in how to use it to your advantage.
How Does It Work?

Photograph by Pexels
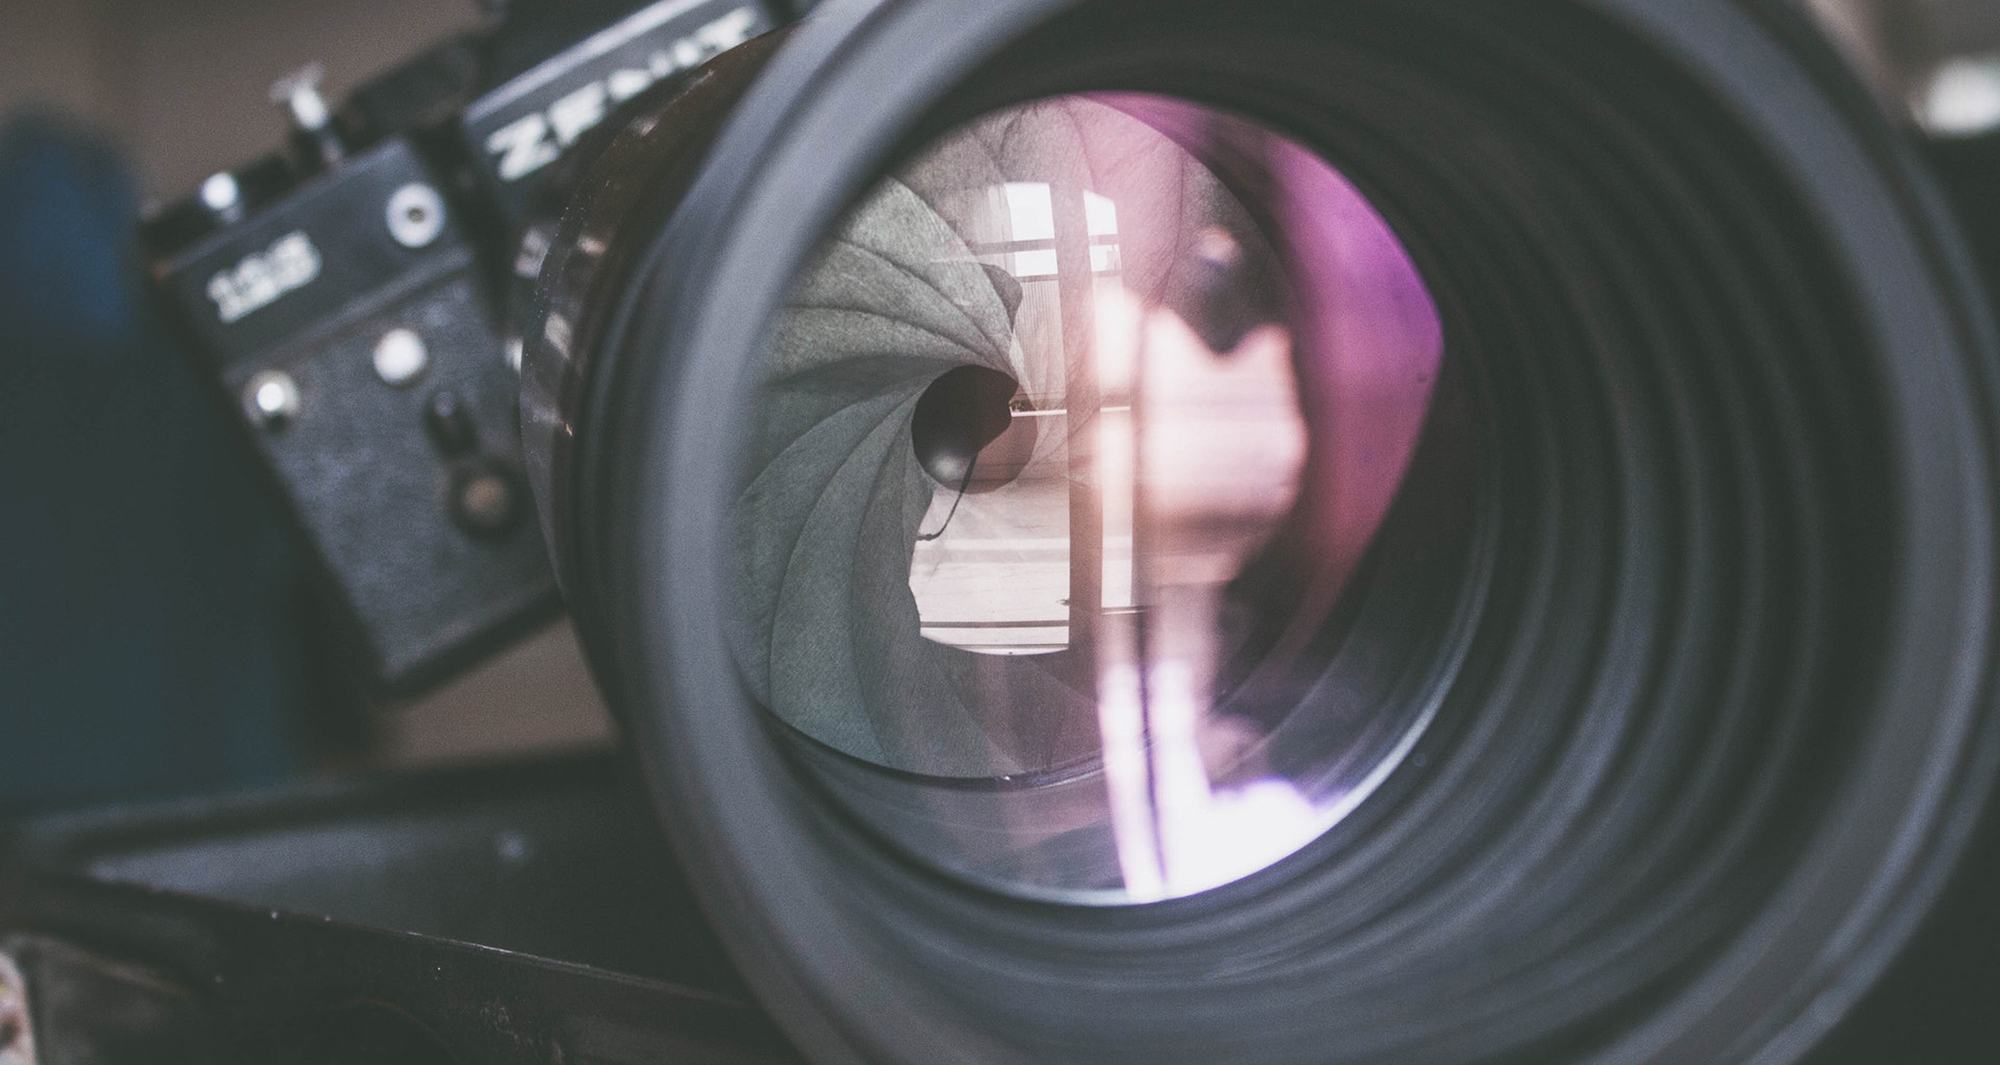
This is where things get interesting. Inside your lens is a set of blades, also known as Diaphragm blades. These blades swivel closer to/further away from the center of your lens to allow a specific amount of light through to your camera’s sensor. The number of blades per lens typically varies from 5 to 10.
If one considers the fact that these blades cannot form a perfect circle, then it comes as no surprise that the ‘circle’ through which light passes into your camera is not perfectly round (see the image above), especially in lenses with ‘straight’ blades. The circle is more ‘well-formed’ in lenses with rounded blades.
The number of f-stops (identified by an f-number) determines how wide your lens is opened. A small f-number implies a widely opened lens and a high f-number implies a smaller opening through which the lens allows light through. This can be quite confusing for rookies, but one gets used to the idea after a while. A ‘wide open’ lens is a lens opened at its widest aperture setting (lowest f-number).
Key Lesson: The term ‘aperture’ refers to the ‘opening’ inside the lens that allows a measured amount of light to pass through to the camera. The term ‘f/stop’ is a measurement of aperture size. F/stop establishes a measuring scale that is accurate across all cameras and lenses.

Photograph by ShareGrid
One of the common traits of a quality lens is the fact that it can open wider than cheaper lenses. Therefore, lenses that can open at f/2.8 and wider are known as ‘pro lenses’ or ‘fast lenses’ and the rest are generally known as ‘kit lenses.’ This does not mean that kit lenses cannot produce good-quality images, but they certainly cannot compete with pro lenses in less than favorable lighting conditions. In general, fast lenses are of higher quality than kit lenses in terms of construction and glass, which makes them more expensive.
Key Lesson: Aperture is manipulated through contracting blades inside your lens. One does not have to be a genius to understand why you should protect your lens against falls and mistreatment – it’s quite a hi-tech gadget!
Avoid using extremely small apertures even if your lens allows it. In general, the sweet spot (delivering best results) for high-quality images needing small apertures (such as landscapes) lies anywhere between f/11 and f/14. Experiment with each of your lenses’ smaller apertures and find their sweet spots.
Recommended Reading: Want a step-by-step guide on photography skills with your DSLR? Grab a copy of our best-selling guide: the DSLR Crash Course.
Three Special Effects Obtained With Specific Aperture Settings
Let’s have a look at a few special effects/ phenomenon obtained by applying specific aperture settings.
Special Effect #1: Depth of Field (DOF)
Depth of field refers to the area of your scene or subject (from the closest point to you to the farthest point from you) that is in focus.
The exact depth of field is mainly determined by the following:
- Your aperture settings – The wider the aperture, the smaller your depth of field will be. In other words, an image taken at f/2.8 will have a much shallower depth of field than an image at f/14 (focal length and distance from your subject the same).
Nikon D600 + Nikkor 70-200 f2.8 @ 175mm f/2.8 | 1/800s | 100 ISO | HH. Photograph by Tobie Schalkwyk
- Your current focal length – The shorter your focal length, the deeper your depth of field will be. In other words, an image taken at 600mm will have a much shallower depth of field than an image at 24mm (aperture and distance from your subject the same).
- The distance from your subject – The further you are from your subject, the deeper the depth of field. In other words, an image taken at 3 feet from your subject will have a much shallower depth of field than when taken at 30 feet from your subject (aperture and focal length are the same).
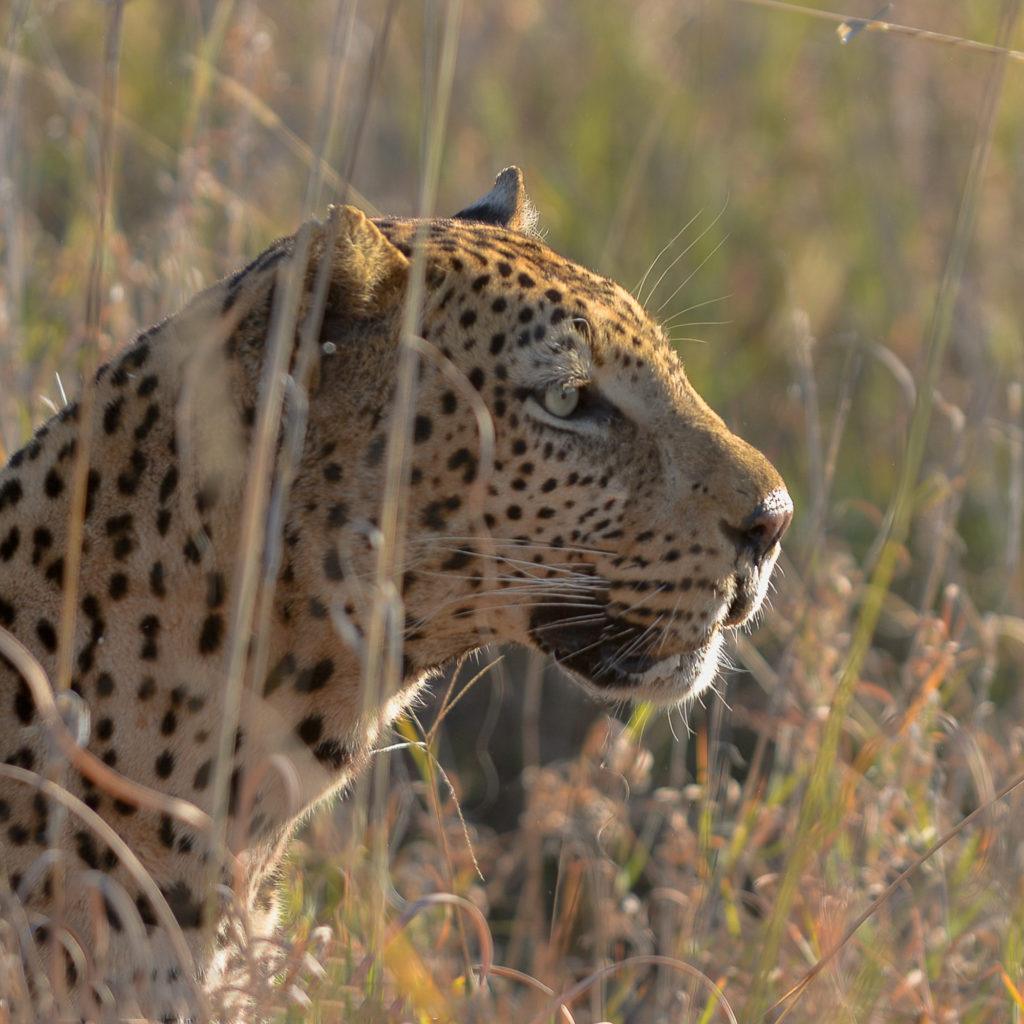
A wide aperture setting (f/2.8) produced a shallow depth of field in the image of the leopard above. That ensured that only the leopard was in focus and not the distracting grasses in the foreground and background.
Needless to say, if you want the shallowest depth of field (such as when shooting a vase in a room), then you should combine a wide aperture with a long focal length and the shortest possible distance from your subject. The opposite is true where you need a deep depth of field, such as when shooting a landscape.
Needless to say, if you want the shallowest depth of field, then you should combine a wide aperture with a long focal length and the shortest possible distance from your subject.
Just like most technical things in life, a formula is available for calculating the depth of field for specific camera settings. I’m not going to discuss that formula here, but do yourself a favor and research it to know more or less how it works. Then download one of the many apps available for calculating depth of field to your cell phone. It is quite handy. You certainly do not want to do this every time you need it.
Key Lesson: Depth of field is extremely important as it determines whether your background is in focus or not (desirable when shooting landscapes but certainly not when shooting portraits). Keep it in mind before taking each shot. Pause, think, adjust if needed. After a while, you will do it without thinking about it.
Special Effect #2: Sunbursts

The Samyang 14mm lens has six diaphragm blades, so it produces six rays. | Nikon D600 + Samyang 14mm f2.8 f/11 | 1/200s | 400 ISO | HH. Photograph by Tobie Schalkwyk
A sunburst is the star-like effect created by strong light sources. They are usually more prominent at round about f/14.
Very few people know about this interesting phenomenon: if you have an equal number of blades in your lens, the same number of rays than the number of blades will emanate from the light source. If you have an uneven number of blades in your lens, the number of rays will be twice the number of blades.
Special Effect #3: Bokeh
Bokeh is the soft background created when using a wide-open aperture. It is at its most beautiful when including soft onion-like (or other) shapes created by background light sources or highlights.

This photograph is an example of hexagonal bokeh. Photograph by Pexels
The number of blades in the lens determine the roundness of bokeh. For example, a lens with only six blades will have hexagonal-shaped highlights, and a lens with nine blades will produce more round-shaped highlights.

Nikon D600 + Tamron 24-70 f2.8 @ 56mm f/2.8 | 1/125s | 800 ISO | HH. Photograph by Tobie Schalkwyk
The further your background is from your subject, the more prominent the highlights in the bokeh will be.
A wide-open aperture and the relatively far distance from the bird to the trees in the background ensured beautiful bokeh in the above’s image.
Recommended Reading: Want a step-by-step guide on photography skills with your DSLR? Grab a copy of our best-selling guide: the DSLR Crash Course.

Photograph by Pexels
Artistically shaped bokeh can be produced by shooting through a filter containing a cut-out pattern (such as heart shapes) of your choice. A wide aperture is needed for the best results.
Key Lesson: Bokeh is one of the most important, and very handy, elements in producing beautiful images. Soft bokeh forces focus onto your subject, and artistic bokeh adds artistic beauty.
Remember to use a wide-open aperture and a relatively long distance between your subject and the background to produce soft bokeh. I say ‘relatively long-distance’ because remember, the closer you are to your subject, the further the relative distance between your subject and its background.
Example: If you are one step away from your subject, then the background five steps away from your subject is ‘relatively’ far away from it. If you are 30 steps away from your subject, a background five steps away from your subject is relatively close to it.
Conclusion

Photograph by Wan San
Aperture is one of the handiest ‘tools’ for producing beautiful photographs. Experiment with it, learn when and how to use it in specific situations. Use it to your advantage. It will reward you with attractive and suitable backgrounds, whether sharp as in landscapes or soft as in portraits.
Most important of all: enjoy your photography!
Self-Check Quiz:
- What is your lens’s narrowest aperture setting?
- What is your lens’s widest aperture setting?
- Is this lens a ‘fast’ lens? Why do you say so?
- How many blades does the lens have?
- How many rays can you expect in a sunburst taken with this lens?
Assignment:
Perform one or more of the following tasks to get comfortable with aperture settings:
- Set your camera on the Aperture shooting mode. Adjust the aperture to its widest setting and take a photograph of an object. Now close the aperture by six clicks on the dial and take a photo of the same object. Have a look at the properties of the images (on your LCD screen or your PC/laptop). How did your camera compensate for the smaller aperture adjustments?
- Still on Aperture shooting mode, set your aperture to its widest possible setting. Take a shot of an object at your lens’s minimum focal distance (the shortest distance your lens can focus). If you do not know what this distance is, look it up in its specs – it is quite important to know what it is. Now step back as far as possible (at least 10 steps). Take another shot. What is the difference in the background of the two images?
- Take a shot with bokeh highlights. What shapes are these highlights?
- Take a shot containing a sunburst. Sunbursts are easiest to create when the sun just barely touches the side of an object. Important: Do not look at the direct sun through your camera’s optical viewfinder, as you may damage your eyes. Ideally, set your camera on ‘Live View,’ allowing you to look at the scene on your LCD screen.
- Photograph an object at your lens’s smallest aperture setting and correct exposure. Do you like it?
- Play around with the various smaller aperture settings (shooting landscapes). Look at the images in post-processing. Where is your lens’s sweet spot?


