

There are many self-satisfying elements to pursuing a hobby, or career, in photography. But one element (which we can all relate to) is the satisfaction of displaying a photograph that elicits a response similar to this one, “Wow! How did you do that?” This is where trick photography can be a lot of fun.
For this entry level guide into trick photography we decided to discuss simple concepts that don’t require a lot of extra equipment or software.
If you own a DSLR camera that has a manual mode and a common standard zoom lens, you can accomplish all of these tricks.
The part that only you can do is to provide the creativity and thought process required to utilize these techniques into your own vision.
Here is a short list of other equipment that would come in handy if you wish to pursue trick photography:
- Tripod
- Camera cable release
- External flash
- A flat black piece of cardboard
- A variety of constant light sources such as flashlights, laser pointers, and lamps
- Black wrap or flat black craft paper
"The part that only you can do is to provide the creativity and thought process required to utilize these techniques into your own vision."
Trick 1: The Zoom Effect

Photo by Renzo Borgatti
This trick is easy to accomplish with a camera and a zoom lens. You would also find a tripod and a flash unit helpful.
- Set your camera to manual mode.
- Find the proper exposure that allows your shutter speed to be anything from 1/4 of a second to 1 second.
- Zoom in as close as you can on your subject.
- Focus.
- Release the shutter while pulling the zoom out.
The concept is this – After you release the shutter, you zoom the lens during the exposure. There are a lot of variables here so it takes some practice. But that’s half the fun.
What are the variables?
You can zoom in, or you can zoom out. The length of time that you set your shutter speed will also change the effect. How quickly you zoom the lens will also be a factor.
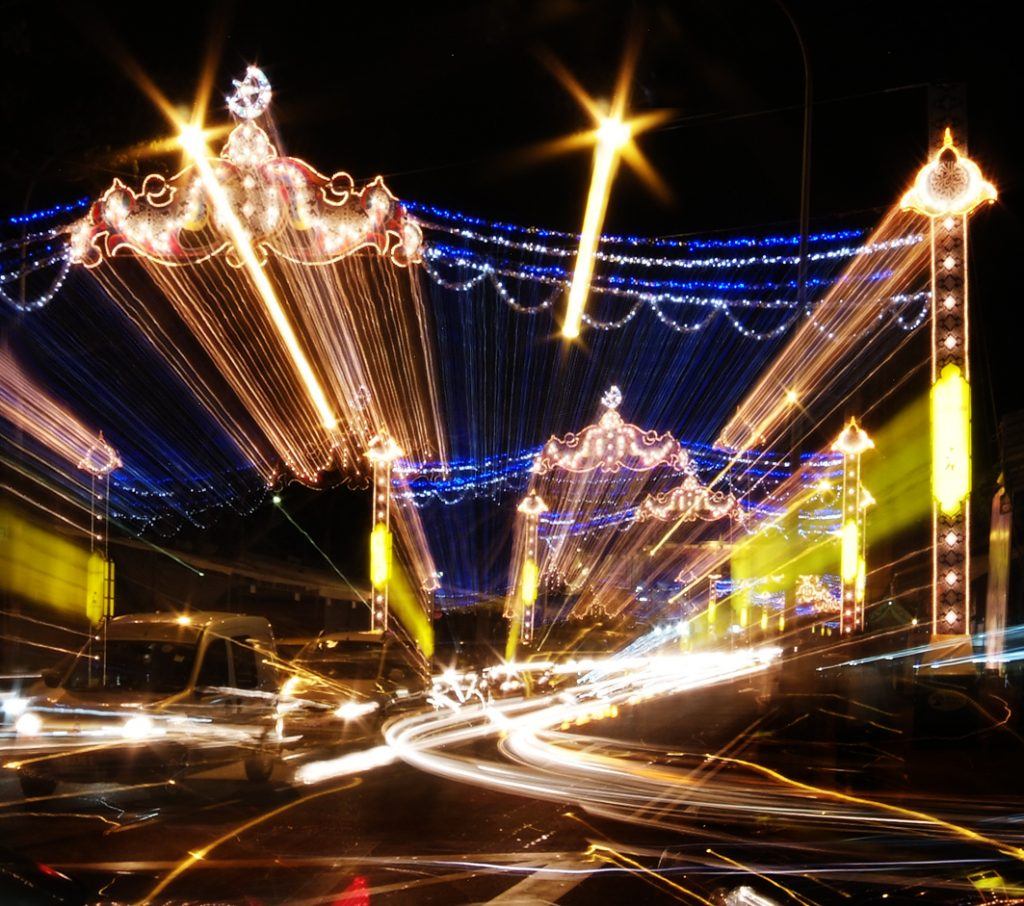
Photo by William Cho
When you’re starting out, we recommend zooming out and keeping your shutter speed at around 1/4 of a second to a 1/2 second.
Practice zooming slowly and smoothly.
Sometimes it helps to begin the zoom before you release the shutter.
If you have a flash unit, the initial burst of a flash will help establish a sharp image before the zoom effect takes place. The zoom effect generally works best when you have bright areas surrounded by dark areas.
PRACTICE!
Many techniques for trick photography involve longer exposures and the use of carefully applied light.
This is why our desired equipment list includes a tripod, a cable release, and a black card.
"Many techniques for trick photography involve longer exposures and the use of carefully applied light. This is why our desired equipment list includes a tripod, a cable release, and a black card."
The tripod is to lock the camera down so that elements of your image will remain sharp. The cable release also serves that purpose by allowing you to fire the camera without touching it.
But, it also serves a second purpose. It allows you to lock the shutter open using the bulb setting on your shutter speed dial. This is extremely useful if you plan on doing elaborate trick photos. The black card serves as an opaque screen in front of
your lens. It allows you to block any light from entering the camera in-between exposures.
So, let’s say that you’re going to attempt a trick photograph that requires three exposures in the same room. You would compose your image with the camera locked down. You would darken the room as much as possible. You would open the shutter using your cable release and lock it open using the bulb setting. You would then use your flat black card to cover the lens.
Set up your first exposure, pull away the card and make the exposure using a flash, lamp, or flashlight(whatever light source you choose). Cover the lens with the flat black card. Set up your next exposure and repeat.
Trick 2: Create A Ghost
This is a very simple trick. You will need a DSLR camera and some method to lock down your camera. This could be a tripod or simply placing your camera on a sturdy object.
Quick Tip – If you don’t have a cable release, use the timer function to fire your camera. For this trick to be effective, it is imperative that your overall image is in sharp focus.

Photo by Nick Perla
Here is how you create a ghost:
- Compose your picture and lock your camera down.
- Set your camera to manual mode.
- Set your shutter speed to 1 second or longer.
- Adjust your f-stop to get a proper exposure.
- If you are the model, use your self timer. If you are using a model, place them into the picture.
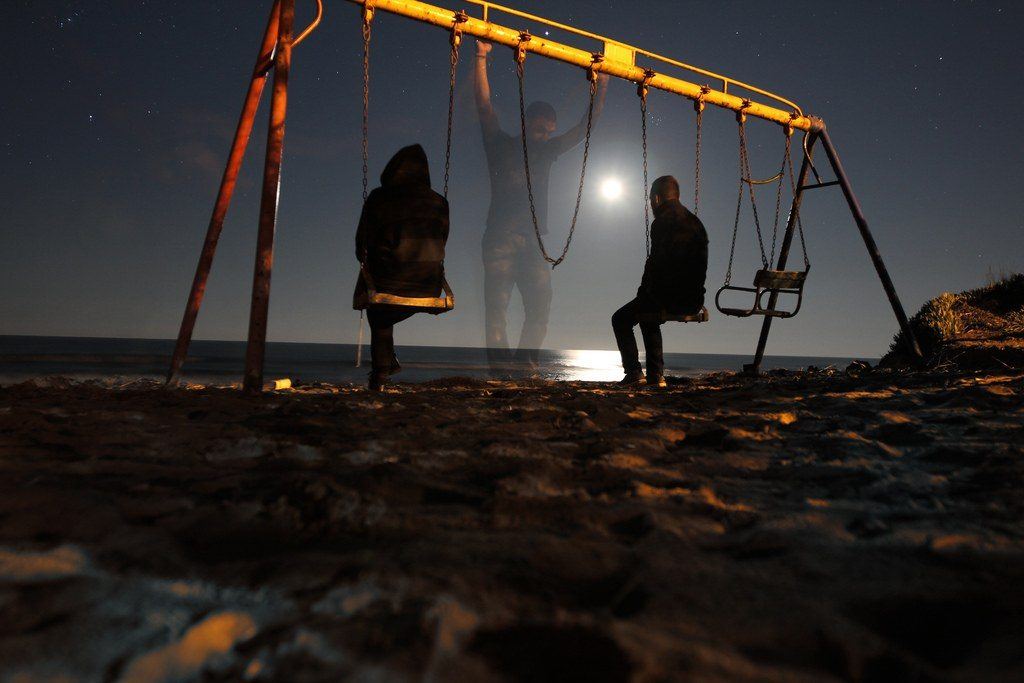
Photo by Instill Moments
This is the secret behind creating a ghost. Your camera is exposing the image for the entire time the shutter is open. But your ghost (yourself or your model) is going to remain in the image for only PART of the exposure.
This gives the effect of “seeing through them” because the exposure continues after they’ve moved through or out of the frame.
You’re going to want to experiment with this technique. How much time do you leave the shutter open? How long does the ghost stand still in the image before moving?
In our two examples above, the first one used a technique where the model simply moved slightly during a shorter exposure. The second example used a technique that required a longer exposure and the model made a hasty exit completely out of the picture.
Did you notice how the other two models did not move and therefore appear solid?

Photo by jnyemb
This last ghost picture used a white dress, some movement, and a long exposure.
Trick 3: Create A Light Sculpture
Creating a photograph is the act of exposing a light sensitive material to light. Many trick photographs are about coming up with unique ways to expose the light sensitive material.
Painting with light has long been a trick photography technique.
It is so fascinating, and provides so much variation, that we could literally write a guide on that subject alone.
For now, we’re going to give you a simple idea to play with.
Painting with light requires a dark shooting area. This should be your first element of planning. Will you attempt your shot at night? Will you darken a room indoors? Just pulling the shades on your windows may not be dark enough. You need a DARK setting for your light painting photograph.
To create a light sculpture you will need your camera, a tripod or sturdy surface, a light source, and some string.

Photo by Evan – Photo Extremist
A good light source to use when beginning your experimentation is a strong penlight with a lanyard.
Remove the lanyard and tie a string to the penlight. You’ll want to make sure that you have enough string to swing the light around you in an arc.
Here are the steps-
- Lock your camera down in a dark area.
- Make sure you have enough room to swing the light around without hitting anything.
- Set your camera to manual and the shutter bulb setting. You will have to experiment with what aperture and ISO to use. Start out with an ISO of 400 and an aperture of f/5.6. You will need to adjust these settings depending on the intensity of your light source.
- Mark the area where you are going to stand in the photograph.
- Lay your light source at your mark and point it at the camera (or have a helper hold it). Manually focus your lens. Don’t have the camera in autofocus!
- Turn the light off and open the camera shutter.
- Walk back to your mark and grab a hold of the string so that the penlight is dangling around your knees.
- Turn the light on and begin to swing the light in a circle.
- As you swing the light, spin your body in a slow circle.
- Check your results.
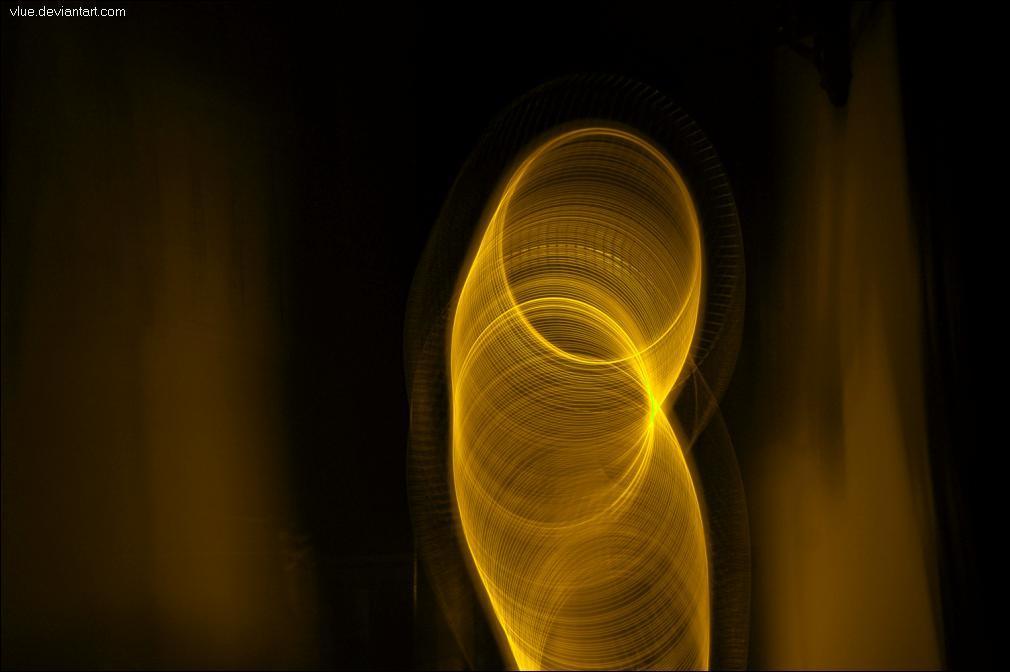
Photo by Evan – Photo Extremist
This is the first step toward a lot of experimentation.
That’s what makes it so fun!
There are so many variables that will change the effect: the light source, how you swing it, how you move your body, putting colored gels in front of the light, etc.
Go wild with your experimentation!
"To create a light sculpture you will need your camera, a tripod or sturdy surface, a light source, and some string."
Trick - 4 Forcing Perspective
This trick requires little in the way of equipment. What it does require is a keen wit and a good eye.
Forced perspective is simply an optical illusion. By placing disparate objects of a known size together, the photographer creates a trick perspective.
Here is what you need to know to accomplish a forced perspective photograph.
This technique works best with wide angle to normal lenses and a small aperture.
The reason for this is that you will need maximum depth of field. You will want your f/stop to be at f/11.0 to f/22.0 for this type of photograph.

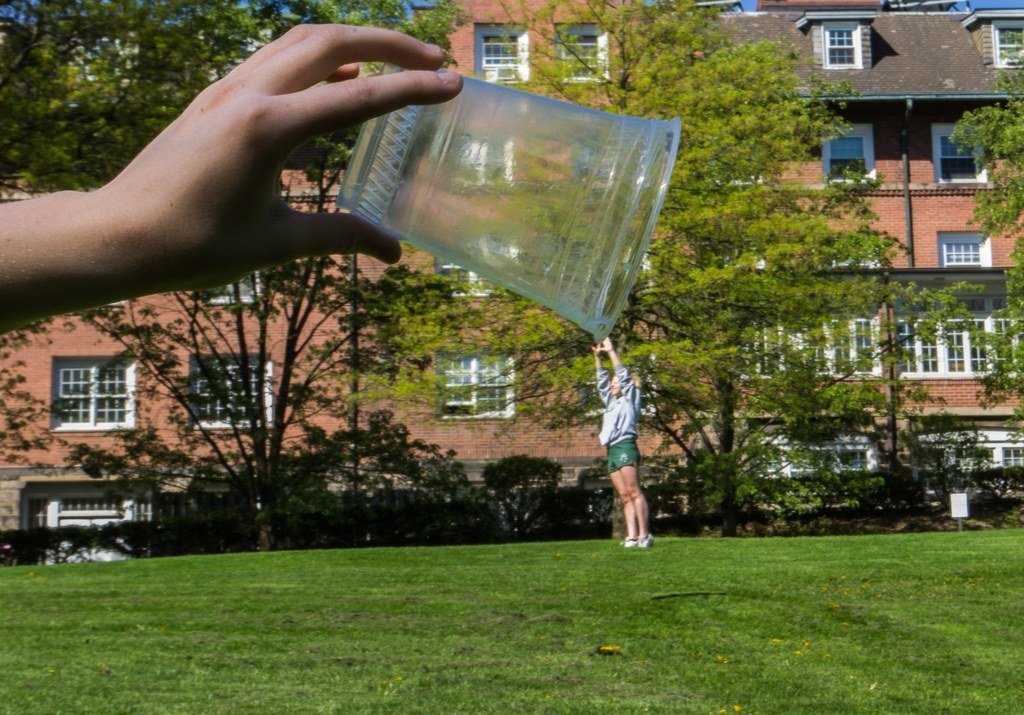
Photo by Kenzie Saunders
Take the above image as an example; if either the girl or the glass were out of focus, the illusion that they are in the same location within the photograph would be lost.
You also need to be careful with the lighting. It should be similar on both subjects. If the hand holding the glass was in the sun, and the girl was standing in the shade, it would not appear realistic.
You may want to study up on depth-of-field if you’re not familiar with how it works.
These are the steps to follow to take the above photograph:
- Lock the camera down on a tripod or sturdy surface.
- Place one model in the background.
- Place the other model in the foreground holding the cup.
- Set the lens to manual focus and an f/stop of f/11.0 – f/22.0.
- Focus on the cup.
- Take a test picture
- Check the focus on the cup and the girl.
- If the girl is fuzzy, gently rotate the focus slightly toward the infinity setting on the lens barrel. Don’t move it more than a quarter of an inch.
- Take another test shot. Continue adjusting the focus barrel until both the foreground and background subjects are in focus.
- Now worry about proper alignment between foreground and background for the final picture.
These examples show another way to utilize forced perspective. This type of work will require a macro lens or close-up filters:

Photo by JD Hancock

Photo by John O’nolan
The idea here is to combine miniatures with real life objects and create an unrealistic scene that appears realistic.
This will definitely get your creativity flowing!
We hope you have fun as you explore these simple ideas in trick photography!


