

Introduction
I bet you have seen some of these questions before (perhaps even asked them yourself):
- What do I learn first: Lightroom or Photoshop?
- I’m using Photoshop – do I need to learn Lightroom?
- What is the best: Photoshop or Lightroom?
The perception among some beginner photographers (or perhaps rather ‘beginner photo editors’) seems to be that Lightroom and Photoshop are competing against each other. Take my word for it: they are not. Sure, both are extremely powerful in what they do, but they are different horses built for different courses.
What is this guide about?
In this guide, we are first going to have a quick look at where each of these two topmost popular photo editing products fits into a photographer’s world. But that is not the main purpose of the guide.
I hope to convince you that every photographer should start with Lightroom. Then we are going to move on to the main purpose of the guide: to have a look at three Photoshop techniques (or groups of techniques) that every Lightroom user should know about.
Recommended Reading: If you want to learn how to enhance your photos and create better images, grab a copy of Photzy’s premium guide: Ultimate Guide to Fundamental Editing.
Photoshop vs. Lightroom
Where does each of these tools fit into a photographer’s world? Which should make out the biggest slice of a photo editor’s pie?
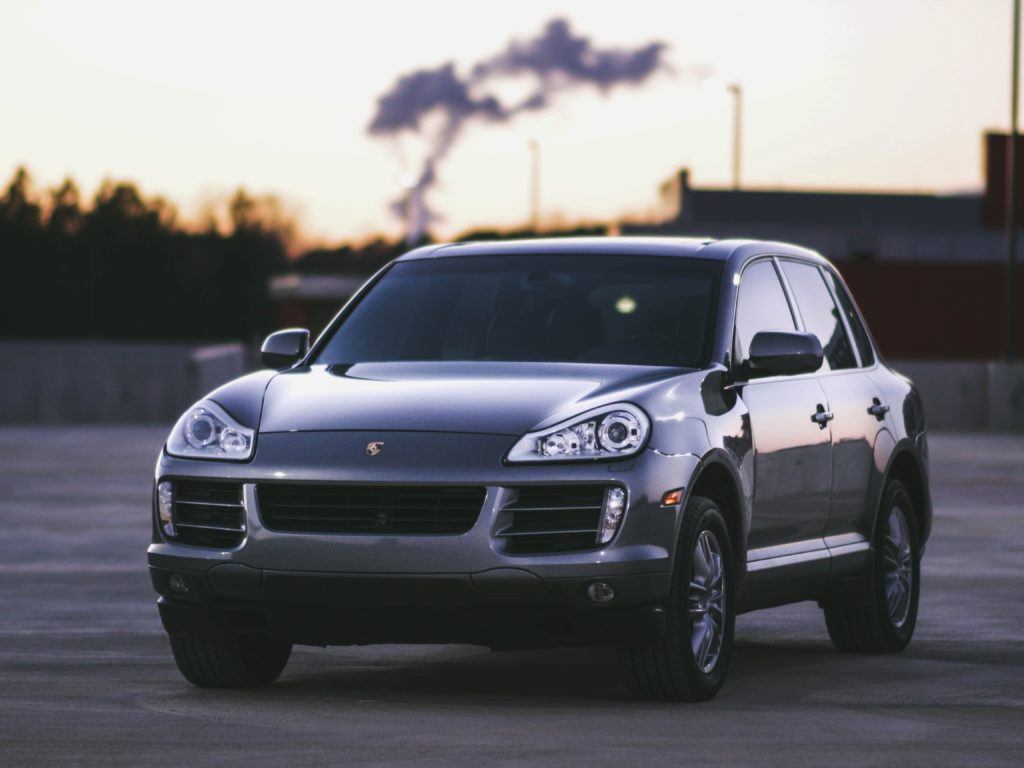
The fact is that each of these tools was built for different reasons. Your choice of main photo editor should obviously keep that in mind. I mean, you may be able to plow your fields with a Porsche Cayenne 4WD. It produces 324kW of power and is a 4-wheel drive, so it will probably get the job done in favorable circumstances.
The perception among some beginner photographers seems to be that Lightroom and Photoshop are competing against each other. Take my word for it: they are not.
It makes so much sense, though, to rather use a John Deere tractor built for this purpose. Depending on your choice of model, it may surpass the Porsche’s kW’s (380+) – they have up to 13-liter engines and produce up to 620 Horsepower. These are monsters! They are STRONG! They run on massive tires. Some of them do not use tires but rather belt-like tracks up to 36 inches wide, built for optimal traction.
Let’s look at the other side of the coin: if you’re planning on a 1,000-mile trip, which vehicle are you going to choose: the Porsche or the John Deere? Of course! You certainly don’t want to tackle this trip in the top-of-the-range tractor, traveling at a maximum of 25 mph!
Photoshop and Lightroom are the same. Each is built for a specific purpose and neither can compete with the other in its field of expertise. Let’s look at a few of their traits important to photographers.
Photoshop
Photoshop was built with graphic design in mind. Its designers cared less about the photographer who returns from a holiday or wedding venue with thousands of photos to edit. Yes, it has some features which are more than handy to photographers, but they probably make out only 10% of its features, if that much. We’ll get to some of those later.

Wedding photographers could certainly edit all of their images with Photoshop, but it’s like traveling with the John Deere (at 25 mph) down the highway. That Porsche would be so much better.
Lightroom
Lightroom is the Porsche 4WD of mass photo editing.
- It was built to store images in folders and categories (in a catalog) so they can be found/recovered easily at a later stage. It has a built-in feature to back up the catalog every time you close Lightroom.
- It provides for bulk changes. You can edit one image and then sync its changes to a group of selected images with the click of a button. This is a massive feature!
- It displays your images in thumbnail form so you can easily find an image or select groups for bulk syncing.
- It provides for bulk exports (conversion to .jpg). These exports include resizing, watermarking, renaming, sharpening, and other features.
- It has all of the features you will ever need to edit photos. All of these are easy to use and are intuitive.
Note: Lightroom and Photoshop integrate perfectly. You can right-click on an image in Lightroom and select Edit In > Adobe Photoshop. If you save the image in Photoshop, the edited version opens automatically in Lightroom with an -Edit extension to its original name.
I actually prefer this method instead of opening any image directly in Photoshop. It allows me to make a few adjustments before opening it in Photoshop. I may also want to add a few finishing touches in Lightroom after editing it in Photoshop and I still have all of the export features at my disposal when I create my .jpg.
Key Lesson: You may get away with very representable images without ever using Photoshop. Photoshop shines in a few areas in support of Lightroom, though. Together they form a magic force, hardly beaten by any other photo editor out there. You simply can’t go wrong by applying the filters as discussed in this guide.
Reason #1: Object Removal
Photoshop has an amazing feature to remove unwanted objects from your image. If I say ‘amazing,’ then I mean it. Sometimes it is simply mind-boggling to see it at work.
Sure, you can use Lightroom’s spot removal tool to remove objects with a clear background. But what if there’s another object behind the unwanted object? Such as a bird’s feathers? Then it may be very tricky to fix, and it’s a time-consuming exercise. In Photoshop you can do it with the click of a button. Let’s have a look at it.
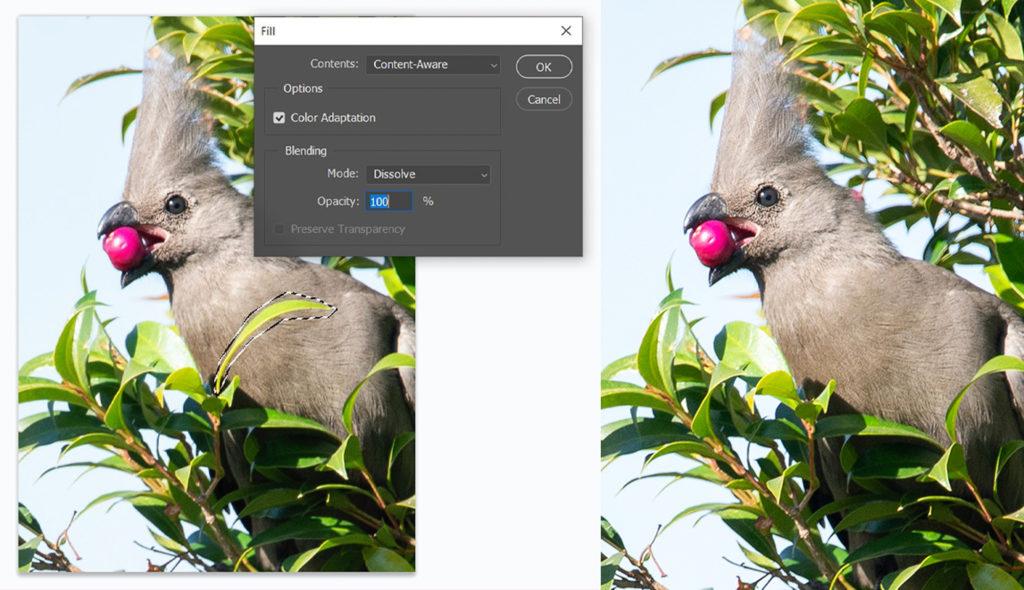
Content Aware Fill
This tool is simply magic. It is as if it knows what is behind the unwanted object and fills it in (seemingly) intelligent ways.
Photograph by Tobie Schalkwyk
You simply do the following:
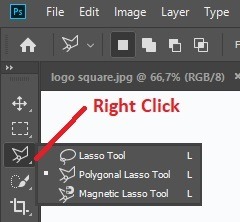
- Select the area around the unwanted object using the Polygonal Lasso Tool.
- Right-click on the selected area.
- Select Contents: Content-Aware from the pop-up menu.
- Select the Color Adaptation
- Select Mode: Dissolve.
- Select Opacity: 100%.
- Click OK.
- Hold your breath!
Photograph by Tobie Schalkwyk
Key Lesson: Photoshop’s Content-Aware Fill is the best thing since sliced bread, as far as I’m concerned. Whether you’re removing unwanted objects/old, expired watermarks, or whatever else, it’s simply a magic tool, not to be surpassed by anything else.
Sometimes the spot removal tool in Lightroom just can’t get an exact match to replace a dust spot with. Use Photoshop’s Content-Aware Fill. It is guaranteed to do the job for you. If you are convinced that an image is too complex for the removal of an object, try this tool. I have been amazed numerous times by how well it worked for me.
Recommended Reading: If you want to learn how to enhance your photos and create better images, grab a copy of Photzy’s premium guide: Ultimate Guide to Fundamental Editing.
Reason #2: Luminosity Masks
What on earth are ‘luminosity masks’ and why would you ever need them?
Luminosity masks allow you to select only certain areas in your image based on tones (in terms of brightness or darkness) and then perform any Photoshop adjustment(s) only on the selected areas.
I use this method most of the time to dodge (lighten) dark areas when the dynamic range was just too large for my camera to produce a good shot. You can, however, use it to dodge or burn most of the image content or simply to create contrast using a curve adjustment.
I use this method most of the time to dodge (lighten) dark areas when the dynamic range was just too large for my camera to produce a good shot.
You may be asking, ‘But I can just raise exposure or shadows in Lightroom. Why use luminosity masks?’ True. But then you will do that in your whole image, and you may not necessarily want to do that. And what if you want to dodge the underexposed areas and burn the overexposed areas in the same image?
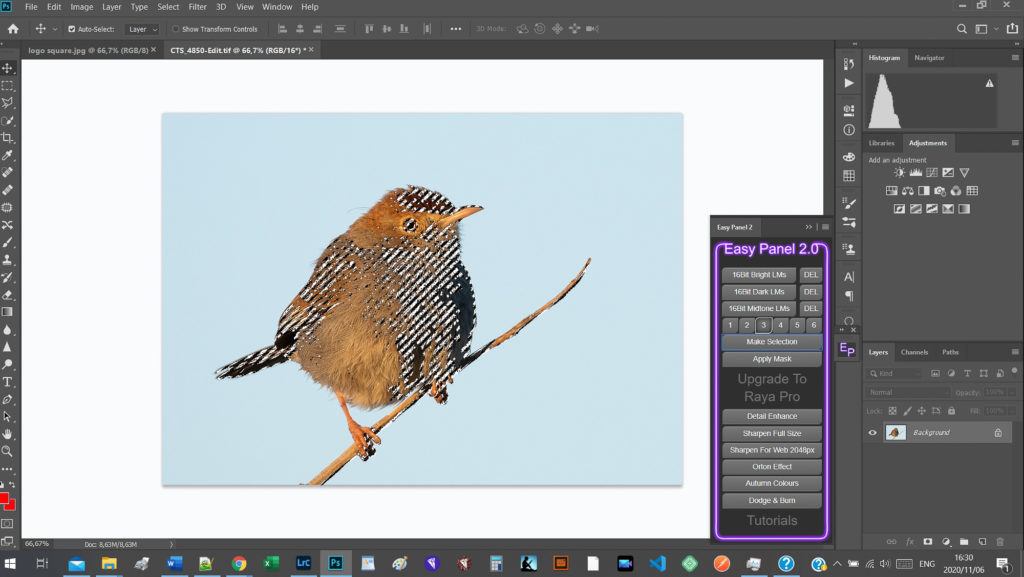
Premade luminosity masks are available around the Internet or you can make your own. I use a commercially available product called Easy Panel, which integrates seamlessly with Photoshop.

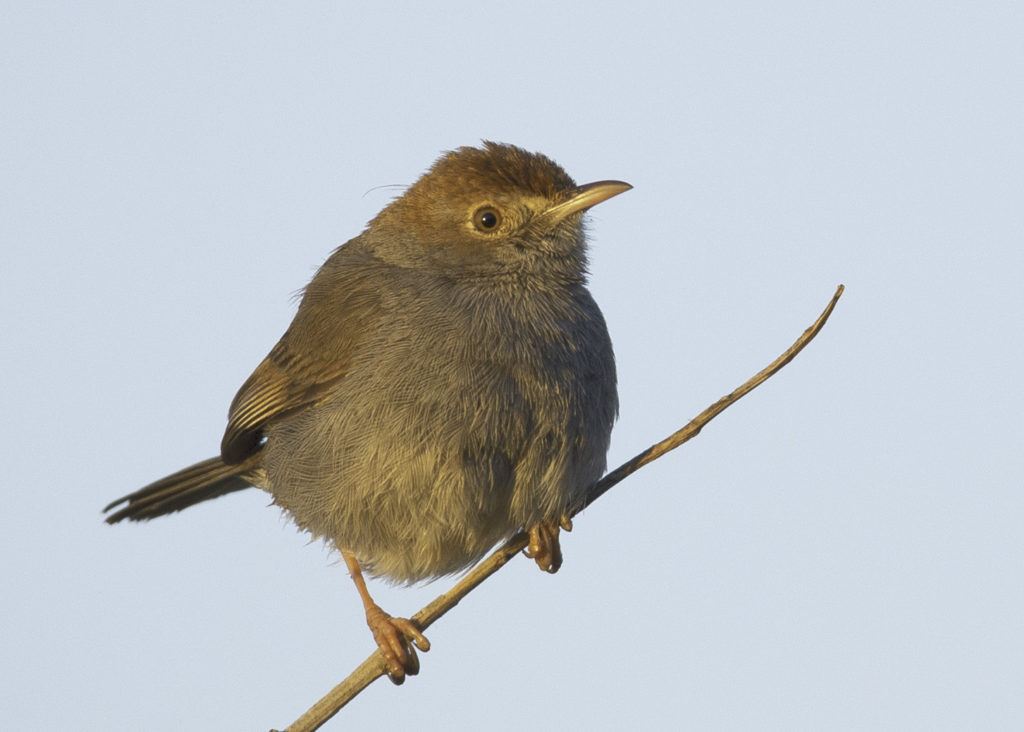
Let’s look at this example. We’ll dodge this bird which came out just a little too dark in the setting sun.
Firstly, we’ll remove the pesky twig which appears to be sticking into his you-know-what. We’ll use the Content-Aware Fill as explained earlier. It is important to do this first. If you do it after applying luminosity masks, the removed area may show small tonal differences compared to its surroundings.
Can you see where the twig was? No? Fantastic!
I then typically proceed as follows:
- I open the Easy Panel by clicking the purple Ep icon in the menu bar to the right of the subject.
- I want to dodge the dark area in the image, so I need to generate luminosity masks in the darker tonal ranges. I thus click the 16Bit Dark LMs I can see how Easy Panel generates six different masks on the right, each covering a different tonal range.
- I usually like to do this in more than one tonal range, starting in the middle of the six generated luminosity masks. So, I click on ‘3.’ The colored image turns black and white. Only the whites will be adjusted. The blacks will be ignored. The whiter the area, the heavier the adjustment will be.

Photograph by Tobie Schalkwyk
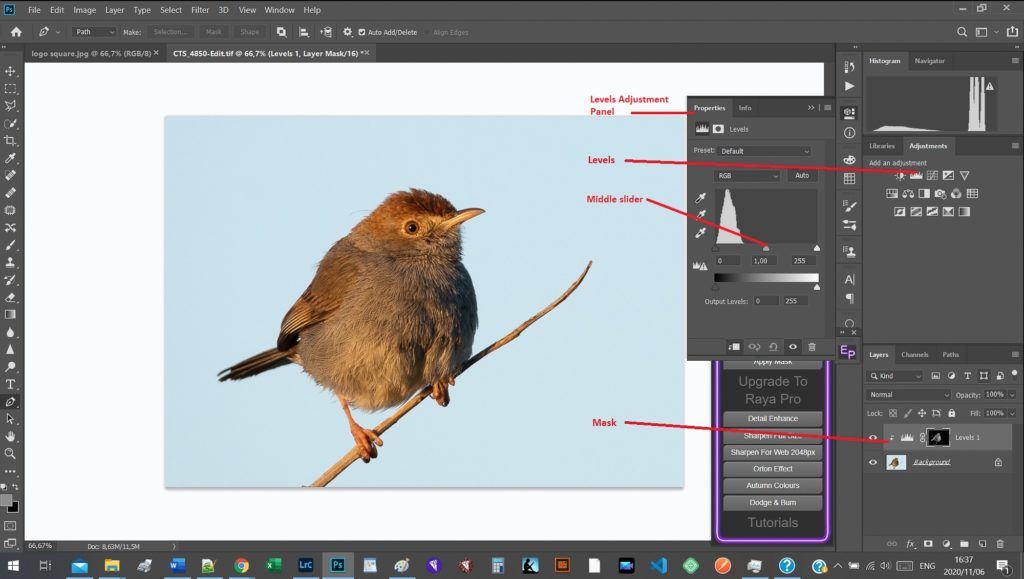
- I’m happy with the tonal range that will be adjusted, so I click on the ‘Make Selection’ button. The areas to be adjusted will now have moving ants borders (if you want some of these areas to be left alone, you can actually deselect them by dragging the Quick Selection Tool on ‘-‘ (deselect) setting over the desired area).
Photograph by Tobie Schalkwyk
- I click on the Levels adjustment tool (top right). That gets rid of all of the generated luminosity masks and a mask for the selection is created instead. A-Levels Adjustment Panel is opened from where I can do my adjustments.
- I drag the middle slider in the Levels Adjustment Panel to the left to dodge the pre-selected area. If I drag it too far, I start losing detail, so I drag it just a little back.
- I now repeat the above process for dark luminosity mask levels 4 and 5. This is not always necessary – it all depends on whether the previous level adjustment was to my satisfaction. Sometimes further dodging is needed.
Photograph by Tobie Schalkwyk
Photograph by Tobie Schalkwyk
- The bird now looks a little bland, so I generate 16Bit Midtone LMs and select level 3, but this time I apply the Curves adjustment tool (dragging the brights up a little and the darks down).

Photograph by Tobie Schalkwyk
The result:
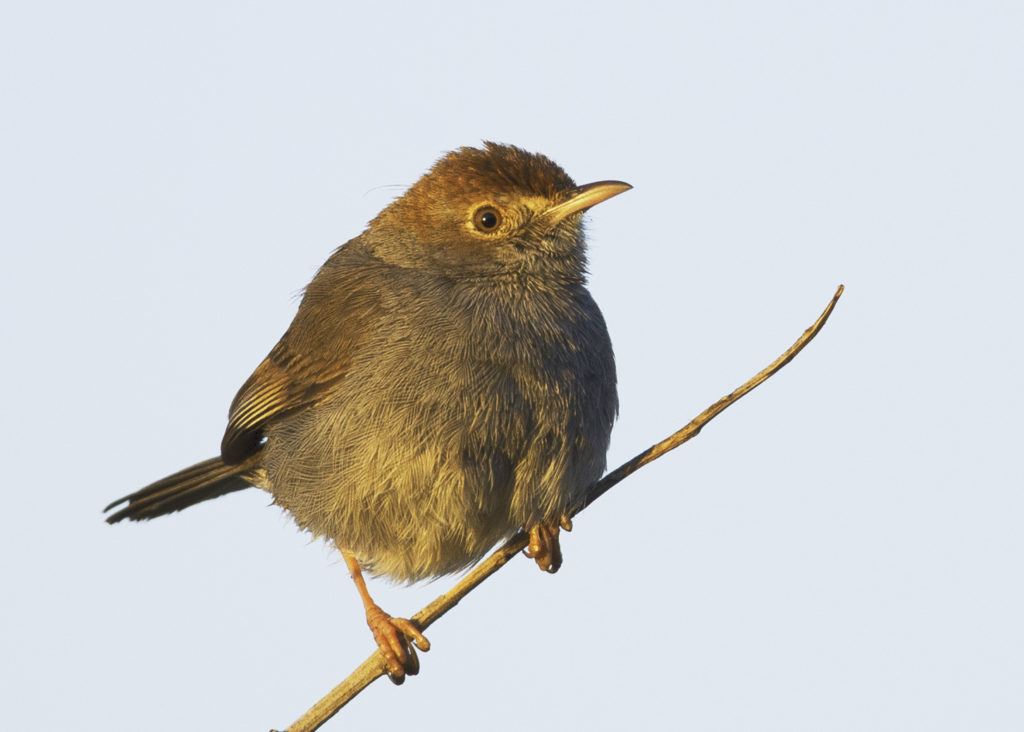
Photograph by Tobie Schalkwyk
This may seem to be a lot of work, but once you have done it a few times, it becomes effortless – and it’s all worth it.
Note: I have only done levels and curve adjustments above, but you can do all types of adjustments using the same method (brightness, saturation, color masks, etc.).
Key Lesson: It is easy to get overwhelmed by the steps to apply luminosity masks. Don’t fall for that trap. There are going to be times where no other solution or tool will produce the same results and then you’ll be glad that you know how to use them best.
Work through a few samples. After a few times you will start feeling at ease with it and then one day – take my word for it – it will reward you for your efforts.
Reason #3: Advanced Sharpening and Blurring Filters
Admittedly Lightroom has made a lot of progress with the quality of sharpening and blurring over the last couple of years. It should not take much effort to convince you, though, that Lightroom’s two sliders (Clarity and Sharpness) can never compete with Photoshop’s six different sharpening filters and eleven blurring filters – some of them with further adjustments via settings in pop-up boxes. If you’re not convinced, then please bear with me.
I am not going into much detail on these filters. You can find stacks of information in Adobe’s online tutorials.
Sharpening Filters
Select Filter/Sharpen in Photoshop to see a list of these options.
- Shake Reduction: Attempts to reduce blurring from different types of motion, such as linear, arc-shaped, rotational, and zigzag motions
- Sharpen: Standard sharpening of the image
- Sharpen Edges: Sharpen the edges of your subject
- Sharpen More: Repeat the previous sharpening action (Ctrl+Alt+F also works on Windows – Cmd+Alt+F on Mac)
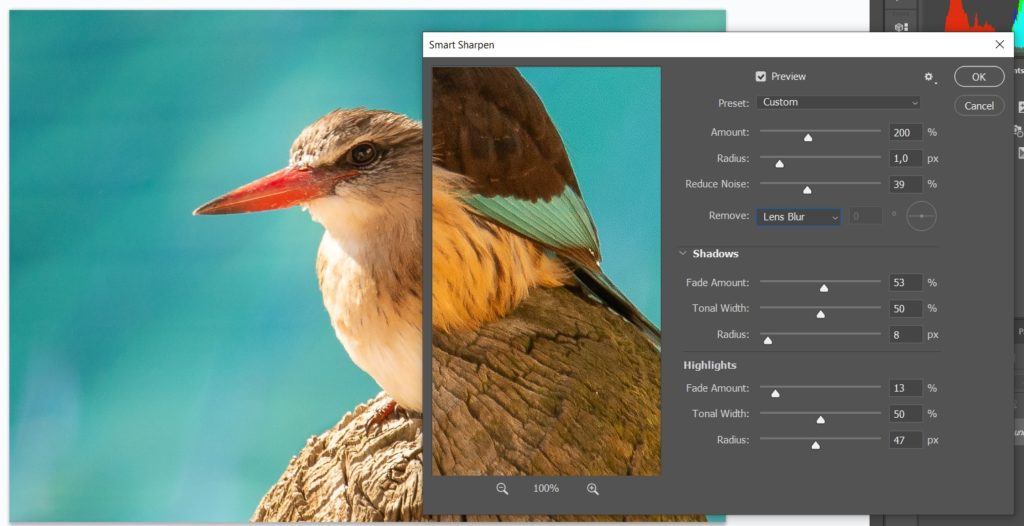
- Smart Sharpen: Smart indeed. This option allows you to adjust the sharpening algorithm, including noise reduction (sharpening usually increases noise) and a drop-down menu to remove different types of blur. You may also adjust the amount of sharpening in the shadows and highlights.
A preview screen with zoom features allows you to see the exact effect of your adjustments.
Photograph by Tobie Schalkwyk
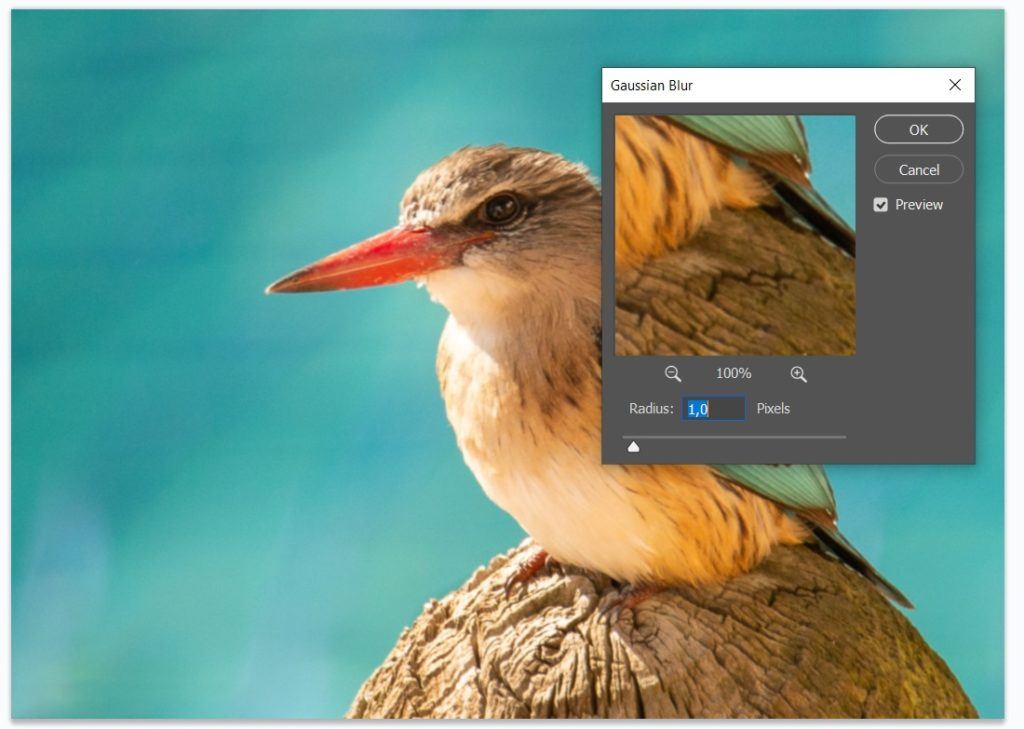
- Unsharp Mask: Don’t be deceived by the word ‘Unsharp’ in this filter. It is my favorite sharpening tool because it’s simple and delivers good results. It also provides you with an adjustment panel that is much simpler than Smart Sharpen’s panel. A ‘zoomable’ preview screen shows you the exact effects of your adjustments.

Photograph by Tobie Schalkwyk
Blurring Filters
Select Filter/Blur in Photoshop to see a list of these options.
- Average: Finds the average color of an image or selection and fills the image/selection with this color to create a smooth look.
- Blur and Blur More: Blurring three to four times more than the above blur. Creates smooth transitions by averaging the pixels next to the hard edges of sharp lines and shades.
- Box Blur: Blurs an image based on the average color of neighboring pixels. You can adjust the average value of such pixel to affect the amount of blurring.
- Gaussian Blur: This is my go-to blur filter. It adds low-frequency detail and can produce a hazy effect. You adjust the amount of blur desired in the adjustment screen and see the results immediately in the Preview screen.
Photograph by Tobie Schalkwyk
- Lens Blur: Creates the effect of a narrower depth of field (more attractive bokeh) so that some objects in the image stay in focus against a blurred background.
- Motion Blur: Creates an effect of taking a picture of a moving object with a fixed exposure time.
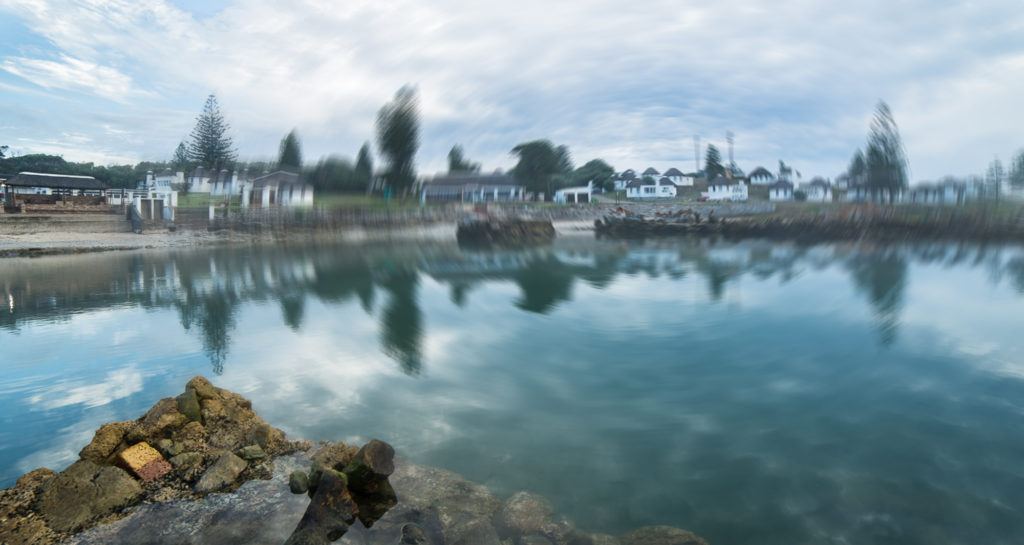
- Radial Blur: Creates the effect of a zooming/rotating camera for artistic reasons.
- Shape Blur: Creates blur based on a selected shape and radius size.
- Smart Blur: Blurs an image with precision. You set a radius, threshold, and blur quality.
- Surface Blur: Blurs an image while preserving edges.
The Blur Gallery
Photoshop offers another set of blur effects to quickly create distinct photographic blur effects with intuitive on-image controls.
Select Filter/Blur Gallery in Photoshop to see a list of these options.
- Field Blur: This allows you to define multiple blur points with different amounts of blur.
- Iris Blur: Used to simulate a shallow depth of field in your image.
- Tilt-Shift: Simulates an image taken with a tilt-shift lens.
- Path Blur: Creates motion blurs.
Spin Blur in action. Photograph by Tobie Schalkwyk
- Spin Blur: This allows you to rotate and blur the image around one or more points.
Key Lesson: Photoshop probably has more sharpening and blur tools than you would ever need. I suggest you work through them all. Try each of them at least once. Who knows, one day you may need a specific effect and then you remember about playing around with something similar in Photoshop.
Choose a favorite sharpening and blur filter and learn to do them well. In my case, it’s Gaussian Blur and Unsharp Mask. I hardly ever use any other filter for sharpening and blur, but I accept that there may be times when I need something different and then I will do so.
Recommended Reading: If you want to learn how to enhance your photos and create better images, grab a copy of Photzy’s premium guide: Ultimate Guide to Fundamental Editing.
Conclusion
Photograph by Tobie Schalkwyk
Lightroom and Photoshop together provide an exceptional combo for editing images – in bulk or not. I have only discussed three groups of Photoshop filters above, based on what I use most for photo editing.
Lightroom and Photoshop together provide an exceptional combo for editing images – in bulk or not
You can produce excellent images by using these together with Lightroom without needing any other effects (although, nothing prevents you from going further than that). Try them out and play with them all. You will recall some of them as you need more from your Lightroom images and then you can apply them.
Most importantly of all, happy snapping!
Self-Check Quiz:
- What is Lightroom’s main strength compared to Photoshop?
- What is a luminosity mask?
- What tool is most handy for removing unwanted objects from an image?
- Name three blur filters and their effects.
- What sharpening filter would you use to reduce the effect of camera shake?


