The When & Why of Sharpening Images in Post

New / Noteworthy

Attention: Do you know what your #1 Photography Killer is (and what it means)? Take this 30 second quiz to find out the #1 thing holding you back from reaching the next level in your photographic efforts. » CLICK HERE to Take the Quiz
This Quick Tip comes to you from our Premium Guide,The Ultimate Guide to Fundamental Editing.
I’m sure that you’ve heard about, and possibly had some discussion, about “sharpening” digital images.
Sharpening seems to be one of the most misunderstood aspects of fundamental editing.
Let me define fundamental editing for you: Fundamental editing is the necessary steps that need to be applied to virtually every digital image file after they come out of the camera.
Sharpening is one of those steps.
However, if you don’t know what you’re doing, you can actually ruin a perfectly good shot in the sharpening step.

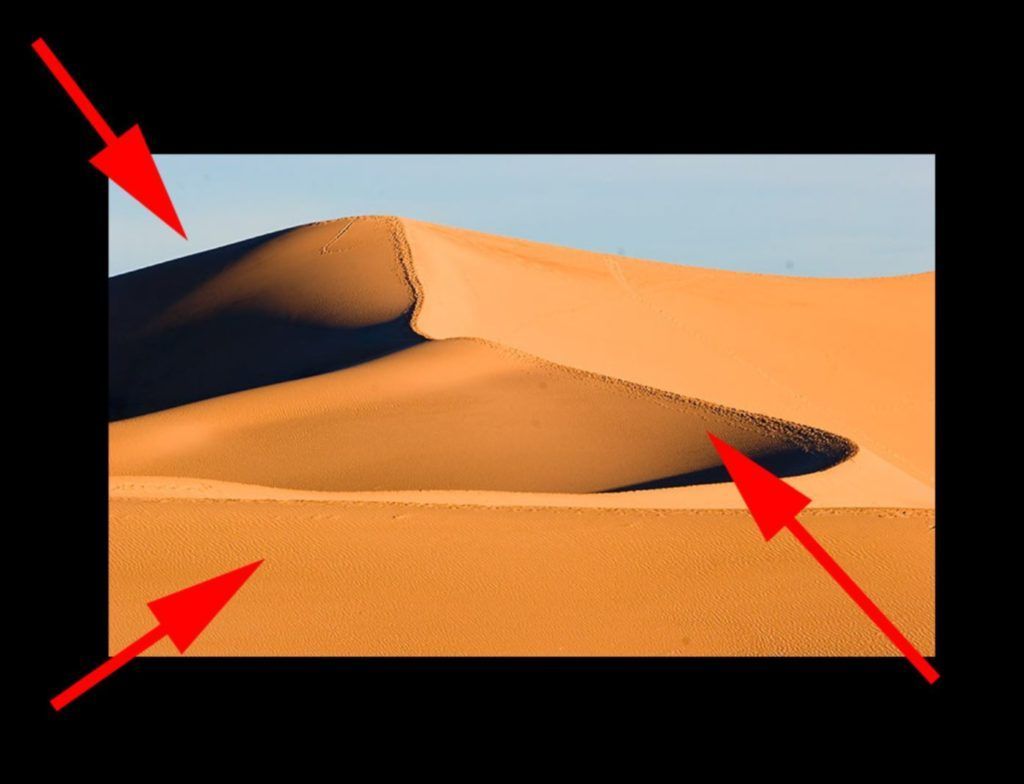
Photo by Eric Ogan
Do you know what your #1 Photography Killer is (and what it means) ? Take this 30 second quiz to find out the #1 thing holding you back from reaching the next level in your photographic efforts. » CLICK HERE to Take the Quiz
This was a beautiful photograph that was ruined by over-sharpening.
- Over-sharpening created a “white line” along the horizon (an extremely obvious artifact)
- The sand along the ridgeline has become pixelated and unreal looking
- The ripples in the foreground have visible artifacts and noise that were introduced by over-sharpening.
Here is your Quick Tip:
- Always apply sharpening LAST while doing your fundamental edits. Other steps in the fundamental editing process increase visible sharpness – while not introducing the problems seen in the image above.
- Always use a very light application of sharpening. How light?
It really depends on the photograph.
But consider this: if you’re only posting your image to the internet, most computer screens do not have high resolution, so they can’t resolve your image that highly anyway. Use very light sharpen settings.
Also, if you intend to print your image, most photo labs apply sharpening through their own equipment. If you sharpen your image file, and then they sharpen it, you can end up with a really lousy looking print.
I've got something special for you on the next page...
If you’d like to learn exactly how to apply sharpening in your post-production workflow, check out our premium guide, The Ultimate Guide to Fundamental Editing now »
It covers all three Adobe products: Photoshop, Lightroom, and Elements. Plus it includes a free printable step-by-step editing checklist with that you can pin-up, or leave next to your computer.
If you missed out on your copy last time. It’s available again, and on sale right now.
Click below now, to read about it on the next page…

About Kent DuFault
Kent DuFault became a photographer in September of 1974. He took a “Basic Photography” class in high school and was hooked for life. His best-selling guide, The Ultimate Guide to Fundamental Editing has helped thousands of photographers worldwide understand and master the craft of post-processing in their photography.

