

Was it me, or is my camera a dud?
Today, I will answer the age-old question of why pictures sometimes come out far too dark.
If you are underexposing your pictures, it’s got to be the camera’s fault, right?
It’s not going to be me because, after all, the camera is packed with the best technology, plus it was set to Auto, and my only input was to press the shutter, so it’s unlikely to be my fault. Then it must be the camera.

Photograph by Robin Nichols
But here’s the rub.
If your camera is messing with your exposures, what can you do about it? Accept poor results? Make some changes? And if the latter, then what changes will work?
Aside from checking if the lens cap was left on or spending an evening listening to a heavy metal vinyl played backward, perhaps the best way forward would be to first check the camera settings, and then make an adjustment to produce a better exposed, brighter result.
Trick Exposure: Underexposure is actually perfect for many subjects. The moon, in all its brightness, ‘fools’ light meters into gross overexposure because meters usually register the amount of blackness surrounding the subject over the subject itself, especially if it is not a full-frame like this. The result is a picture that looks like a white dot in a sea of black. Underexpose by two or three stops and you get a perfect result.
What you’ll learn in this article:
- How to recognize an underexposed file
- Ways to rectify underexposure
- Situations where underexposure works for the photographer
- Learning about metering patterns
- Using exposure compensation
- Learning about exposure bracketing
- Shutter speed trick
- Quick software fixes for underexposure
Recommended Reading: Want a step-by-step guide on photography skills with your DSLR? Grab a copy of our best-selling guide, the DSLR Crash Course.
What Is Underexposure?
Before getting into the why’s of underexposure, this is perhaps a good time to describe exactly what underexposure is.
- An underexposed image is very dark in the places where it should be light.
- Underexposure produces hard-to-discern detail specifically in the mid-tones and shadows. It might be so bad that the mid-tones and highlights look black or ‘murky.’
- Underexposure conceals valuable photographic detail.
- Underexposure produces false-color values.
- Very dark images, when lightened, invariably reveal ugly image imperfections such as digital noise and image artifacts.
Top 3 Reasons Why You Mistakenly Underexpose
- Shooting in Manual mode without checking the (previous) meter readings
- Forgot to check the previously set Exposure Compensation settings (in Auto, P, A, and S)
- Using Spot Metering incorrectly or inadvertently
Are Some Cameras Better at Handling Underexposure?
The simple answer to this is yes. Underexposure is less likely to occur using cameras with state-of-the-art metering, which essentially means new cameras are better than old cameras.
Also, camera models higher up the range (i.e. more expensive) will also perform better, based just on the principle that when new technology is released, it’s the higher-end cameras that benefit from it first. Entry-level models are usually stuck with the older tech till it slowly filters down the product line.
Underexposure is less likely to occur using cameras with state-of-the-art metering, which essentially means new cameras are better than old cameras.
Another point worth noting is that the larger the sensor, the better your results will be from underexposed files. Not specifically because they are less prone to underexposure, but because large sensors produce cleaner-looking image files, especially when a lot of post-production is added to the mix.

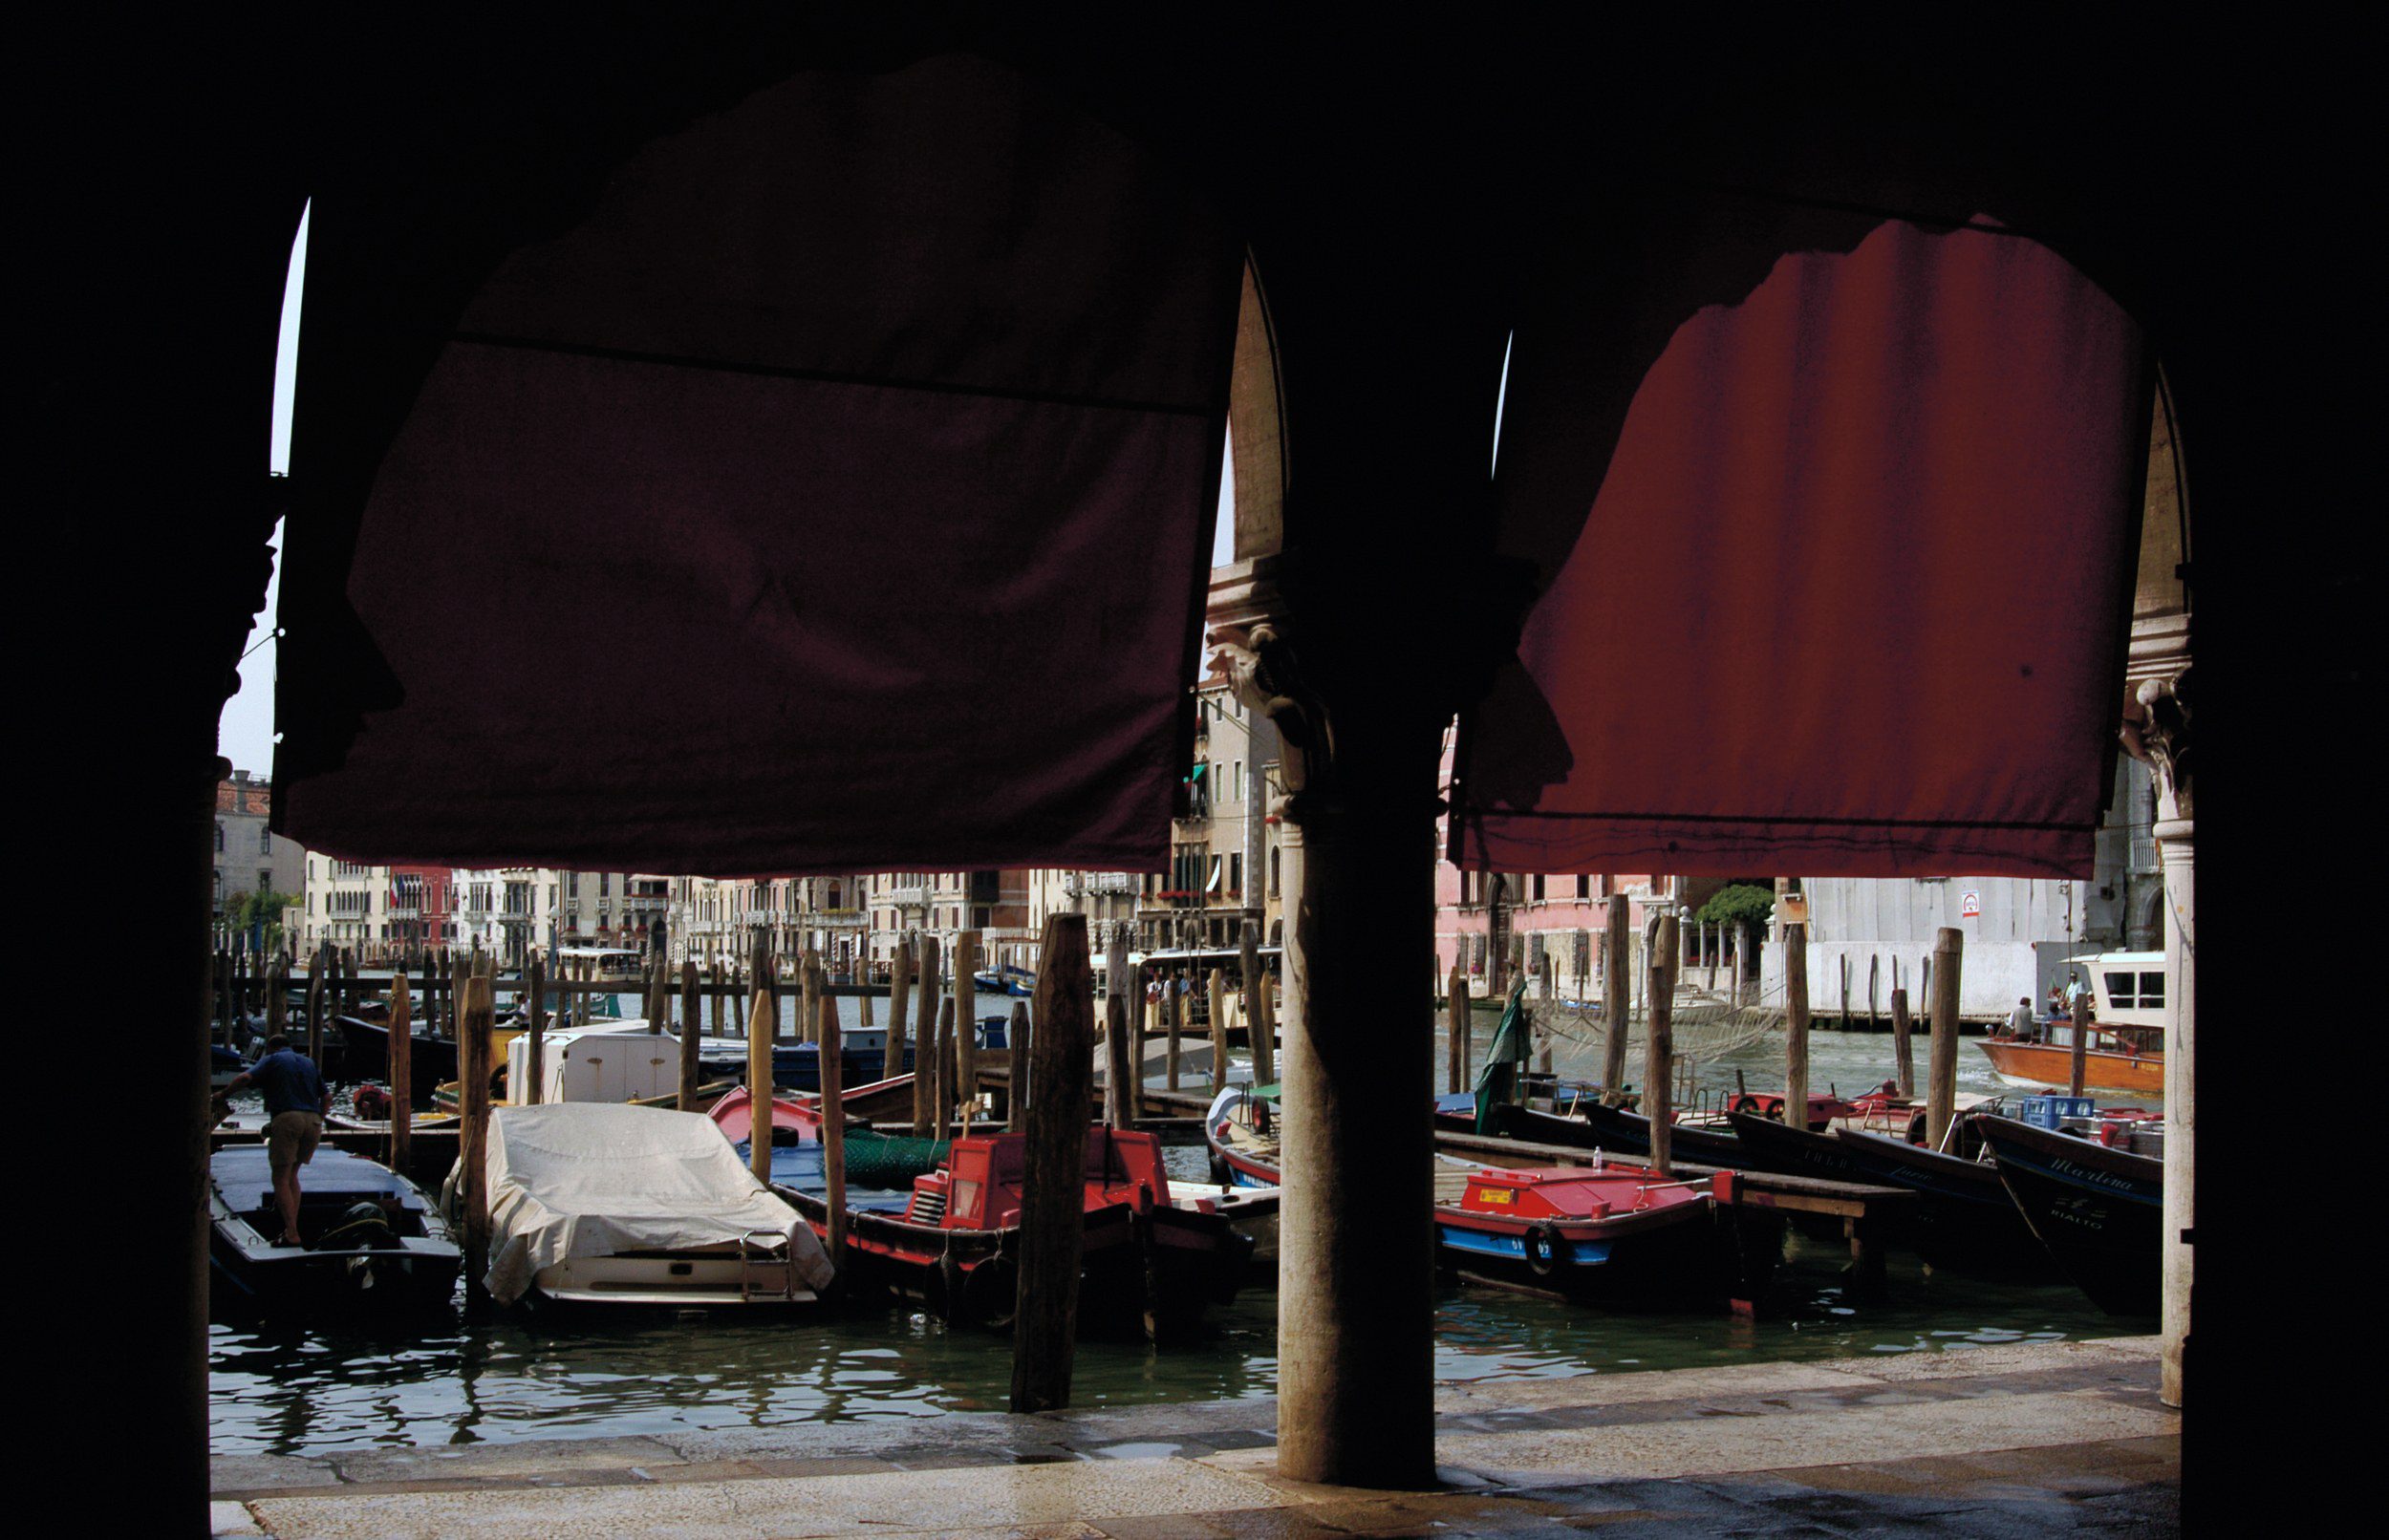
Photograph by Robin Nichols
Wide Exposure Variance: Here’s a classic metering conundrum. The scene, a fish market in Venice, is shot from the inside looking out. More than 60% of the scene is very dark, so unless you are careful, the camera will drastically overexpose the outdoor section of the frame. Quick answer? In this example, I deliberately set the camera’s Exposure Compensation feature to minus two. This underexposed the frame by two exposure steps, producing a far more acceptable result!
How Exposure Works
Let’s take a look at how exposure works. There are two methods in which light is recorded in a camera: reflected light and direct light.
Before SLRs with light metering systems came along, photographers had to either guess the exposure or use hand-held meters to gauge the intensity of the light.
Typically, you’d approach the subject where possible and measure the amount of light reflected off that subject. This technique took into account the nature of the subject material itself; for example, if it was shiny, matte, dark, or light.
But if you couldn’t get close to the subject because it was too distant or too dangerous, you’d place a plastic diffuser over the meter’s sensor (a device called an invercone) and read the light falling onto the subject. This took into account subjects that had mixed reflectivity.
I still have one of these meters – a Weston Euromaster II. And you know what, it still works perfectly. OK, I don’t actually use it anymore because I don’t need to, but if I did, it’d function pretty accurately.
The simple reason for this is that the principle of exposure has not really changed since meters first became a consumer thing back in the thirties.

Photograph by Robin Nichols
Use the LCD: Not a particularly exciting illustration perhaps, but reading the histogram is one of the best ways to judge exposure on a camera’s LCD screen. (On some models this is visible in Shooting Mode as well as in Replay Mode.) The above left photo shows two stops of underexposure (the tones in the graph are mostly slumped against the left-hand vertical axis), the middle example is what the camera ‘thinks’ is normal exposure, while the right-hand frame is overexposed by two stops (the tones are predominantly to the right-hand side). The ‘normal’ shot is still underexposed; the tones in the histogram are mostly located towards the left-hand side of the center point, indicating slight underexposure. Providing that the tones are not touching the left or right vertical axes, they can be edited lighter or darker without much of a problem. If either is touching one of those axes, it’s a different matter. Tones might have been permanently lost or ‘clipped’ from the file and therefore would be impossible to recover, regardless of your editing prowess.
A Bit of History
Thirty years ago, if you pointed your camera at a white subject, the camera would produce a grayish-toned result – not white as you might expect. Similarly, if you snapped a picture of an all-black subject, it would also produce a grayish-looking result. This was because meters were not very sophisticated and were designed to ‘average out’ the meter reading.
In this scenario, it produces something halfway between black and white: gray. But because we all take shots in different lighting conditions, camera designers began developing more sophisticated meters that ‘weighted’ the light reading process.
This began by designing systems that placed more emphasis on the center of the frame than the edges because in practice that’s where the majority of subjects were placed. And so metering patterns were born.
Top-of-the-range DSLRs and mirrorless cameras still operate on the principle of measuring the light that passes through the lens; although, metering has become significantly more refined.
Nikon engineers, for example, studied tens of thousands of consumer images to produce algorithms that describe the best (exposure) result for what’s described as an ‘average’ type of photograph.
But because we all take shots in different lighting conditions, camera designers began developing more sophisticated meters that 'weighted' the light reading process.
Indeed, Nikon’s Matrix metering system, Canon’s Evaluative, Olympus’s ESP metering, to name just three, are all excellent generalist metering modes that produce predictably good results in a wide range of shooting situations, maybe 80%-90% of the time.
The difference between my old Euromaster and the Evaluative metering system in my Canon DSLR is that the latter is less likely to be ‘fooled ’by tricky lighting because of the included programming, plus the sophisticated ‘weighting’ percentages added by the metering pattern.
Recommended Reading: Want a step-by-step guide on photography skills with your DSLR? Grab a copy of our best-selling guide, the DSLR Crash Course.
Metering Patterns
One camera feature that can make a massive difference to exposure success is the metering pattern. This is not the same as the metering mode. A metering pattern describes where in the viewfinder or sensor the meter takes its exposure information from.
If you’ve never heard of the term before, the best example would be to look at the difference between a camera’s Average Metering pattern versus its Spot Metering pattern.
The first ‘averages out’ the exposure over the entire image, much as cameras did 30 years ago, while the latter only takes a reading from the middle 5% of the scene. (Note: this figure varies according to camera make and model.)
But you get the point. The exposure results from using either pattern type might be identical, but equally, they might also be radically different. It all depends on the brightness qualities of the subject.
Three Different Types of Metering Pattern:

Photograph by Robin Nichols
Top: This represents Canon’s Evaluative metering pattern (other cameras will be slightly different) which splits the viewfinder into zones that meter the light wherever the AF focus point is set. In this illustration, the DSLR has only nine AF points. More sophisticated cameras have many more points.
Middle: The center-weighted average metering pattern emphasizes the central part of the frame.
Bottom: Spot metering is very specific as it only records the light from just 5% in the center of the frame.
Metering Pattern Characteristics
All metering patterns have slightly different names and slightly different specifications depending on the camera make and model. Here’s a rough guide on what to expect from different pattern types.
Evaluative or Matrix metering – This mode assesses the scene by dividing the metering into zones that individually assess the light and dark properties of any scene. Generally, these patterns are great all-rounders and work for most of our photographic subject matter.
Average Center-Weighted – As the name suggests, this mode averages light and dark areas but places more emphasis on the central zone because this is inevitably where the majority of photographers place their subject.
Average – An older style of metering where the entire scene brightness is averaged out. This is ideal for subjects like urban night shots, where there’s a lot of very bright street lighting and a whole bunch of very dark shadows.
Spot metering – This is a mode that only looks at a small part of the scene. How much of the scene differs between camera models, but assume it’s about 5%. While it is excellent for singling out a very specific part of a scene, if pointed at dark or light subjects, it might produce exposure errors.
Exposure Compensation
This feature, found on all cameras, works in Program, Aperture Priority, and Shutter Priority modes. It’s possibly the most important of all camera features as it allows you to quickly modify the exposure by making the next frame darker or lighter, in steps as small as one-third of an exposure click (set the amount in the camera menu). If you have never used this feature, check your camera’s specifications and try it out!
Exposure Compensation.. is possibly the most important of all camera features as it allows you to quickly modify the exposure.. in steps as small as one-third of an exposure click.
Exposure Compensation gives you tremendous control when the otherwise accurate metering process goes off the rails. Note: it only changes the exposure, NOT the color.

Photograph by Robin Nichols
Exposure Compensation is the best feature: Get to know your Exposure Compensation feature (in red, here it’s set to zero, but it can be extended as much as plus two exposure steps and minus two exposure steps when needed). It will help you control the exposure in scenes where the regular metering mode is fooled into producing an incorrect result.
The Top Three Reasons Why You Might Need to Purposely Underexpose
- To create a deliberately low-key result
- To preserve delicate highlight tones from being lost
- To produce a faster shutter speed and create a sharper image
Exposure Bracketing
Exposure bracketing was a feature originally designed for photographers specifically shooting color slides (transparencies). This film had a very narrow exposure latitude. If it was more than a half stop over or underexposed, the image was useless. So shooting a range of different exposures in one press of the shutter button usually produced at least one usable frame. Wasteful, yes, but an essential technique if you had no second chance to get the shot.

Photograph by Robin Nichols
Exposure Bracketing, the process of shooting several frames of the same subject but with different shutter speeds (in Aperture Priority mode), can often produce at least one good exposure. It’s a good technique to use when in a hurry, or when your subject lighting is challenging, such as the deep shade and harsh highlights seen here in Dubai Airport. Here the results are minus 2, ‘normal,’ and, on the right, plus +2 f-stops.
Three Underexposure Tricks
1: Compensate for Loss of Highlights
I have been lucky enough to have been on safari in Africa several times and never get bored of photographing wildlife even though it can, at times, be tricky, especially fast-moving action like a running cheetah when there’s little time to think!
One situation that I’ve always found tricky is photographing elephants. Yes, I know they don’t move quickly, and I appreciate that they are rather large so there’s less need for a massive telephoto lens, but because they are predominantly dark, they can fool a meter to produce an overexposed result.
On the surface, this might sound like a petty comment, but anyone that has been on safari will know that elephants are nearly always accompanied by clouds of white egrets looking for small prey disturbed by the feeding pachyderms.
Because a herd of elephants is a predominantly dark subject, what frequently happens is that the camera meter overexposes the file slightly. This would be easy enough to fix in post-processing by darkening the file, but what inevitably happens is that the white birds are also overexposed to the point where valuable highlight tones are clipped and are therefore completely lost from the file.
I generally shoot using Aperture Priority mode, so set the Exposure Compensation to minus one or 1.5 exposure steps. This can be dialed-in easily and quickly; you hardly need to take your eye from the viewfinder.

Photograph by Robin Nichols
Underexposure is good: Although the elephants can be darkened in post-production to look ‘normal,’ the white birds remain featureless (above left). The answer in this situation is to force the camera to underexpose so as not to lose those valuable highlights. I usually underexpose everything by one-third of an f-stop by default, but any file that contains such white and dark subject matter needs a further one f-stop of underexposures – maybe more if the contrast difference is extreme. Your images will look dark on the camera’s LCD, but once edited in post-processing, they’ll look fully toned and awesome.
2: Using Underexposure for a Faster Shutter
Ever been stuck because there’s not enough light and your shutter speed is too slow? I seem to encounter this problem every time I go out with my camera. Here’s a good tip to counter a slow shutter speed: underexpose!
If shooting in Aperture Priority mode set the Exposure Compensation feature to minus one f-stop. This produces a darker result because, to underexpose in this mode, the camera is forced to increase the shutter speed by one exposure step. One step faster shutter speed might be all you need to get a blur-free shot, and the resulting darker image can easily be fixed (brightened) using software with little or no negative results.
Here's a good tip to counter a slow shutter speed: underexpose!
I often find I have to increase this to minus two steps for an even quicker shutter speed. Any additional noise, or artifacting, revealed by the much-needed software brightening is likely to be quite acceptable once you appreciate that the image is now razor-sharp. A blurry but noise-free image is not as attractive as a pin-sharp subject with a little noise in it.
In Manual metering mode, you can create the same effect by simply doubling the shutter speed or halving the ISO number.

Photograph by Robin Nichols
Shutter speed is vital, especially with long lenses: Here’s a classic example where underexposure can save the day: a female Kudu with a calf at sunset. I deliberately underexposed this shot by two exposure steps to maximize the shutter speed and therefore ensure a shake-free shot.
Recommended Reading: Want a step-by-step guide on photography skills with your DSLR? Grab a copy of our best-selling guide, the DSLR Crash Course.
3: Go Low Key
For some reason, low-key images were a really popular photo technique, or ‘look,’ back in the ’80s. When done well, it can look impressive.
To make this work, photographers would typically use an old-school spot meter or choose the Spot Metering Pattern in their camera, both of which restrict the metering response to a small central part of the viewfinder, typically around 5%.
For a portrait of a Caucasian, a photographer would typically meter off the subject’s face, therefore holding all the details in the pale skin tones and darkening the mid-and shadow tones. For a darker-skinned person, you’d simply drag in some underexposure to darken the skin tones (because a camera meter is likely to slightly overexpose dark skin).
Much of this can also be simulated easily enough using software, but if you can accurately capture the tonal groundwork through careful exposure monitoring first, it’s so much better.

Photograph by Robin Nichols
Light or dark: One of my favorite photos from Marrakesh – bamboo provides some shade from the blazing summer sun, but the concentration of brilliant highlights and dark shop interiors are perfect for a metering mistake. Here I deliberately underexposed the frame two stops to get the far more atmospheric result, on the right.
6 Quick Software Fixes for Underexposure
- Underexposed RAW files can be lightened using a combination of the Exposure, Shadow, and Blacks sliders (here I’m referring to Adobe Photoshop Elements and Adobe Photoshop CC).
- To make a non-RAW file image lighter, use a Curves, Levels, or Brightness tool to brighten the file.
- Use the application’s Dodge brush tool to ‘paint’ lightness into only the affected parts of the image.
- Use the application’s Layer Mask feature to isolate and brighten specific areas in the image.
- Alternatively, use a soft-edged (‘feathered’) Selection to isolate the dark areas in an image first and then apply a tone change to reveal otherwise ‘lost’ details in the darker areas.
- Use the application’s noise reduction filter (sparingly) to reduce the noise exaggerated by severe software tweaking.
Self-Check Quiz:
- True or False: You can rely on camera technology to deduce the proper exposure.
- List three attributes of an underexposed picture.
- Name two of the three top reasons for underexposing a photo.
- Can the camera model make a difference in determining exposure?
- Describe what a metering pattern is and does.
- Describe the function of exposure compensation.
- True or False: There are occasions where you would want to purposefully underexpose a picture.
- Describe the act of exposure bracketing.
- True or False: When a scene is mostly comprised of black or dark colors, it will fool your camera meter.


