


In October 2020, Adobe released a powerful new tool in Photoshop 2021: the Sky Replacement tool. Other programs have sky replacement tools (e.g. Luminar), but this is the first time Photoshop has included this option.
Photographers have been using Photoshop to replace skies all along, but the process could be time-intensive. Before the Sky Replacement tool, you’d have to carefully select the sky using various selection tools and create a layer mask. If the foreground and sky formed a clean edge, then this wasn’t too difficult. But if trees or other complex edges were overlapping with the sky, masking could be difficult.
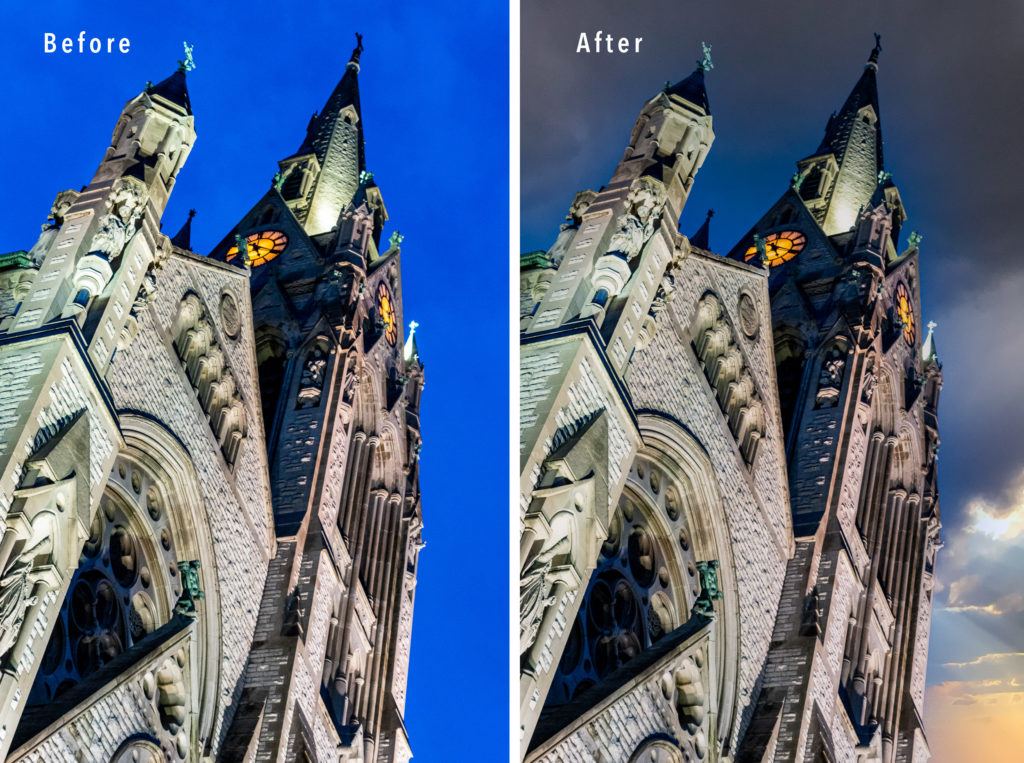
Before and after comparison of a church tower at dusk. The image on the left shows the original sky. The image on the right shows the same image after the sky was replaced. Photograph by Jenn Mishra
With the new Sky Replacement tool, two clicks in Photoshop will take care of the masking. Even Lightroom users who don’t have a lot of experience in Photoshop will find this tool accessible. You don’t have to know how to create layers or layer masks. The program will do it for you.
Let’s take a look at Photoshop’s surprisingly easy-to-use Sky Replacement tool. In this guide, we’ll cover the following:
- An introduction to sky replacement
- Using the Sky Replacement tool
- Using your own images as sky replacements
Recommended Reading: If you’re interested in improving your post-processing workflow, check out Photzy’s Understanding Masking premium guide. It has sections on Lightroom and Photoshop, as well as Snapseed for mobile users, too.
Introduction to the Sky Replacement Tool
Why Replace a Sky?
If you’ve never replaced a sky in your images, you may be wondering what all the fuss is about. Why would photographers replace a sky?
The most common reason to replace a sky is to add drama to an image. Blue skies are nice but boring. Clouds, storms, and sunsets make an image more interesting. Even if you’re not after the drama, adding textured clouds to your image will break up uniformly gray or blue skies and add visual interest.

Before and after comparison of a Cuban classic car. Sometimes I replace a sky to make it visually less distracting. In the ‘before’ image, the sky is blown out and distracts from the main subject. The ‘after’ image shows a muted sky that enhances the subject. Photograph by Jenn Mishra
You should know that opinion is divided about sky replacement. Many photographers replace skies freely while others think it’s cheating.
A sky replacement is a type of compositing. Composites are made up of two or more images. Compositing is common in photography, but it does not accurately represent reality. The sky really didn’t look like that when you took the photo. This isn’t necessarily a problem. No rule says that you have to accurately represent reality in your photographs; though documentary photographers, like photojournalists, are expected to be faithful to reality.
Most photographers post-process their images, but it’s up to each photographer to decide what they will and will not do. Some photographers clone out bits of trash or power lines, whereas others won’t. Some will replace skies, whereas others won’t.
In the end, it’s up to you to decide. The only thing I will say is that if you decide to use sky replacements, be open about it. Don’t hide the fact that the image is a composite.
How Photoshop’s Sky Replacement Tool Works
The Sky Replacement tool in Photoshop automates what photographers have been doing all along when replacing skies.
The tool analyzes your image and detects areas of the sky. Then the program creates a layer mask.
A layer mask selectively shows or hides parts of your image. In this case, the mask allows the new sky to show through foreground elements.
The Sky Replacement tool in Photoshop automates what photographers have been doing all along when replacing skies.
Photoshop also adds a layer that adjusts the lighting in the foreground to help blend the new sky with your original image. This means adjusting color temperature and exposure.
Using layer masks means that your original image is never changed. The tool is non-destructive. You have the ability to adjust the mask if you think Photoshop didn’t quite get it right. You can also remove the sky layer and mask anytime you want.
I’ve done some informal testing on my images and the masks Photoshop creates are fairly accurate even with the complex foreground.
Using the Sky Replacement Tool
Let’s walk through the process of replacing a sky with Photoshop. Follow along with an image of your own.
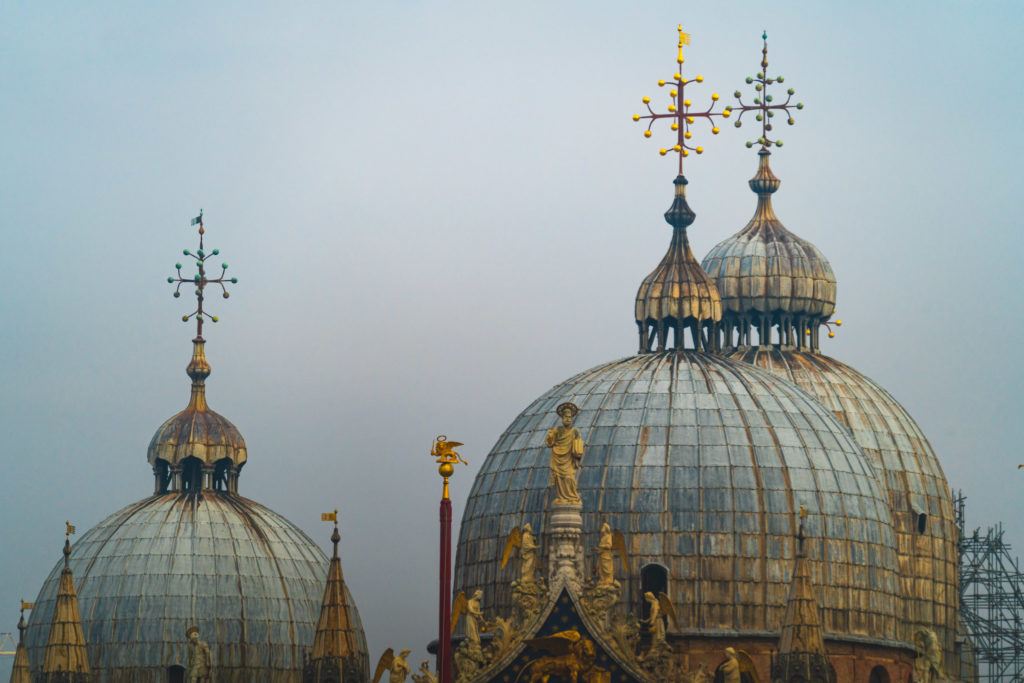
Original image of St. Mark’s Basilica in Venice with a muted sky. Photograph by Jenn Mishra
Here (above) is my image before replacing the sky.
I don’t mind the soft sky in this image, but the color is too close to that of the domes of St. Mark’s Basilica in Venice. The colors are too monochrome for my taste. I needed a sky with some color.
Before you get after me for not being patient enough to wait for the color to appear or being dedicated enough to visit at the right time, this WAS sunrise. It was a winter sunrise in Venice on a gray day. When we travel, we don’t have control of the weather.
Let me take you through the steps for replacing the sky:
Step 1: Open Your Image in Photoshop
If you’re a Lightroom user, this is called “roundtripping.”
Go to Photo > Edit In > Edit in Photoshop 2021 (Ctrl or ⌘E). The image will open in Photoshop. When you’re finished editing in Photoshop, save your file. The saved file will automatically be added to your Lightroom catalog.

Lightroom screenshot showing how to roundtrip an image into Photoshop. Photograph by Jenn Mishra
Step 2: Open the Sky Replacement Dialog Box
In Photoshop, select Edit > Sky Replacement
If you’re not seeing the Sky Replacement option under Edit, check that you’re using Photoshop version 22.0. Older versions won’t have this option.
If you see the Sky Replacement option but it’s grayed out, check that your background layer is selected in the Layers panel.

Photoshop screenshot showing how to open the Sky Replacement tool. Photograph by Jenn Mishra
Step 3: Choose Sky Replacement Options
By default, Photoshop will automatically apply a pre-loaded sky replacement to your image. If you’ve used the Sky Replacement tool before, Photoshop will replace the sky with the last selected sky.
You can see what other skies would look like in your image by clicking on the arrow next to the icon at the top labeled “sky.” Adobe has pre-loaded some blue skies, spectacular skies, and sunsets for you to experiment with. You can also load your own sky images into Photoshop. I’ll show you how to do this in the next section.

Screenshot of the Sky Replacement dialog box showing how to see more sky replacement options Photograph by Jenn Mishra
The sky you choose is up to you. I usually experiment with a few options before settling on a replacement sky. The lighting in your foreground doesn’t have to match the background sky exactly. But if your image has obvious shadows, select a sky that has directional light that matches the light source in your original image.

Image of St. Mark’s Basilica with the sky replaced. Photograph by Jenn Mishra
Don’t force it. Choose a sky that looks good with your image.
For my image, I selected one of the pre-loaded Spectacular skies

Screenshot of the mask created by Photoshop during the Sky Replacement process. Photograph by Jenn Mishra
Take a look at the mask (above) that Photoshop created. You can see how Photoshop has masked around all the bumps and fine lines including the decorative tops on the domes.
Before you click OK, look at some of the other options you have in the Sky Replacement dialog box.
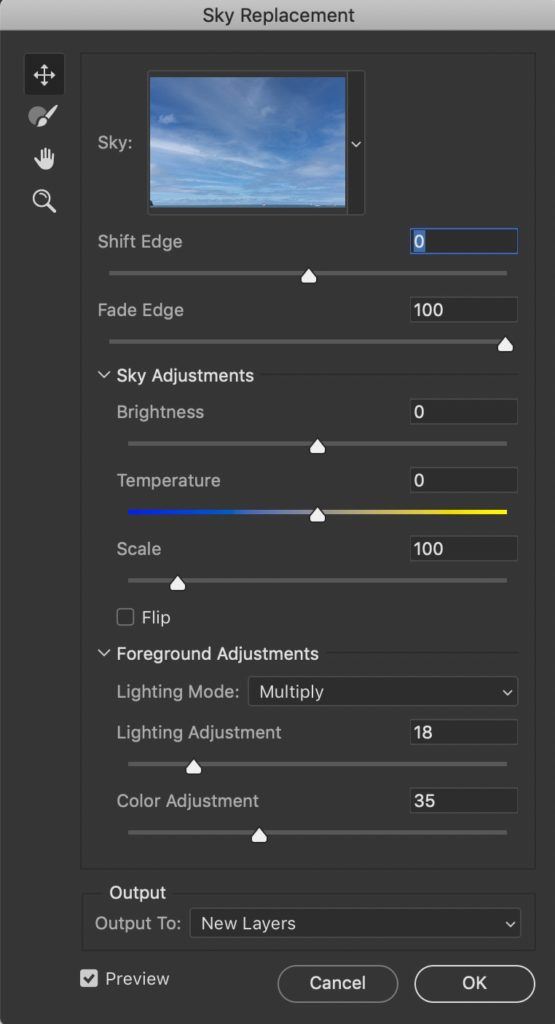
Screenshot of the Sky Replacement dialog box showing editing options available. Photograph by Jenn Mishra
Photoshop automatically makes adjustments, but you have control. If you don’t like the way something looks, you can fix it before applying the sky replacement.
Shift and Fade Edge
The Shift and Fade Edge sliders allow you to change how the sky and foreground intersect. You can move the boundary between the sky and the foreground and change how much one fades into the other.
Recommended Reading: If you’re interested in improving your post-processing workflow, check out Photzy’s Understanding Masking premium guide. It has sections on Lightroom and Photoshop, as well as Snapseed for mobile users, too.
Sky Adjustments
In this section, you can adjust the brightness and temperature settings of the sky. You can also resize the sky using the Scale slider. Checking the Flip box will horizontally flip the sky.
Foreground Adjustments
Photoshop automatically applies a lighting and color cast on the foreground to better blend with the new sky.
The default Lighting Mode is “Multiply,” which darkens the image. You can switch this to “Screen” mode for a lighter touch. Photoshop users will recognize Multiply and Screen as commonly used blend modes.
You can also lighten or darken your foreground to better blend with the new sky and add a color cast.
Output
By default, the sky replacement is set to output as new layers. This means that Photoshop is applying the sky in a non-destructive way. Your original image is not changed.
After you click OK, Photoshop will create two new layers. One is the sky replacement, and the other is the color changes applied to your foreground. You will be able to go into the individual layers and change them if you wish.
The sky you choose is up to you. I usually experiment with a few options before settling on a replacement sky.
If you want Photoshop to simply apply the sky replacement and don’t want to edit individual layers, you have the option of changing the output to Duplicate Layer. A copy of the background layer will appear in your Layers panel with the sky applied. The background copy merges all of the individual layers and layer masks.
Additional Tools
Along the left side of the Sky Replacement tool dialog box, you have four additional tools. Photoshop users will recognize these tools.
The top tool is the Move tool. This allows you to move the sky around in the background. You can reposition the horizon line to best work with your image. The Brush tool lets you fine-tune how the sky background fades into the foreground.
The Hand tool and Magnifying Glass allow you to zoom in close and move the image around for detailed editing.
Step 4: Click Ok
That’s it!
If you look at your Layers panel, you will have new layers with layer masks. You can easily adjust the layer masks by clicking on the mask and using a black brush to exclude or a white brush to include information.
For my image, I applied a Photo Filter and Brightness/Contrast layer to add a bit of warmth and brightness to the image and the transformation was complete.
A boring sunrise in Venice became a spectacular sunrise.
Import Your Own Skies

Photo of a Ferris wheel against a city skyline. Photograph by Jenn Mishra
Adobe has included a couple of dozen skies for you to use, but it’s easy to import your own. This makes your images uniquely your own. You won’t be flipping around the internet and see someone else’s photo with the same sky background.
Let me show you how to import a sky and apply it as a sky replacement to this image.
Step 1: Select a Sky Image
Find an image that is mostly sky and which has a clear horizon. I look for images that have the horizon low in the frame. It’s ok if there are low trees or hills along the horizon, but avoid including any prominent subjects. It doesn’t matter if the image is horizontal or vertical.
Save the image as a jpg or tiff file.

A sky image was taken at sunset near my home along the Mississippi River. Photograph by Jenn Mishra
Step 2: Open the Sky Replacement Dialog Box
Select Edit > Sky Replacement.
Step 3: Click the Arrow Next to the Sky Image at the Top
Step 4: Click the Gear Icon

Screenshot of the Sky Replacement dialog box showing how to access the import features. Photograph by Jenn Mishra
Step 5: Select the “New Sky” option

Screenshot of the Sky Replacement dialog box showing how to add a new sky. Photograph by Jenn Mishra
Step 6: Navigate to Your Sky Image and Select Open

Photo of a Ferris wheel against a city skyline with the sky replaced. The sunset adds color and drama to the scene. Photograph by Jenn Mishra
The sky will automatically import and be applied to your image.
Notice how well Photoshop has replaced the sky around the spokes of the Ferris wheel and even the tiny airplane.
I’ve created a new group for my skies so that I know which are mine and which are Adobe’s. To do this, select the “New Sky Group” option under the gear dropdown menu.
The next time you see an amazing sky, take a few photos, even if you don’t have an interesting foreground element. You may be able to use these images later as sky replacements.
Recommended Reading: If you’re interested in improving your post-processing workflow, check out Photzy’s Understanding Masking premium guide. It has sections on Lightroom and Photoshop, as well as Snapseed for mobile users, too.
Conclusion

Photograph by Jenn Mishra
Use sky replacement both to add drama to skies and to add texture to a blown-out or boring sky.
Sky replacement won’t work in every photograph, but it will work for many. Photoshop is good at detecting the sky, but if it’s a very complex scene, the program may become confused.
Sky replacement won’t work in every photograph, but it will work for many.
The ease of replacing skies in Photoshop makes this option available to photographers of all levels. Simply open an image in Photoshop and select the Sky Replacement option in the Edit dropdown menu. Photoshop will do the rest. You can use the pre-loaded skies or upload your own.
In two clicks, you can add a new sky and completely change your image.
Self-Check Quiz:
- How did photographers replace skies before the Sky Replacement tool was included in Photoshop?
- Where is the Sky Replacement tool located in Photoshop?
- Describe two reasons photographers may want to replace skies in their images.
- What is a composite image?
- In what circumstance would replacing a sky not be considered ethical?
- The Sky Replacement tool in Photoshop is non-destructive. Describe what this means.
- What is a layer mask?
- How do you select a different sky to use as a replacement?
- Describe three settings you can change in the Sky Replacement dialog box.
- How do you import a sky image that you took into the Sky Replacement tool?
Editing Assignment:
- Open an image in Photoshop that has a prominent sky. For this exercise, it doesn’t matter what the original sky looks like.
- Replace the sky using the Sky Replacement tool.
- Experiment with different pre-loaded skies or upload your own.
- Adjust sliders in the Sky Replacement dialog box and notice what changes.


