

The first decent digital camera I purchased had a crop sensor. I also bought a 100-400mm pro lens for it because I wanted to take pictures of wildlife. It wasn’t long before I returned to my favorite camera shop to enquire about why my images just weren’t very sharp. That was when I received a valuable camera lesson.
Those unclear images, as it turned out, were a direct result of my novice camera techniques. I wasn’t holding it steadily enough and I also wasn’t using a fast enough shutter speed for the length of lens. It cannot be over emphasized that lack of camera motion, in addition to critical focus, are paramount if sharp images are your goal.
If your photograph is not in focus, or it is suffering from motion blur, then no amount of sharpening can save it.
Sharpening can only enhance edge contrast and detail that is already in the image. However, if your photograph is in focus, and free of motion issues, then the conundrum is how to sharpen it without it looking like it’s been sharpened.
Sharpening is something that all photographers face when post-processing their images. Overuse of sharpening tools is a universal tendency when first learning how to post-process digital images. It’s easy to do, and it takes some experience and judgment to refine your approach.
Admittedly, your vision of what you want your picture to look like may be different from someone else’s. There are, however, some by-products of bad sharpening that really should be avoided, which we’ll be discussing.
Not all photographs need to be sharp, nor should they be. An image of a foggy morning is one example that comes to mind, but even this type of image requires some specific sharpening, which we’ll also be discussing.
Besides focus, sharpness is dependent on two main factors: the first being the amount of contrast at the edge of objects, and the second being the inner detail of those objects. Each different sharpening tool, or technique, affects sharpness differently. No one sharpening process is inherently superior to all others. The most appropriate type is dependent on each unique image, or creative intent.
Not all photographs need to be sharp, nor should they be.
Some images require the use of multiple sharpening approaches to achieve the required final result. Understanding each different type of sharpening, along with how and when to apply it, is key to getting good results. In this guide we’ll be discussing how each sharpening technique works and its practical use, while avoiding as much technical jargon as possible. The goal is to learn the practical side of sharpening, which will guide you in your sharpening decisions.
There’s no absolute answer to sharpening. Anyone who tells you there is should be avoided, or at the very least be asked to supply an extensive thesis on the subject which should get them out of your hair for a while.
In this article, you’ll learn:
- The three stages of sharpening
- Different ways to sharpen
- How each type of sharpening works
- How to sharpen by blurring
- How to control sharpening halos
- How to nondestructively sharpen
- How to adjust sharpness after it’s applied
- How to selectively apply sharpening
No one sharpening process is inherently superior to all others.
Recommended Reading: If you’re interested in improving your postprocessing workflow, check out Photzy’s premium guide: Understanding Masking.
A Few Notes Before We Begin
For the purpose of this guide, I’m going to assume that you’re capturing your images in the RAW format. RAW files contain all of the data from your camera’s sensor. They allow for the greatest amount of post-processing. JPEG files, on the other hand, have been sharpened and compressed with some of the data lost. Some of the sharpening we’ll be discussing may apply to post-processing JPEGs, but beware, as sharpening JPEG files can exaggerate any artifacts that were created by the JPEG process.
The majority of this guide’s techniques will refer to Lightroom, Adobe Camera Raw (ACR), and Photoshop because these are the most commonly used postprocessing programs. Most of this guide’s information will apply even if you’re using other software.
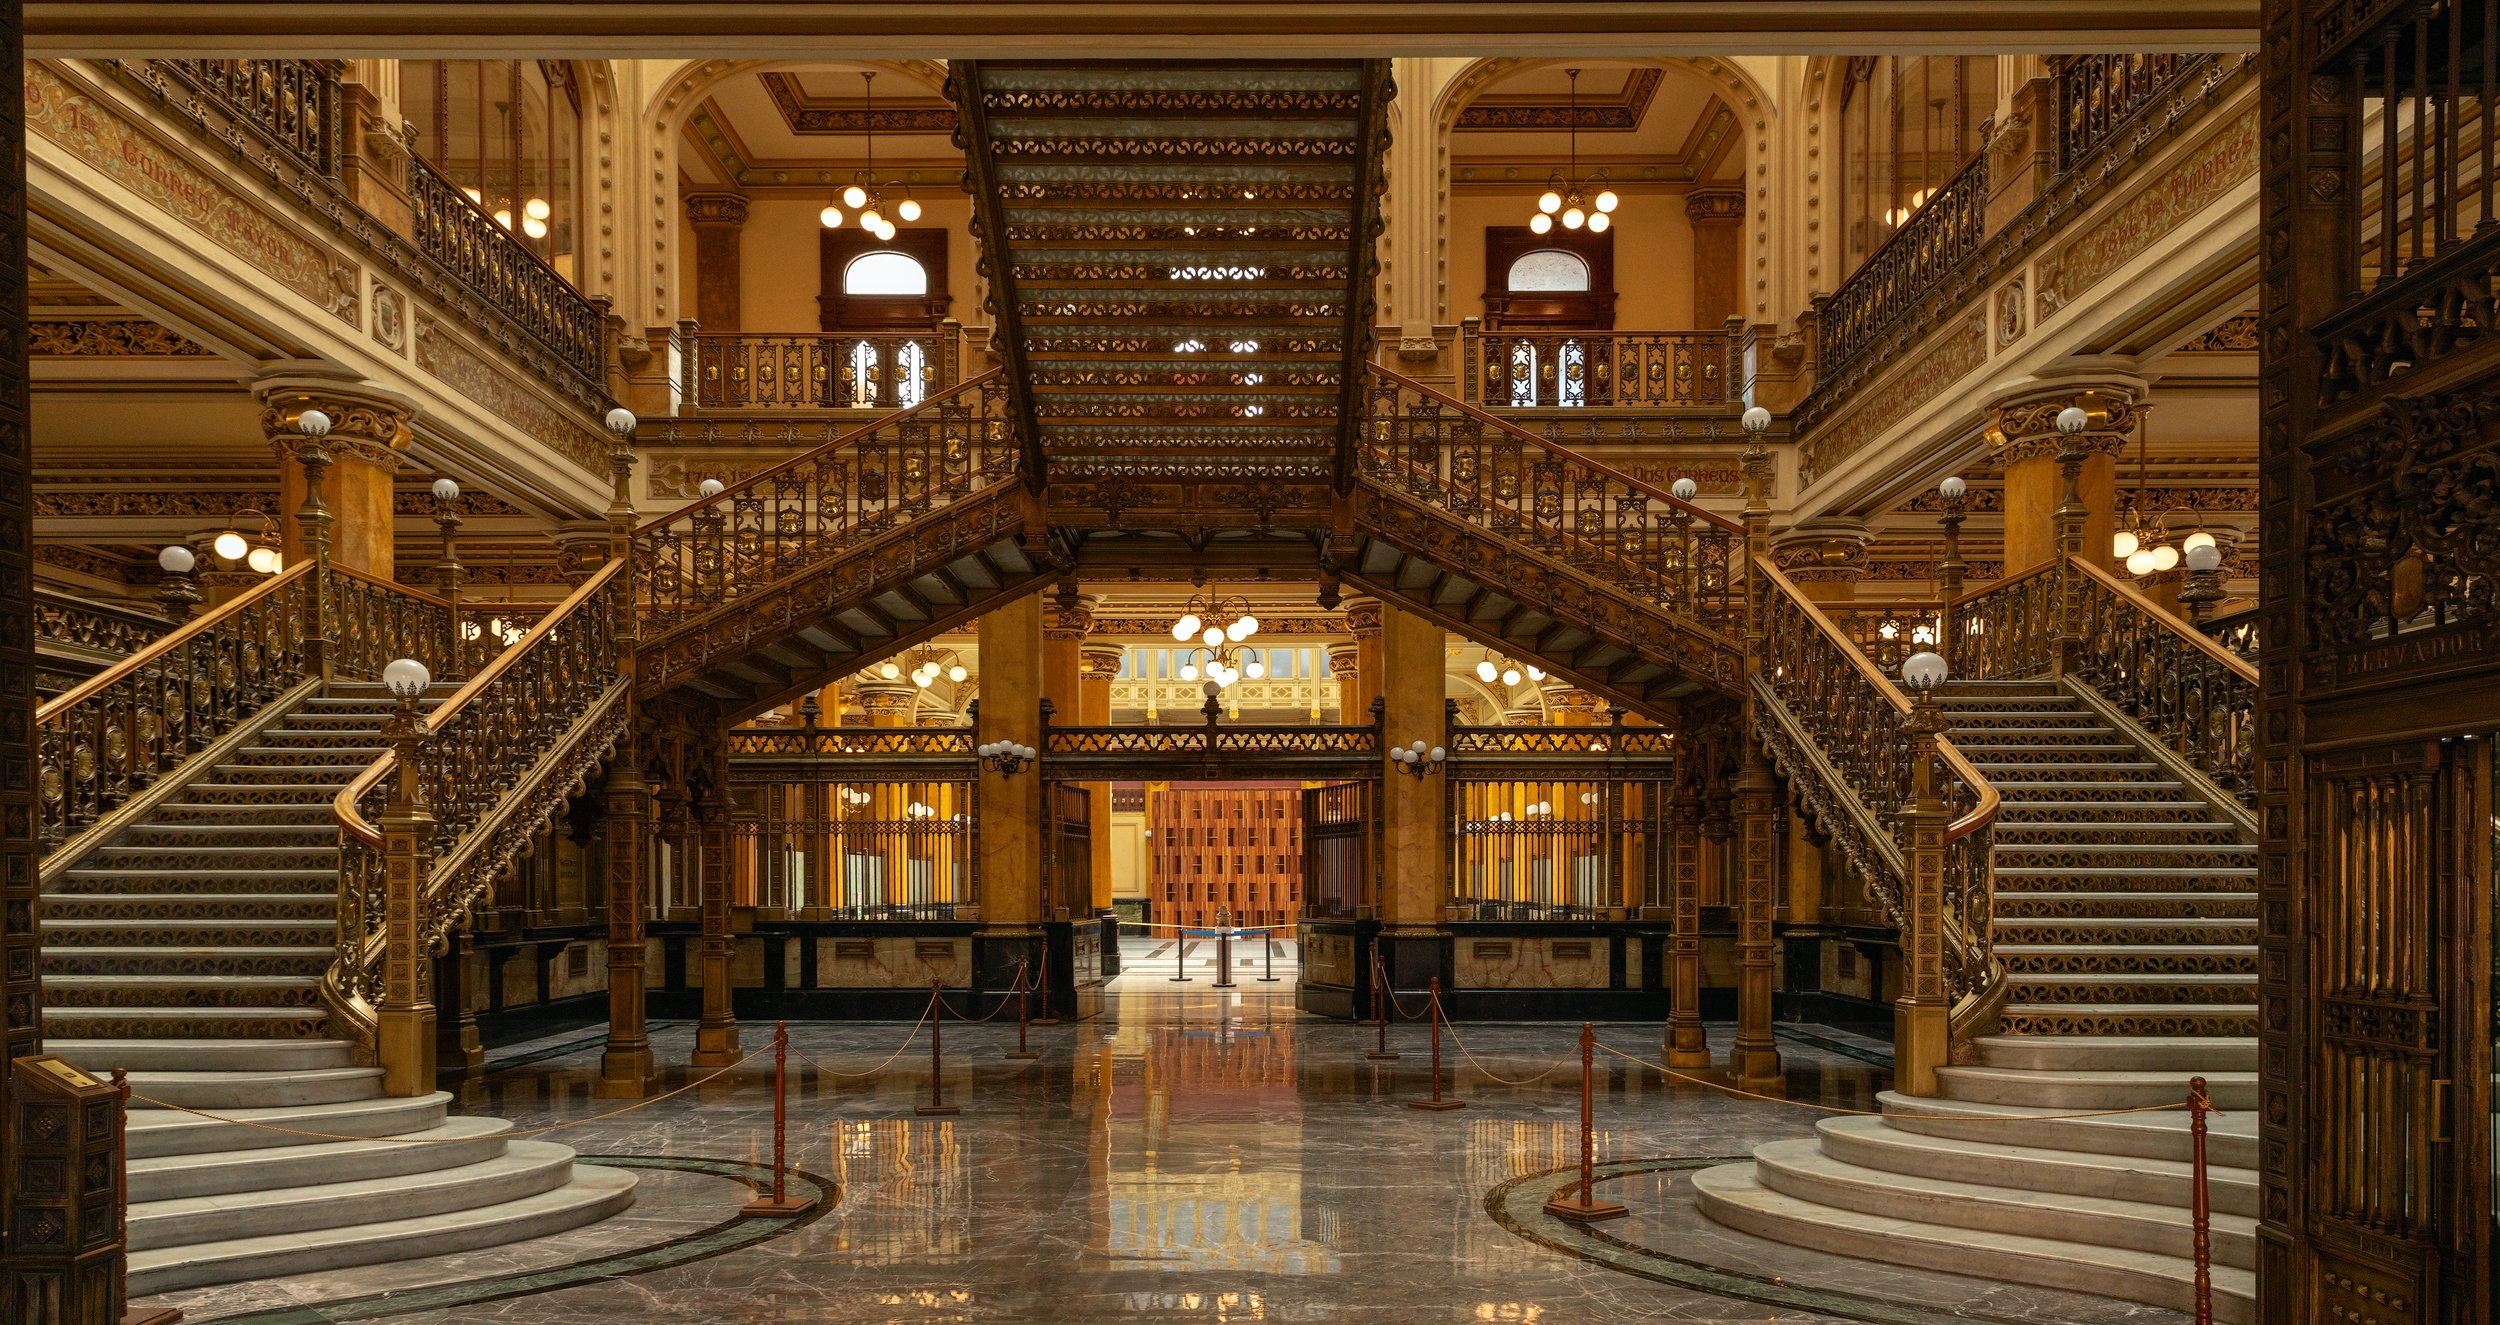
Photograph by Rob Eyers
This image has not had any sharpening applied. On the right is the same image after sharpening. It appears to be more in focus with more detail. There are no halos or visible clues that it’s been sharpened.
The Three Stages of Sharpening and the Reasons for Each
It’s generally accepted that a digital image requires three different rounds of sharpening:
- Capture sharpening
- Creative sharpening
- Output sharpening
Capture Sharpening
All digital images from all cameras require some initial sharpening to deal with softness in the image. This softness is a result of the camera sensor’s demosaicing process and anti-aliasing filter, plus the camera lens. Understanding all of the technical details is not important. Just know that the data coming out of your camera requires some further work called capture sharpening. The goal for capture sharpening is to reduce noise and sharpen the image just enough that it responds well to any ensuing creative sharpening.
Creative Sharpening
Creative sharpening is exactly what the name implies. It can be used to draw the viewer’s attention to the subject of the image, or perhaps heighten the perceived depth of field in a photo. What you don’t apply it to is as important as what you do apply it to. For example, a person’s skin, or a clear sky, would not generally benefit from further sharpening. A person’s eyes, on the other hand, might. Normally, creative sharpening is applied selectively, and as such it’s the most time-consuming and subjective task.
Output Sharpening
Note: It’s best to save the image after all of the creative processing is finished, and before any output sharpening is applied. By having a saved copy of the finished image, all that is required for different uses is a round of specific output sharpening. This specific-use version can be saved separately with a distinct name to identify it.
How to Capture-Sharpen
Capture sharpening is applied at the RAW development stage on your computer, unless you’ve shot in JPEG. Adobe Camera RAW, Lightroom, or any other RAW software performs this task.
If you’ve shot in JPEG, the sharpening was baked in when the JPEG was created in the camera. The amount of sharpening applied depends on the camera and the type of preset selected, such as landscape or portrait. This baked-in sharpening cannot be undone, leaving no options for changing capture sharpening.
Key Lesson: Optimal capture sharpening can only be done with a RAW file.
Each image is different in the detail it holds as well as the amount of noise present. Achieving the best sharpening is a balancing act between increasing detail and not intensifying the noise which detracts from it. It’s best to deal with noise first before any capture sharpening is applied.
Achieving the best sharpening is a balancing act between increasing detail and not intensifying the noise which detracts from it.
If the amount of noise in the image is minimal, then use the noise reduction adjustments that are in the Detail panel of the Develop module of Lightroom, or ACR. If the noise is great, then you may wish to use one of the many noise reduction programs on the market. Choose the one you like and use it before you do any capture sharpening on those very noisy images.
Dealing With Noise Before Capture Sharpening
Noise is made up of color impurities, luminance differences, and chromatic aberrations. They all need to be dealt with before capture sharpening. If they aren’t, the sharpening process will exaggerate them, which will alter the apparent sharpness of the photograph.
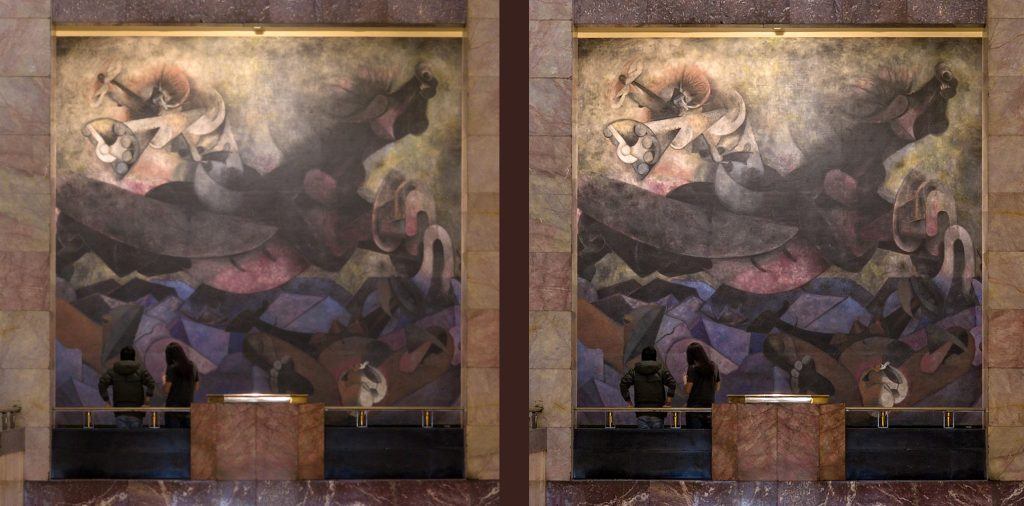
Photograph by Rob Eyers
This image (above) is zoomed to 400% so that all three types of noise are more obvious.
Adjusting Color Noise
Photograph by Rob Eyers
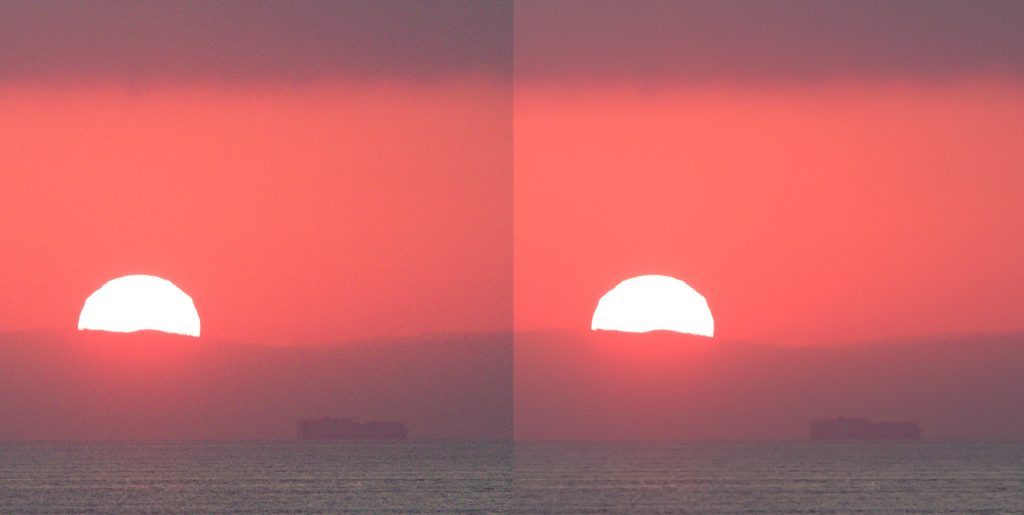
Color noise appears as blobs of color that are most noticeable in evenly colored areas. It’s usually easiest to see it in darker or lighter areas, as in the ‘before’ portion of the image above.
Color noise reduction is found in the Lightroom/ Develop Module/Detail Panel, and in ACR in the Detail Panel. Adobe’s current default settings are Color = 25 with Detail and Smoothness = 50.
Lightroom’s defaults are good general settings; however, they may not be the absolute best for every photo. An approach to dialing in the best adjustments is as follows:
- Zoom in to at least 200% or more on an area where color noise is evident.
- Set Color Detail to 100 and Color Smoothness to zero to exaggerate the noise.
- Sweep the color slider slowly from zero to 100, setting it at the point where most color noise disappears. A few iterations may be necessary to determine the best setting. When in doubt, err on the side of caution.
- Move the detail slider toward zero until any smaller amounts of remaining color impurities are removed.
- Move the smoothness slider up and watch any even-colored area that looks blotchy. Stop when the blotchiness is reduced.
Compare your results by toggling the Detail Panel off and on.
Adjusting Luminance Noise
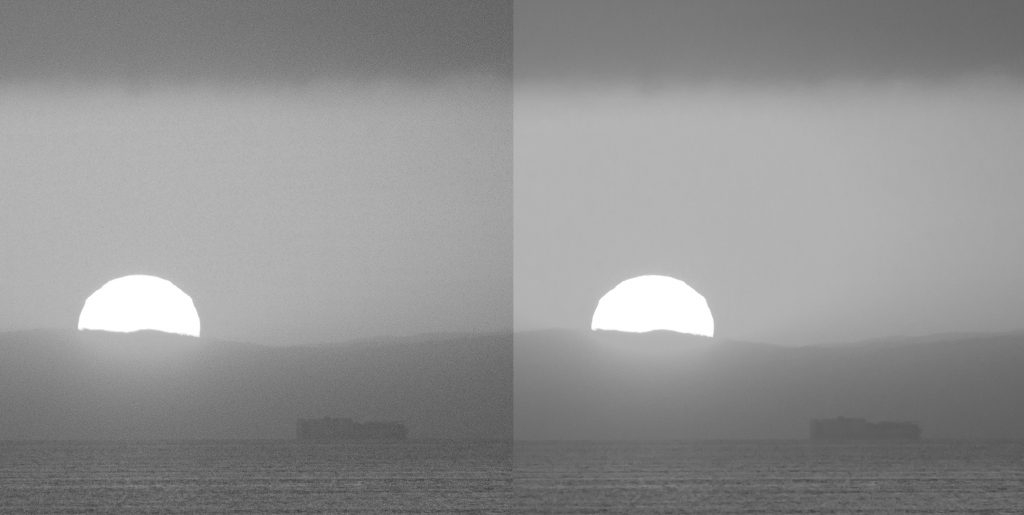
Luminance noise is colorless and varies depending on the camera’s image sensor and the selected ISO. A higher ISO will cause more luminance noise.
Luminance noise reduction is found in the Lightroom/Develop Module/Detail Panel, and ACR in the Develop Panel. The current default settings for luminance noise are Luminance = 0, Detail = 50, and Contrast = 0.
Photograph by Rob Eyers
Photograph by Rob Eyers
Not all photographs require luminance noise reduction, so Adobe has set the default to zero. Be very cautious with it because it’s easy to wipe out detail with the luminance slider. If detail is killed at this point, it won’t be possible to recover it later. Overdoing it will result in a waxy, over-processed, and fake-looking image. An approach to dialing in a good adjustment is as follows:
- Zoom in to at least 200% on a portion of the image which displays a high degree of detail.
- Set the detail slider to zero.
- Slowly bring up the luminance slider, watching for any loss in detail. Stop at the point where any loss is barely noticeable. Typically, that point will be somewhere between 5 and 10 or less. While making the adjustment, it can be helpful to see the image without color. To do this, hold down the Alt key (Option key on a Mac) while fine-tuning the settings.
- Bring the detail slider back up until any lost detail is recovered.
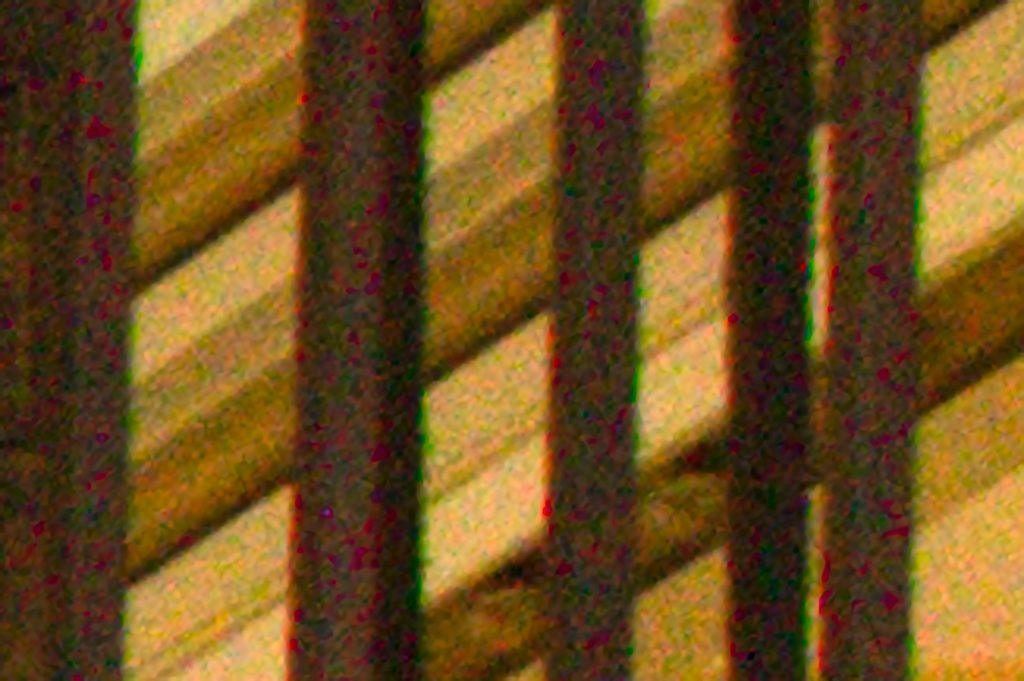
Adjusting Chromatic Aberration
Chromatic aberration shows up as a red, purple, blue, cyan, or green fringing, as on the left in the image above. It’s easiest to see on the edges of objects that have good contrast, which occur near the outer edges of a photo.
Adobe have created profiles for many popular lenses to make chromatic aberration adjusting easier. To apply these in Lightroom, go to Develop → Lens Correction → Remove Chromatic Aberration and turn it on.

Photograph by Rob Eyers
The same adjustment is available in ACR. While in this panel, it’s a good time to turn on the Lens Profile Correction too. This will apply corrections for any geometric distortions caused by the lens.
If the profile for Chromatic Aberration isn’t perfect, there’s a manual panel where fine tuning can be accomplished. In the manual panel, use the eye dropper by clicking on the colored fringes, or make adjustments by using the sliders.

Key Lesson: Noise affects apparent sharpness. Adjust for it first before applying capture sharpening, so that it’s not intensified.
Recommended Reading: If you’re interested in improving your postprocessing workflow, check out Photzy’s premium guide: Understanding Masking.
Capture Sharpening After Noise Reduction
It’s important to understand that capture sharpening is only used to correct the blur that’s inherent in the image captured by the camera. It’s not intended to render a final sharpened image. Go easy, and don’t overdo it. Sharpening too much now will negatively impact the creative sharpening being applied later on in the workflow.

Photograph by Rob Eyers
The image above demonstrates what sharpening does. It enhances the definition of edges in an image by adding contrast. This is accomplished by lightening the brighter side of an edge and darkening the darker side. This image has had large amounts of sharpening applied to make it easier to see the effect. Small amounts of sharpening go a long way, and heavyhanded sharpening with strong halos, as in the image above, will not look natural.
Key Lesson: Go easy on sharpening, and don’t create obvious halos.
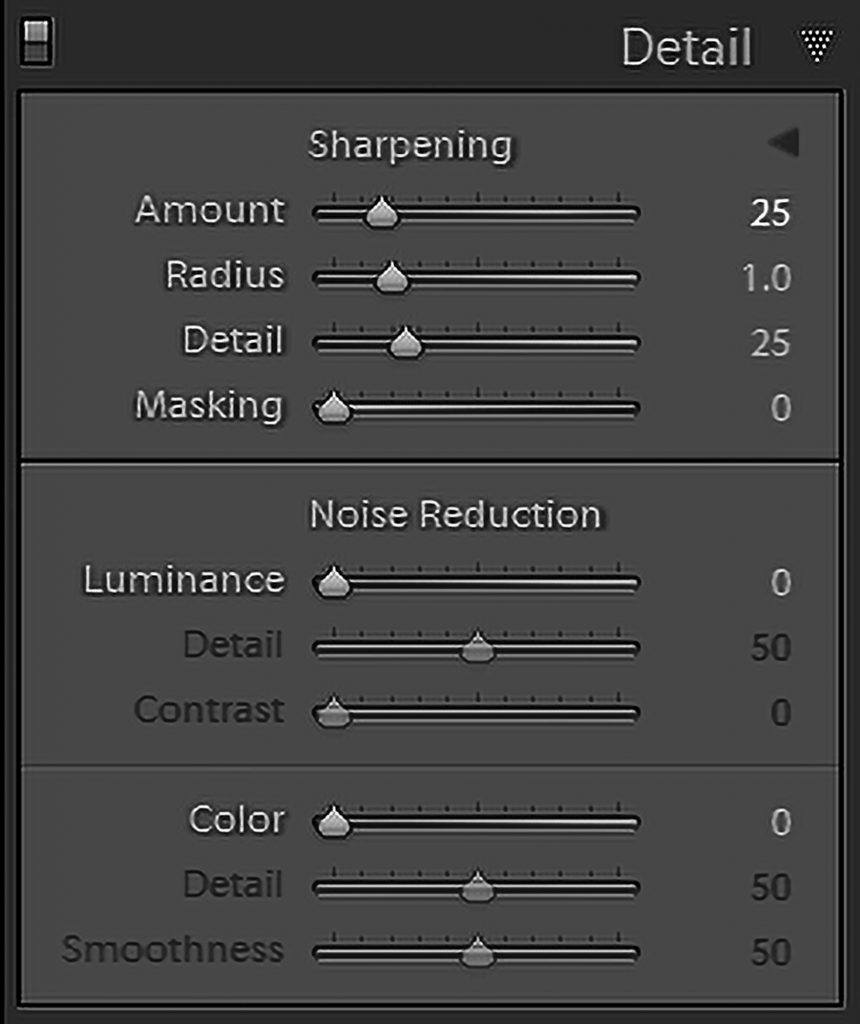
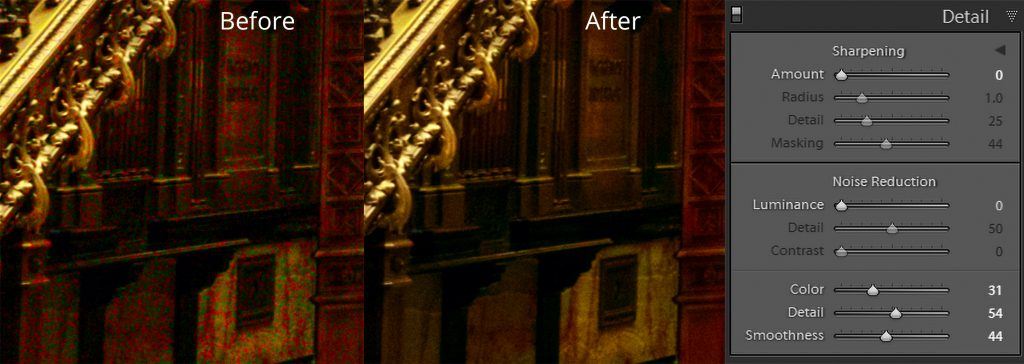
Lightroom and ACR’s default sharpening values are displayed in the image above.
- The Amount slider adjusts how much sharpening is applied
- The Radius slider determines how far from a given pixel the effect is applied.
- Use smaller settings for more highly detailed images and larger settings for the converse.
- The Detail slider can be thought of as a finetuning adjustment for the Amount slider, with 25 being neutral.
- The Masking slider blocks sharpening from being applied to portions of the image. (Black conceals and white reveals.)
Note: As with other sliders in the detail panel, holding down the Alt key (Option key on Mac) while making an adjustment removes color, making the adjustment easier to see.

Photograph by Rob Eyers
In the capture-sharpened portion of the image above, the noise has been reduced, which is easy to see in the coat and pants. While the noise reduction is harder to see in the textured walkway and stairs, the sharpening there is obvious. Notice that there are no halos, and things now appear solid and focused. This image is now in good shape for further creative processing.
Creative Sharpening
The sharpening conundrum now is what to sharpen, what not to sharpen, and how much to sharpen. The answer is entirely up to you as I can only speak for my own creative vision. Like a painter, you have your own ideas of what your image should be.
Creative sharpening should only be done after all other creative processing has been finished. Although final creative sharpening can be accomplished with the adjustment brush in Lightroom, Photoshop is a more powerful program with more ways to accomplish the task.
Creative sharpening should only be done after all other creative processing has been finished.
Photoshop’s main sharpening tools are Smart Sharpen, Unsharp Mask, and High Pass. There are many tutorials online explaining how to use these, so this guide will not be duplicating that. Instead, we’ll be inspecting the results of exaggerating each sharpening type to shed light on how they work. This will be helpful in deciding which sharpening type to use.
Creative sharpening is typically applied selectively. It’s best applied on a separate layer, so a mask can be employed to limit the sharpening to the areas required. It’s good practice to make the sharpening layer a smart object, so that any sharpening done is non-destructive and adjustable.
Key Lesson: Creative sharpening on a smart object layer allows for further adjustment, and is non-destructive.
Exaggerated Sharpening Examples

Photograph by Rob Eyers

Photograph by Rob Eyers
The following are examples of Photoshop’s Smart Sharpen, and Unsharp Mask. The amount was set to 250, and the radius to 10, which is ridiculously high, but it makes it easier to see what’s actually going on.
Smart sharpen creates hard-edged contrast, and the halos created are of complementary colors. It’s not generally advisable to introduce unwanted colors, so the blend mode of the sharpened layer should be set to Luminosity. This transforms the halos to gray scale.
Unsharp Mask creates softer-edged contrast, and like Smart Sharpen, the halos created are complementary colors. Here, the blend mode of the sharpened layer should be set to Luminosity to transform the halos to gray scale.

Photograph by Rob Eyers
In the High Pass example above, the radius was set to 10. High Pass creates more subtle, soft edges. Here, the halos created are complementary colors.

As with the other two sharpening modes, the blend mode should be set to Luminosity. To accomplish this, the High Pass layer must be placed in a group with a copy of the Background layer. This is necessary because the High Pass layer must remain in one of the Overlay or Light blend modes in order to work. In the image above, the Background copy layer and the High Pass layer have been placed in a group (the red square). The group’s blend mode has been set to Luminosity.
Controlling Halos
All three of these sharpening modes enhance the luminosity on both the bright and dark sides of edges. The most objectionable halos, which attract the eye the most, are the ones on the bright side. There’s a way of restricting those bright halos, so the sharpening is not as obvious. To do this, a dark luminosity mask is applied to the sharpened layer, or in the case of High Pass it’s applied to the group. Here’s how to accomplish this even if you aren’t familiar with luminosity masks:
- Duplicate your finished image (Image/ Duplicate).
- Flatten the duplicated copy using Ctrl+Shift+M (Windows) or Cmd+Shift+M (Mac).
- Duplicate the Background layer using Ctrl+J (Windows) or Cmd+J (Mac).
- Name the new layer “Sharpen.”
- Convert the Sharpen layer to a Smart Object.
- Sharpen the layer with Smart Sharpen (for now use amount 300 and radius 3).
- Go to the Channels Panel and click on the RGB icon while holding CTRL (Windows) or Cmd (Mac).
- Add a layer mask to the Sharpen Layer (it’ll be a black and white of your image).
- Select the Layer Mask and invert it using Ctrl+I (Windows) or Cmd+I (Mac).
- The sharpening can be adjusted by changing the values of Smart Sharpen and/or reducing the opacity of the layer.

The layers panel should now look like this image.
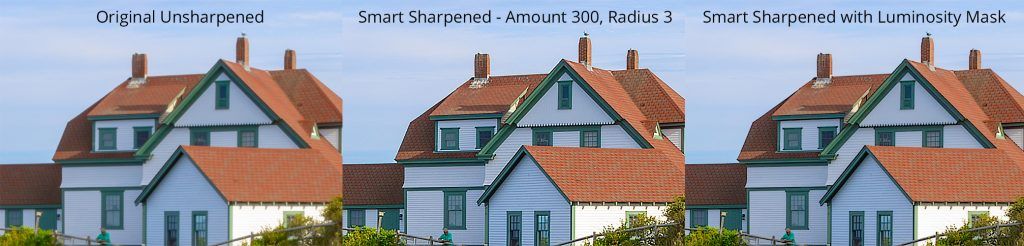
Photograph by Rob Eyers
As an example, the middle part of the image above is over-sharpened. The white halos are definitely noticeable. The right side uses a dark luminosity mask to block the light portions of the sharpening while leaving the dark sharpening visible. The effect is a sharper picture without halos. When using a dark luminosity mask the initial sharpening can be more aggressive.
Sharpening isn’t normally applied to a complete image. The use of a mask makes it easy to apply the sharpening of the sharpened layer to any desired areas. To do this, use the following process:
- Place the sharpened layer in a group by selecting it and pressing Ctrl+G (Windows) or Cmd+G (Mac).
- Apply a black mask to the group by holding Alt (Windows) or Option (Mac) while selecting the new layer mask button.
- Paint white on the mask to apply sharpening to any desired areas.
With the sharpening layer put in a group, with a mask applied to the group, the layer panel will look like this. These masks don’t have to be painstakingly accurate, so they’re easy to create.
Recommended Reading: If you’re interested in improving your postprocessing workflow, check out Photzy’s premium guide: Understanding Masking.
Blur Sharpening
The final sharpening process in this guide is counterintuitive. It’s one of my favorites, and it’s referred to as Blur Sharpening. This process enhances inner detail well, but it doesn’t leave noticeable halos. Blur sharpening uses the strongest of the blurs, which is Surface Blur. Here’s how it’s works:
- Duplicate your finished image (Image/ Duplicate).
- Flatten the duplicated copy using Ctrl+Shift+M (Windows) or Cmd+Shift+M (Mac).
- Create two copy layers using Ctrl+J (Windows) or Cmd+J (Mac).
- Name the bottom layer BASE and the top layer VIVID.
- Place the BASE and VIVID layers in a group using Ctrl+G (Windows) or Cmd+G (Mac).
- Name the group BLUR SHARPEN.
- Select the VIVID layer and invert it using Ctrl+I (Windows) or Cmd+I (Mac).
- Convert the VIVID layer to a smart object.
- Apply Surface Blur with Radius 20 and Threshold 10 (Filter/Blur/Surface Blur).
- Set the VIVID layer blend mode to Vivid Light.
- Set the BLUR SHARPEN group’s blend mode to Overlay.

After blur sharpening is complete, the layers panel should look like this. In addition, a white mask has been added to the group to facilitate selective application of the effect. Simply invert the mask to black and paint in the sharpening with white.
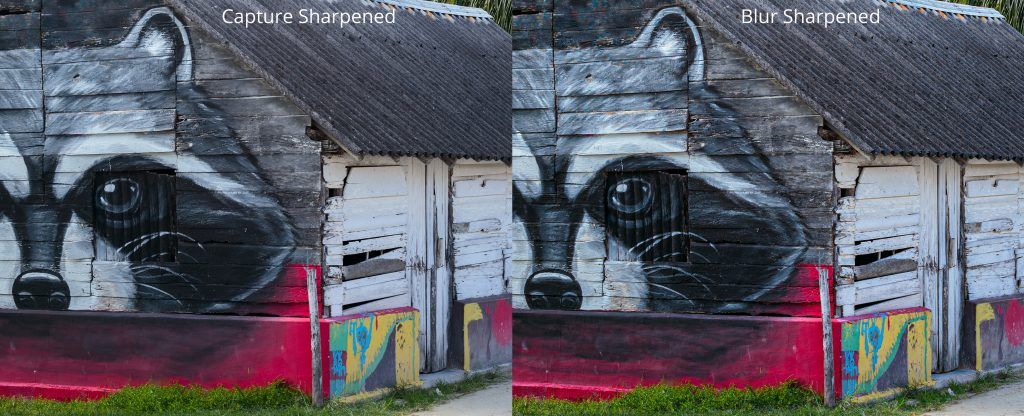
Photograph by Rob Eyers
Blur sharpening results in fewer halos and more inner detail. Details such as the boards behind the eye and the grain of the other boards etc. are greatly enhanced. Because the VIVID layer is a smart object, the Surface Blur can be further adjusted to fine tune the detail required. The BLUR SHARPEN layer’s opacity may also be reduced if the sharpening is too strong.
A good rule of thumb is to adjust the sharpening until it feels right. At that point, back it off by 10 or 20 points and take a break. When you come back to it later you’ll have fresh eyes and a more objective view of whether it’s too much or too little.
Creative sharpening can give your image that final touch to set it apart. Consider the use of your photo, though. If its end use will be on the web, don’t spend too much time on it because viewer’s monitors are not that detailed. If it’ll be printed, the extra time will be well spent.
Sharpening for Output
Now that the image is finished, it’s time to save a uniquely named copy as a TIF or PSD file. The last step in sharpening is to prepare the image for its use. If its use is the web, then some downsizing will likely need to be done. The resizing process affects the image’s apparent sharpness. Firstly, resize and then sharpen the image using Lightroom’s Detail panel, or Unsharp Mask in Photoshop (Unsharp Mask settings of 0.2 to 0.3 @ 200-400% work well when downsizing).
A good rule of thumb is to adjust the sharpening until it feels right.
When it’s going to be printed, the considerations are paper type, resolution, and viewing distance. Matte paper requires more sharpening than gloss or pearl paper. Likewise, closer viewing requires less sharpening than a wall hanging which will be viewed from a distance, for example.
Most printing software like Lightroom allow for choosing a paper type as well as the degree of sharpening preferred. These aren’t exact settings, but for many uses they’re adequate. Experimentation is sometimes the only way to arrive at the best result.
Photograph by Rob Eyers
Summing It up
For those who find this topic interesting, there’s still more to learn, such as lab sharpening. If you’re interested, I encourage you to continue learning other techniques. What’s been covered in this guide, however, should be all that’s needed for most images.
Sharpening can be a powerful tool in finishing a photo. How much, and when to do it, is the conundrum we all face. It can also be days lost which can never be regained, so always consider the end use, and spend your sharpening time wisely. Above all, don’t over-sharpen! The old expression that less is more certainly applies in this instance.
Enjoy the journey. Happy editing!
Self-Check Quiz:
- What are the three stages of sharpening?
- When is the best time to reduce noise?
- How can a sharpening layer be adjusted after it is done?
- When should an archived copy be saved when post-processing a photo?
- What are the different processes for sharpening an image in Photoshop?
- Which sharpening process leaves the least amount of halos?
- How can halos be reduced?
- How can sharpening easily be restricted to a portion of an image?
- What are the considerations when sharpening for print?
- What is the better sharpening process when more inner detail is required?
- Can an out-of-focus image be made to look in focus with sharpening?


