


The Rule of Thirds is one of the most frequently used and fundamental basic rules in photography. It is the first composition rule that photographers learn about but is sometimes misunderstood and misused.
In this guide, I’m going to look at the Rule of Thirds in detail and show you how to use it to the best effect. I’m also going to explain when to break the rules!
Here’s what we’ll cover:
- What is the Rule of Thirds?
- When should you use the Rule of Thirds?
- Using leading lines and negative space in conjunction with the Rule of Thirds.
- When should you break the Rule of Thirds?
Recommended Reading: If you’d like to improve your composition skills for better images, grab a copy of Photzy’s best-selling premium guide: Understanding Composition.
What Is the Rule of Thirds?

This image perfectly illustrates the Rule of Thirds, with a third of the sky, a third of the horizon, and a third of the foreground, along with the tree at a point of interest. Photograph by Ken Cheung
The most basic idea of the Rule of Thirds is to break down a photograph into thirds both horizontally and vertically. Important elements of an image are placed along a 3 x 3 grid which, in turn, equally divides the photograph into nine rectangular sections. The grid looks like this:
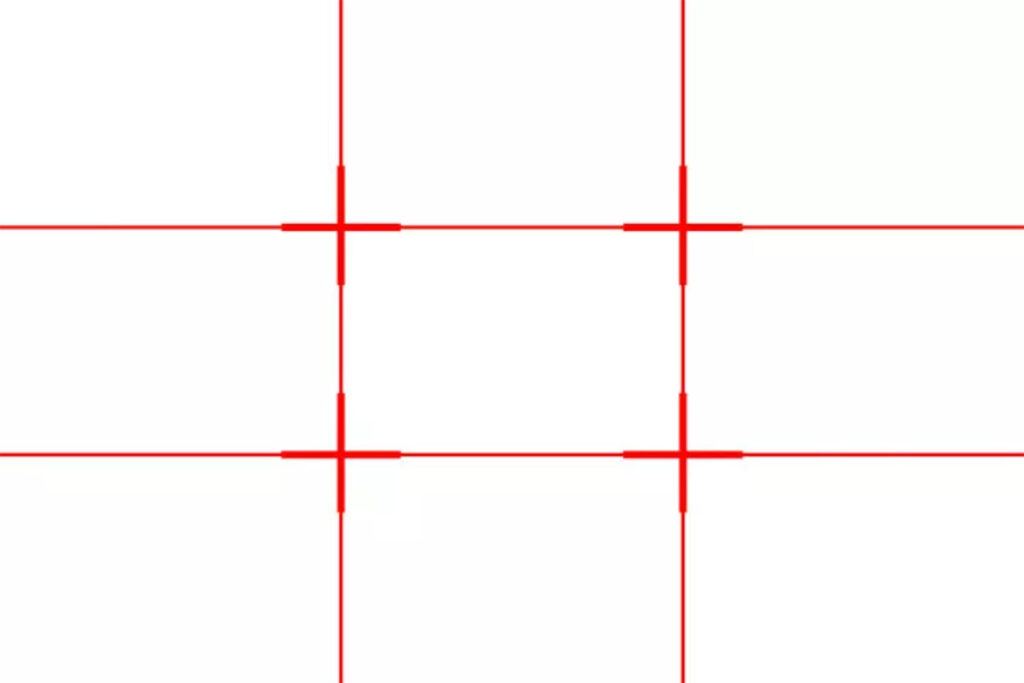
Illustration by Jo Plumridge
If you look at the diagram above, you can see that the nine sections also give you four intersecting points. The idea is that the important elements of your photograph are placed at the intersection point of these lines – they are your points of interest. Using the Rule of Thirds is a very helpful compositional tool in a variety of setups, particularly when you’re first starting in photography. By the way, some cameras have a rule of thirds grid that you can overlay on your LCD screen to help train your eye.
When Should You Use the Rule of Thirds?

Using the Rule of Thirds for portraits (and portraits don’t just have to be of people) can lead to interesting and quirky shots! Photograph by Tolga Ulkan
Key Lesson: You can use the Rule of Thirds in any photographic composition, but it’s most commonly used in landscape photography. If you’re shooting a landscape, the horizontal grid gives you an easy way to produce a perfectly balanced shot. If you shot with a third of the sky, a third of the horizon, and a third of the foreground, this will leave you with a landscape that looks natural and realistic, as well as balanced. Use your intersection points to place any objects within your landscape (for example, a tree) to create a point of interest and direct your viewer’s gaze into your shot.
The Rule of Thirds is also a simple way to start getting more creative with portraiture. It’s common to place your subjects in the center of the frame when shooting a portrait, which often creates a very strong composition. However, using the Rule of Thirds can help to produce a more dynamic portrait. Place your subject’s face along with one of the vertical lines and try to place your subject’s eye (the one nearest the camera) at an intersection point. A strong portrait is all about the connection for a viewer with the subject’s eyes, so it makes sense to put them at a point of interest.
The Rule of Thirds is also a simple way to start getting more creative with portraiture.
A quick note on post-production: don’t forget that you can always crop images to fit the Rule of Thirds for a more visually pleasing composition. If you work in Lightroom, you can simply press ‘R’ on your keyboard. This will show the Rule of Thirds grid that’s built into the program. Photoshop doesn’t have a preset Rule of Thirds grid, but you can easily construct one by going to View > New Guide.
Using Leading Lines and Negative Space in Conjunction With the Rule of Thirds

Using leading lines naturally found in the landscape helps to direct a viewer’s gaze around your image and works well with the Rule of Thirds. Photograph by Jeffrey Eisen
As you start to grow more confident with the Rule of Thirds, it’s important to consider other factors. Leading lines are particularly useful when photographing a landscape, as they help to direct your viewer’s gaze into the image. Horizons create strong leading lines, but you can also find them in shafts of sunlight, clouds, trees, buildings, etc. Leading lines can be very useful in helping to direct a viewer towards your points of interest in an image (it’s also worth noting that our eyes are used to reading text from left to right, and positioning your subject on the right-hand side of an image often leads to a more visually appealing shot). Faces and bodies also have lines in them and you can use these to your advantage – again with your intersection points.
Key Lesson: Another factor that can help improve your photography is understanding negative space. Put very simply, negative space is the area around your photograph’s subject matter (known as the positive space). For example, if you took a head and shoulders shot of a person, they would be your positive space. The background and anything surrounding them is the negative space. However, negative space also needs room to breathe for it to be effective! A larger amount of negative space gives your subject more definition. You can particularly effectively combine negative space and the Rule of Thirds when you’re shooting portraits. Placing your subject to one side so that they hit your intersection points naturally gives you a lot of negative space to the side of your subject, creating an interesting and dynamic shot.
Recommended Reading: If you’d like to improve your composition skills for better images, grab a copy of Photzy’s best-selling premium guide: Understanding Composition.
When Should You Break the Rule of Thirds?
I do believe that the Rule of Thirds is a fantastically useful composition rule for those starting in photography to get to grips with. It’s a fantastically simple way of producing nicely balanced landscapes in particular – something I’ve found that beginners often struggle with. But the major issue with the Rule of Thirds is that it can’t and doesn’t take into account what you’re photographing. Sometimes, you simply don’t want to divide an image up in this way!

At sunrise and sunset, you’ll want to make the most of the dramatic skyline. It’s at times like this that you will want to break the Rule of Thirds. Photograph by Shea Rouda
As you go further into your photography journey, you’ll also find a host of other composition techniques involving grids over images, such as the golden spiral and dynamic symmetry, to name a few. And all of these are interesting techniques to apply to certain imagery. But the danger comes when using these techniques curtails your creativity.
Take landscapes, for example. If you’re shooting at sunrise or sunset, the dramatic colors of the sky will likely be your focus. And much of the foreground is going to be in shadow. In situations like this, you wouldn’t want to follow the Rule of Thirds; you’d want to focus on the sky and use the foreground to add some definition and placement for your shot. Lighthouses and trees work very well in shots like this! Or you might just simply want to shoot from a different angle of view, such as shooting up or down on your scene and thus breaking the Rule of Thirds. It’s not, and should never be, a problem to break rules. It’s always more important to look at a scene and shoot the shot you think looks appealing!
Don’t underestimate the impact of a central component in portraiture. The sharp focus of the eyes and direct gaze demands attention! Photograph by Houcine Ncib
When it comes to portraits in particular (although, it’s a point to remember across all genres), it’s also important not to underestimate the value of a central composition. I think there’s something very powerful about a centralized portrait that demands the viewer engages directly with the subject. The Rule of Thirds is also about teaching people to look at off-center composition. But subjects don’t always need to be placed along the exact lines of the 3×3 grid. Framing a subject just slightly off-center or indeed in the extreme corners can produce equally powerful images in their own right
I think there’s something very powerful about a centralized portrait that demands the viewer engages directly with the subject.
At this point, you might be wondering what the point of learning about and using the Rule of Thirds is! Well, in my mind, it’s such a helpful technique to start with and is invaluable in teaching beginners how to look at images in a balanced way. Until you understand how to balance an image and make it look visually appealing, you may struggle to produce images that have an impact. Learn the rules and then break them!

Conclusion
Some photographers look down on the Rule of Thirds, seeing it as simplistic, but in my mind, it’s a vital and useful rule of composition. Understanding it and using it correctly can be helpful when you’re starting. And the Rule of Thirds will rarely fail you if you want to shoot a good, visually appealing landscape. As you become more confident and learn more about photography, you will find that (like many rules!) the rule is made to be broken. Sticking rigidly to the Rule of Thirds can remove and stifle creativity. Photography isn’t about adhering to rigid rules, but rather using them when you need to.
Self-Check Quiz:
- How many sections does the Rule of Thirds grid have?
- How would you divide up a landscape using the Rule of Thirds grid?
- How do you activate the Rule of Thirds grid in Lightroom?
- What is negative space?
- What times of day might you commonly want to break the Rule of Thirds in?
- What is a particularly powerful portrait composition?


