

Adobe Camera Raw, as its name implies, is a raw image converter/processor. So now that’s settled, we can all go home. No, just joking. First, let’s define how the word raw applies to photography.
I like Wikipedia’s definition: “A camera raw image file contains minimally processed data from the image sensor of…a digital camera…Raw files are named so because they are not yet processed and therefore are not ready to be printed or edited with a bitmap graphics editor….There are dozens of raw formats in use by different manufacturers of digital image capture equipment.”
Key Lesson: “Raw” is just what it says; raw, unprocessed, uncompressed data from your sensor.
Here is what I will cover in this guide:
- What is a camera raw file?
- How is it better than a .jpeg file?
- How to efficiently process your camera raw files.
- The difference between camera raw processing with Photoshop and Lightroom.
- What is a plugin?
- The importance of updates.
- Why you could find it easier to learn camera raw processing in Photoshop ACR versus other editing apps and software suites.
- What are the limitations of ACR?
Recommended Reading: If you want to learn how to enhance your photos and create better images, grab a copy of Photzy’s premium guide: Ultimate Guide to Fundamental Editing.
Every digital image-recording device records the raw image data first (and it’s not an acronym so we don’t capitalize it). All raw is, is data—ones and zeros. Raw isn’t even an image file, although we call it that for convenience. Raw must be processed and converted to some other file format to even be seen, much less shared, displayed, or printed. Many lower-end consumer cameras don’t even offer to output the raw data; they have an onboard algorithm—a raw processor/converter written by engineers who may or may not be photographers. The camera’s processing engine adjusts color, exposure, and dynamic range, opens shadows and applies other enhancements, and then…
Raw must be processed and converted to some other file format to even be seen, much less shared, displayed, or printed
The algorithm compresses what’s left into a JPEG and discards the remaining raw data. Poof! Gone! Irrecoverable! What it “spits out of the slot” is only 1/3 to 1/4 of the original data, taking up little space on the cards and drives, but at the considerable expense of much lost detail.
Key Lesson: If you shoot only JPEGs, you are allowing your camera to make decisions and to compress and discard irrecoverable raw data.
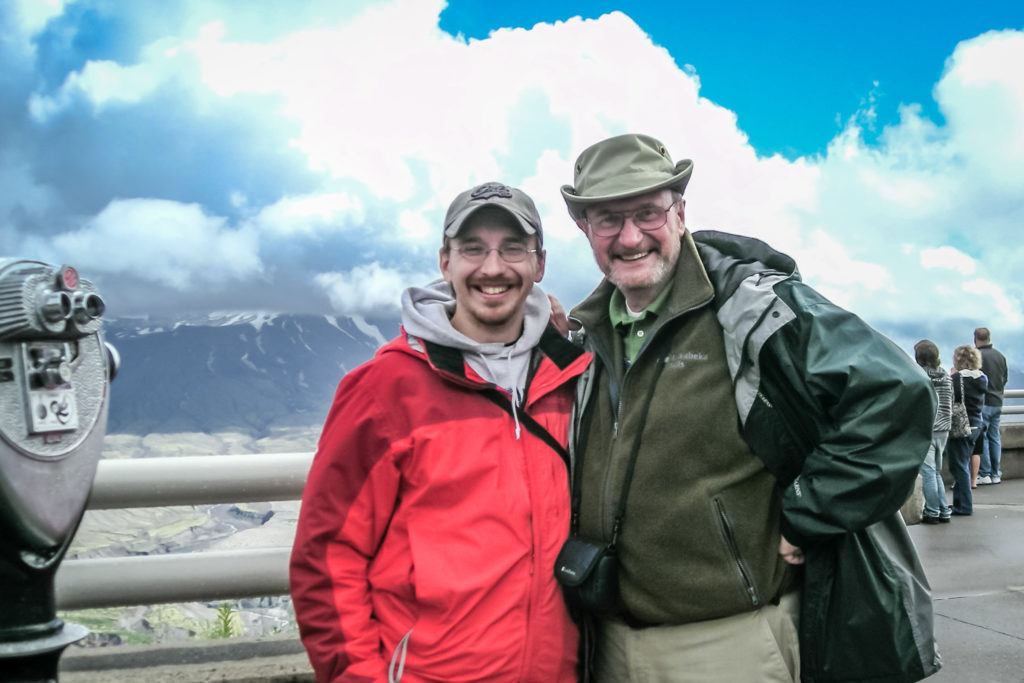
Clouds lifting off Mt. St. Helens, JPEG. Photograph by Daphne Haacker
For many if not most, that’s enough. It’s what most phone cameras and point-and-shoots output. It’s really not bad, especially if you aren’t too picky. Where you’re most apt to see the compromises is loss of detail in the brightest highlights. White clouds, for example, are very often overexposed because you are exposing for foreground detail. The cloud details are in fact captured in the original raw data, but the highlights are the first thing to go when the algorithm enhances and compresses the raw data down by (usually) about 2/3. Your detailed, fluffy white clouds are blocked—just white blobs with no detail—as in this JPEG snapshot from an old point-and-shoot (image above).
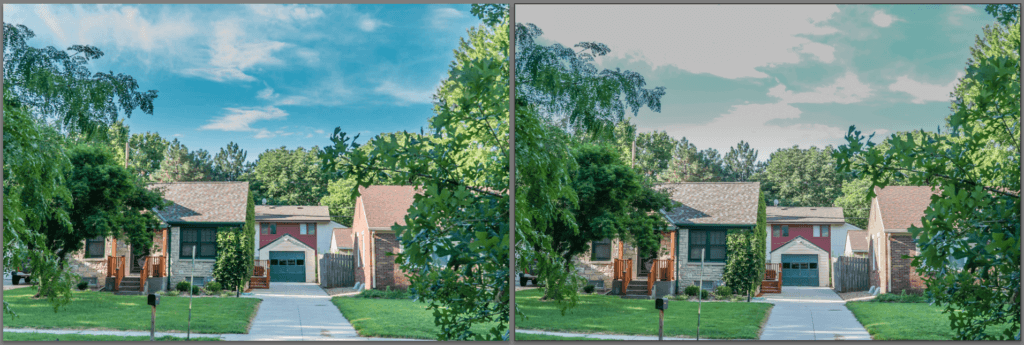
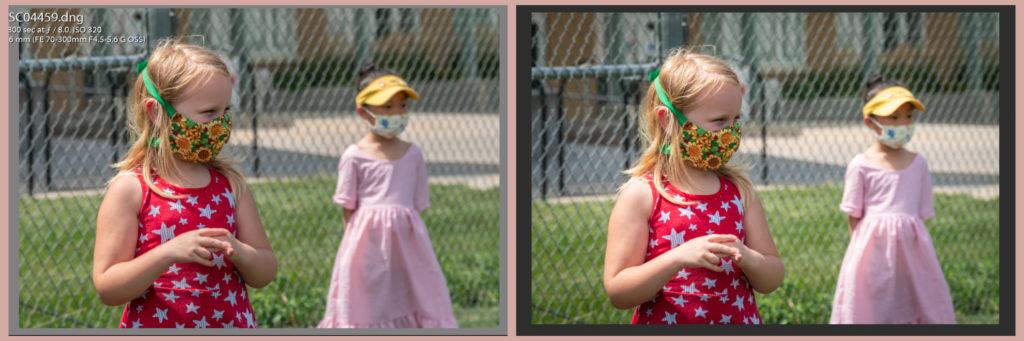
I set my camera to shoot raw plus JPEG and exposed for the foreground, which overexposed the sky. Both pictures were processed identically in ACR, including the use of a graduated filter to bring out the sky. The JPEG on the right shows what happens when you overexpose. Photograph by Charles Haacker
If you want to preserve that subtle highlight detail, you must have all the original raw data, so you want to choose a camera that will deliver it. Many raw shooters liken raw files to photo negatives. Ansel Adams, the giant of black and white landscape photography, said, “The negative is comparable to the composer’s score and the print to its performance. Each performance differs in subtle ways.” Most high-end digicams and even cell phones nowadays offer the choice, or at least will output both a JPEG and the original raw file. Even if you don’t think you are ready for raw, hang onto it. There will come a day (I would know).
Key Lesson: Even though raw capture means mandatory computer time, it doesn’t take long to learn to process efficiently and the results are far better.
For the broad difference between working in raw as opposed to just letting your camera make JPEGs for you, I like the cake simile: You want to bake a special cake. You have the simple choice between buying a cake or making one yourself from the (ready for this?) raw ingredients (see what I did there?). Both cakes will taste good, but the store-bought cake is the product of someone else’s decisions about how this special cake should look and taste (the engineer who wrote the algorithm in your camera). The cake you bake from scratch reflects your choices of ingredients, flavors, looks, and tastes. Maybe you want to substitute some applesauce for an egg, or add cardamom. It’s your special cake made exactly how you want it from the raw ingredients. That’s what you have when you shoot raw—the raw ingredients for making your own artistic decisions for how you want your picture to look.
Once you have the raw ingredients, you need a place to assemble them and bake them into a finished cake. Your prep area and stove or oven are your raw processing app, specifically Adobe Camera Raw.
Key Lesson: Raw data are never altered or destroyed regardless of the processor. You don’t actually “do” anything to a raw file. The edits are recorded in a “sidecar” XMP file.
It’s important to understand that in as much as raw data is only data, “processing” raw image files is non-destructive by default, no matter what raw processor you use. The actual data cannot be altered or destroyed except by deletion. Anything you “do” to a raw file is not “done” at all; your “adjustments” are recorded as metadata and filed as a “sidecar” XMP file, which may or may not be embedded with the raw data (in the case of DNG), but the raw data are never actually touched. What you see on your screen is an embedded JPEG preview of what the file should look like when exported (saved) as a JPEG or TIFF or PNG or another file format that can be printed, shared, emailed, or whatever.
You cannot get Adobe Camera Raw (abbreviated ACR) as a standalone. ACR comes as a plugin with Photoshop, Bridge, Photoshop Elements, and Lightroom, but while a subscriber will see ACR by itself needing occasional updates, it cannot be used by itself. If you purchase a standalone like Elements, ACR comes with it as the plugin raw processor.
Lightroom may be said to “come with” ACR, but really, ACR is the foundation of Lightroom— something I like to joke is “Adobe Camera Raw on Steroids.” Lightroom essentially replaced ACR and is many things besides a raw processor, but as a raw processor I personally find Lightroom much easier to use than ACR as a Photoshop plugin. That could be just because I am so accustomed to Lightroom. Muscle memory.
I am a strictly 100% raw shooter. When I made that transition more than five years ago, I subscribed to Adobe’s Creative Cloud Photography Plan. Adobe CC is now the only way to get Photoshop, Lightroom, and Adobe Camera Raw bundled, with frequent updates included forever. There are several versions of Lightroom, including some that work on phones and tablets, but Lightroom Classic, designed for desktop computers, is no longer available as a standalone. Lightroom is the most convenient and efficient way to utilize ACR, but we are here to talk about ACR more or less by itself. This is an adventure for me as well since I’ve only ever used ACR in its Lightroom iteration.
Key Lesson: Adobe Camera Raw is a plugin for everything except Lightroom, where ACR is the foundational basis of the app.
Locating the file on the hard drive before attempting to open it in Photoshop. Photograph by Charles Haacker
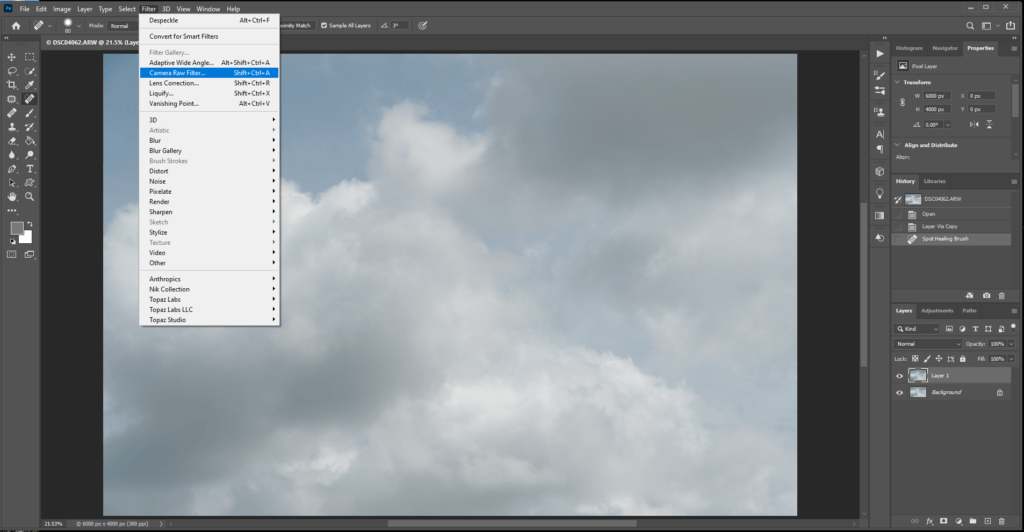
You access ACR in Photoshop as a plugin, an add-on program providing additional image effects or tasks that are hard or even impossible for Photoshop alone. I already knew how to access ACR in Photoshop as a filter, but I wanted to see if I could open a raw file directly from the finder/explorer by clicking on it and scrolling to OPEN IN Photoshop.
And it worked!
The raw file opened in Photoshop’s Adobe Camera Raw plugin. Photograph by Charles Haacker
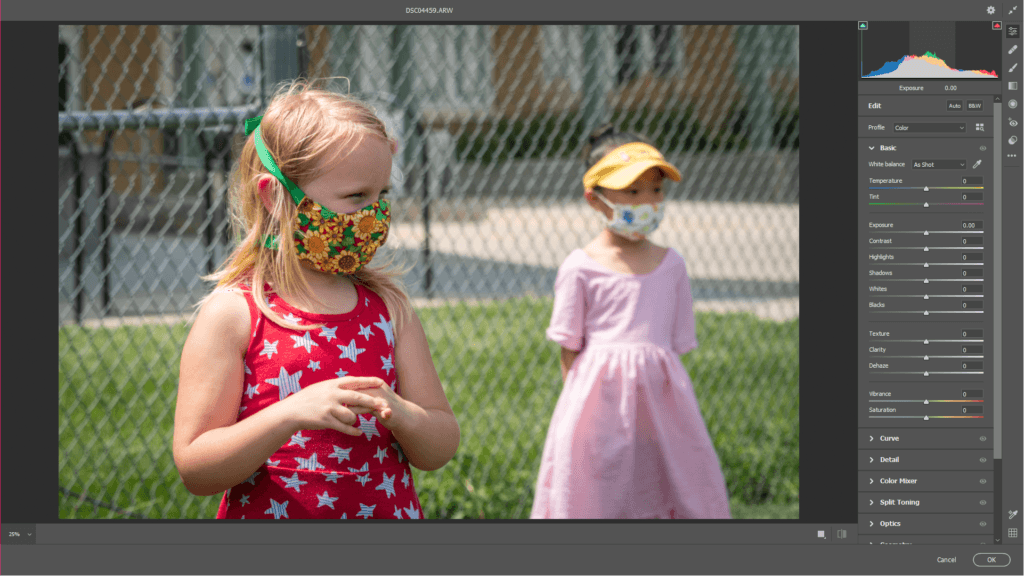
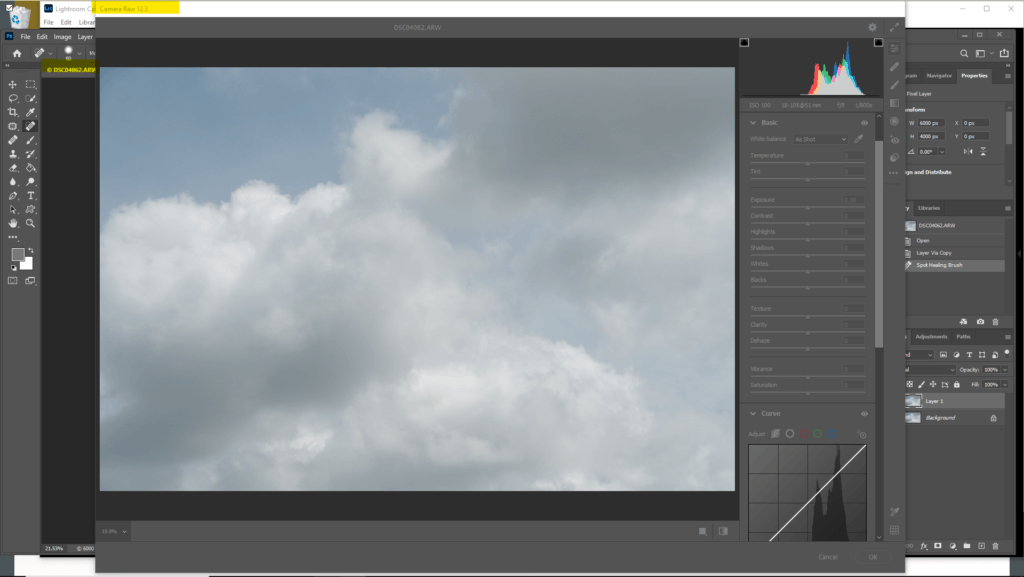
The ARW opened in Adobe Camera Raw plugin inside Photoshop. The control panel is essentially the same as the controls in Lightroom. A glance at the zeroed sliders in this control panel show that this raw picture has not yet been processed, but the embedded JPEG is frankly so good as to be too good. Remember that you cannot see the raw data. What you see is a JPEG embedded with the data, so you have something to work on. Raw captures once were notorious for looking flat and muddy on the screen, but clearly that’s been fixed, plus I just discovered that, because I have Creative Cloud with constant updates, my version of Photoshop is the latest, 21.2.0 release. Many of you may have older versions of ACR, and that may make a difference between what I show and what you see on your own screen.
Key Lesson: Because Adobe constantly updates their Creative Cloud apps, even weekly, the lessons we give this week may be obsolete next week, but it’s a feature, not a bug.
Remember that you cannot see the raw data. What you see is a JPEG embedded with the data, so you have something to work on.
Photograph by Charles Haacker
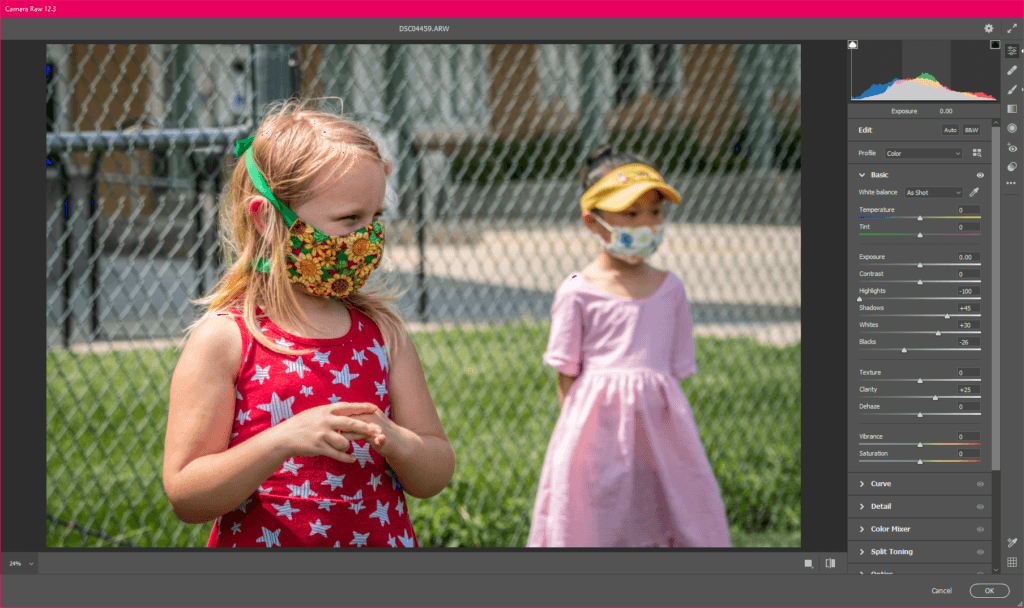
This (above) is the Adobe Camera Raw workspace as opened in Photoshop (not Lightroom). I’ve made some minor adjustments that you can see from the sliders on the right. The controls are familiar if you have ever used Lightroom, but not all of them are in the same order. Some that Lightroom has are missing, and others do not work the same way. If you’ve never used Lightroom, you will quickly get used to ACR in Photoshop. But for those of us who learned ACR in Lightroom, the transition feels awkward.
Key Lesson: If you have never used Lightroom, you may actually have an easier time on the learning curve with ACR in Photoshop or Bridge or Elements.
Photograph by Charles Haacker
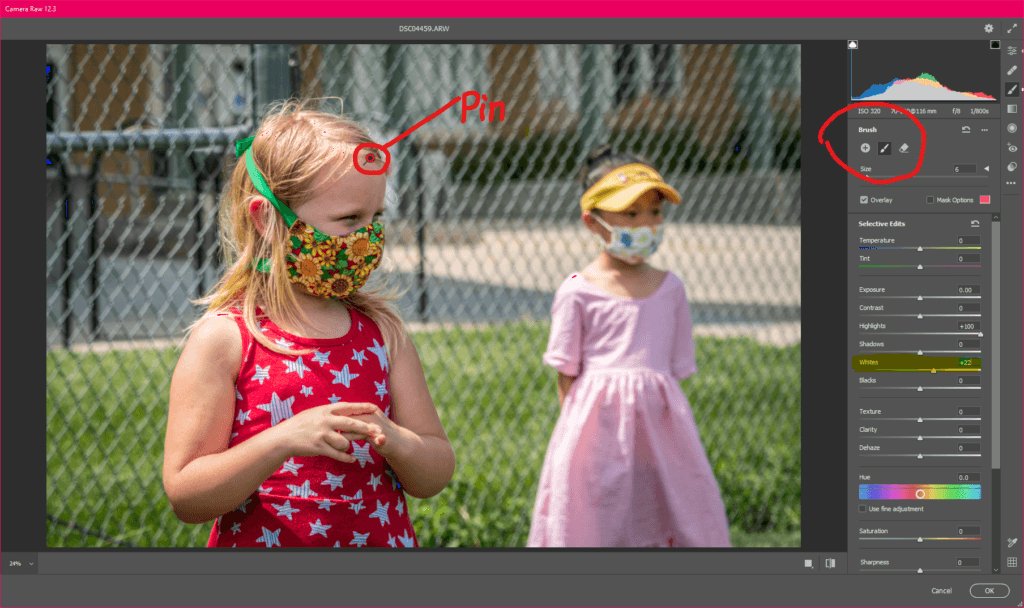
I wanted to lighten up my granddaughter’s forehead, so I tried the Adjustment Brush, which works the same way as it does in Lightroom. The adjustment brush is a local adjustment tool, as opposed to the main editing tools which are “global,” affecting the entire picture. The “pin” is where I first clicked the brush to activate it. I painted just her forehead with a very soft brush, then pushed the highlight slider all the way up plus added +22 to the whites slider.
Photograph by Charles Haacker
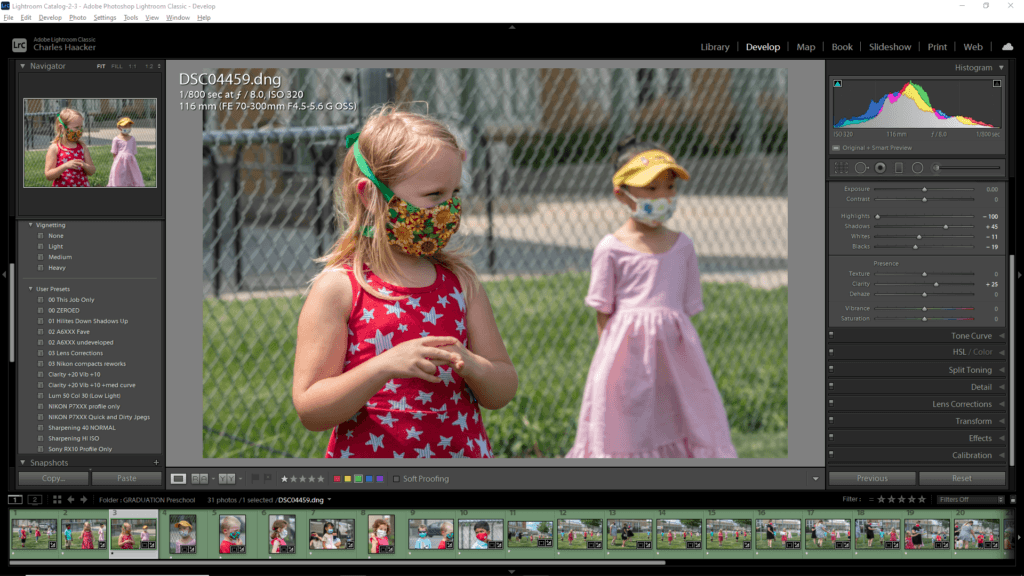
For comparison, here’s the same file processed in Lightroom. Remember that Lightroom’s foundation is ACR. You can see what I did from the sliders on the right. The histogram shows that the exposure was balanced, black and white points set, all really minor adjustments. What I wanted to see was whether I could duplicate the processing in another iteration of ACR not directly connected to Lightroom.
Key Lesson: ACR is ACR; only the workspaces and controls will look different in each iteration.
Recommended Reading: If you want to learn how to enhance your photos and create better images, grab a copy of Photzy’s premium guide: Ultimate Guide to Fundamental Editing.
Photograph by Charles Haacker
This is the LR vs ACR direct comparison (Lightroom on the left, Adobe Camera Raw on the right). When I processed in Photoshop’s ACR, I did not use the LR version as a reference, I just tried to come as close as I could.
If you send an otherwise untouched raw file from Lightroom to >EDIT IN Photoshop, it will not open automatically in ACR as I think it once did. You now get from Photoshop into ACR by finding it under the FILTER menu. Raw files in older versions may still open automatically first in ACR.
Photograph by Charles Haacker
I shot some new raw “cloud negatives” to use as backgrounds and replacement skies. I’ve been keeping shots of clouds since I was a student. I opened this one from Lightroom into Photoshop (Edit in > Photoshop). It opened directly in the Photoshop workspace, but it’s an unedited raw. To first edit it in ACR, you use the drop-down menu under FILTERS; scroll down to >Camera Raw Filter and click or use the keyboard shortcut (see above screenshot).
Photograph by Charles Haacker
The raw (ARW) file opens in Photoshop’s Adobe Camera Raw plugin workspace, over the Photoshop workspace. Once you are in ACR you cannot access Photoshop from ACR; you must either cancel or confirm ACR to get back to Photoshop, so you make all your ACR adjustments first.
Photograph by Charles Haacker
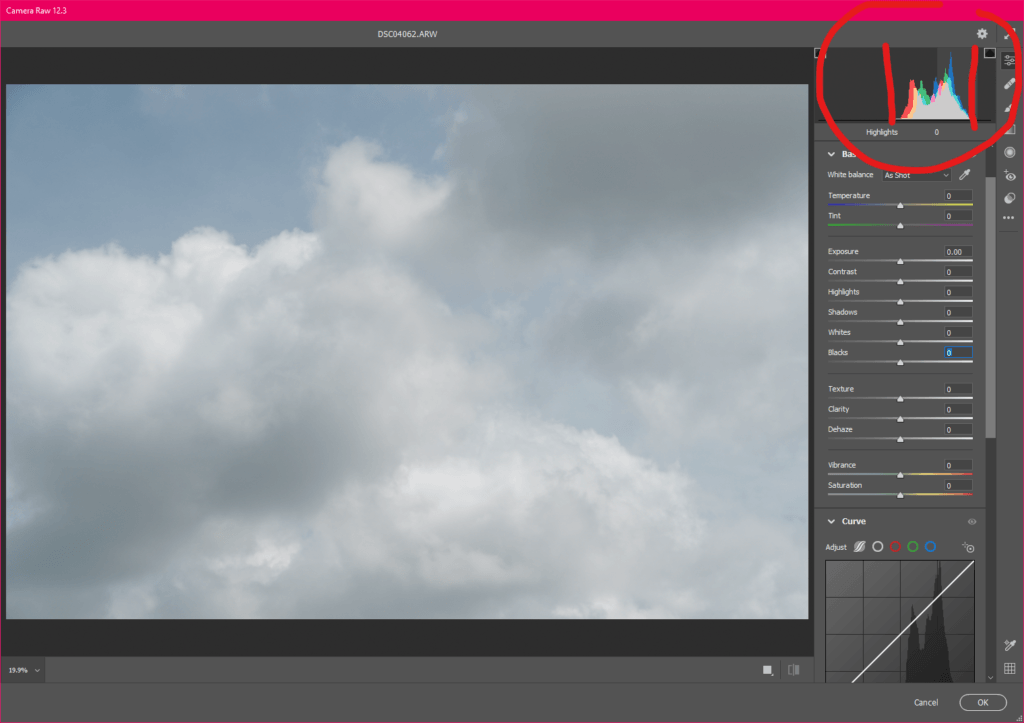
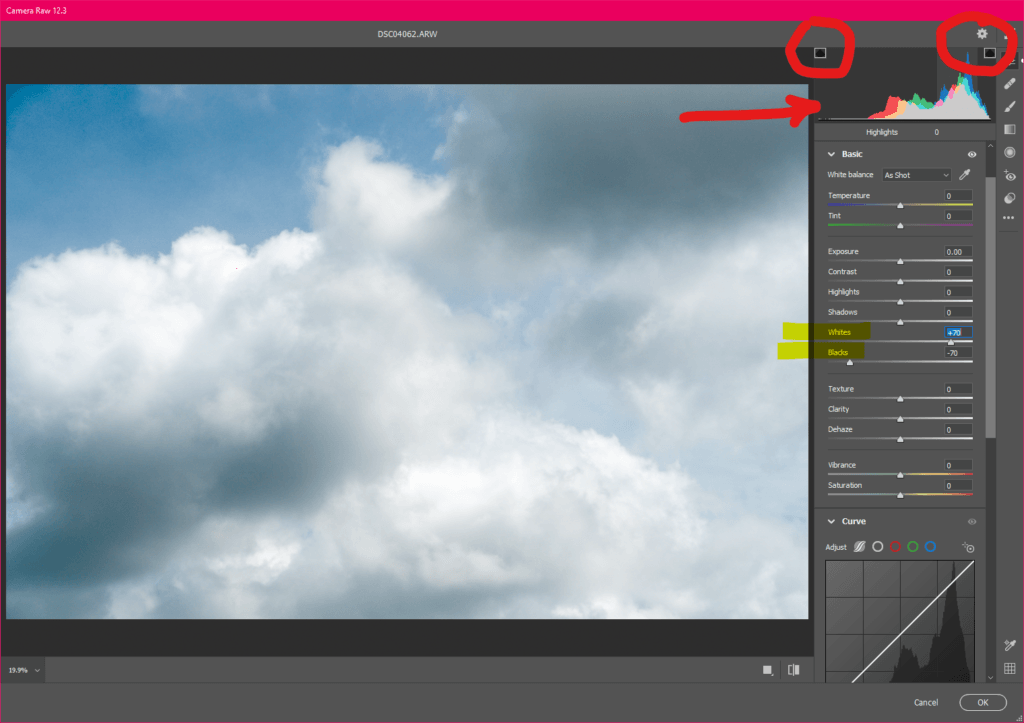
I clicked on the histogram (or anywhere) to activate the control panel (currently zeroed out). Take a look at that histogram. It’s all bunched up and toward the bright end of the box. You can see from the little boxes at upper left and right (the clipping indicators) that there is no true white or black in this picture. This is what we mean by “flat and muddy.” I could use it just as it is, but I like a little more oomph.
Photograph by Charles Haacker
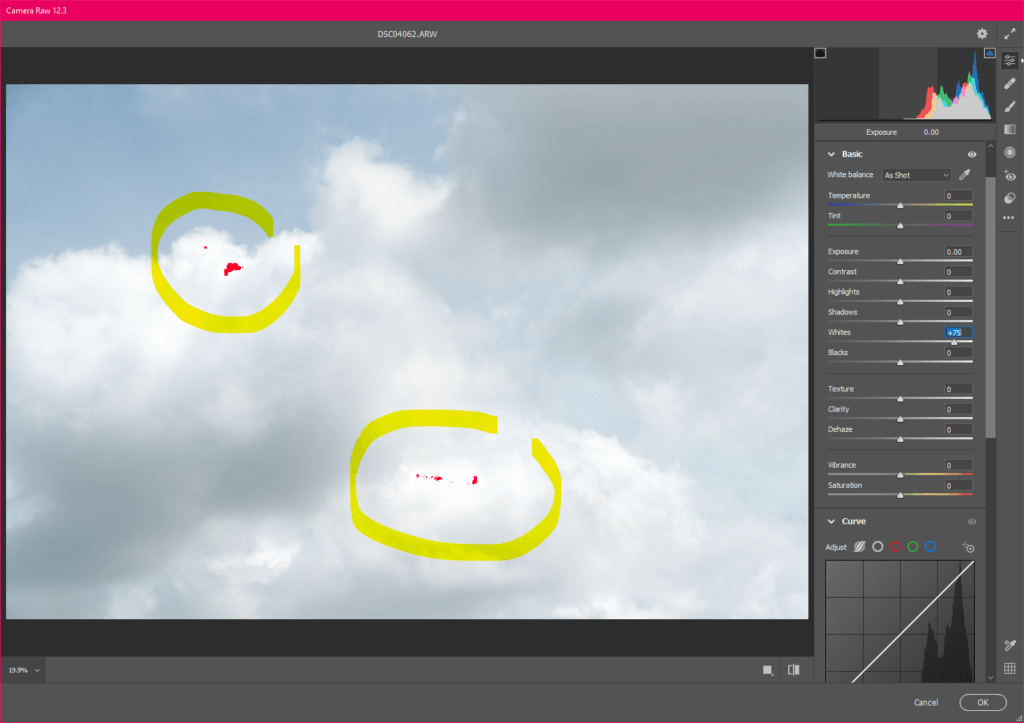
I have moved just the WHITES slider +75 to the right. The little red spots are clipping indicators, telling me that there is no detail under the red spots.
Photograph by Charles Haacker
I pulled the BLACKS slider down -70 and backed off the WHITE slider to +70. You can see from the clipping indicators (circled boxes) that there is now no clipping of either whites or blacks (blues, actually) and the histogram shows that the overall exposure is balanced, but on the light side because these are (after all) clouds. I find this much more dramatic than the unedited original, but also not overdone.

So, what’s a “cloud negative” good for? Flying pinecones, anyone? Photograph by Charles Haacker
Finally, what limitations are there to ACR in Photoshop as opposed to Lightroom
- Photoshop ACR is strictly a raw processor.
- Lightroom is also a superb organizer.
- Photoshop ACR cannot batch process multiple files.
- Lightroom can batch process.
- Photoshop ACR has no catalog.
- It works in conjunction with Bridge.
- Lightroom’s catalog is central to its operation.
- Both Photoshop and Lightroom record adjustments in “sidecar” XMP files.
- Lightroom stores all the develop information in the catalog.
- Photoshop keeps that information with the actual file.
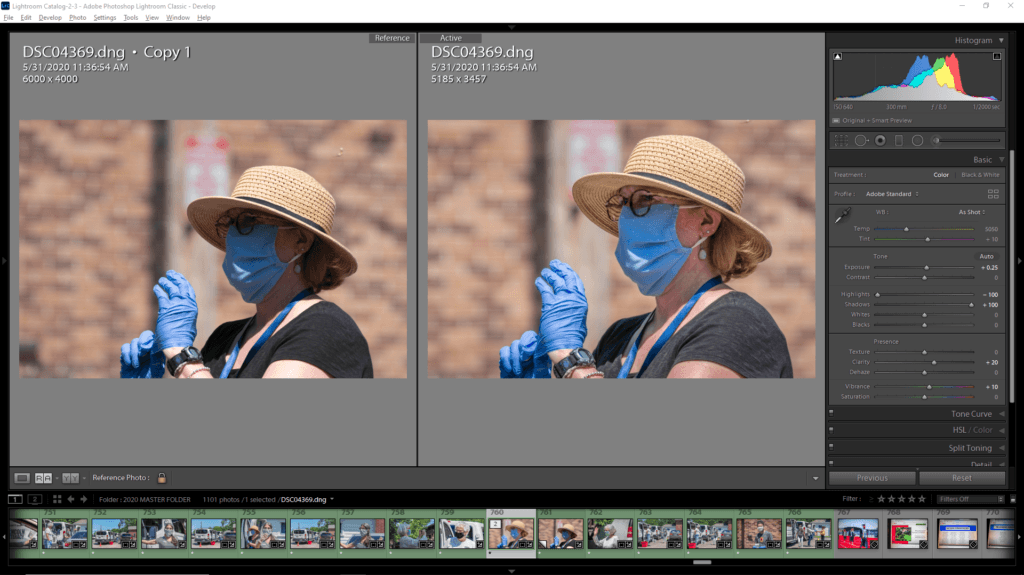
Lightroom’s workspace offers many perks beyond just processing. Outside of Lightroom, for example, ACR cannot place a reference image and a working image side by side. Photograph by Charles Haacker
- Lightroom does not store any pictures. They are all in their places in your folders on your drives. Lightroom stores only the sidecar files.
- If you convert your originals to DNG (I do), the XMP sidecars are embedded with the DNG.
- You must carefully preserve Lightroom’s catalog(s). You will not lose a single image file as they are still on your drives, but you will lose all the processing data and have to start over. The images are still there, but as pristine as they were when you imported them.
- In Photoshop ACR, when closed, the processed image is already in the Photoshop workspace. You can go straight to work on it.
- Lightroom forces the extra step of transferring the image file to Photoshop.
Recommended Reading: If you want to learn how to enhance your photos and create better images, grab a copy of Photzy’s premium guide: Ultimate Guide to Fundamental Editing.
Regarding that last one, I really cannot see the difference. As I am certain most workers do, I guesstimate that 80% or more of my raw processing begins and ends in Lightroom. I value Photoshop tremendously because there are things it does better, and there are things Lightroom cannot do at all, such as composites like my flying-in-the-clouds pinecone. If it needs layers, it can’t be done in Lightroom alone.
I value Photoshop tremendously because there are things it does better, and there are things Lightroom cannot do at all...
But I upload (import) everything I shoot first into Lightroom. There I can do my cull of the clinkers. I can batch process the keepers. I can copy and paste develop settings. I can match exposures. The list seems endless. If I need Photoshop, it’s still only a click, or maybe two, away and I’m good to go. When finished in Photoshop I “save-as” (export) the file as a TIF or PSD and it pops back up in Lightroom alongside the original. The Lightroom adjustments are all still there and non-destructive. The Photoshopped file has (generally) permanent changes, but I always save all the layers so if I need to reopen it I can go right back where I left off. If I don’t have the layers, I can just as easily reopen the original with its Lightroom adjustments in Photoshop and start over.
I am certain this is why Adobe bundles Lightroom together with Photoshop. You can subscribe to just one or the other, but if you check you’ll see that the individual subscriptions are more expensive than the bundle, which is Adobe not-so-subtly telling you to get the bundle.

So, who is going to bake this cake? You? Or Walmart? Photograph by Charles Haacker
I know workers who use Photoshop for most of their processing, but most of them are fine-art photographers for whom working a single time-intensive image is par for the course. The great majority of photographers, working or not, are generally more interested in being able to knock out well-balanced finished files (think weddings). For most of us, opting for ACR in any iteration other than Lightroom is like trying to work with one hand.

Photograph by Ksenia Chernaya
- True or False: Adobe Camera Raw is engineered to make a better cake.
- True or False: ACR in Photoshop is quite different from ACR in Lightroom.
- True or False: You can buy and use ACR as a standalone for raw processing.
- True or False: If you have never used Lightroom, it may be easier to learn ACR outside of LR.
- True or False: It’s more expensive to subscribe to the Photographer Package than the standalone apps.
- True or False: Photoshop ACR can be used for batch processing


