
The Circle of Confusion
When I first skimmed the list of upcoming guides I’d been contracted to write, I thought Photzy had finally flipped. Wheels of confusion? A song from one of my all-time favorite bands? What was going on? I re-read the email and saw that it was circles, not wheels of confusion, a term used to describe photographic focusing and not heavy metal bands. Duh!
Aptly named, this Circle of Confusion (CoC) is a term used to describe how a lens focuses on the subject to produce what’s referred to as a sharp image.
Key Lesson: But before I go further, I want to point out that the CoC is a fixed phenomenon in that, once purchased, a lens will display a certain sharpness characteristic – this is something that’s not adjustable. If you find that your lens, although mechanically sound, doesn’t produce what you consider to be a truly sharp shot, there’s not much you can do to improve sharpness other than to buy a better lens.
Recommended Reading: If you’d like to master camera settings to create gorgeous, creamy, blurry backgrounds, grab a copy of Photzy’s premium guide: Beautiful Background Blur.
Circle of Confusion in a Nutshell
All lenses channel light from a scene through the lens and onto the sensor. That’s their job.
How much of that scene gets captured (or ‘framed’) is controlled by your proximity to the subject, the lens focal length, and what’s lined up in the viewfinder,
Importantly, how sharp the resulting image might be is influenced by several factors:
- Lens design
- Quality of the glass in the lens
- Camera AF response
- User technique
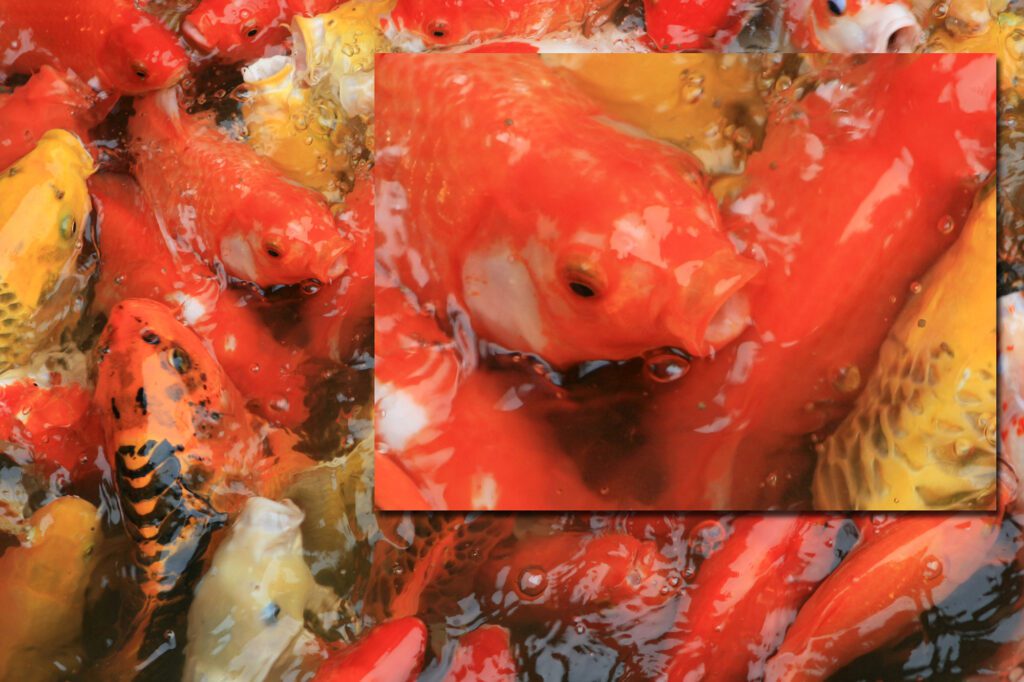
The carp pond: I had thought this was a great shot until I enlarged it and discovered that it was mostly soft. Not out of focus or blurred, just not 100% sharp. Much later I decided that this was because it was a budget lens. Many inexpensive lenses feature a generous circle of confusion, meaning that the camera is not so fussy when it comes to deciding what’s in focus and what’s not. Photograph by Robin Nichols
Ultimately, sharpness is influenced by how accurately the camera transfers the point of focus, the point in the scene that the camera focuses on, to the plane of focus, which is the camera sensor.
So, you might be thinking, “So what? I just press the shutter button; the camera focuses and I take the shot. Why should I care about CoC, or whatever it’s called?”
Key Lesson: The simple answer is that you needn’t bother with the CoC at all. But if you are aware that you are not getting sharp shots, it might be caused by the lens’s inability to bring the point of focus to within an acceptable point on the sensor.
Lenses mostly cannot focus just one point on the plane of focus. Typically, there’s a range of spots in front of and behind the plane of focus that collectively produce what’s termed an area of acceptable focus. Top-of-the-range lenses produce a smaller CoC, which means that what’s deemed as ‘acceptable focus’ is a far narrower window than you’d find with a less expensive lens.
A lens that reproduces a single focus point as a single point on the plane of focus could be considered as being the ‘perfect lens.’ To date, I don’t think this has been designed as it would be both incredibly complex to achieve optically and prohibitively expensive to manufacture.
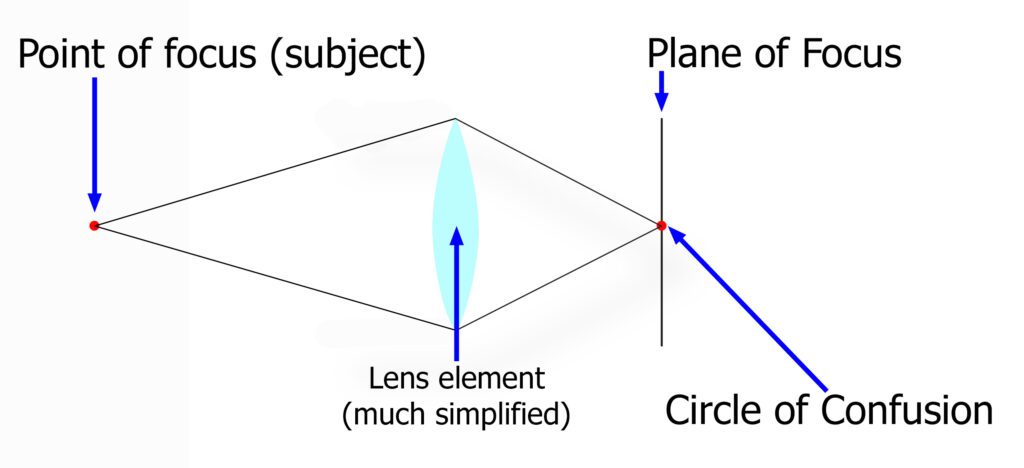
Illustration by Robin Nichols
What we will learn in this guide:
- Identify what the CoC means
- How it impacts our image focus
- How to get a better lens
- Identifying chromatic aberrations
- How to remove aberrations
Unacceptable Circle of Confusion
From years of experience, I know that what many enthusiastic photographers regard as ‘sharp’ shots aren’t that sharp at all.
Emotion and ‘the moment’ often cloud critical judgment.
I’ve presided over many photo competitions where numerous entrants are soft, or more commonly, what I consider to be ‘just not quite sharp.’
This might be because the folk making the image selections are blinded by their emotional connection to the picture – something that happens to most of us – or they might just not be very good at self-criticism. And let’s face it, who is?
Lack of sharpness can be caused by poor camera technique or sub-standard technology, or both. I’ve owned a lot of lenses over the years and sadly a few were just never that sharp. Conversely, some lenses are incredibly sharp.
Not surprisingly, most of these ‘offending’ lenses were of the less expensive type. One zoom lens in particular gave me a lot of grief. I tried shooting with a tripod, using a self-timer, selecting a range of shutter speeds, and keeping the ISO as low as possible to avoid noise. I even went through all of the apertures one by one, but still couldn’t get a sharp shot.
It was an inexpensive entry-level lens and although many might be OK with a product like that, I was frustrated by its lack of tack sharpness.
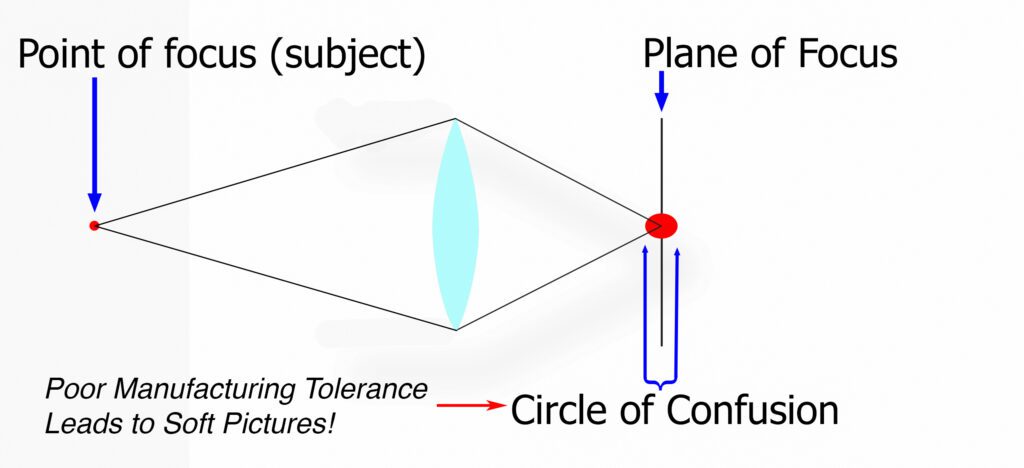
Illustration by Robin Nichols & Kent DuFault
In this particular lens, the softness was due to its CoC characteristics. That is, its inability to transfer the focusing point onto the sensor with a degree of accuracy (see illustration).
Some lenses have fairly generous CoCs, while with the more expensive lenses the CoC is tight and small.
What this means is that with my troublesome kit lens, the CoC registered ‘in focus,’ even though the focus point was not 100% registered onto the focal plane.
This is why all the shots from this lens appeared less than sharp, irrespective of the shutter speed and aperture selected.
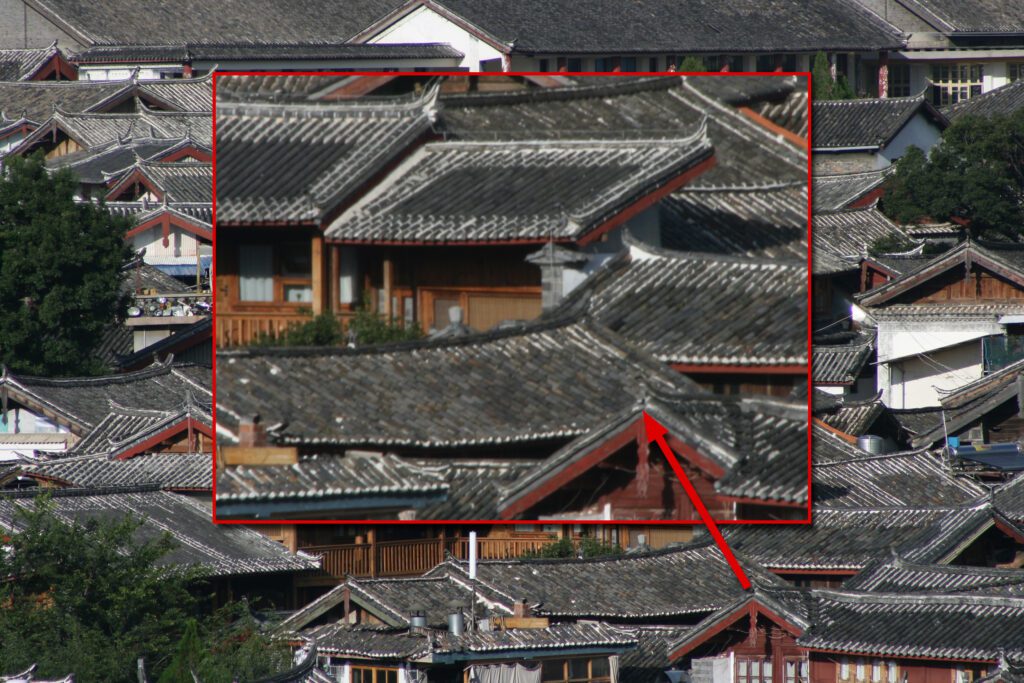
Lijiang, China: Here’s a classic example: tripod, self-timer, fast shutter speed, good depth of field, and lowish ISO still produced a soft-looking result. (Note that these shots were made using an early model Canon DSLR so that characteristics other than the CoC, such as pixel quality, noise, and firmware, all contributed to the poor image quality.) Photograph by Robin Nichols
Many years ago, I worked in an agency photographing product mock-ups for clients. At the time the lens I was using was a Nikkor 105mm macro lens. It was so accurate in focus that it picked out things in the mock-ups that were almost invisible to the naked eye: bits of glue, the wax used by typesetters, and fingerprints.
Lack of sharpness can be caused by poor camera technique or sub-standard technology, or both.
This was in the days before Photoshop was the answer to every image retouching problem so, on some projects, I used another lens that was not quite as tack sharp as the 105mm, to conceal some of the finer details that the client did not want to see.
At the time, I was completely unaware of the CoC, but in hindsight, this is a good example of exactly how it can influence our picture-making.
Exploit Your Sweet Spot
Tennis players will be familiar with this term. Hit the ball using the optimal spot in the racket and it bounces off the strings with perfect speed and direction.
Many might also know that lenses also have a sweet spot: an aperture setting that produces a good depth of field while producing optimal focus.
Key Lesson: The sweet spot for a lens is usually found at an f-stop of around f8 to f11. Of course, this figure varies slightly according to the manufacturer and lens model. Close the aperture to a smaller number or shoot wider open and some clarity (resolving power) is usually lost.
As with the CoC, there’s nothing you can do to alter this performance characteristic other than to work the figures to get the best results.
This was why even choosing a wide depth of field aperture (f22) made little or no difference to the clarity of my results.
In another example, I have a fast, f2.8, 14mm fisheye lens that produces images with soft edges when used at a wide-open aperture, but at f11 everything comes out pin-sharp, and this is not a cheap lens!
Chromatic Aberration Clouds the Issue
Lenses, especially wide-angle lenses, have to ‘bend’ light to get the image onto the sensor. Some lenses are far better at doing this than others.
One issue that can affect the clarity of your work is something called chromatic aberration: the inability to bend the three components of light (red, green, and blue (RGB)) to the same degree, meaning they start as one point of light and meet as one point of light on the sensor.
With a lot of lenses, the result is often the appearance of a color fringe around objects in the scene – typically more so at the very edges of the frame. Colors can be green or magenta or both. When enlarged it can look quite unsettling.

Photograph by Robin Nichols
I use Canon gear and was annoyed to discover, after buying a couple of expensive wide-angle lenses, that the brand was infamous for producing noticeable chromatic aberration (or at least more so than its main rival, Nikon). Unlike my dodgy zoom lens whose CoC couldn’t produce a sharp shot, there’s a software fix for excessive chromatic aberration. Most good software programs have a chromatic aberration filter of some sort or other. I typically use the one in Adobe Camera RAW to remove such visual problems, but there are dozens of other fixes available.
For a long time, I was unhappy with some of my wide-angle work caused by chromatic aberration, but unlike most filters that soften the image, removing the color fringing produced by chromatic aberration can have a dramatic sharpening effect on your files.
Chromatic aberration at its worst – aside from the focus issues already discussed, this ugly artifact can also have a softening effect on your files. But you can fix most of the problems using a range of reduction filters found in most software applications. Once ‘fixed,’ files will appear significantly sharper.
Key Lesson: Some readers might remember the glory days of postcards – produced cheaply and in the millions of copies. Very often the color print registration was out of whack, meaning that you could see where one color layer was not accurately applied on top of another, resulting in a slightly fuzzy-looking print. That is kind of what chromatic aberration looks like. Get all three color layers in perfect register and the image will jump off the page with absolute clarity.
Recommended Reading: If you’d like to master camera settings to create gorgeous, creamy, blurry backgrounds, grab a copy of Photzy’s premium guide: Beautiful Background Blur.
In Practice
As mentioned earlier, there’s nothing you can do to change the CoC characteristics of a particular lens other than to exploit its sweet spot characteristics, but it’s important to be aware of what’s happening when your lens refuses to produce a sharp image.
As I discovered, the best way to get a sharp result was by buying a better lens.
OK, that might be money that you don’t have, but think about this.
If you blow $1000 on a good quality lens it should give you 20+ years of great service. See it as a solid investment. You might need to update your camera body from time to time, but the lens? It will last years.
When I struggled to get sharp results from my inferior zoom lens, I had no alternative but to invest in a better product because the results it produced were so poor. I spent the money on a fast, pro-level zoom lens in the hope that it would be better. And it was.
As I discovered, the best way to get a sharp result was by buying a better lens.
Paying top dollar for a new lens can be daunting; however, my investment produced a lens that is pin-sharp, plus it has a lightning-fast AF response and a fine bokeh characteristic. That was 15 years ago.
I still use that lens almost every time I go out with a camera. It’s never been superseded or ‘improved’ in that time, and even if we’re to be updated, I’m so happy with the current results that I don’t feel the need to replace them.
Aside from reading every lens forum online – a task that’s both daunting and one that can be misleading – I’d put more value in the technical tests available for such a lens and not user opinions.
One of the most comprehensive available is from DXOMark.com, a site that publishes lens details on:
- Cost
- Release date
- Overall sharpness
- Distortion
- Vignetting
- Chromatic aberration and transmission

Correcting for lens chromatic aberration using Photoshop. Photograph by Robin Nichols
These clinically researched figures (DXOMark) provide potential buyers with a far more accurate idea of the quality and value for money of a lens than random two-paragraph non-technical opinions on amateur websites.

Zhongdian, China: I thought this was the perfect landscape, with front-to-back sharpness (at f18). On closer inspection, it appears a bit soft, another victim to poor quality lens design, and an unacceptable CoC. Most might not be aware that this is even a problem. With most pictures ending up on Instagram and Facebook with relatively tiny display mediums, you are very unlikely to appreciate such image flaws. Photograph by Robin Nichols
Shooting Exercise:
There’s no chart that I know of that reveals the CoC of all lenses. However, researching a site such as DXOMark will help illustrate the tested sharpness of a lot of lenses. Check the ones you own and maybe make your test by doing the following:
- Place the camera on a tripod and frame a shot.
- Manually focus the lens.
- Set the camera to Aperture Priority mode.
- Set a lowish ISO and run through all the apertures being careful not to move the camera between shots. Use the self-timer.
- Inspect the results at 100% and see if the frames are all the same sharp (taking the varying aperture into account).