Are you a new photographer? Do you wonder why some photos are more fun to look at than others?
There are many nuances to photography, but a solid building block for any photograph is composition.
Composition is essential because it tells a viewer, a random person, what your intent was when creating the picture. You can spot a poorly composed image when you don’t know where to look or acquire any feelings or mood from the presented still image.
Composition isn’t a slam dunk. It does take time to learn about it, practice it, and finally accomplish it quickly while on the fly.
I tell my students to start with what I call the Big Three.
The Big Three are the easiest composition tools to learn, spot within a scene, and utilize in a composition.
These three tools are the focal point, leading lines, and frames.
Key Lesson: Photo composition is about creating a road map into and around a picture. It starts a viewer in one place and moves them through the frame of the image until their eyes come to rest on the subject area.
Recommended Reading: If you’d like to improve your composition skills for better images, grab a copy of Photzy’s best-selling premium guide: Advanced Composition.
Learning and becoming proficient with these three tools will significantly enhance your photography abilities. You can then move on toward the more nuanced tools of advanced composition.
In this guide, you will learn:
- What is a focal point?
- What creates a focal point?
- How does a focal point work in a photo composition?
- What creates a poorly executed focal point?
- What is a leading line?
- How do leading lines work in a photo composition?
- What not to do with leading lines
- What is a frame?
- How is it effective?
- Recognizing a good frame in a scene versus a not-so-good one
Focal Points
A focal point is a location within the frame of a photo that is visually dominant and attracts immediate attention.

The image above is the opening example because it is a very easy-to-identify focal point. When you look at the image, your eyes go right to the hot air balloon. The balloon is so dominant that the rest of the image is almost non-existent.
A focal point can be created in numerous ways, and we will examine several of those ways in this guide.
Key Lesson: A focal point can be a visually dominant object placed near the subject to draw attention toward the subject, or the focal point can be the subject. This is the case in the image above.

The man in the white t-shirt is visually dominant in this quite busy photo. He’s dominant for several reasons, but primarily it is the contrast of his shirt to his surroundings.
What do you think? Is he the subject or a focal point to the subject being the crowd? That’s a hard call on this one. I think he is the subject and focal point. However, in this case, the surrounding elements are essential as opposed to the image on the previous page.
Key Lesson: Tonal contrast works well to isolate an element within a scene as a focal point. When exploring a picture idea, look for aspects of tonal contrast and imagine how to use that contrast to direct attention to a particular location within the frame.

Another method of contrast as a focal point is color contrast. Color contrast occurs when you position warm and cold colors in the same frame.
The image above utilizes color contrast to create a focal point. The setting sun is very warm in hue. The sky, legs, and shoes are cool in their colored hues. This creates a color contrast that firmly pulls the eyes inward toward the tree.
In dissecting this image, I would say that the legs and shoes are a leading line. The tree is the subject area, and the setting sun is the focal point.
Key Lesson: Color contrast is also a very effective tool when searching for focal points. Remember, color contrast occurs when you combine a warm color and a cool color in the same shot. Think about how you combine these colors. You don’t want them to lead away from your subject area but toward it.
This is an interesting image. It uses a focal point and a frame, both created by shape.
Key Lesson: A easily identified shape that stands out from the surrounding area is a perfect potential candidate to become a focal point. Again, ensure that the shape is placed so that it draws attention toward the subject area.
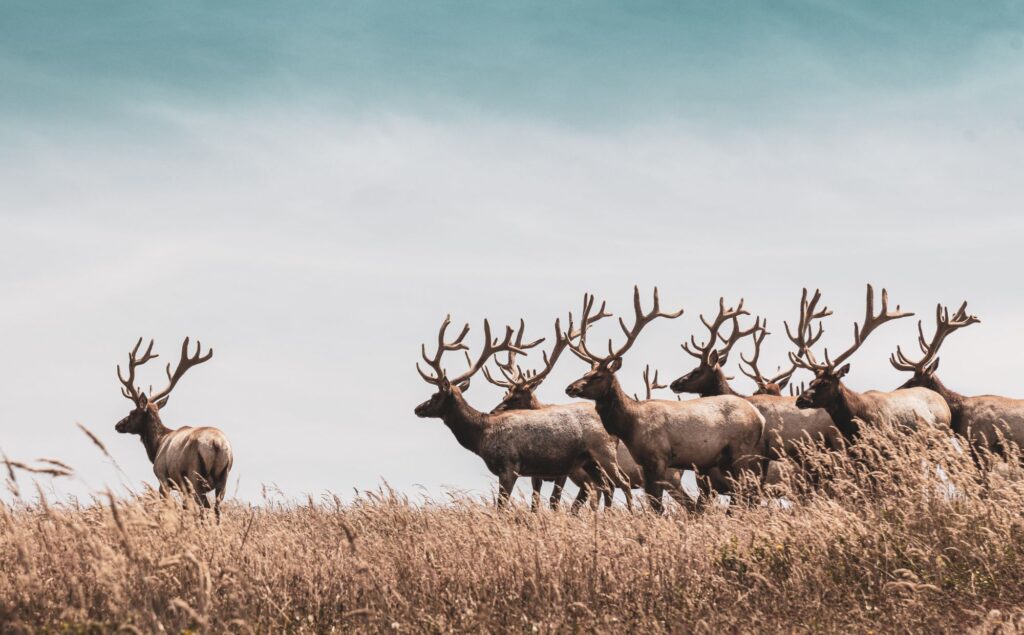
The image above presents an advanced use of a focal point, but I think you’re ready for it.
The focal point is created by the negative space between the herd of elk and the one to the left. This is also enhanced by a leading line created by the herd’s line of sight.
Key Lesson: Negative space can create a focal point when it isolates the subject from the rest of the frame.
Leading Lines

A leading line in photographic composition is an actual physical line or an implied line that leads into the picture and toward the subject area.
The image above is an easy-to-identify leading line. The mountain at the end of the line is an imperative element in this composition as it provides a subject area.
Key Lesson: The most common problem in using leading lines in photography by students or beginner photographers is that the lines they incorporate do not lead to the subject area or lead past the subject area.
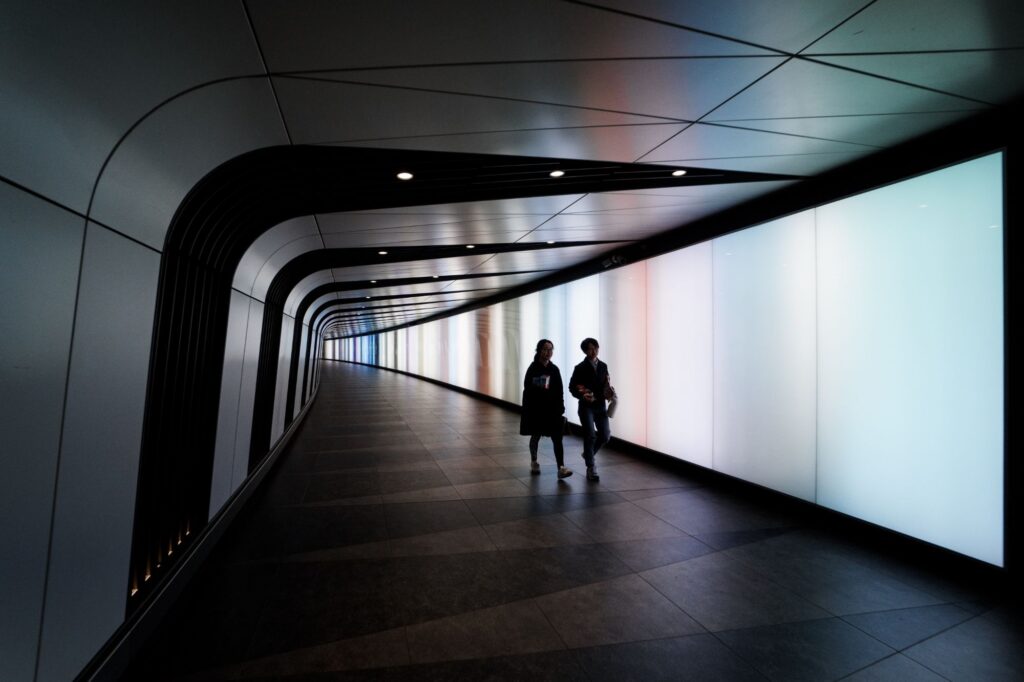
The image above has a clearly visible leading line, which appears to be one of those troublesome shots I just mentioned, as the line leads past the couple walking, which is the subject area.
But here’s the deal. Composition is complex, and it is always a give and takes. This composition (even though the line leads past the subject) works for two reasons. The subject is a dominant shape that stands out from the surrounding area. And even more important is the placement of the subject within the frame and along the line.
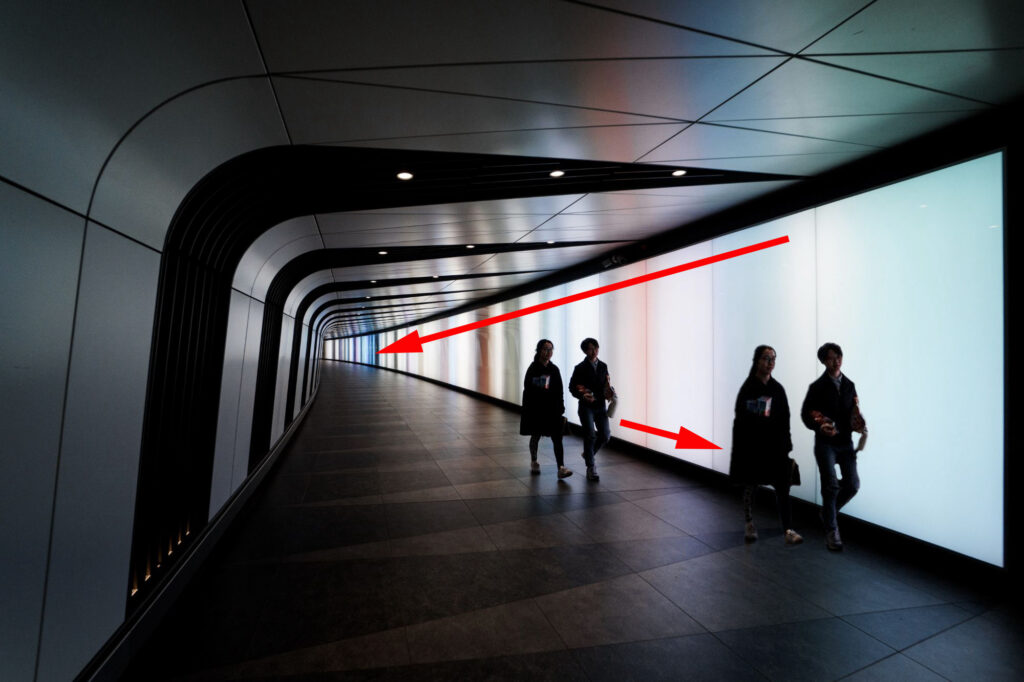
Photograph by Marcos Nieto and Graphics by Kent DuFault
I used Photoshop to clone the couple into a spot closer to the camera and still along the leading line. Suppose the photographer had waited until this position. In that case, the leading line now becomes a problem because the line behind the subject is more visually dominant than the line in front of them.
Key Lesson: All composition tools, including the Big Three, are open to interpretation. Your primary consideration when composing should include the following question. Does this composition lead toward the subject area or away from it? And if so, why, and can it be corrected?
Recommended Reading: If you’d like to improve your composition skills for better images, grab a copy of Photzy’s best-selling premium guide: Advanced Composition.

Earlier, we touched upon the term ‘line of sight.’ A line of sight is an invisible leading line created by a person or animal looking intently in a particular direction. Think about it this way. Have you ever been out and about when you saw someone staring at something? What is the natural reaction? You would look to see what they are looking at. That is the line of sight, and it is a powerful tool in photography.
You would look to see what they are looking at. That is the line of sight, and it is a powerful tool in photography.
However, like leading lines, you want that line of sight to lead somewhere important, typically the subject area.
The image above has a robust line of sight. The image isn’t a bad one. However, it would be stronger if the man had something of interest in his hand, such as a wrench. The wrench would anchor the subject area and add a better story element.
The wrench would also be a focal point. Are you concluding that I am trying to impress upon you? When possible, use as many of the Big Three tools in a single photo as you can. Each element strengthens the composition.
Key Lesson: A line of sight is a valuable composition tool. Make sure the line of sight leads somewhere important. Combine the Big Three in a single photo as often as you can.

Many photography students believe that a leading line must start in the foreground and lead into the distant background. This isn’t necessarily true. A good leading line will catch the eye and move it toward the subject area. It can come from any direction.
Watch out for repetitive objects that mimic your leading line poorly or unintentionally.
Watch out for repetitive objects that mimic your leading line poorly or unintentionally.
For example, in the image above, I would have removed the distant boat wake in the upper left part of the photo as it draws attention away from the intended leading line and subject area.

With the second wake removed, the intended leading line and boat are strengthened as the subject area. Photograph by Sophie Dale and Editing by Kent DuFault
Key Lesson: Make sure your leading line stands out and has no competition for attention.

My final word on leading lines is this. They can also be centric. In other words, lines that begin at the edge of the frame and extend inwards are also effective when they end at the subject area.
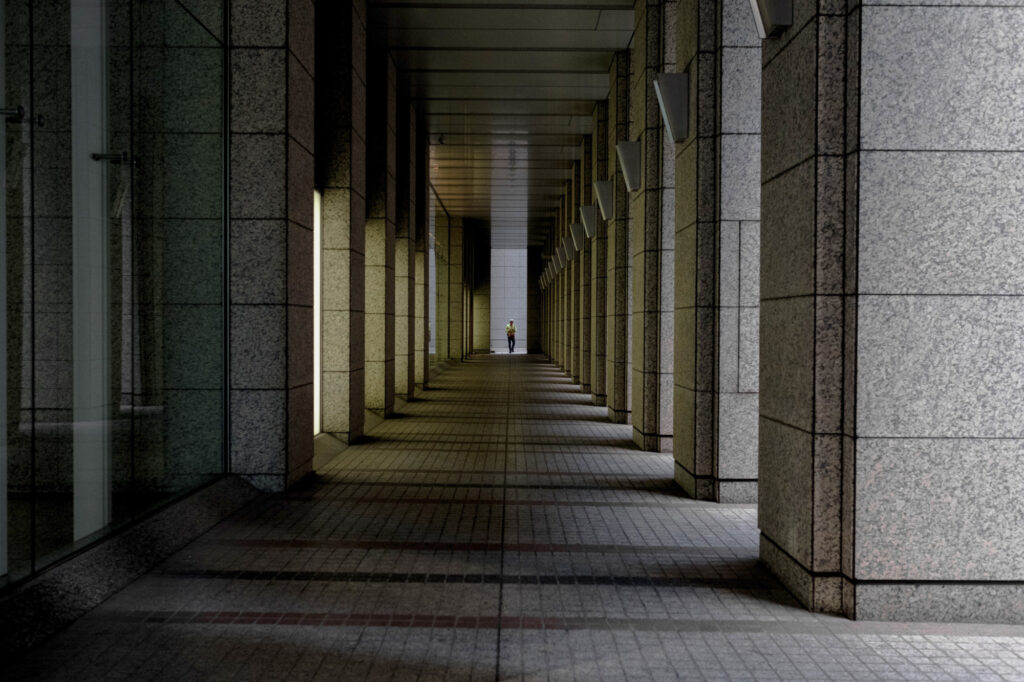
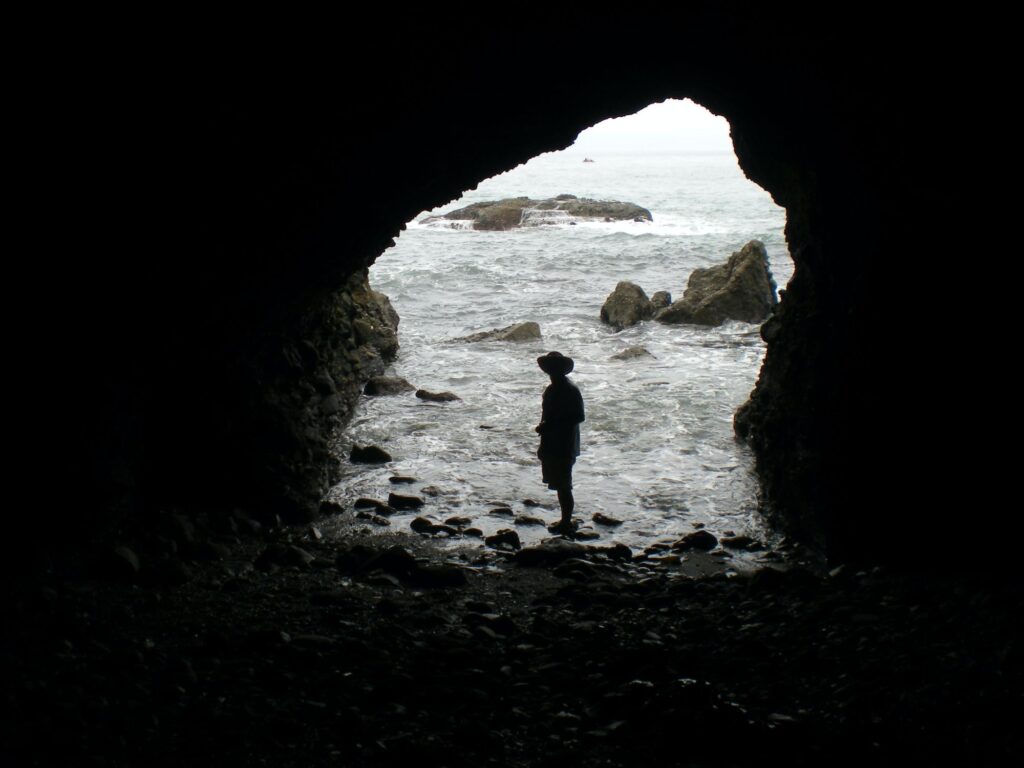
Frames

This isn’t exactly what we mean when we talk about a composition frame. Although, it is a cute idea. I’ve seen some beautiful shots created with a picture frame being held in the scene, and I encourage you to give it a try.

The image above is one classic example of using a frame in landscape photography. In this case, the frame provides two critical composition elements to the final picture.
Firstly, it forces the eyes upward toward the more exciting part of the scene. Secondly, it adds foreground interest when there wasn’t much interest in the grassland.
Key Lesson: A composition frame in photography is an object or an implied line that stops the eyes from moving in one direction and forces them to move in the opposite direction.

Photograph by Alessio Furlan and Graphics by Kent DuFault
The image above illustrates how the foreground frame pushes the eyes upward and inward toward the subject area.
The concept of a composition frame began with the early baroque period painters who often used it in still life and portraiture paintings.
A vignette is a form of a composition frame.
Key Lesson: A vignette is a frame that pushes the eyes inward from all sides.

In the image above, the brick wall on either side of the woman pushes the eyes inward from both sides.
Key Lesson: A frame can include all sides of the image area, only a couple of sides, or even just one side.

In the image above, the frame is the tree on the right. It forces the eyes left toward the subject’s face.

A frame doesn’t necessarily need to be a dominant visual element. It does need to separate the subject from the surroundings.
The image above is a fantastic example of a subtle frame that is very effective.

The blue smoke in this image is too dominant and draws attention away from the subject.
Key Lesson: When creating a frame, ensure it doesn’t visually dominate the subject.
Recommended Reading: If you’d like to improve your composition skills for better images, grab a copy of Photzy’s best-selling premium guide: Advanced Composition.
Conclusion
If you can master the Big Three, you can improve almost all your photographs. Make sure that your composition always points toward your subject. A focal point can also be the subject. Leading lines can be physical or implied; they don’t have to originate in the foreground and move toward the background. However, they should lead toward the subject area. Frames are a powerful tool to direct viewers’ eyes in a particular direction. Don’t let your frame overwhelm your subject visually.
Self-Check Quiz:
- Why is composition essential?
- What composition tools comprise the Big Three?
- Can a focal point also be the subject?
- What two types of contrast can create a focal point?
- An easily identified ____________ can create a focal point.
- ___________ ______can make a focal point when it isolates the subject from the rest of the frame.
- True or False: A leading line can lead anywhere.
- True or False: Under no circumstances should a leading line go past the subject area.
- Name one type of implied leading line.
- What is the purpose of a composition frame?
- What is the one thing you never want your composition frame to do?