


As photographers, we love to go out and capture the world. With our digital cameras, we can click the shutter as many times as we want. There is no cost to us at all. But not all of us like what happens next. It takes time to sort through dozens, or even hundreds, of photos on our cameras. How do we quickly find the photographic gems?
When you first started photography, you could probably keep track of your images. When you wanted to share your images with family or friends, you could quickly find your best. But as you take more photos, maybe even hundreds at a time, you need a system to help you organize your images. At the very least, you need to be able to find your best and mark images that are not worth keeping.
Culling is the process of sorting through your images. Some you keep and some you delete. Some photographers go into this part of their workflow with a sense of excitement. What treasures might they find? Other photographers dread culling. The sorting process always seems to take a lot of time and attention.
But there are ways of speeding up the sorting process that can save you a lot of time later. Never again will you waste time post-processing an image only to find better light or composition on the next shot.
This guide explores ways of speeding up your culling workflow. This includes developing an efficient process of rating and ranking images. It also means taking advantage of programs that help you make quick photographic decisions.
What we’ll cover in this guide:
- Rating systems and making decisions
- Speeding up culling in Lightroom
- Specialized culling software
An effective culling workflow helps you get from shutter clicks to the photographic treasures that you love.

Culling photos means choosing your best from a series of images. In this series, I choose the one on the right because the bee was in better focus. Photograph by Jenn Mishra
Recommended Reading: If you want to learn how to enhance your photos and create better images, grab a copy of Photzy’s premium guide: Ultimate Guide to Fundamental Editing.
Rating Systems for Making Decisions
Most post-processing programs have at least one system for a rating or ranking your images. These programs often use a system of flags or likes, stars, or colors. Once you mark your favorite images, filter or sort your images to bring these to the forefront.
Screenshot of ON1 Photo Raw showing a system of hearts, stars, and colors. Screenshot by Jenn Mishra
Quick Picks
Tags, flags, and hearts let you make quick yes/no decisions about your photos. Start your sorting process by making simple binary decisions. This keeps you from getting overwhelmed. Binary decisions are quicker to make than decisions with more options. On your first pass through your images, use the program’s ranking system to flag your favorite photos. Click the heart icon, pin it with a flag, or give it a star.
As you go through this initial pass, try to keep your decisions quick. When you start looking at details, try to look for only a couple of details at a time. This photo is in focus. That photo has a pleasing composition. During my initial pass, I’m more visceral in my decision-making. I try not to get bogged down in technical details. If I immediately liked the image, I flag it.
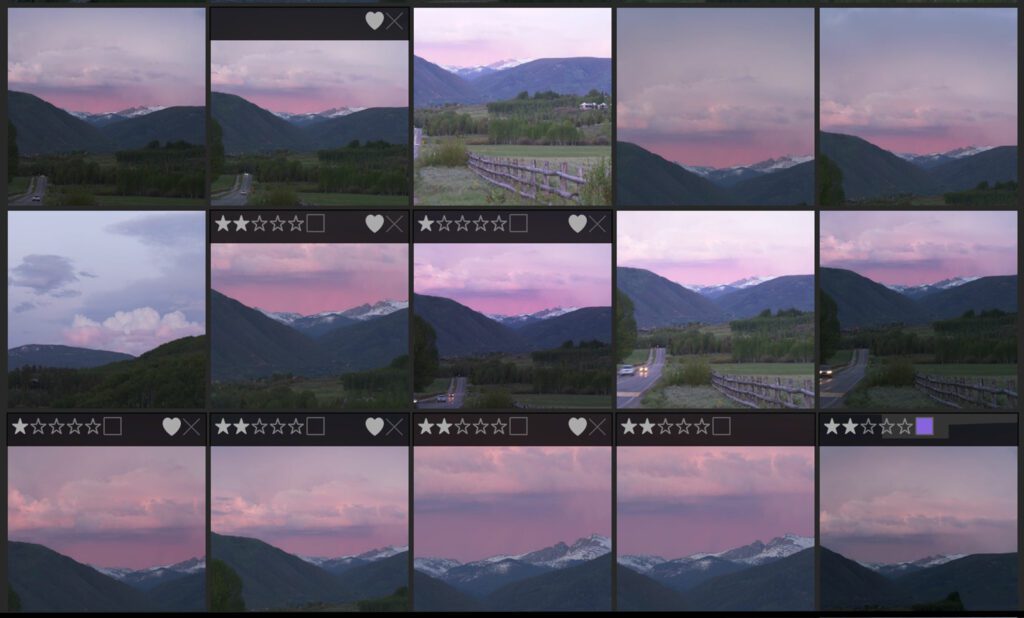
Lightroom workspace showing an initial set of flagged images. Screenshot by Jenn Mishra
You can be as generous as you want with your “yes” vote. Some photographers flag a lot of photos; others like only a few on their first pass. But there is no limit to the number of images you can keep. I am generous with my initial likes. Later, I will make more thoughtful decisions and make choices between similar images.
Some photographers flag a lot of photos; others like only a few on their first pass. But there is no limit to the number of images you can keep.
What you do with the unselected images is up to you. You can delete them, but you don’t have to do anything with them. Most programs let you filter images to show only those selected. The unselected photos disappear into the background.
A quick pass through your images reduces the number of images that need more in-depth consideration. From here, narrow down your favorites with a rating system.
Ratings to Focus Choices
Many post-processing programs also include a system of rating photos, often a star system. Using this system lets you make quality decisions and compare similar photos.
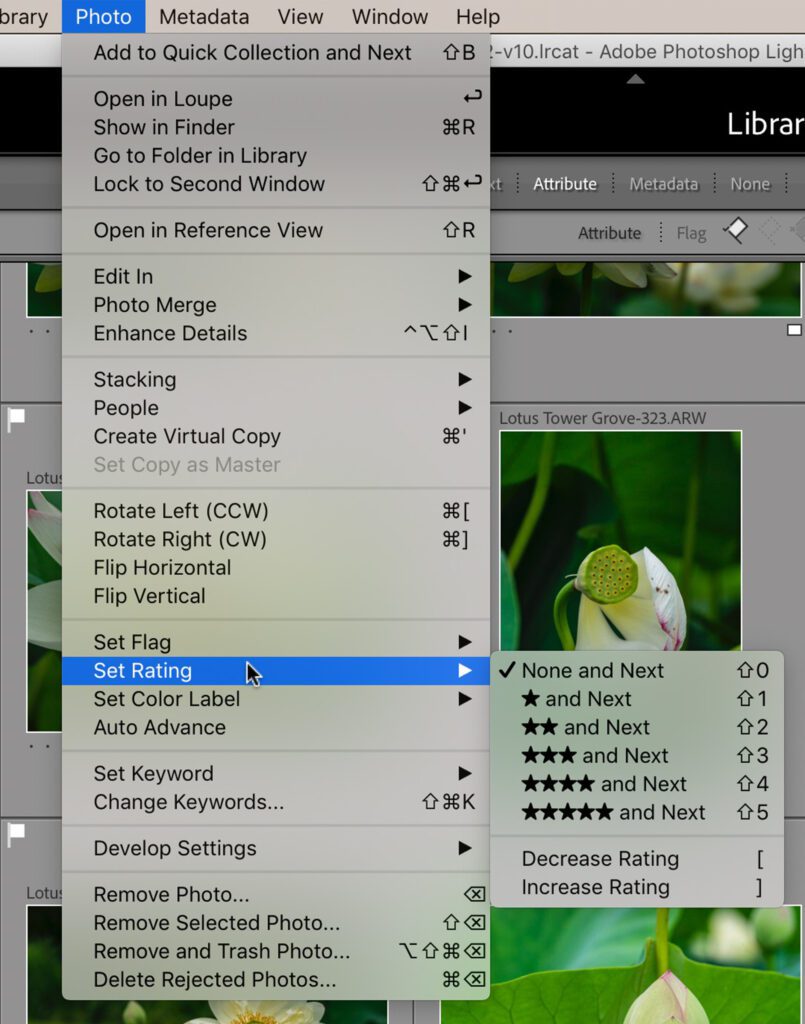
In many programs like Lightroom, you can use stars to rank images. Screenshot by Jenn Mishra
There are a lot of ways to use a rating system. Generally, more stars equate to a better photo. Lightroom lets me use as many as five stars, but I only need three. One is good, two is better, and three is best. Only three-star images get the full post-processing treatment.
You may be able to look at a photo and quickly decide if it is a one-star or a five-star image. I look at my one-star images and decide which deserves another star. I can compare like-images and decide which ones are better than the others. Then I look at my two-star images and give an extra star to the best. With each pass, I narrow down the images. I’m looking for the best of the best. Other photographers are less systematic and that’s ok, too. Culling is a personal process and varies based on your personality.
Try not to put too much pressure on each decision. The more technical or artistic characteristics you analyze at once, the slower your decision-making process will be. It is better to make more passes through the images, each time refining your decisions, rather than try to decide on your best images right away.
Color Coding
Some programs give you other sorting options, like the ability to color-code your images. You can use colors as a ranking system. Like a traffic light, green means “go,” yellow means “maybe,” and red means “no.”
But colors can mean anything. You can use colors to mark subjects or a photographic technique, like highlighting a series of HDR-bracketed images. You can mark images edited in a program like Photoshop or with a Topaz plug-in. I use colors to tell me where I’ve published a photo on social media.
It doesn’t matter so much what your individual system is. It matters that you have a system that helps you find your favorite photos faster.
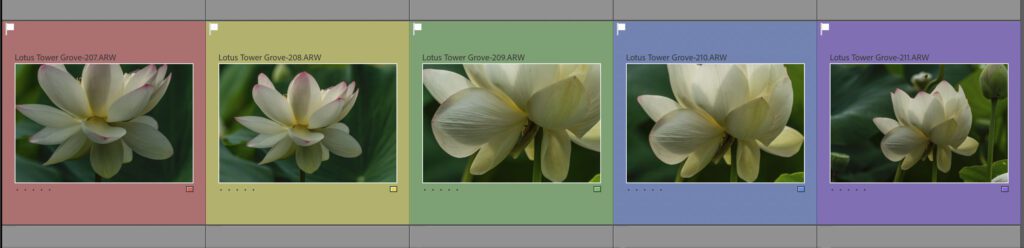
Lightroom and other programs let you color code images. The colors can mean anything you want. Screenshot by Jenn Mishra
Maximizing Culling Speed in Lightroom
Many photographers use Lightroom to cull their images. The program has a system of flags, stars, and colors to help you select your best images. Then, you can quickly sort by any combination of attributes. Adobe continues to improve the speed of Lightroom, but there are ways to maximize how fast you can sort through a large number of images.
Sort Before Import
Before you press the import button in Lightroom’s import window, decide which photos you want to import. It takes time to import images into Lightroom. The time increases if you are copying images from an SD card to a hard drive. So, only import images that you might want to keep.
On the import screen, the checkmarks next to the thumbnails flag the image for import. Uncheck the box to skip this image. There is no need to import images that you don’t like and will immediately delete.
Select full-screen view or double-click an image to see it full screen with the option to zoom in for a closer look.

Screenshot of Lightroom Classic import workspace. You can select or unselect images for import. Screenshot by Jenn Mishra.
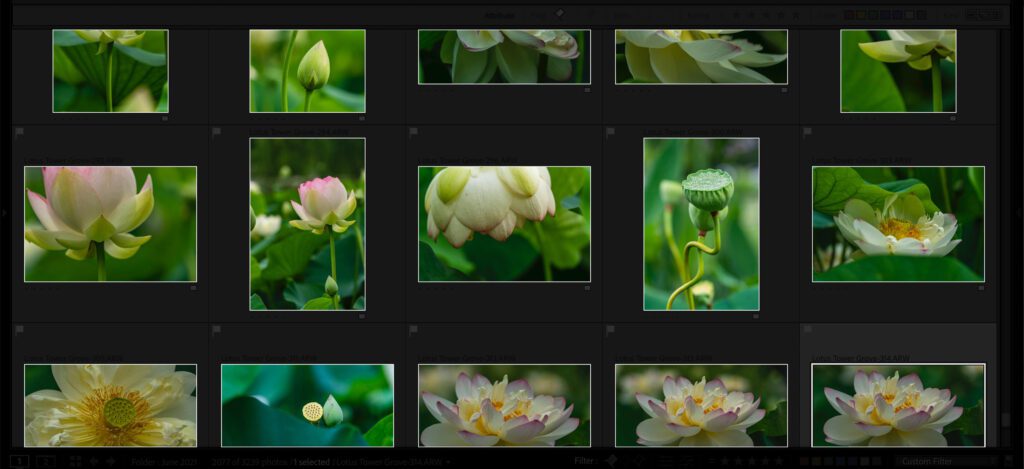
Cull in the Library Module
Speeding up the culling process has a lot to do with speeding up how long it takes for the image to appear on your screen. It takes time for photos to resolve enough that you can see details. Photos render faster in the Library module. Images are slower to appear in the Develop module.
Use Keyboard Shortcuts
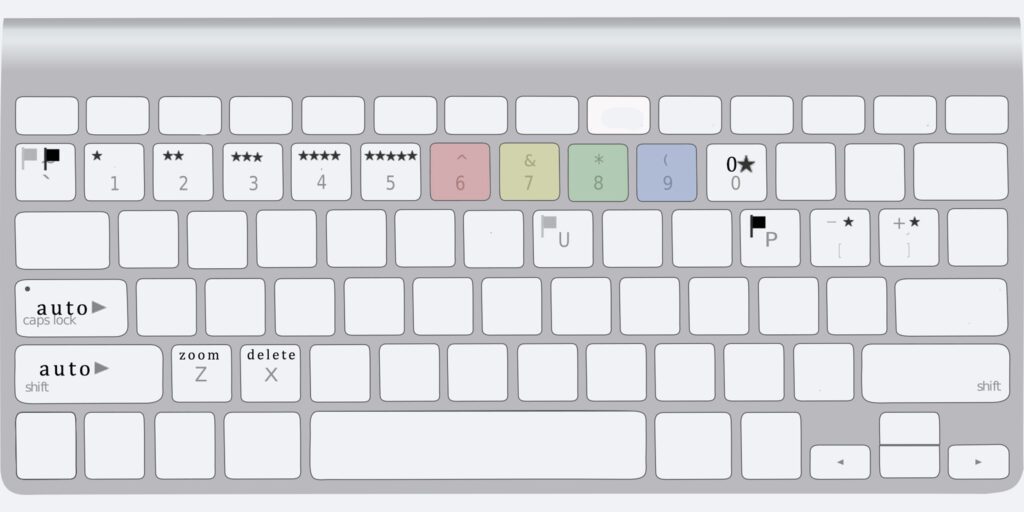
Mac keyboard showing keyboard shortcuts used for sorting images in Lightroom. Image by Jenn Mishra
Keyboard shortcuts speed up the culling process. It is faster to press a keystroke than to flag an image with your cursor or use the drop-down menus.
In Lightroom, the P and U keys work to pick or unpick an image. Or use the key left of the number 1 (`) to toggle pick on and off. Delete an image by clicking the X key.
Keyboard shortcuts speed up the culling process. It is faster to press a keystroke than to flag an image with your cursor or use the drop-down menus.
Star images using the numbers 1 through 5. The bracket keys increase or decrease the rating. Numbers 6 through 9 color code the image (6 is red, 7 is yellow, etc.).
You can zoom in for a closer look by holding the Z key. Release the Z key to return to full screen.
Turn On Auto Advance
Every keystroke or motion adds time to the culling process.
You can advance through the images using the arrow keys to advance, but it’s faster if you turn on Auto Advance. Lightroom flags, rates, or color codes a photo and then automatically move to the next image. To turn on Auto Advance, go to the Photo drop-down menu and select Photo > Auto Advance. You can also turn on this feature by holding the shift key or clicking on the Caps Lock.
Build Previews During Import
During import, Lightroom builds previews. The type of previews you build influence the speed of import and how fast you can move through your images during culling.
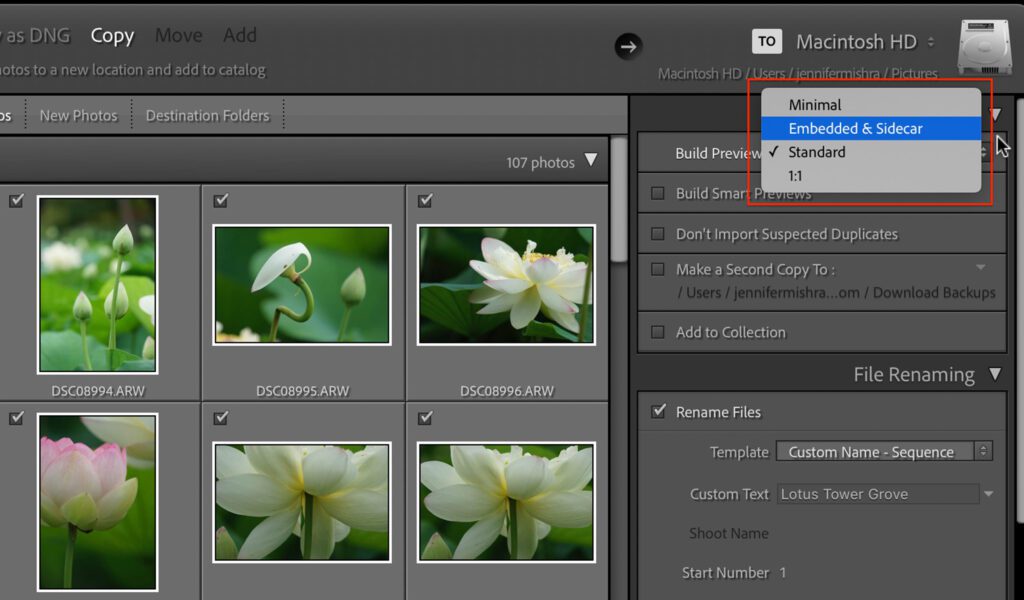
On the import workspace, Lightroom gives you the option of building Minimal, Standard, and 1:1 previews as well as sidecar files. Screenshot by Jenn Mishra
Minimal previews are quick to make during import but are lower in quality. Standard previews have better quality for full-screen viewing. If you like to zoom in to see detail, the photo needs a Smart or 1:1 preview. This takes more time to build during import, but photos will render faster during culling.
If you like to zoom in during culling, take the time to build 1:1 previews during import. You can start culling while the previews build. If you make your decisions based on a more global view of the image, build the quicker minimal or standard-sized previews.
Recommended Reading: If you want to learn how to enhance your photos and create better images, grab a copy of Photzy’s premium guide: Ultimate Guide to Fundamental Editing.
Smart and 1:1 previews take up a lot of memory in your catalog, so it’s a good idea to discard these previews when you no longer need them. Select Library > Previews and choose one of the discard options.
Also, photos render slower in Full-Screen view than in Grid or Loupe view. To see images at a larger size, use Loupe view (keyboard shortcut E) instead of Full-Screen preview. Minimize left and right columns by clicking the Tab key. You may also want to remove the filmstrip (F6) and the module menu.
Auto Stack Images
Auto stack groups images by time. Go to the Photo drop-down menu and select Photo > Stacking > Auto Stack by Capture Time. You can make larger or smaller stacks by using the slider.
Compare the images in each stack and select the best. Move your choice to the top of the stack.
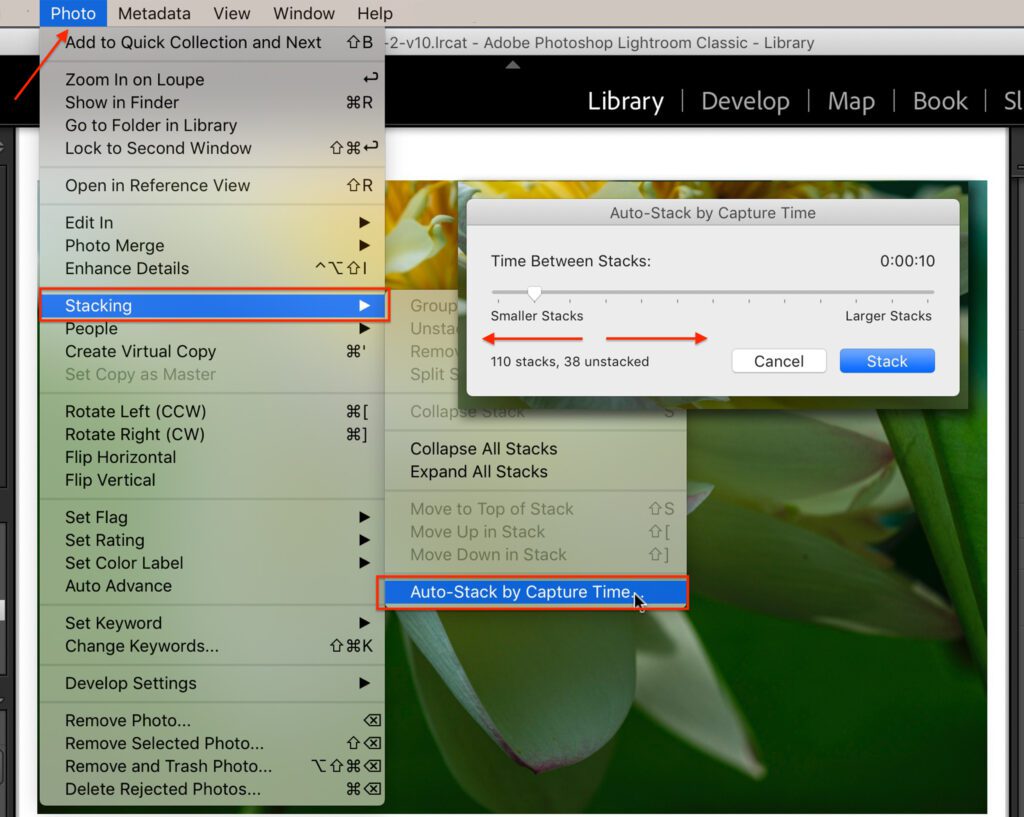
Screenshot of Lightroom showing how to auto-stack images. Screenshot by Jenn Mishra
Compare Images in Survey View
Survey view lets you compare selected images on one screen. Highlight the images you want to compare and open Survey View. You can easily see duplicates and compare similar images to decide which you like best.
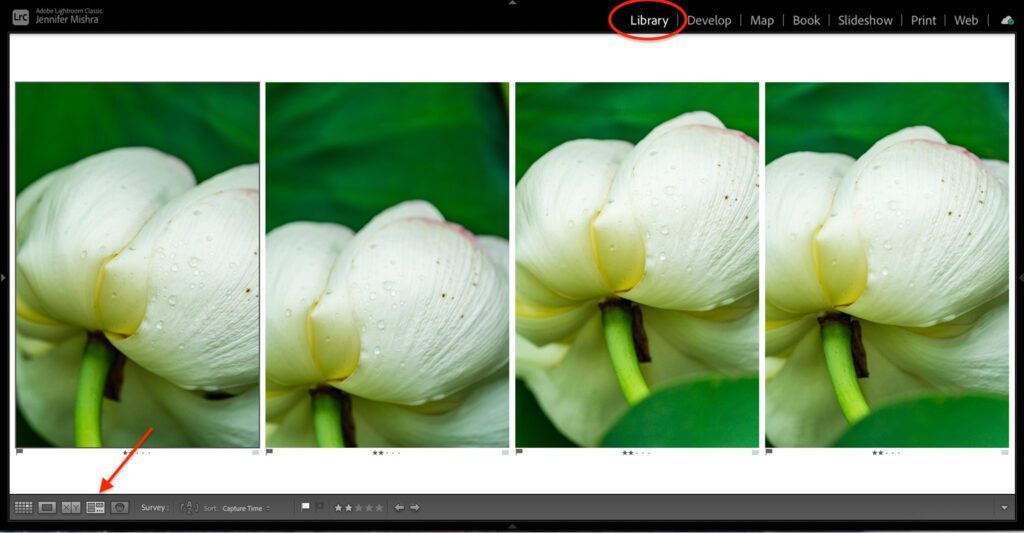
Survey View in the Library module lets you compare selected images on one screen. Screenshot by Jenn Mishra
Limit Images With Filters
As you are sorting through images, use Lightroom’s filters to limit the photos that you see. You can find the filters on the right side of the filmstrip. You can filter images by flags, stars, or color codes. Or you can see edited or unedited images. You can also create filter presets that let you save a combination of attributes. For instance, I have created a filter to help me find photos that are edited but have not yet been published on a social media site.

Screenshot of Lightroom workspace showing filter options on the filmstrip. Screenshot by Jenn Mishra
There are many ways to maximize how fast you can sort images in Lightroom, but I’m always looking for a faster program or one that has additional tools to help me find my best images. Let’s explore programs specially designed to help cull through your images. Many of these are designed to interface with Lightroom or other photo editing programs.
Specialized Culling Software
Lightroom works well for culling photos, but many photographers complain about the speed of the program. If you find culling in Lightroom slow, you have options. Let’s look at some alternative software programs that are designed to sort large numbers of images. Each has a different set of features. Two of the programs include AI that automatically sorts your images. The programs also vary in price, but each has a free trial.
Photo Mechanic
Photo Mechanic is a popular culling program: https://home.camerabits.com/. It is a non-AI culling program marketed as a faster way to view and organize your images. The user interface looks similar to Lightroom, but parts of the program have a basic design and can be confusing.
Lightroom works well for culling photos, but many photographers complain about the speed of the program.
When you open a folder, the Photo Mechanic immediately shows you the images. There is no need to import (ingest) before you sort images. The program uses keyboard shortcuts to tag, star, or color-code the images. Where Photo Mechanic seems to shine is its ability to keyword and add other metadata to images and sort images into catalogs. These features are helpful for photojournalists and sports photographers.
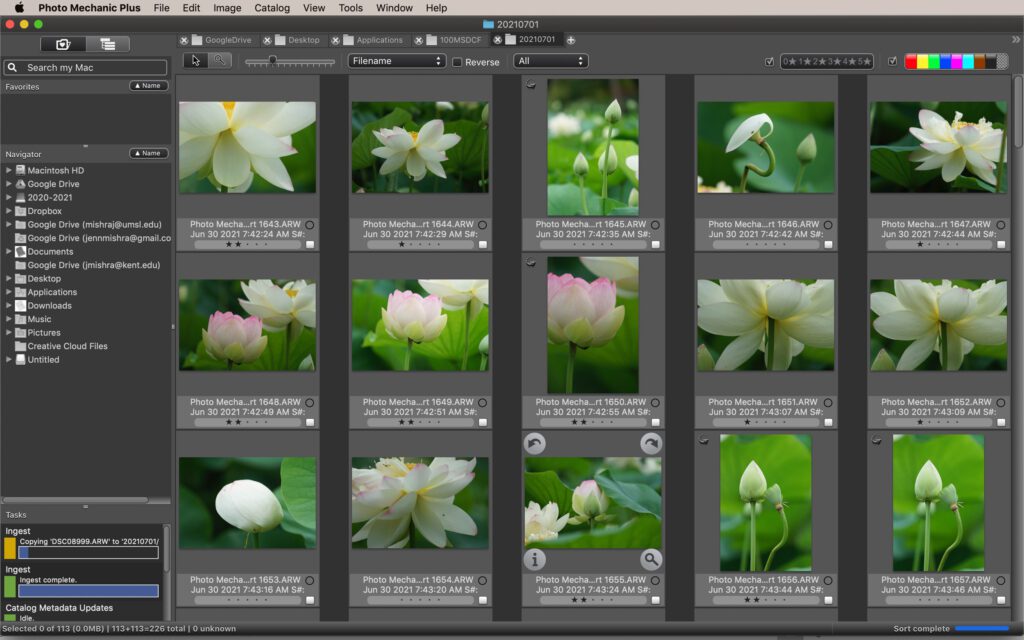
Screenshot of Photo Mechanic Plus workspace. Screenshot by Jenn Mishra
Many photographers like Photo Mechanic for culling, but I find the program confusing and not very intuitive. I couldn’t find the promised auto-advance feature. So, there was always an extra keystroke to move to the next image for review. There is no direct interface with Lightroom; though you can drag selected files from Photo Mechanic into Lightroom for import. Ingesting files into Photo Mechanic took time and didn’t save me any time when I imported my selections into Lightroom.
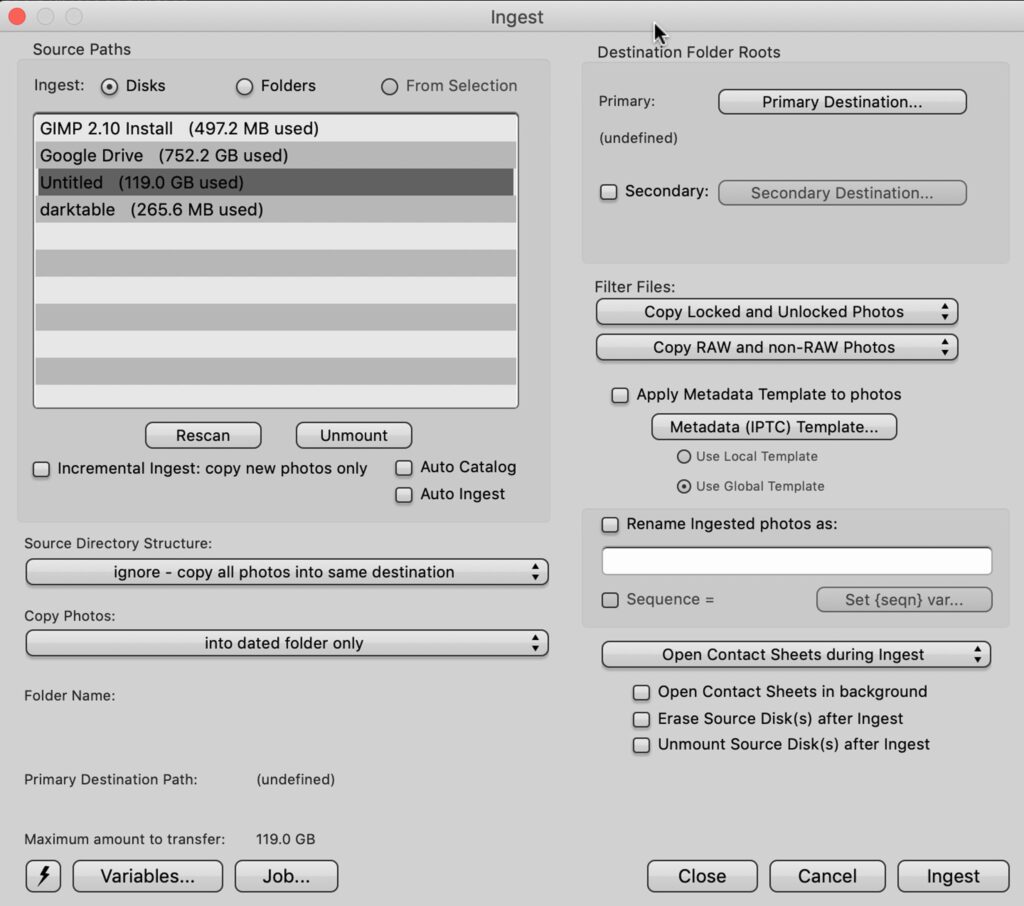
Screenshot of Photo Mechanic Plus Ingest window. Screenshot by Jenn Mishra
Also, the program is pricy. Photo Mechanic Plus, which includes the new database feature, is $229. If you own an older version of the program, you can upgrade at a reduced rate.
Pros of Photo Mechanic:
- View before import
- Keyboard shortcuts
- Filter by rating
Cons of Photo Mechanic:
- Confusing interface
- Expensive
FastRawViewer
FastRawViewer, https://www.fastrawviewer.com/, is my current favorite non-AI culling program. The user interface is a bit old-school, but it has many tools to help you make quick decisions about your photos.
When you open a folder, FastRawViewer immediately shows you the images. All keyboard shortcuts are customizable. Use any key you want to select, star, or color-code your images. The program includes evaluation tools that help you decide between images. For instance, you can see focused edges, over and underexposed areas, and color channel information. You can even do some basic exposure, contrast, and white balance adjustments. When you’ve finished culling, send selected images directly to Lightroom for import.
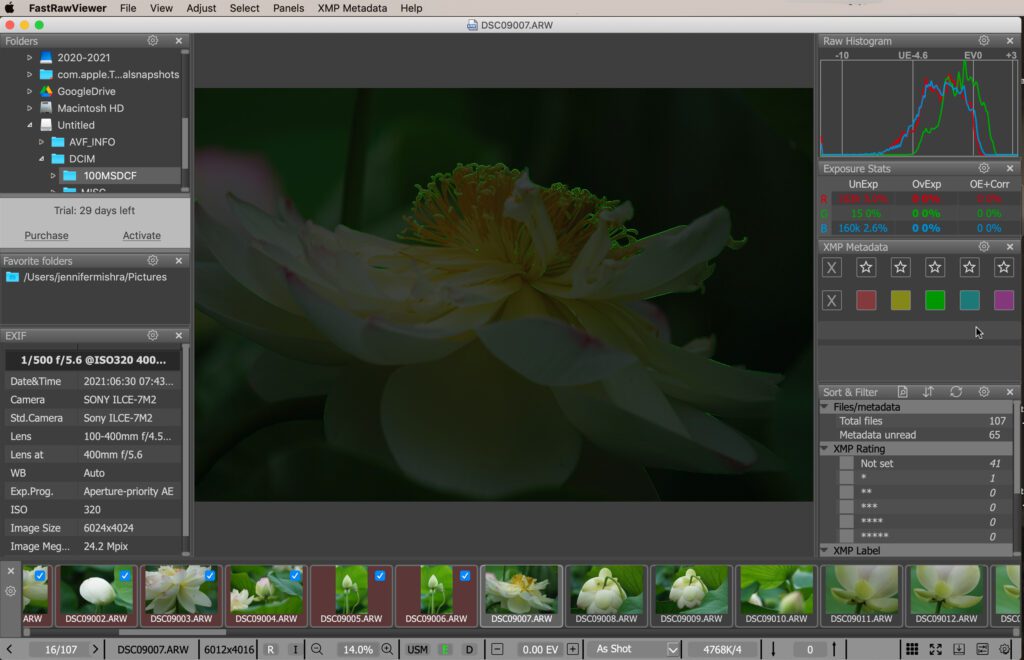
Screenshot of FastRawViewer workspace with focus peaking turned on. Screenshot by Jenn Mishra
The program is fast and packed with tools to help you sort images. It is also inexpensive. The cost is currently $19.99.
Pros of FastRawViewer:
- View before import
- Customizable keyboard shortcuts
- Auto-advance
- Evaluation tools like focus peaking and zoom
- Filter by rating
- Send images to Lightroom or Photoshop
- Inexpensive
Kodak Professional Select
Kodak Professional Select, https://www.kproselect.com/index.html, is an AI-based photo sorting program. The user interface is uncluttered and professional-looking.
The program starts by processing and scoring your images. This takes some time. The program groups your images by time and rates them by quality. Duplicates are stacked and hidden under the best image of the group. You can sort images by score and change the weight of various characteristics. For instance, you can make sharpness a low priority and color a high priority. You can tag and star images, but the program does not color code.
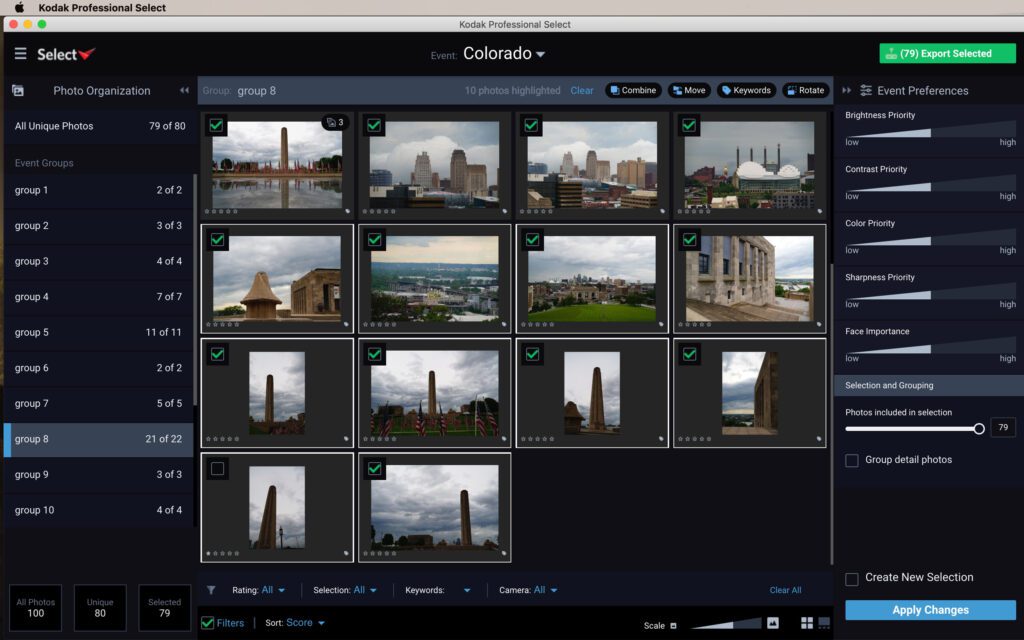
Screenshot of Kodak Professional Select workspace showing AI groupings in the left column and preferences in the right column. Screenshot by Jenn Mishra
There is a lot of functionality in this program, but a lot of it is hidden. The program uses keyboard shortcuts, though they are initially difficult to find. To see your options, open the keyboard shortcut link. I also couldn’t find a way to auto-advance the frames. The program exports selected files to a disk but do not connect directly with other programs.
This program has possibilities. The AI scoring is intriguing. It would be informative to see the statistics behind the scoring, but that doesn’t seem possible. The price is the biggest issue. The cost is $300 per year.
Pros of Kodak Pro Select:
- AI analysis
- Keyboard shortcuts
- Auto group by time
- Filter by rating
Cons of Kodak Pro Select:
- No auto-advance
- Does not interface with other programs
- Scoring system hidden
- Expensive and subscription-based
FilterPixel
FilterPixel, https://filterpixel.com/, is my current favorite AI culling program. The interface is professional-looking and easy to navigate. The program analyzes photos for focus and eye quality. These two features are useful for wedding and portrait photographers.
The program automatically rejects photos with major issues; though, you can override the decision. The program uses the same keyboard shortcuts as Lightroom, which cuts down on confusion if you are using both programs. The focus and eye quality statistics are helpful when choosing between images. When you’ve finished culling, send selected images directly to Lightroom for import.
The AI is not flawless, but it can help you sort through many images quickly. I could not find a way to zoom in for a closer look. It would also be helpful to include a focus peaking overlay.
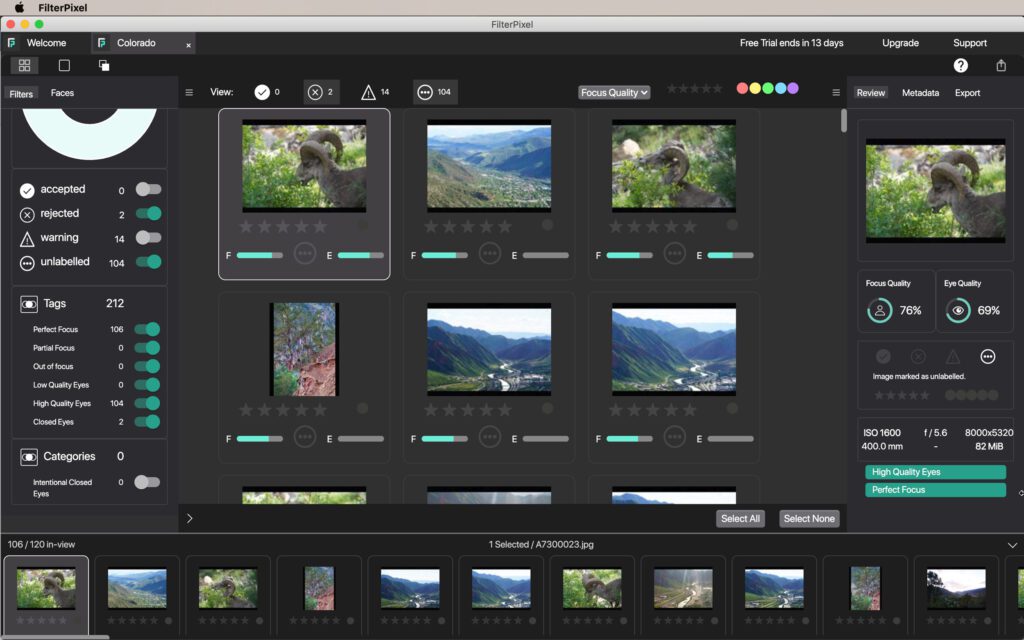
Screenshot of FilterPixel workspace showing AI groupings in the left column and AI ratings for selected photos in the right column. Screenshot by Jenn Mishra
The free version of FilterPixel lets you manually cull images. You can activate the AI features for as little as $5 per month. The cost of a subscription depends on how many images you want to sort per month.
Pros of FilterPixel:
- AI analyzes eye and focuses quality
- Auto-advance
- Keyboard shortcuts
- Filter by rating
- Send images to Lightroom or Photoshop
- Auto group by time
- Free version available
Cons of FilterPixel:
- No zoom capability
- Limited to the eye and focus analysis
- Lacks focus peaking overlays
- Pricing is subscription-based
Recommended Reading: If you want to learn how to enhance your photos and create better images, grab a copy of Photzy’s premium guide: Ultimate Guide to Fundamental Editing.
Conclusion

Photograph by Jenn Mishra
Sorting through your images can be maddeningly slow, but there are steps you can take to speed up the process. Develop a rating system that works for you that focuses on making quick decisions.
Sorting through your images can be maddeningly slow, but there are steps you can take to speed up the process.
If you use Lightroom to sort images, explore the features that maximize the speed of the program, like auto-advance. Lightroom is one of the best culling programs, but other programs may speed up the process. These programs may render photos faster and include features that help you find your best images quicker. Some programs use AI to group and select quality images.
Speeding up your workflow includes editing only your best photos. Effectively sorting your images to find these gems is key to creating your best work.
Self-Check Quiz:
- Describe the types of ranking and rating systems included in post-processing programs.
- True or False: You must import images into Lightroom before you can start selecting images.
- Describe three ways you can speed up culling in Lightroom.
- What does auto stack do in Lightroom?
- Which keyboard shortcuts will flag an image in Lightroom?
- What is the benefit of using Survey View in Lightroom?
- Describe the pros and cons of building 1:1 previews in Lightroom.
- What does auto-advance do?
- Describe three tools in FastRawViewer that can help you assess the quality of an image.
- Describe the AI features found in Kodak Professional Select or FilterPixel.
Assignment:
Use the tips in this guide to speed up your culling workflow. Consider your current decision-making process. What your workflow looks like is less important than having a system that works for you. Explore ways to speed up the sorting process in Lightroom. Then, download a trial version of a specialized culling program. Explore this option for increasing the speed of your workflow.


