

Though image sharpening can be of great benefit to photographers, it can also create a raft of image problems that can ruin an image as efficiently as it can improve it.
Often, you might think that an image is already nice and sharp. But in my experience, once you have tried adding some sharpness using one of the many specialist sharpening tools at hand, you might decide that even the clearest-looking picture could benefit from being just a little sharper.
During the COVID-19 lockdown, I’ve found myself shooting many more images around the house and in the backyard than before the lockdown. It has and continues to be, an interesting exercise. Like many others, I’ve also been busy trying to complete several home-based DIY projects, one of which was a new stereo cabinet (this is a long intro, so bear with me here).
Though image sharpening can be of great benefit to photographers, it can also create a raft of image problems that can ruin an image as efficiently as it can improve it.
Recently I discovered that my DVD player had died, so I went on the hunt for a replacement, which somehow led to the idea of a new cabinet.
Once the new DVD device was installed in the newly constructed piece of furniture, I tested it out only to discover that the resulting picture looked terrible on-screen. Was it the new player, the old DVD, or my amateur woodwork which was the problem?
In desperation, I opened the TV options menu and discovered that the sharpen setting for the DVD input was cranked up to the maximum – 100% over the average. The figures on the screen literally glowed with unsightly halo effects emanating from the subject edges. I reduced the sharpening from a setting of 100 to 25 and was pleased to see that the screen immediately looked significantly better. Even at a minus setting, the picture, now slightly softer, appeared a little more cinematic. Success!
This little story goes some way to illustrate not only the need for sharpening but also the importance of careful control over its settings. Too much sharpening, whether it’s on a TV screen or in a photographic file, can cause a lot of damage. Perhaps this was the reason I gave up on DVDs in the past.
What You'll Learn in This Article:
- All about the Unsharp Mask feature
- Best settings for USM
- How to avoid over-sharpening
- New sharpening tools like Haze Removal and Shake Reduction
- Sharpening for print or social media
Recommended Reading: If you’re interested in improving your post-processing workflow, check out Photzy’s Understanding Masking premium guide. It has a section for Lightroom and Photoshop, as well as Snapseed for mobile users too.
Years ago, I recall running a (basic) software class using Photoshop Elements. I precisely remember the moment when I showed the students an example of how to sharpen an image. There was a sudden outbreak of enthusiasm (I suspect some students had drifted off with my meanderings) as I showed them how impactful the technique was. “Fantastic!” exclaimed one student, “at last I can fix up some of my out-of-focus shots.”
Sadly, I had to break the news that although the sharpening process was awesome, it really couldn’t fix an out-of-focus or unsharp image file. That said, sharpening actually can be used to make a fuzzy image appear sharper; not sharp, but certainly sharper than it was. For many, this might be all that’s needed. And if the file is already quite sharp, the sharpening process should make it pop off the page with a new-found clarity.
Let’s first take a look at the basics of sharpening, and then we can profile a few of the tools at our disposal for making regular shots stand out with a sharpness that has to be seen to be believed.
Sharpening is all about contrast. If you take a regular photo file straight off the camera and increase its contrast using any software – that is, brighten the highlights and darken the shadows, leaving the mid-tones alone – then you’ll not only add visual impact, but chances are that the image will also look a bit clearer. Sharper, in fact.
Photograph by Robin Nichols
Study the images above. Straight from the camera, the RAW file on the left looks OK, but it could be clearer. By darkening the shadows and brightening the highlights in the right-hand image, I made the image look not only brighter but also clearer – a beneficial side effect of increased contrast.
So, next time you import some images, add a bit of contrast and see for yourself. Most digital camera files are designed to record with a flatter contrast curve than what was actually present in the scene. This is done to capture more tonal detail in the file, which is why, when you first look at a RAW file on your computer, it might appear a bit underwhelming. If the contrast is boosted, you will begin to lose tones as fine detail disappears into absolute black and white. But even so, the image should end up with more visual impact.
So, after a contrast boost, if your photo still needs to be clearer, you can use one of the many sharpening tools available to boost the appearance of clarity.
Here are some suggestions:
- Sharpen Filters: Most photo editing programs have a few sharpen filters designed to add a bit of global sharpness to a file. These are OK as quick fixes but offer no user control. They are either ON or OFF, and if the filter is too strong, or not enough, there’s little you can do about it. For this reason alone, I rarely use these filters.
- Unsharp Masking (USM): This strangely named sharpening tool is actually very good. You’ll find this in Photoshop, Photoshop Elements, Lightroom, and a wide range of other photo editing apps.
Too much sharpening, whether it’s on a TV screen or in a photographic file, can cause a lot of damage.
USM is possibly the best sharpening tool because it can be applied to specific parts of the image and offers a scale of action (from zero to 100% rather than the simplistic On and Off settings of the more generic sharpen filters). The way USM works is simple: it enhances the contrast along lines of differing tonal brightness. In a portrait, for example, it mostly affects the areas around the eyes, lips, nose, eyebrows, and hair because that’s where you’ll see noticeable tonal differences.
Even better, USM provides control over how dramatically those contrast edges are enhanced, to help match the software action with the characteristics of a specific image. The masking part of this tool is there to reduce the sharpening action to just those obvious edges and restrict its actions on those parts of the image you don’t want to sharpen, such as the skin tones. This variable mask can also be used to minimize the negative effects of sharpening in an image that displays a lot of high ISO noise.
Photograph by Robin Nichols
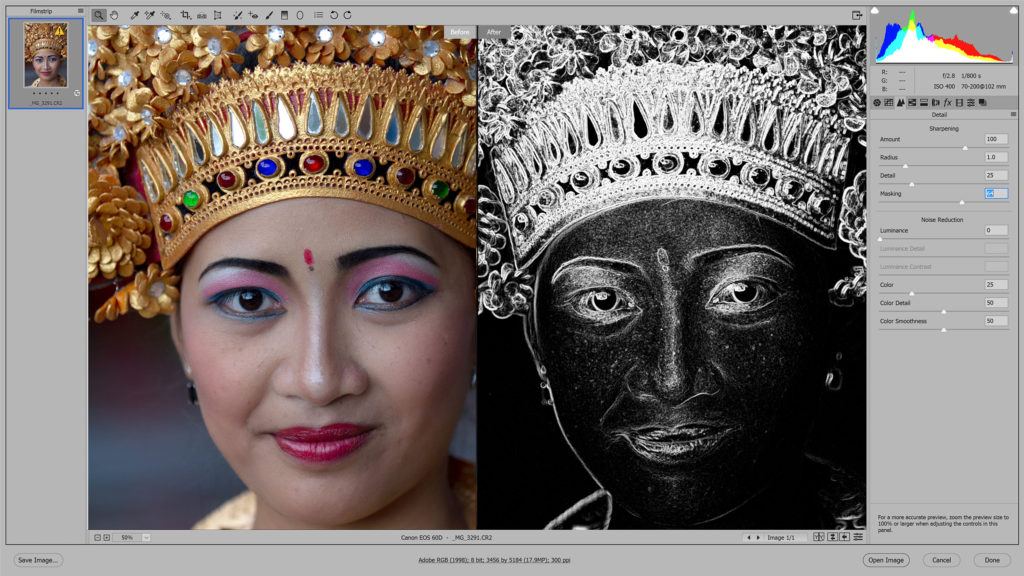
The illustration above should highlight both the huge advantage of using USM on a picture and its downsides. In this screenshot, I added too much on the Amount, Radius, and Detail sliders, which made the skin tones, in particular, appear gritty. This Balinese woman was photographed using ISO 400, but with the added sharpening effect it now looks like I had the camera set to ISO 3200 or higher. Using the mask will temper this negative effect.
Photograph by Robin Nichols
Hold the Alt/Opt (PC/Mac) key down and shift the Masking slider to the right. Holding down this key makes the black and white mask visible (this is Photoshop CC). The black areas remain opaque, so the sharpening effect is restricted to the white, unmasked areas of the image. In this example, the jewelry and stronger facial features of the dancer are sharpened but the open areas of skin tone are left untouched, which produces a significantly more flattering effect.

Photograph by Robin Nichols
Here’s a comparison between the gritty, over-sharpened version (left-hand side) and the masked version (right-hand side). A similar amount of sharpening has been applied to this image, but, thanks to the mask, it only treats the detailed areas and leaves the smooth skin tones alone.
Recommended Reading: If you’re interested in improving your post-processing workflow, check out Photzy’s Understanding Masking premium guide. It has a section for Lightroom and Photoshop, as well as Snapseed for mobile users too.
Sharpen Specifically
Out of focus images aside, USM can be customized for a specific output type. For example, if the file is destined for print, it needs a different Amount (for ‘amount’ read ‘%’) compared to files destined for onscreen display, such as Instagram or other social media. Displaying your best work on a screen driven by excited electrons is a completely different process from an image printed by adding ink to paper.
Sharpening Tips
- Always test an image with the sharpen tools before it is uploaded or printed.
- Files destined for print generally need more sharpening (up to 20% more) as the print process softens the sharpening effect.
- You will get different clarity results for gloss, matte, and semi-gloss papers.
- Adjustable sharpen tools will always produce greater control over one-hit filters.
- Avoid using the USM filter more than once on the same image.
- Consider sharpening on a duplicated layer and then use the Eraser brush to remove/reduce areas that do not need sharpening or look oversharpened.
- Don’t forget, most photo editing applications have a Sharpen Brush, which is a tool used to paint sharpness into small parts of an image. It’s very handy, but it’s also easy to overdo it. Take care!
When It All Goes Wrong
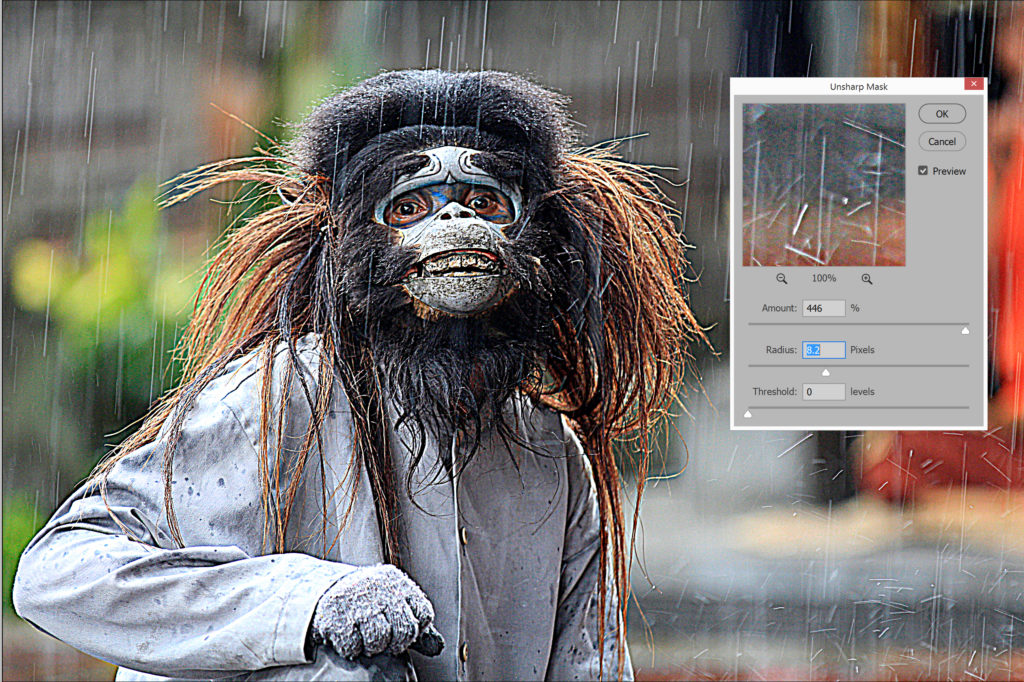
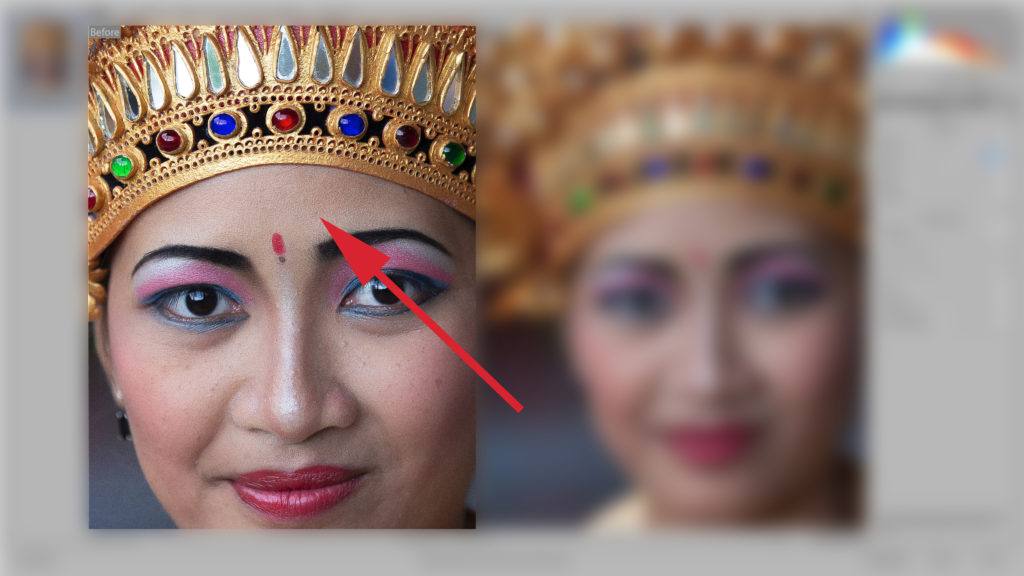
Here’s a classic example of what happens if too much USM is added to an image. It was quite sharp, to begin with, so it does not need such a high Amount, nor does it need the very high halo-inducing Radius setting seen here. Photograph by Robin Nichols
As I discovered with my new DVD project, if any image on a TV screen or sourced from a digital camera is sharpened too much, it will begin to look a bit weird. Haloes appear around objects, fine detail begins to look ‘gritty’ to the eye, and digital noise becomes uncomfortably exaggerated.
The problem with using USM as a go-to sharpening technique is that although it can make an image file appear amazingly clear and sharp, if you adjust it too far, it will ruin the image, making it appear worse than it ever was straight from the camera.
Always test an image with the sharpen tools before it is uploaded or printed.
Tips for Getting the Best From the USM Filter
- Keep the Amount setting between 50% and 75% whenever possible.
- Use the masking feature (hold the Alt/Opt key when dragging the masking slider to reveal the black and white mask).
- Add/subtract edge detail using the Detail slider. This feature can make a big difference to the result.
- Use Radius sparingly where possible. Too much produce those ugly haloes.
- If the USM process makes JPEG artifacts and digital noise appear worse (it usually does), consider using the application’s Luminance and Color Noise Reduction filters to smooth out that ugly grittiness.
While USM is the go-to sharpening tool for many professionals, if you feel that your images still need a bit of a sharpness push but you want something simpler to use, I think Photoshop Elements has most of the answers.
Shake Reduction

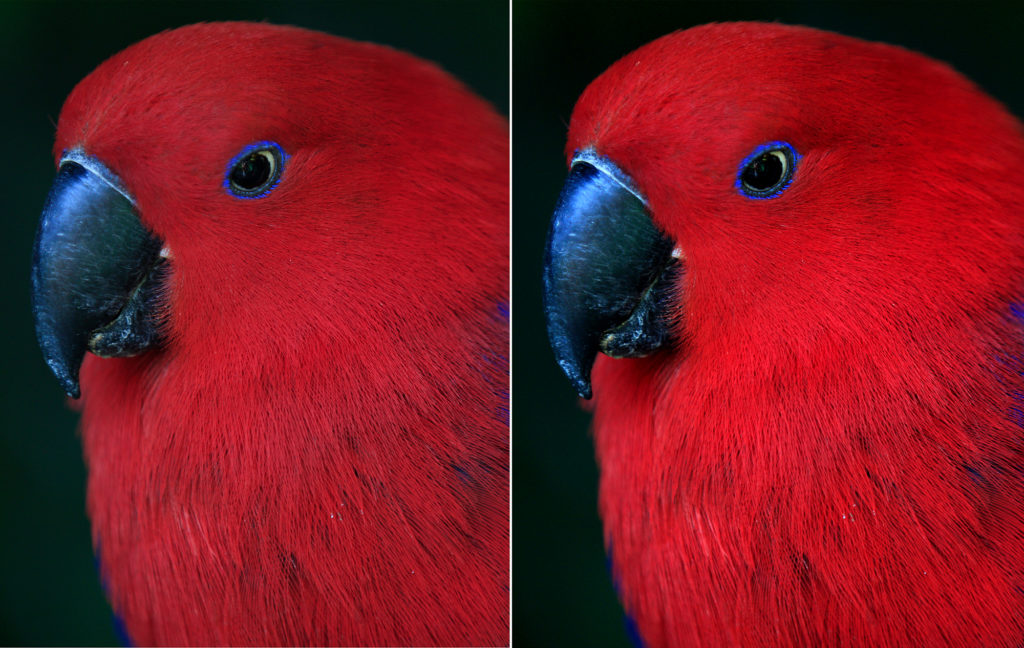
Here’s a good example of Elements’ Shake Reduction feature making a slightly blurry image appear clearer (image on the right). Photograph by Robin Nichols
As the name suggests, this is an impressive tool to make all those almost-sharp-looking images appear, well, somewhat better than they were. As mentioned at the start of this feature, no software has yet been designed to make a blurred image appear fully focused, but this tool, through the clever use of analysis and contrast control, can help produce a result that many would be more than happy with, especially when you consider the alternative: a fuzzy picture.
Here’s how it works:
- Open an image.
- Start the Shake Reduction feature (Elements > Expert Edit > Enhance>Shake Reduction).
- If the filter appears to have little effect, adjust the Sensitivity slider, or move the dotted square marquee to another part of the image so the utility can make a new (shake) assessment from a different source. This generally makes the result better (note that this is a very processor-intensive filter so the reassessments might take several seconds to register each time it is changed).
Haze Reduction

Photograph by Robin Nichols
As with Elements’ highly useful Shake Reduction tool, this feature also relies on boosting local contrast to the point where a previously hazy, cloudy, smokey, or slightly fuzzy image appears clearer and much sharper.
Here’s how it works:
- Open an image.
- Start the Haze Reduction feature (Elements > Expert Edit > Enhance > Haze Reduction).
- If it appears to have little effect, adjust the Sensitivity slider or move the dotted square marquee so the utility can assess a different part of the image file.
Adobe Photoshop Elements comes with a decent range of useful effects tools, including the dramatic Haze Removal feature. Because it alters the contrast, it also works to make a slightly indistinct image appear clearer and sharper. And yes, it really does make a huge difference to any image that’s hazy, misty, or foggy.

Photograph by Robin Nichols
Recommended Reading: If you’re interested in improving your post-processing workflow, check out Photzy’s Understanding Masking premium guide. It has a section for Lightroom and Photoshop, as well as Snapseed for mobile users too.
High Pass Popping
Here’s another amazing technique that you can create with most photo editing software, using one of the industry’s most obscure and least-used filter effects to add a bit of clarity and ‘pop’ to any image. It’s reasonably simple to use and produces an instant hit on most images. Plus, it’s infinitely variable, so it suits a wide range of topics.
Photograph by Robin Nichols
Here’s how it works:
- Open the image and duplicate the layer.
- With the top layer active (highlighted in blue), change the layer Blend
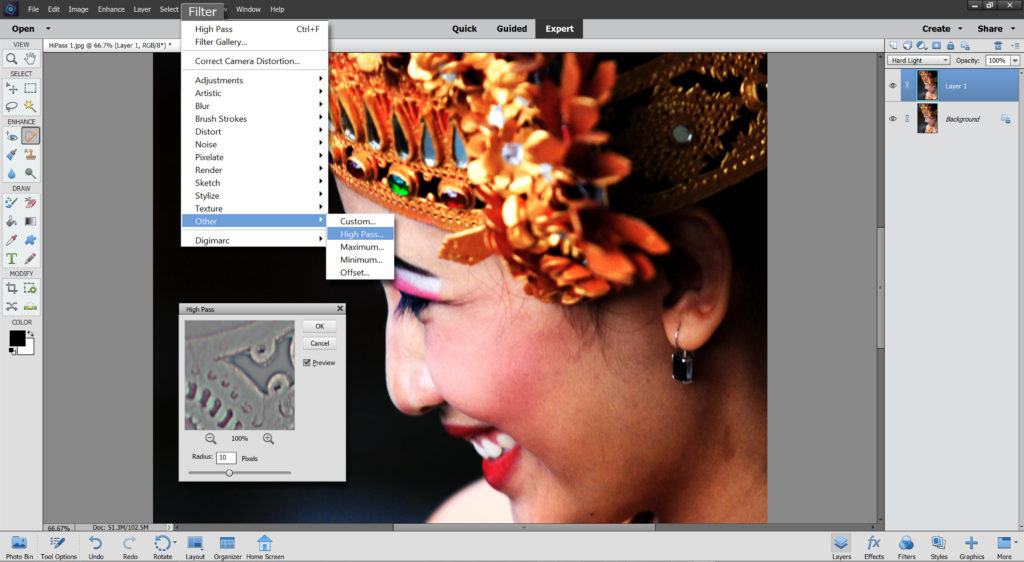
Mode from Normal to Soft Light, Overlay, or Hard Light (in order of sharpening severity). - Find the High Pass filter (Photoshop CC > Filter > Other > High Pass).
- Apply a 10-pixel radius and click OK. You should see quite a difference in the image clarity.
If it goes too hard, either change the Blend Mode or reduce the layer’s opacity.
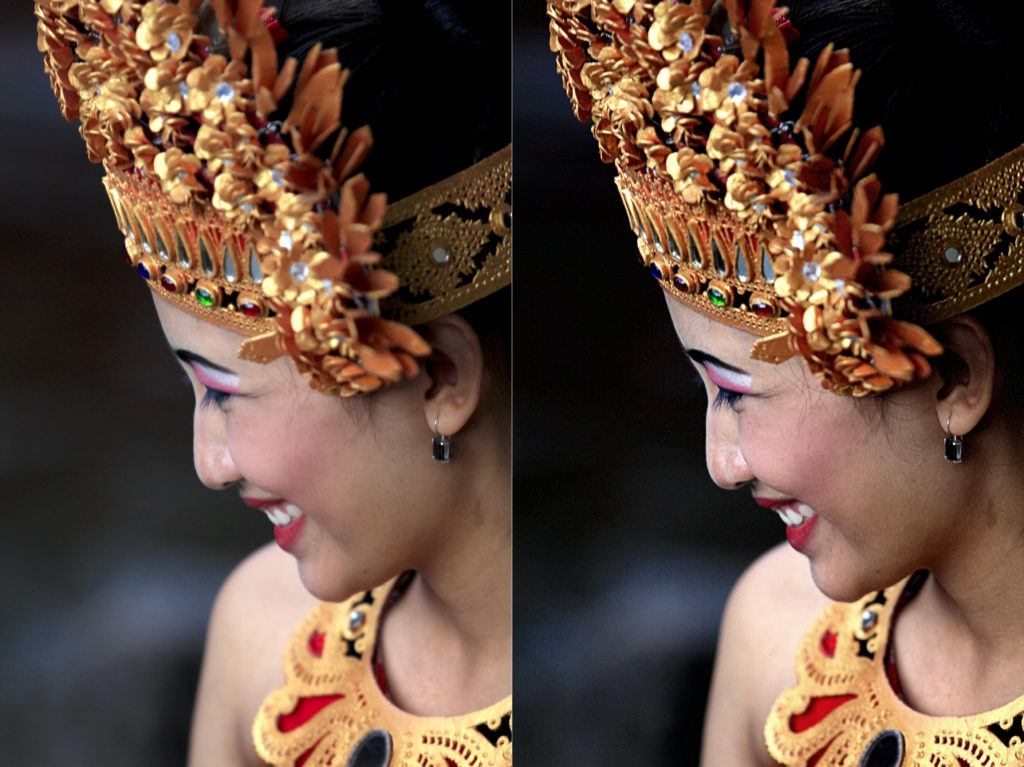
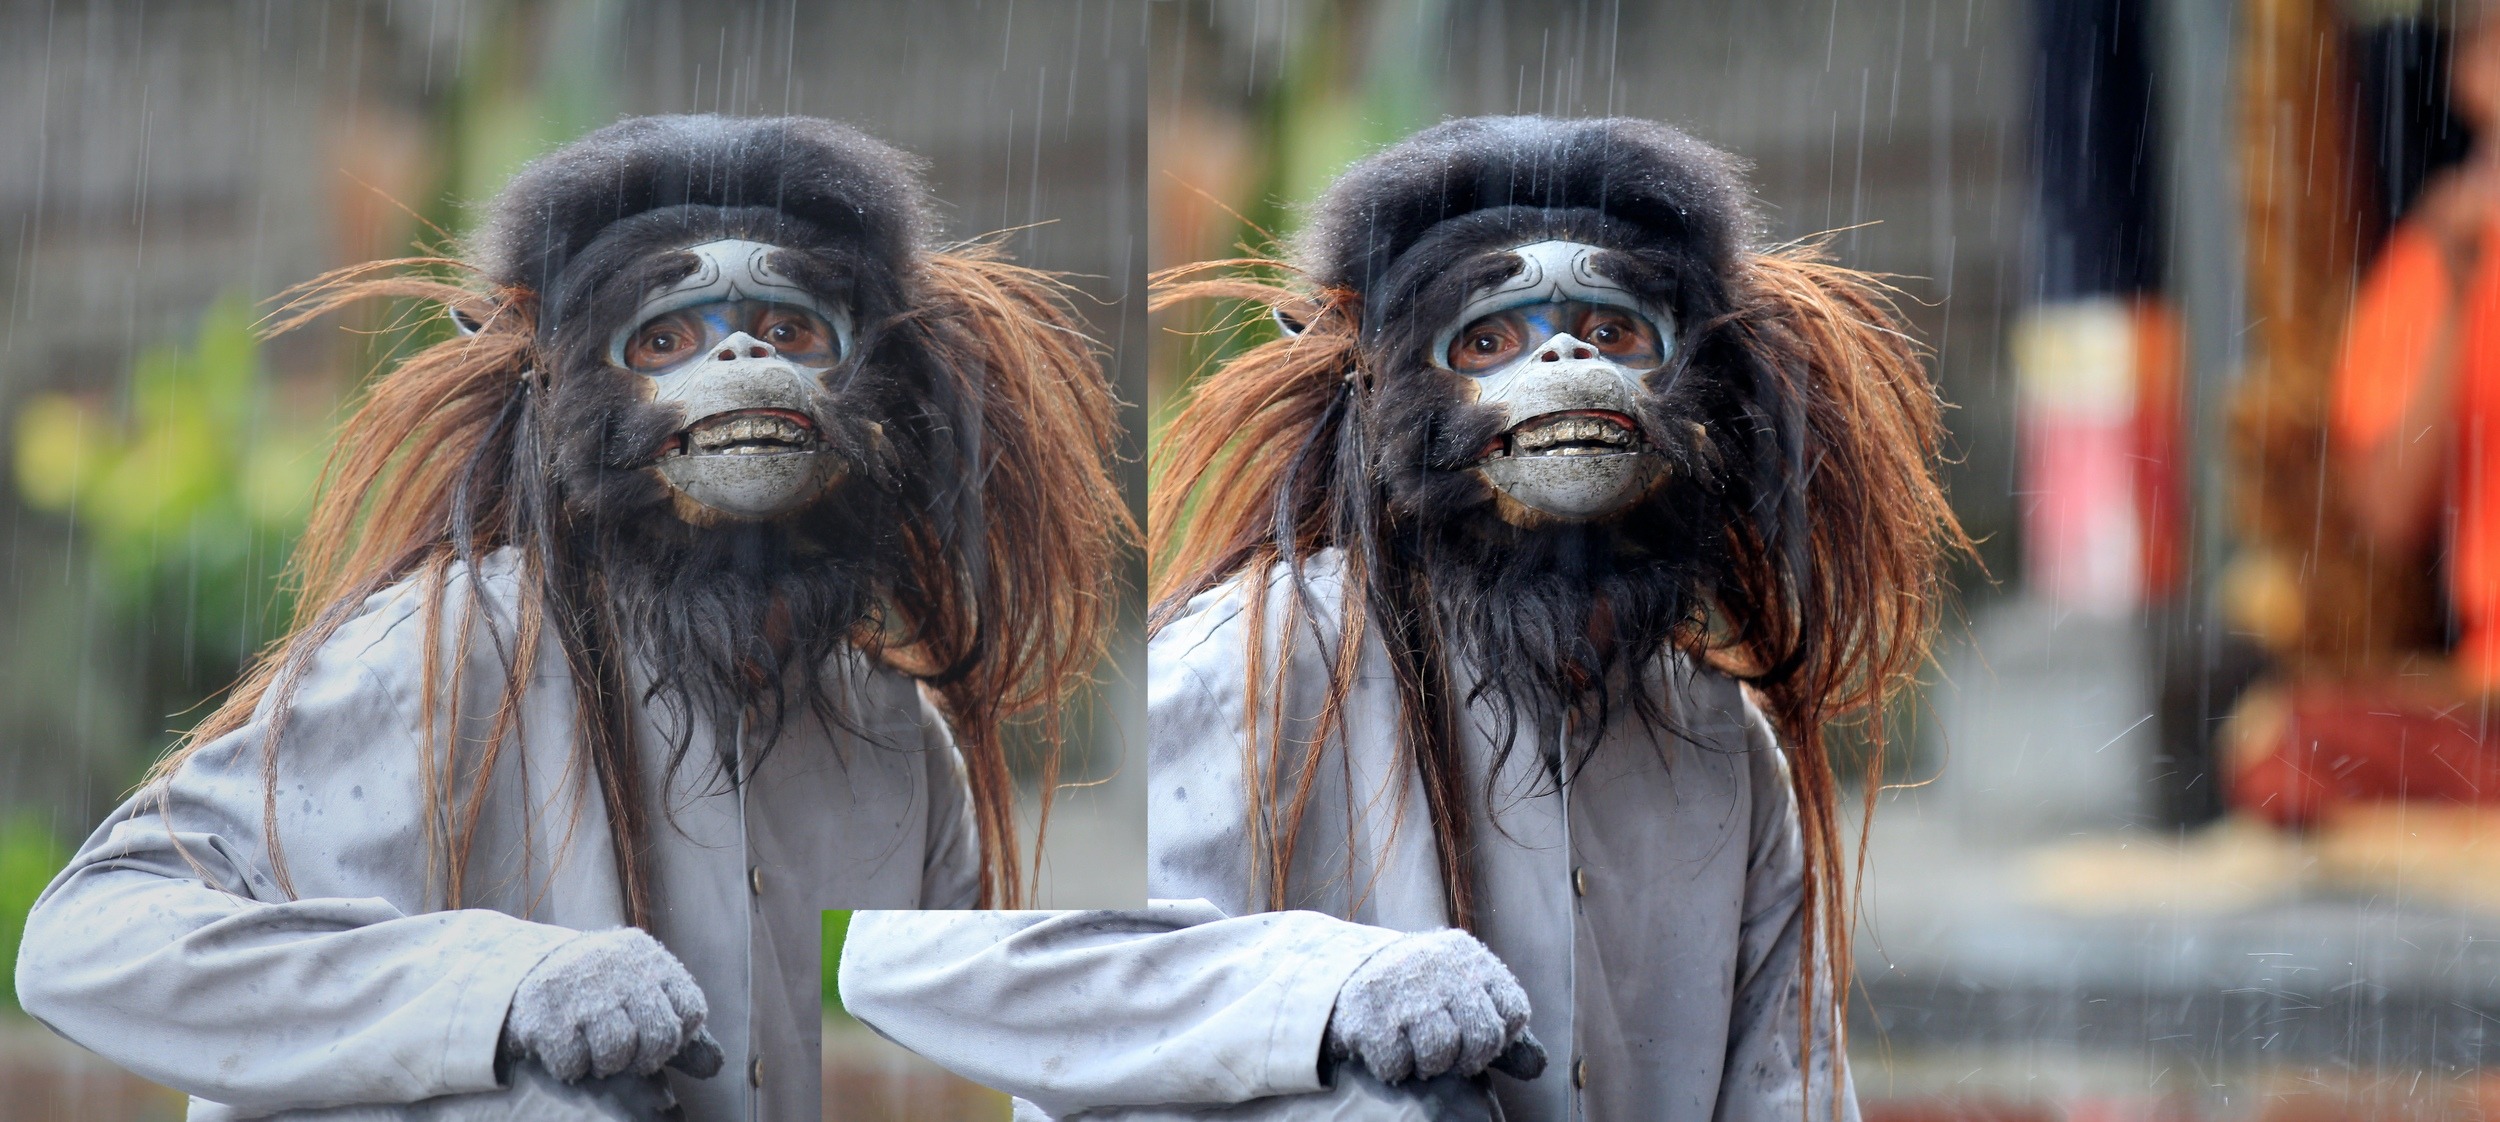
Photograph by Robin Nichols
Here’s a great example of High Pass Popping. The image was not 100% sharp, but I liked it enough to have a go at bringing back some sharpness. This is most noticeable in the woman’s headgear and make-up. Although the process has ‘hardened’ the open skin tones a little, I think the overall sharpening effect has succeeded nicely.
Self-Check Quiz:
- Can you fix an out-of-focus picture with sharpening?
- Sharpening is all about __________.
- What does the Unsharp Mask do?
- What does the masking function of the Unsharp Mask filter do to the filtering process?
- When printing your pictures, does the texture of the photo paper affect the apparent sharpness?
- True or False: With the USM filter you should set the radius sparingly.
- True or False: The Shake Reduction filter only works with slightly blurry images.
- True or False: You cannot use the Haze Removal feature to increase apparent sharpness.
- What are the three blend modes used in High Pass Popping?


