

Camera settings? You mean there are settings other than those for exposure?” I hear you ask this question to yourself as you read the heading of this guide.
Well, I have news for you. There are many additional settings and features – subtle and otherwise – that can help you get a higher photo success rate.
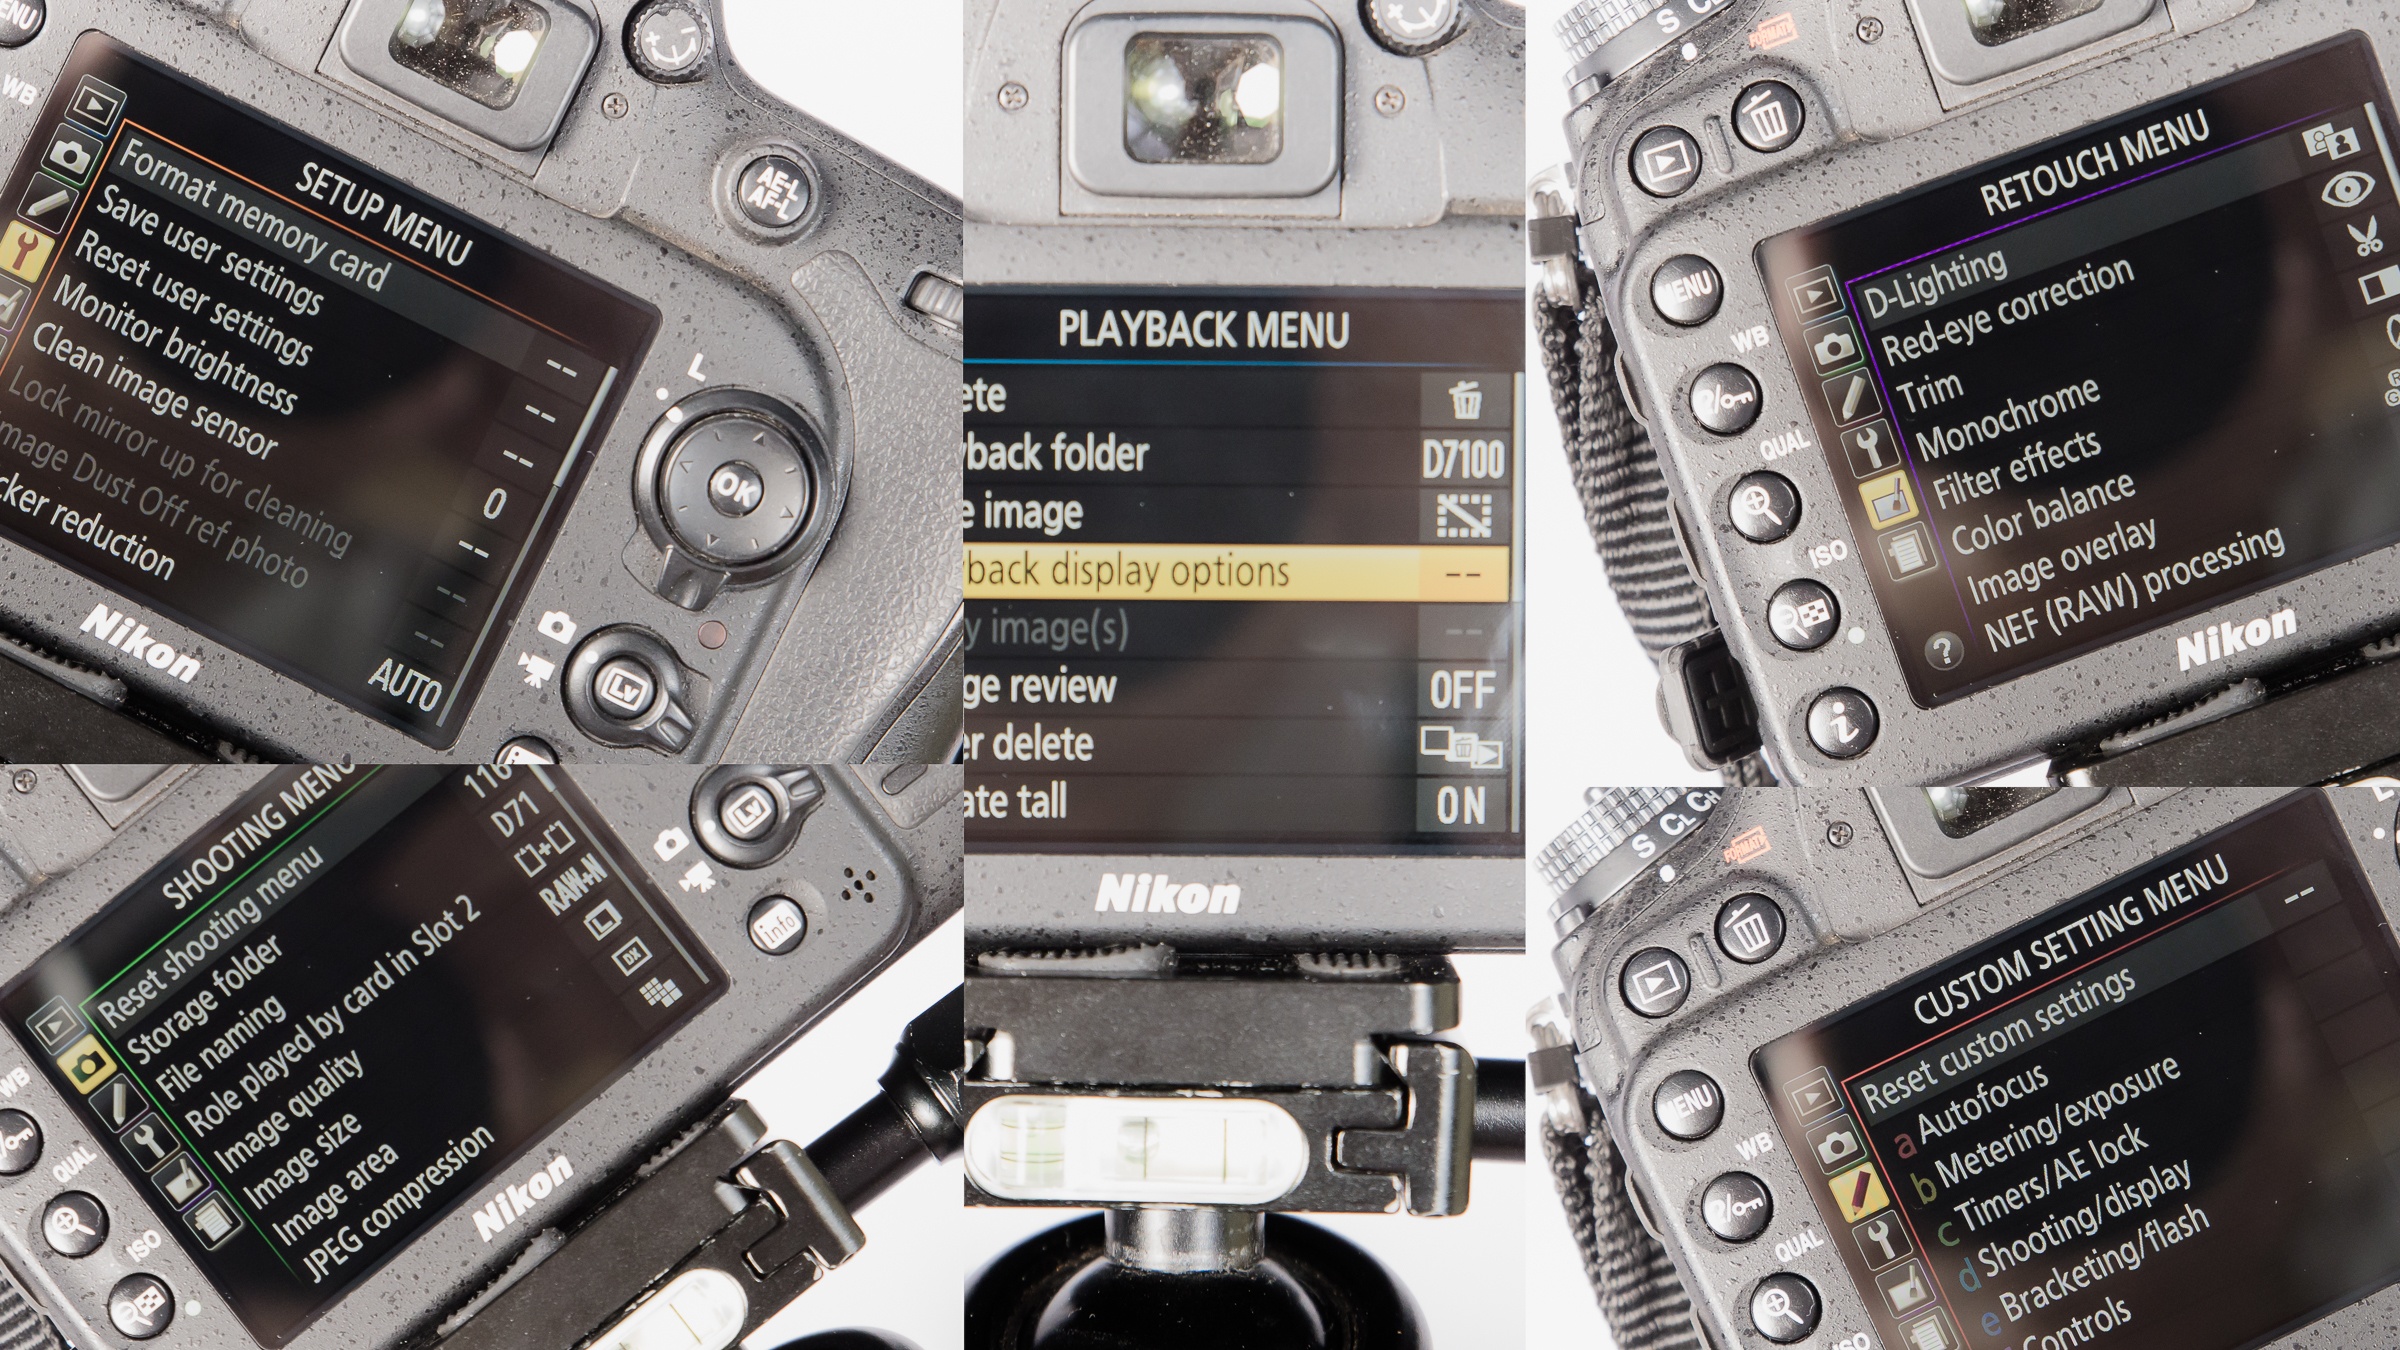
In this guide we will explore them in order to ‘tweak’ your camera for the purpose of bird photography. You will set them once and hardly ever touch them again – unless you have a very good reason for doing so. Most of these settings are adjusted via your camera’s menu system.
You will forget about some of these settings as time goes by, while they quietly serve you in the background, and so it should be. You have enough other settings to keep in mind during a shoot!
We’ll be looking at the following settings:
- Diopter adjustment
- Image recording format
- Metering mode
- White Balance (WB)
- Highlight indicator
- Color space
- Active D-Lighting
- Auto ISO sensitivity control
- Focus tracking with lock-on
- AF point illumination
- Number of focus points
- ISO sensitivity step value
- Setting Back Button focus
Please note…
- In this article, I’ll be using Nikon DSLR terminology and examples as that is the brand that I use. All top DSLR brands offer almost identical features, although they sometimes use different terminology. Image stabilization (Canon), Optical stabilization (Sigma), Vibration Reduction (Nikon), and Vibration Compensation (Tamron) are a perfect example.
If you’re not using Nikon, don’t fret – simply consult Uncle Google or your own camera’s User Guide for the equivalent term or feature. Having said that, most terms of all camera brands are quite self-explanatory so most of the time you’ll be just fine.
- Your settings and camera layout may differ slightly from those in the sample shots (taken from a Nikon D7100) if you’re using a different Nikon model, but the concepts stay the same. It should be relatively easy to figure out how to select the same settings on your camera.
- I only touch the tip of the iceberg as far as each of the topics discussed is concerned. There’s a tremendous amount of information available on each of these should you want to do more research on topics you’re not 100% sure of.
- Sometimes one would swear that every (bird) photographer comes from a planet of his/her own. We all have our own opinion about certain things and agree on others.
The recommendations below are based on my personal experiences and beliefs; yours might differ from mine, if not now then later on, as you grow in your own experiences and abilities. My recommendations would at least give you a good starting point. If you prefer to do something a little different later on (or even right from the start!), then don’t be afraid to do so! That is totally OK – nothing in photography is cast in stone!
Recommended Reading: After learning about camera settings, improve your photographs by understanding how light works! Grab a copy of Photzy’s premium guide, Understanding Light Book One.

I can vaguely remember my extreme state of confusion and worry about a year after buying my first DSLR camera. It was during a bird shoot. Suddenly everything in my camera’s viewfinder was a blur.
My heart sunk into my shoes. I could hear a little red creature with a fork sitting on my shoulders, giving an evil laugh as he reminded me of what I’ve paid for my camera – or lens, whichever is broken – and how difficult it’s going to be to convince my wife that I’ll have to fork out that much money again to replace or repair it!
Back home I frantically started to search the ‘net and forums about what could be wrong with my kit. Then, at last, a flicker of hope from a forum member: “Check your camera’s diopter!” “Huh? My what?”
I immediately delved into my camera’s User Guide with renewed hope (yes, I know; obviously I have not read it from front to back in the first place after buying the camera!) and found this little wonder-button which allows you to customize the clarity of your view through the viewfinder. Of course! Every person’s eye is different from another’s, like one person wearing thick glasses and another not, and each photographer’s eye will focus differently! I must have bumped it or adjusted it by accident during the shoot!
Diopter

Note: This adjustment is so different from the others covered in this guide but it’s so important that I had to mention it.
Locate your camera’s diopter control – usually a little round button right next to your viewfinder. Look at a subject 30+ meters away. Turn it in any direction until your view is out of focus. Turn it back to where the focus is at its sharpest. Believe me, somewhere in the future you’ll have to do this again. I had to, more than once!
Image Recording Format

Photograph by Tobie Schalkwyk
You have a choice between two formats: JPEG or RAW. If ‘raw’ is a word that always makes your tummy turn because it reminds you of something which you once bought at a burger shop, then don’t worry – this time it’s something good!
If you are 30 years old or older, then you have probably taken photos on film in your childhood days. After reaching your maximum number of shots (usually 24 or 36), you had to remove a spool containing the ‘negatives’ from the camera and hand it in at a photo shop. These negatives were then processed in a dark room with photos on paper as the end result.
RAW image files are the digital negatives as produced by digital cameras. They store all of the information as recorded on the camera’s sensor and allow you to do much more extensive photo editing than Jpeg files.
Nikon RAW files have the ‘.NEF’ extension. Older generation Canon RAW files have the ‘.CRW’ extension, and newer Canon models the ‘.CR2’ extension.
Jpeg files contain the ‘processed’ versions of their relevant RAW files and have a ‘.jpg’ extension. This ‘processing’ is done by the camera (kind of in its own virtual dark room) as it tries its best to ‘guess’ what you want each photo to look like, or exactly what you have seen. It then compresses each processed image’s recorded data into a Jpeg file, losing a lot of the recorded data in the compression process. Jpegs are therefore much smaller in size than RAW files. Jpegs can be edited just like RAW files, but the editing very quickly shows in the form of pixelation or simply by looking ‘sloppy’ or ugly.
Jpegs can be edited just like RAW files, but the editing very quickly shows in the form of pixelation or simply by looking ‘sloppy’ or ugly.
It is thus of utmost importance that you record your images in RAW format. You cannot pose birds at favorable spots, so most of the time after a shoot it is necessary to reduce highlights, raise shadows, remove unwanted objects in the scene, etc. Jpeg files are not really suitable for this.
You may set your camera to record both RAW and Jpeg files. If you like what you see on the Jpeg version, you may decide to do no any editing on the RAW version and to keep the Jpeg instead.
Personally I like to record all of my images in RAW format only and do all of the editing myself.

Nikon D600 + Nikkor 300mm f/4 + TC 14 E II @ 420mm | f/5.6 | 1/800s | 400 ISO | handheld The recording format is set in the camera’s menu system. If you record images in Jpeg format, most cameras allow you to set the image quality and size. Select small/ medium sizes and a ‘mid-quality’ setting to save space on your memory card(s). Photograph by Tobie Schalkwyk
Metering Mode
The metering mode determines what area of your scene the camera uses to indicate your current exposure on the (ruler-like) Exposure Bar as seen in the viewfinder. Underexposure of your scene is indicated by means of one or more high lit stripes to the left of the middle mark of the Exposure Bar, and vice versa for overexposed scenes.
Note: Some cameras are set up the other way round, showing underexposed scenes by high lit lines on the right-hand side of the middle mark of the exposure bar in your viewfinder, and vice versa for overexposed scenes. It usually allows you to reverse this via your menu system, if that is what you prefer.

Metering mode is one of the settings you adjust by pushing and holding down the Metering Mode button on your camera whilst turning the Main dial. Find out where this button is on your particular camera and change the modes to see the different symbols for each. Your selection should reflect on your small top LCD screen for quick viewing and, if your camera allows it, in your viewfinder. Photograph by Tobie Schalkwyk
In general, this is how you might use the metering modes (I always leave mine on spot metering and fix issues in post processing):
- Matrix (Canon:Evaluative) metering mode: Most of the scene is used when there’s not much contrast between the bird and the background (i.e. darkish bird against a dense bush as background, a white bird against a white sky, a backlit subject)
- Centre-weighted metering mode: When shooting a bird with a mixture of contrasting levels of brightness (for example, black and white). If you use spot metering in this case (unless the bird is quite far so the metering area covers the whole bird), the blacks will be a bit underexposed if metering was done on a white area or the whites will be blown if metering was done on a black spot on the bird.
- Spot metering mode: When shooting a bird of even colors or there’s much contrast between the bird and background. Basically it means that the camera is ignoring the background and only making sure that the bird is correctly exposed. This can sometimes create a kind of high-key feel if the background around a bird is much brighter than the bird itself.
- Center-weighted average metering mode (Canon only): When you’d like the metering to be weighted at the center and then averaged out on the remainder of the scene.

Nikon D7100 + Nikkor 300mm f/4 + TC E14 II @ 420mm (35mm equiv of 630mm) | f/7.1 | 1/800s | 200 ISO | beanbag in car window. Photograph by Tobie Schalkwyk
White Balance

Press the Info button before you start your WB changes as it’s then easier to see the currently selected WB as you dial through them via the main dial. Photograph by Tobie Schalkwyk
White Balance is one of the settings you can change by pushing in the WB button on your camera body and then scrolling through the different options by turning the camera’s main dial. The current selection reflects in your small top LCD screen if your model supports this. It also reflects on your main LCD screen after pressing the Info button.
Activate Your Highlight Indicators

The Highlight Indicators (also called ‘blinkies’) give you a quick warning during playback preview on your LCD screen if you have blown out either your brights or darks. It will point out the blown areas by ‘flashing’ them.
If some of your background items are blown out, it’s not too serious. If parts of your main subject are blown out, then it’s more serious. You could quickly make an appropriate adjustment by means of exposure compensation and take the shot again.

Nikon D7100 + Nikkor 300mm f/4 @ 450mm | f/7.1 | 1/500s | 800 ISO | beanbag in car window. Photograph by Tobie Schalkwyk
Key Lesson: Highlight indicators are not needed, but they are an on-the-spot indication that some areas in your scene have blown highlights or blown darks. Blown areas are not always wrong, however. In some instances you would want blown areas and then you would ignore the indicators.
Color Space
Without going into too much detail, you have a choice between sRGB and Adobe RGB.
The sRGB color space does not carry the full color spectrum of Adobe RGB but it is more suited for displaying images on screen. It is thus a safer option for posting your shots on social media. If you use Adobe RGB for displaying images on social media, then some of your colors may seem a bit ‘off.’

If the purpose of your images is mainly viewing on-screen, select (or leave it on) sRGB. This is usually the default color space (factory setting) so you may not have to change a thing. Photograph by Tobie Schalkwyk
Adobe RGB carries a wider spectrum of colors than sRGB and is more suited for printing purposes.

Adobe’s Lightroom package offers you the option of changing the color space at the export phase. You may opt for Adobe RGB at this stage if you’re exporting an image for printing purposes. Photograph by Tobie Schalkwyk
Active D-Lighting
In short, Active D-Lighting (Canon: Auto Lighting Optimizer) tries to correct dynamic ranges too high for your camera to handle by extracting more details from your blown highlights and blown darks in an image. This only applies to Jpeg files, however, so it will not be discussed in detail here (assuming that you’ll be shooting in RAW).
Recommended Reading: More details on this topic can be found here: What Is Active-D Lighting and How Does It Work?

Nikon D7100 + Nikkor 300mm f/4 @ 450mm | f/8 | 1/800s | 1000 ISO | beanbag in car window. Photograph by Tobie Schalkwyk
Note: This option might be disabled (greyed out) on your camera if you have not selected a format option which includes the creation of Jpegs.
Key Lesson: Active D-Lighting can be used to prevent blown areas in Jpeg files. However, it may result in ‘flat’ (low contrast) shots.
Maximum ISO Sensitivity
If you have a crop-sensor camera and it is not known to be one of the latest products which handles high ISOs very well, I suggest you set this to 800 or 1000 at the most. This will prevent your camera from producing images so contaminated by noise that they are actually useless.
If you have a crop-sensor camera and it is not known to be one of the latest products which handles high ISOs very well, I suggest you set this to 800 or 1000 at the most.
Most full frame cameras and some of the latest crop sensor cameras can handle extremely high ISOs; although, there are a couple of models known not to do so well in this area. Check out online forums and/ or social media discussions to determine the highest ISO levels your camera is comfortable with and select that value here. Until then, or as a general guideline, select a value of about 6400 ISO.

This setting only becomes relevant after activating Auto ISO on your camera and is disabled (greyed out) otherwise. Photograph by Tobie Schalkwyk
Whatever value you select, you can always switch off Auto ISO during a shoot and go beyond this value in Manual mode, if needed.
Key Lesson: Auto ISO automatically adjusts your ISO to ensure correct exposure during a shoot. Different cameras have different high ISO handling capabilities. The maximum ISO sensitivity setting can be used to ensure that the Auto ISO feature does not render images ruined by extreme noise levels due to ISOs too high for the camera to handle.
Autofocus Menu Settings
Tracking with Lock-On
This setting determines how long the camera waits before refocusing on your subject when the focal length behind the focus point(s) abruptly changes in Continuous Focus mode and you have the shutter button pressed halfway down (or you have your finger on the focus button in back button focus mode).

Tracking with lock-on (Canon: Tracking Sensitivity). Photograph by Tobie Schalkwyk
For example, let’s say you focus on a bird in flight and you keep the shutter button pressed halfway down (or you’re having the back button focus activated). The bird disappears behind a tree. The camera will wait for the selected period of time and if the area behind the focus point(s) is out of focus, it will start to refocus. If the bird reappears within the selected period, the camera will simply continue focusing on the bird instead of searching for the subject and refocusing right from the start, wasting precious capture time.
Set this setting to +/- 3 seconds and store it away in the back of your memory in case you want to adjust it based on your personal preferences and experiences.

Nikon D600 + Nikkor 300mm f/4 + TC 14 E II @ 420mm | f/5.6 | 1/2000s | 800 ISO | handheld. Photograph by Tobie Schalkwyk
AF Point Illumination
Switch this setting to ‘ON.’ It causes your focal point to be highlighted in the viewfinder, leaving no doubt exactly what part of the bird you’re focusing on or which section in your view is focused on.

Most cameras allow a few selections starting at ‘1’ only, to a midfigure like ‘9’ or ‘11’, up to the highest the camera allows (+/- ‘50’ in older models to ‘153’ in the latest Nikon flagship, the D5s). Photograph by Tobie Schalkwyk
Number Of Auto Focus (AF) Points
Selection of ‘1’ implies that only a single AF point in the middle of the frame will be used to focus on the subject. The moment the subject is not in the middle of the frame anymore, it will lose focus and the camera will refocus on whatever is then in the middle of the frame. This is probably the worst option for bird photography due to their tendency to move around.
Selection of a higher number of AF points means that the camera will track the subject as it moves around inside the frame (crossing the AF points), but that requires more processing by your camera, possibly slowing down the focusing process and wearing down your battery.
A high number of AF points is a viable option for fast, erratic moving birds like swallows and bats (yes I know, it’s not a bird, right? But I promise you, you will be tempted when it enters your view!).
“A high number of AF points is a viable option for fast, erratic moving birds like swallows and bats..”
For bird photography, keep this setting at ‘9’ or ‘11’ or any other number close to this figure. That means that you will only have to keep your subject more or less in the center of the frame to keep focus on it, and the processing power needed by your camera to track it will be low to moderate.
Note: Some Canon models implicitly allow selection of the number of focus points by selecting AF area sizes. On the Canon 7D II, AF Point Expansion selects 8 focus points. I have seen a couple of suggestions to switch between these selections based on the situation at that moment, but personally I believe it’s not feasible for bird photography. Rather select a ‘safe’ or ‘all-round-suitable’ option as mentioned above.
The Canon 5D III has a set of sophisticated AF Case settings and other features assisting you in tracking subjects. If you’re one of the fortunate owners of this camera, I’d like to encourage you to explore these or at least select the ‘Versatile multi-purpose setting’ (if not selected by default) until you have mastered most features on your camera and you are ready to explore more of them.

Key Lesson: You may have a wide choice of focus points to be used by your camera. Only a few focus points (typically 9 or 11) are needed for successfully tracking birds in most situations. A higher number of focus points will require more processing power from your camera but may be needed for a specific purpose.
ISO Sensitivity Step Value

This selection determines by how much of an f-stop your exposure changes (up or down) for each ‘click’ on the ISO settings dial. This setting should correspond with how much of an f-stop your exposure changes by for each ‘click’ on the aperture and shutter speed dials.
Why is this important? Let’s say your shutter speed dial changes your exposure by one third of an f-stop every time you change it by one ‘click’ (see ‘EV steps for exposure control’ below). Your exposure is spot-on during a shoot but you do not have a choice – you need a faster shutter speed to prevent blur on the subject in your viewfinder. You increase your shutter speed by dialing x number of clicks on the shutter speed dial. To keep the same exposure, all you need to do is increase the ISO or open the Aperture (or a combination of these) by x number of clicks on their relevant dials.
I’m not sure why this feature is even available because as far as I’m concerned the ISO, Aperture, and Shutter Speed dials’ increase values should always be in sync, whether 1/3 f-stops or one half of an f-stop per click. Yours are most likely in sync already, but you may want to check that they are and file this in the back of your memory in case they happen to become out of sync in the future.
Key Lesson: Some cameras allow you to choose whether the exposure values increase by 1/3 and half of an f-stop for every click on the ISO settings dial. Whatever you select, make sure it corresponds with the same values applied by the Aperture and Shutter Speed dials.
EV Steps for Exposure Control

Photograph by Tobie Schalkwyk
This selection determines by how much of an f-stop your exposure changes (up or down) for each ‘click’ on the Shutter Speed, Aperture, Exposure Compensation, Flash Compensation, and Bracketing dials. Your choice lies between 1/3 of an f-stop or one half f-stop. My recommendation is to keep them at 1/3 as it allows you more exact changes.
Note: Remember to keep the ISO sensitivity steps value (discussed just before this feature) in sync with this selected value.
Setting Back Button Focus

This is a feature that you may want to postpone until you are more familiar with all of the other functions on your camera, but I want to encourage you to do it as soon as possible. It takes a while (and a bit of practice) to get used to, but once you are used to it, you’ll never want to turn back to ‘normal’ focusing again.
Why would you want to do this? Let’s say you’re photographing a bird in flight; you have set your camera on continuous focus, allowing you to keep focusing on the flying bird by pushing the shutter button halfway down and keeping it there. Now you start pushing the shutter fully down.
The moment you leave the shutter halfway position, the camera stops refocusing. By the time the shutter is released, the bird might be half a meter or more away from the last point of focus. If your depth of field is very shallow at that time, you may end up with a blurred shot. Or if you’re on continuous shooting mode, only the first shot will be within the focus area and every shot thereafter will be further away from it.
“The moment you leave the shutter halfway position, the camera stops refocusing.”
So what does back button focus do? It disables communication between your shutter button and the focusing process. As long as you’re pressing down the back button focus button, the camera will keep on focusing on the bird, regardless of what your shutter release button is doing. If you’re in continuous shooting mode, every shot written to your camera’s sensor will be in focus.
How do you set the camera for back button focus? This process might be slightly different for each camera brand and model, so I’d like to encourage you to consult your manual or Google the process for your particular camera if the following process is not applicable to you.
On my Nikon D600 and D7100 (and presumably most other Nikons), the process is as follows:
- Menu/Custom Settings (pencil symbol)
- Controls/Assign AE-L/AF-L button
- Select ‘AF-ON’
For Canon, the following process should set back button focus:
- Select Menu/Custom Controls
- Select AF-ON
- Select AF and metering
- Press the INFO button
- Select HP
Conclusion
I’m sure that I have given you a good kick-start to get going with bird photography. It is obviously impossible to cover each and every feature in detail in such a short space (and cover the different camera brands at the same time), but I believe we’ve covered all concepts that you at least need to be aware of before you step out on your first bird shoot.
If all of this information feels a bit overwhelming, then don’t fret! Simply experiment with each feature one step at a time and before you know it, you’ll be comfortable with most features and ready to explore more. Do as much research as possible via user guides, perhaps an educational book about your specific camera model, social media, and other online resources. Most importantly, enjoy one of the most enjoyable and rewarding hobbies: bird photography!
Self-Check Quiz:
- True or False: The exposure settings are the only camera functions that really matter in bird photography.
- What is the name of the camera adjustment that helps you to see better through the viewfinder, especially if you wear glasses?
- What image format is considered a “digital negative”?
- Name the four camera metering modes discussed in this guide.
- True or False: It’s a good idea to constantly change the white balance setting on your camera, just to make sure you get a good one.
- What does the “highlight indicator” do?
- Which color space is recommended for online viewing?
- What does the “maximum ISO sensitivity setting” do?
- AF point illumination should be turned on or off?
- Why is the “back focus” button helpful in bird photography?


