There is no light like backlight.
I like to believe that quote is all mine. I’ve never seen it anywhere else, and I say it often because I really believe it. I think that backlight is THE most beautiful light. Light coming from behind a subject adds drama, depth, dimensionality, translucency, allure, and detail in a photograph.
Backlight seems to wrap a subject in a gossamer cloak of pure light. It can be strong or soft, warm or cool. It can be natural or artificial. It can come from high or low. Once you learn to see it, you can’t deny its beauty and quality, no matter the subject.
Sometimes backlight is not easy to define. It does not have to be directly behind a subject; it just needs to be more, or mostly behind, so that any shadow cast is somewhere in front of the subject.
The source can be in the frame or not. The key thing is that the main source is somewhere even slightly behind the subject, which does not rule out side or crossing light. Conversely, the source can be in the frame or even directly behind the subject, peeking through.
Light is, of course, essential to photography. We need at least some light to make pictures. If you try to photograph in total darkness you won’t get anything, but truly total darkness is actually rare, like the inside of a closet.
Even on a very dark night outdoors there is almost always some light coming from somewhere – if nothing else, from stars, or a random streetlight. Even in heavy overcast conditions there will be light from the ground reflecting off the clouds, or perhaps moonlight illuminating them from above.
Note – I use mirrorless cameras that are in live view all the time. I shoot only in raw, and I post-process everything I show in Lightroom and Photoshop (Creative Cloud). My approach may be different from yours depending on the camera(s) that you use.
- Translucent subjects
- Opaque subjects
- People
- Landscapes
- Silhouettes
- Exposing for backlight

This might have earned a C for effort. Made with a single direct floodlight close over the lens axis. Photo by Charles Haacker
The egg looks base white all right, and it still has some discernible surface texture (barely). But while the foreground is white enough, the background has fallen off to middle gray, not what the assignment called for.
If the egg looks round at all, it’s mostly because we all know what an egg looks like, but the lighting does nothing to emphasize its roundness.

The same single floodlight, except moved high overhead and slightly behind the eggs to both top- and backlight them. Photo by Charles Haacker
This (above) is what the instructors were actually after.
A single high backlight floods both the background and foreground equally so they have the same exposure value as well as the same exposure value on the tops of the eggs.
Backlight seems to wrap a subject in a gossamer cloak of pure light.
The texture of the shells is strong, owing to the light skimming across the surfaces from the rear. The eggs are in their own shadows, but the reflection off the white cove opens the shadow beneath.
There can be no question that these are globular objects.
Recommended Reading: If you’re interested in learning more about light and how you can use it to improve your photography, grab a copy of Photzy’s bestselling premium guide: Understanding Light Book Two.
1. Translucent Subjects
I think that light coming through a leaf or other semitransparent material is the most arresting, palpable, spectacular, rich, luminous light.
It is what caught my eye in the first place, usually while road tripping in the late afternoons. Driving along with the sun going down off to the left or the right, I’d suddenly become conscious that the quality and character of the light coming through roadside woods was different somehow; dazzling, captivating, compelling, phosphorescent.
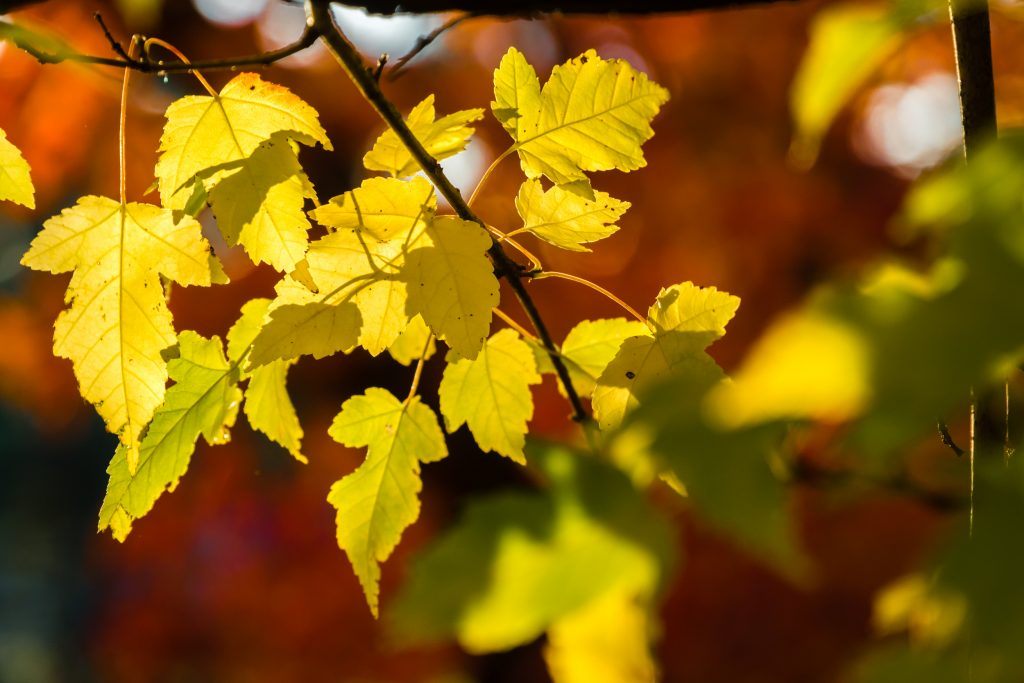
Backlit golden autumn leaves pop against a background of darker red. Photo by Charles Haacker
I think I realized it even before I got really deep into photography. I’m not sure when I figured out exactly what was happening, but once I did it was one of those things I couldn’t un-see.
For those of us who live in regions that get fall colors, they represent one of the most photographically exciting times of the year.
I think that light coming through a leaf or other semitransparent material is the most arresting, palpable, spectacular, rich, luminous light.
We are eager to capture that magnificent color with anything that will record a picture. But have you ever noticed that sometimes, somehow, your pictures just don’t have the “look”? The colors you saw seemed not to translate to film or sensor. They lacked the snap, crackle, and pop our eyes saw.
One possible reason might be that you are trying to frame it too much, taking in the entire tree. It has a great impact on the living eye, but reduced to a two-dimensional photo it may suddenly look “meh.”
Another reason is that our brains are excited by all that color and enhance it in the “mind’s eye,” but the camera can only record what is really there, and it’s often not as punchy as we perceive it.
I also suspect a third reason: shooting with reflected light, which seems to me to lack “punch.” Somehow the brilliant colors are lost in translation.

Photo by Charles Haacker
The image above is the straight-out-of-camera scene that caught my eye. As I perceived it, it was brilliantly colorful, but when photographed it went all “meh” on me.

Photo by Charles Haacker
This is the same picture after processing in Lightroom to make it look more like I remembered it, but to me it’s still basically “meh.” I increased the vibrance, darkened the greens, and added more saturation to the yellows, but it still seems to lack that certain je ne sais quoi.

Photo by Charles Haacker
Now this is more like it! I walked over to the trees and turned around so the backlight was popping that ethereal golden glow, with layered leaves casting shadows for texture, color, and interest. I also cropped in the camera, framing for just the leaves rather than the entire tree.

Only a skylight in a greenhouse lit these globular Peace Lilies. This lighting is quite flat and not very flattering to these beautiful flowers. Backlight would have helped immensely! Photo by Charles Haacker
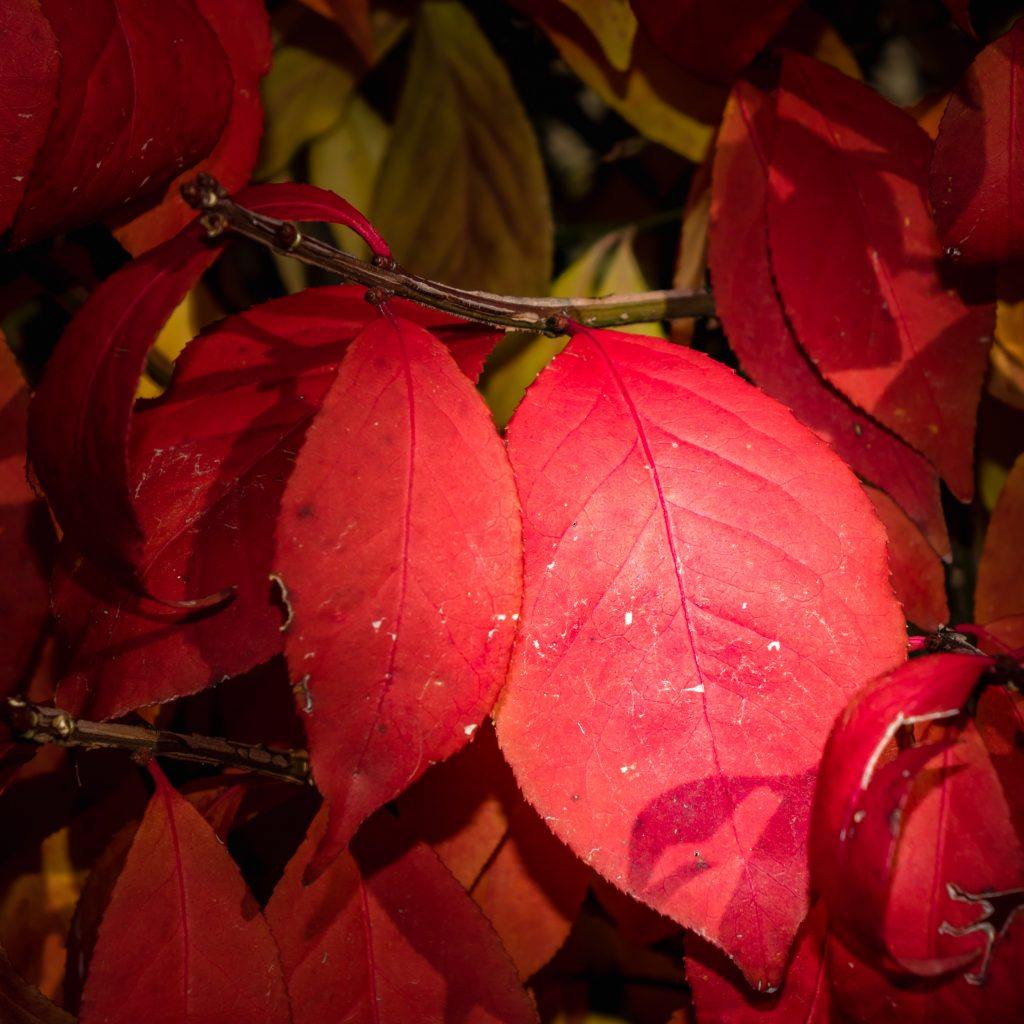
I loved the rich red of this bush, but was confounded by the feeling that I was not getting the picture as I saw it. Photo by Charles Haacker

I walked around to the back side of the bush so that the setting sun was shining through the leaves rather than reflected from them. I think this is a much more exciting capture. Photo by Charles Haacker

This one is a little unusual. It is backlit and the sun is in the picture, but it’s also a macro shot. The subjects are tiny blueberry buds that are just emerging. The photo was made with my Sony A6300 and prime 30mm macro lens. The result is many times life size. Shooting at f/16 created the starburst. Backlighting in this macro example created high drama! Photo by Charles Haacker
2. Opaque Subjects
One of the characteristics that I love about backlight is that it seems to wrap around solid objects.
They become rim lit.
They are then standing in their own shadows, which can be very dark (but we will address that).

In a park near where I live are some columns that were removed from a federal building long ago and deposited here. They became an attraction. This picture is what the unedited raw capture looked like. Photo by Charles Haacker
These are simply called The Columns and are frequently visited and photographed. I was there as the shadows were getting long, and I deliberately shot the columns backlit, exposing for an average so that the sky would have some detail, as would the columns. The original raw capture was pretty bleak in color.
One of the characteristics that I love about backlight is that it seems to wrap around solid objects.
My approach may be a little unorthodox.
I shoot only raw (I never bother with JPEGs), because raw files deliver all of the data captured by the sensor.
The original file has far more dynamic range and latitude, and in a good postprocessing program (Lightroom in my case), every single thing you see can be “fixed” (to a point).
It does require skill, practice, and patience, and there are other ways to get this result, but this works best for me.

This is the edited version of the same file. Photo by Charles Haacker
Key Lesson: One of the main challenges to becoming an expert photographer in backlighting is to learn how to expose so that you can maintain adequate detail in the areas that you want visible. If not properly exposed and postprocessed, the columns would have become silhouettes with little or no detail on the camera side.
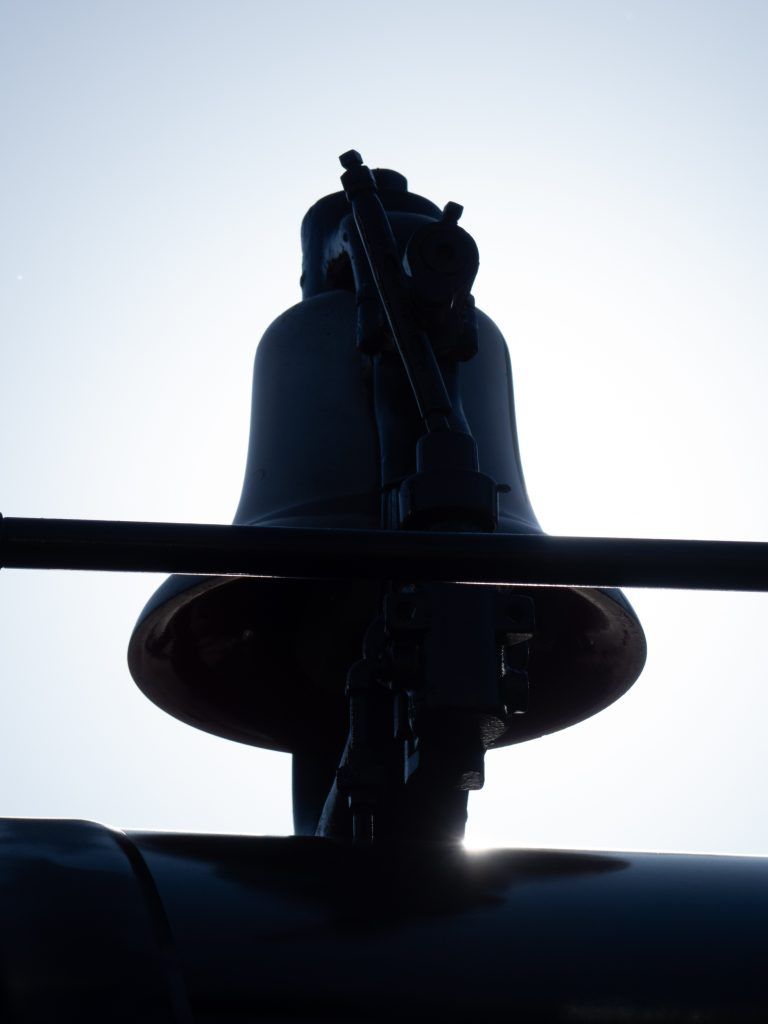
Photo by Charles Haacker
The example above is the unedited raw file of a backlit bronze bell atop an antique steam engine. I let the setting sun peek around the base of the bell at the boiler to create a focal point.
And here is why I like my method (exposure and post-processing) better than using a fill flash or a reflector. Once more, a camera raw file, plus Lightroom processing, makes a once-impossible picture possible.
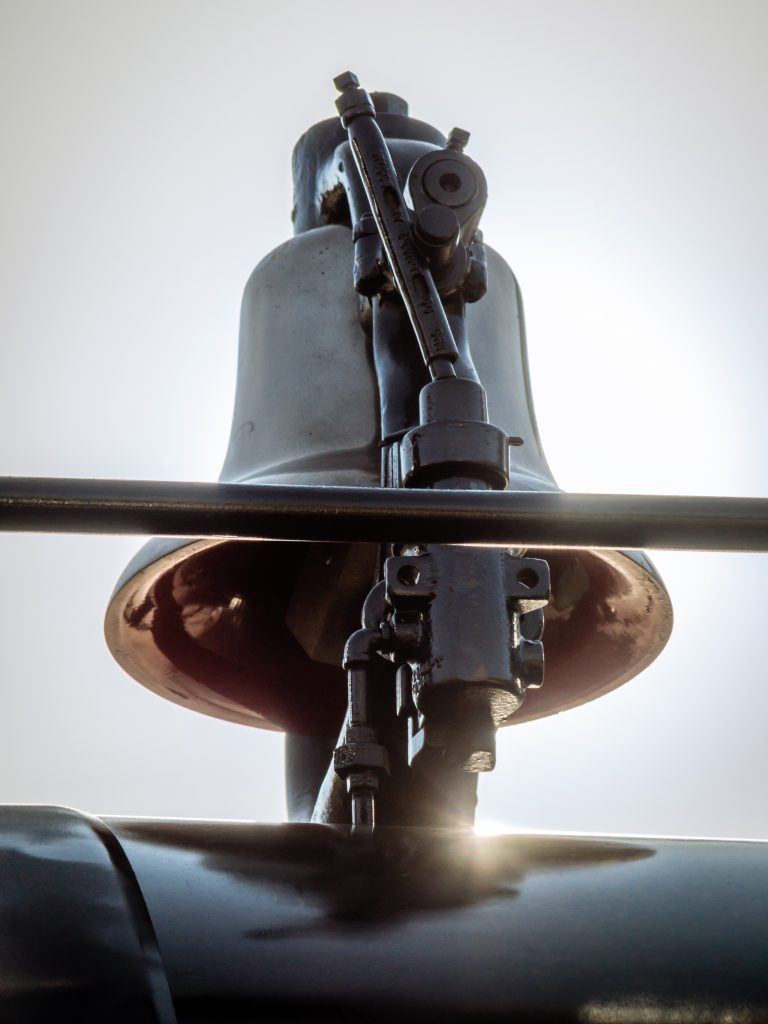
Photo by Charles Haacker
This image shows why I am never fearful of shooting pretty much anything against the light.
My approach can even work when shooting JPEG, but the exposure becomes more critical and the depth and subtlety of detail will never be as broad as a camera raw file, because the JPEG engine in the camera has already processed and compressed it, discarding some 2/3 to 3/4 of the original raw capture.
You can shoot raw and JPEG, but I see no good reason to clog up the buffer and the card.
However, if you prefer JPEG, I always suggest that you expose for the highlight, and develop for the shadow.

This picture was made years ago with a tiny point-and-shoot camera and using the JPEG format while on an early spring walk across the prairie. If you expose and process properly, you can achieve good results with JPEGs.
Photo by Charles Haacker
Recommended Reading: If you’re interested in learning more about light and how you can use it to improve your photography, grab a copy of Photzy’s bestselling premium guide: Understanding Light Book Two.
3. People

My granddaughter is up in a tree (in, yes, a tutu). I love how the backlight accentuates her hair. This was shot in camera raw, so it was easier to prevent the hair from blocking up, while opening up the shadows, but that could also have been done using a reflector or a fill flash. Photo by Charles Haacker
Any time that you find yourself photographing people in full sun, your best bet is to place them with their backs toward the sun.
Their hair will be lit, but their face will be in their own shadow, so you don’t get weird blotchiness. (See the image above.)
Any time that you find yourself photographing people in full sun, your best bet is to place them with their backs towards the sun.
This technique works well during the ‘Golden Hour.’
You may want to use a reflector to get some light back into the shadow side, or use a fill flash.
It’s a good idea to use a lens hood, and if you have a protective filter on the lens, take it off to minimize flare (I never use them).
Key Lesson: Using backlighting on people is very useful for creating a hair light or a halo effect around the entire body. The challenge is that you will have to balance out the shadow side to the backlighting. This can be accomplished by putting light into the shadow side with a reflector or a fill flash. You can also accomplish this by minimizing the intensity of the backlight. The image on the left is a great example of minimizing the intensity of the backlight. The tree is breaking up the direct sunlight, thus reducing its intensity but not eliminating its effect on the girl.


Going into a Mud Run, a team of Air National Guards is backlit. Their hair shines, and there is no harsh sunlight on their faces. The track is a lighter color, so it helps by reflecting some light back into the shadows. Photo by Charles Haacker
4. Landscape
When I shoot landscape photography, I often prefer to get in close and isolate details rather than capture the big picture.
I look for the substance of detail: the component parts of the bigger scene.
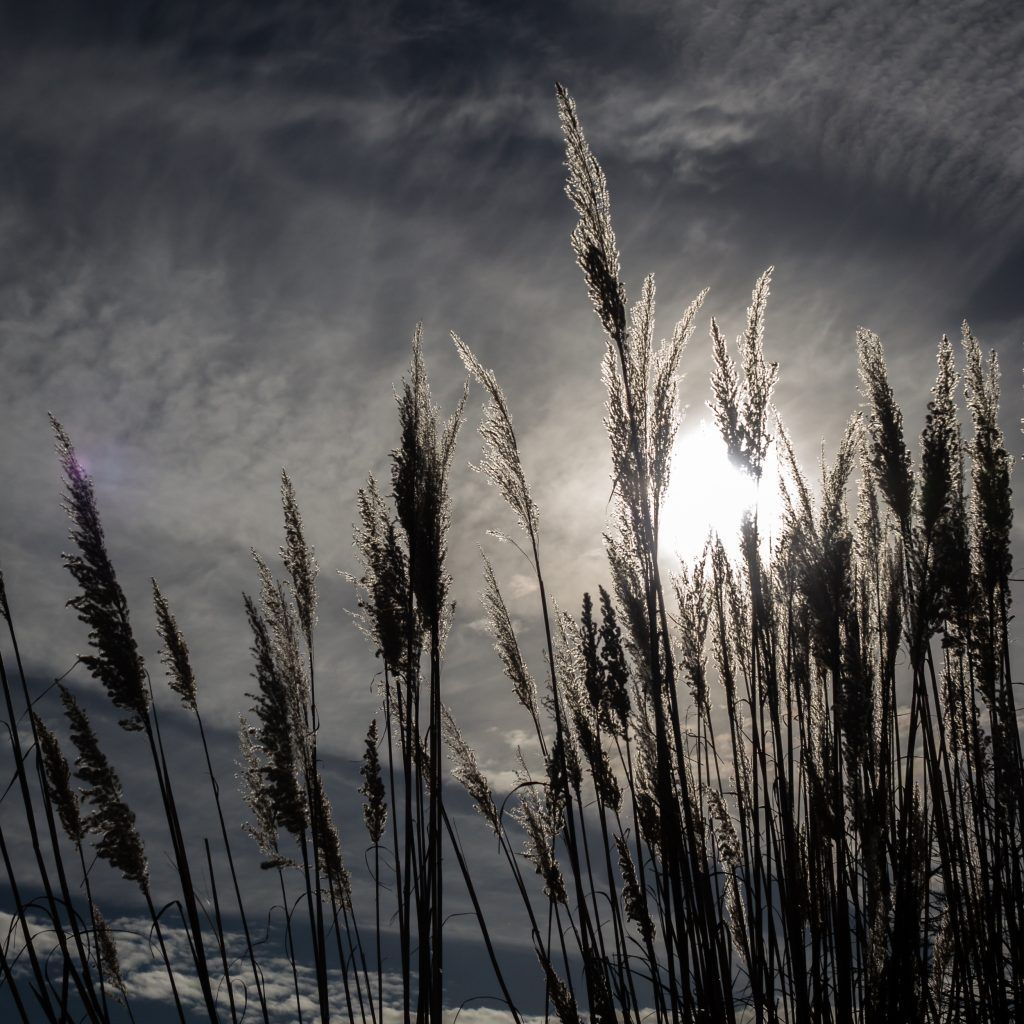
Photo by Charles Haacker
In this image above, the sun is right in the picture, coming through a thin layer of clouds. In this case, I wanted to emphasize the texture of the pampas grass and those luminous clouds.

Photo by Charles Haacker
This is that same strand of pampas grass, except I moved around to get side lighting (almost backlit). I then processed it for bright color.

Photo by Charles Haacker
This is the same image file as the last picture, except I processed it differently, to be dreamier and more ethereal. I usually shoot for sharpness, but this version could benefit from a little motion blur.
Key Lesson: Study these last three images (pages 21-23). Each version is significantly different. What they have in common is some degree of backlighting. Backlight gives you many options to change the look of your photograph.
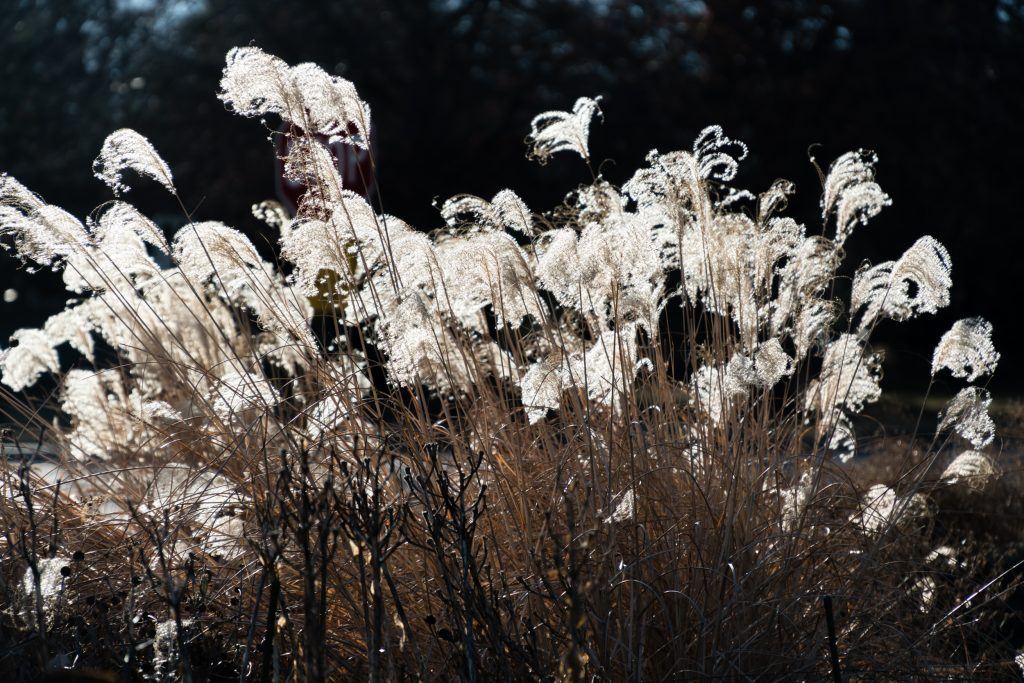
Photo by Charles Haacker
I love these feathery grasses. This shot was taken very near sunset. I finished this to make the shadows beyond the plumes go to deep black because there were houses back there that were a distraction. This is almost a silhouette. Why isn’t it a silhouette? The feathery grasses are translucent!
Key Lesson: If you’re just starting out with backlighting, translucent objects are a great place to start, because they make exposure calculation a little easier.

Photo by Charles Haacker
This photo was taken in early spring, getting right up underneath a flowering tree with the sun in the picture blazing through a gap in the blossoms.
Key Lesson: When using backlighting with an opaque subject, careful placement of the backlight can create interesting flares and focal points. This works best when you place the source of the backlight near an intersection of two solid (non-translucent) objects. (See the image above.)

Photo by Charles Haacker
This photo was taken in very late fall, in very late afternoon light, of desiccated oak leaves with the sunburst peeking through a gap. This is another example of the previous Key Lesson. In this case I used a short extension ring to get in very close. Take notice of how the use of backlight adds color, shadow, shape, and texture, while also providing a dramatic focal point.
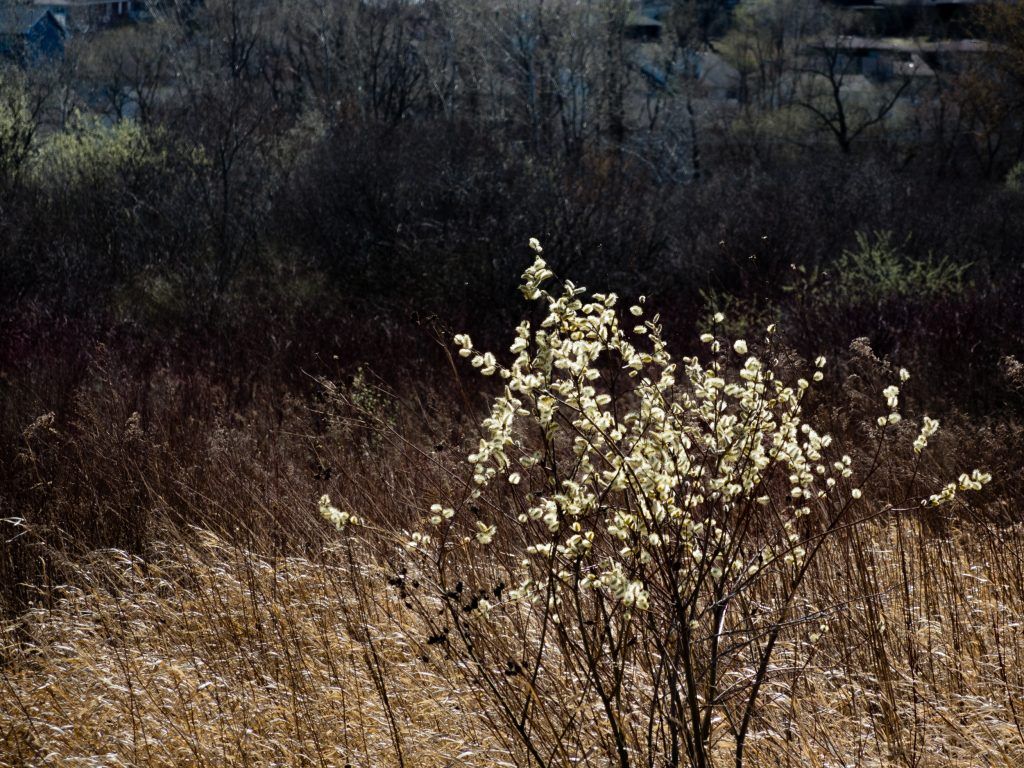
Photo by Charles Haacker
The sun was rising just out of frame, above the trees, to illuminate this plant. The sun above and behind the trees lets them go black so as not to distract from the fuzzy, tiny pussy willow blossoms.
Key Lesson: Backlighting is a very effective tool to help your chosen subject stand out from the background.
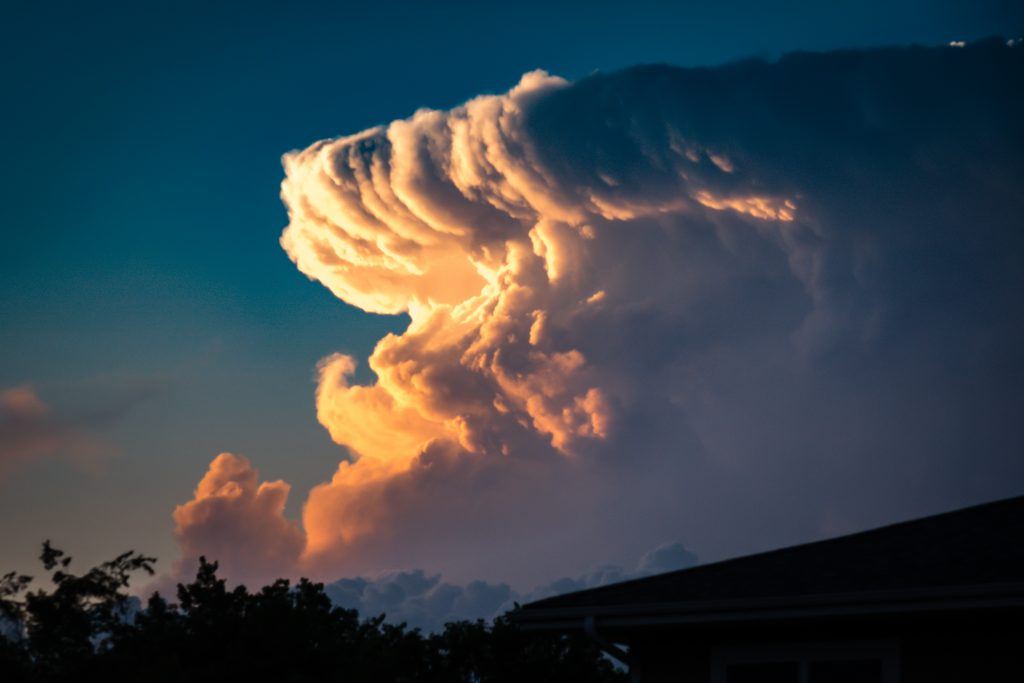
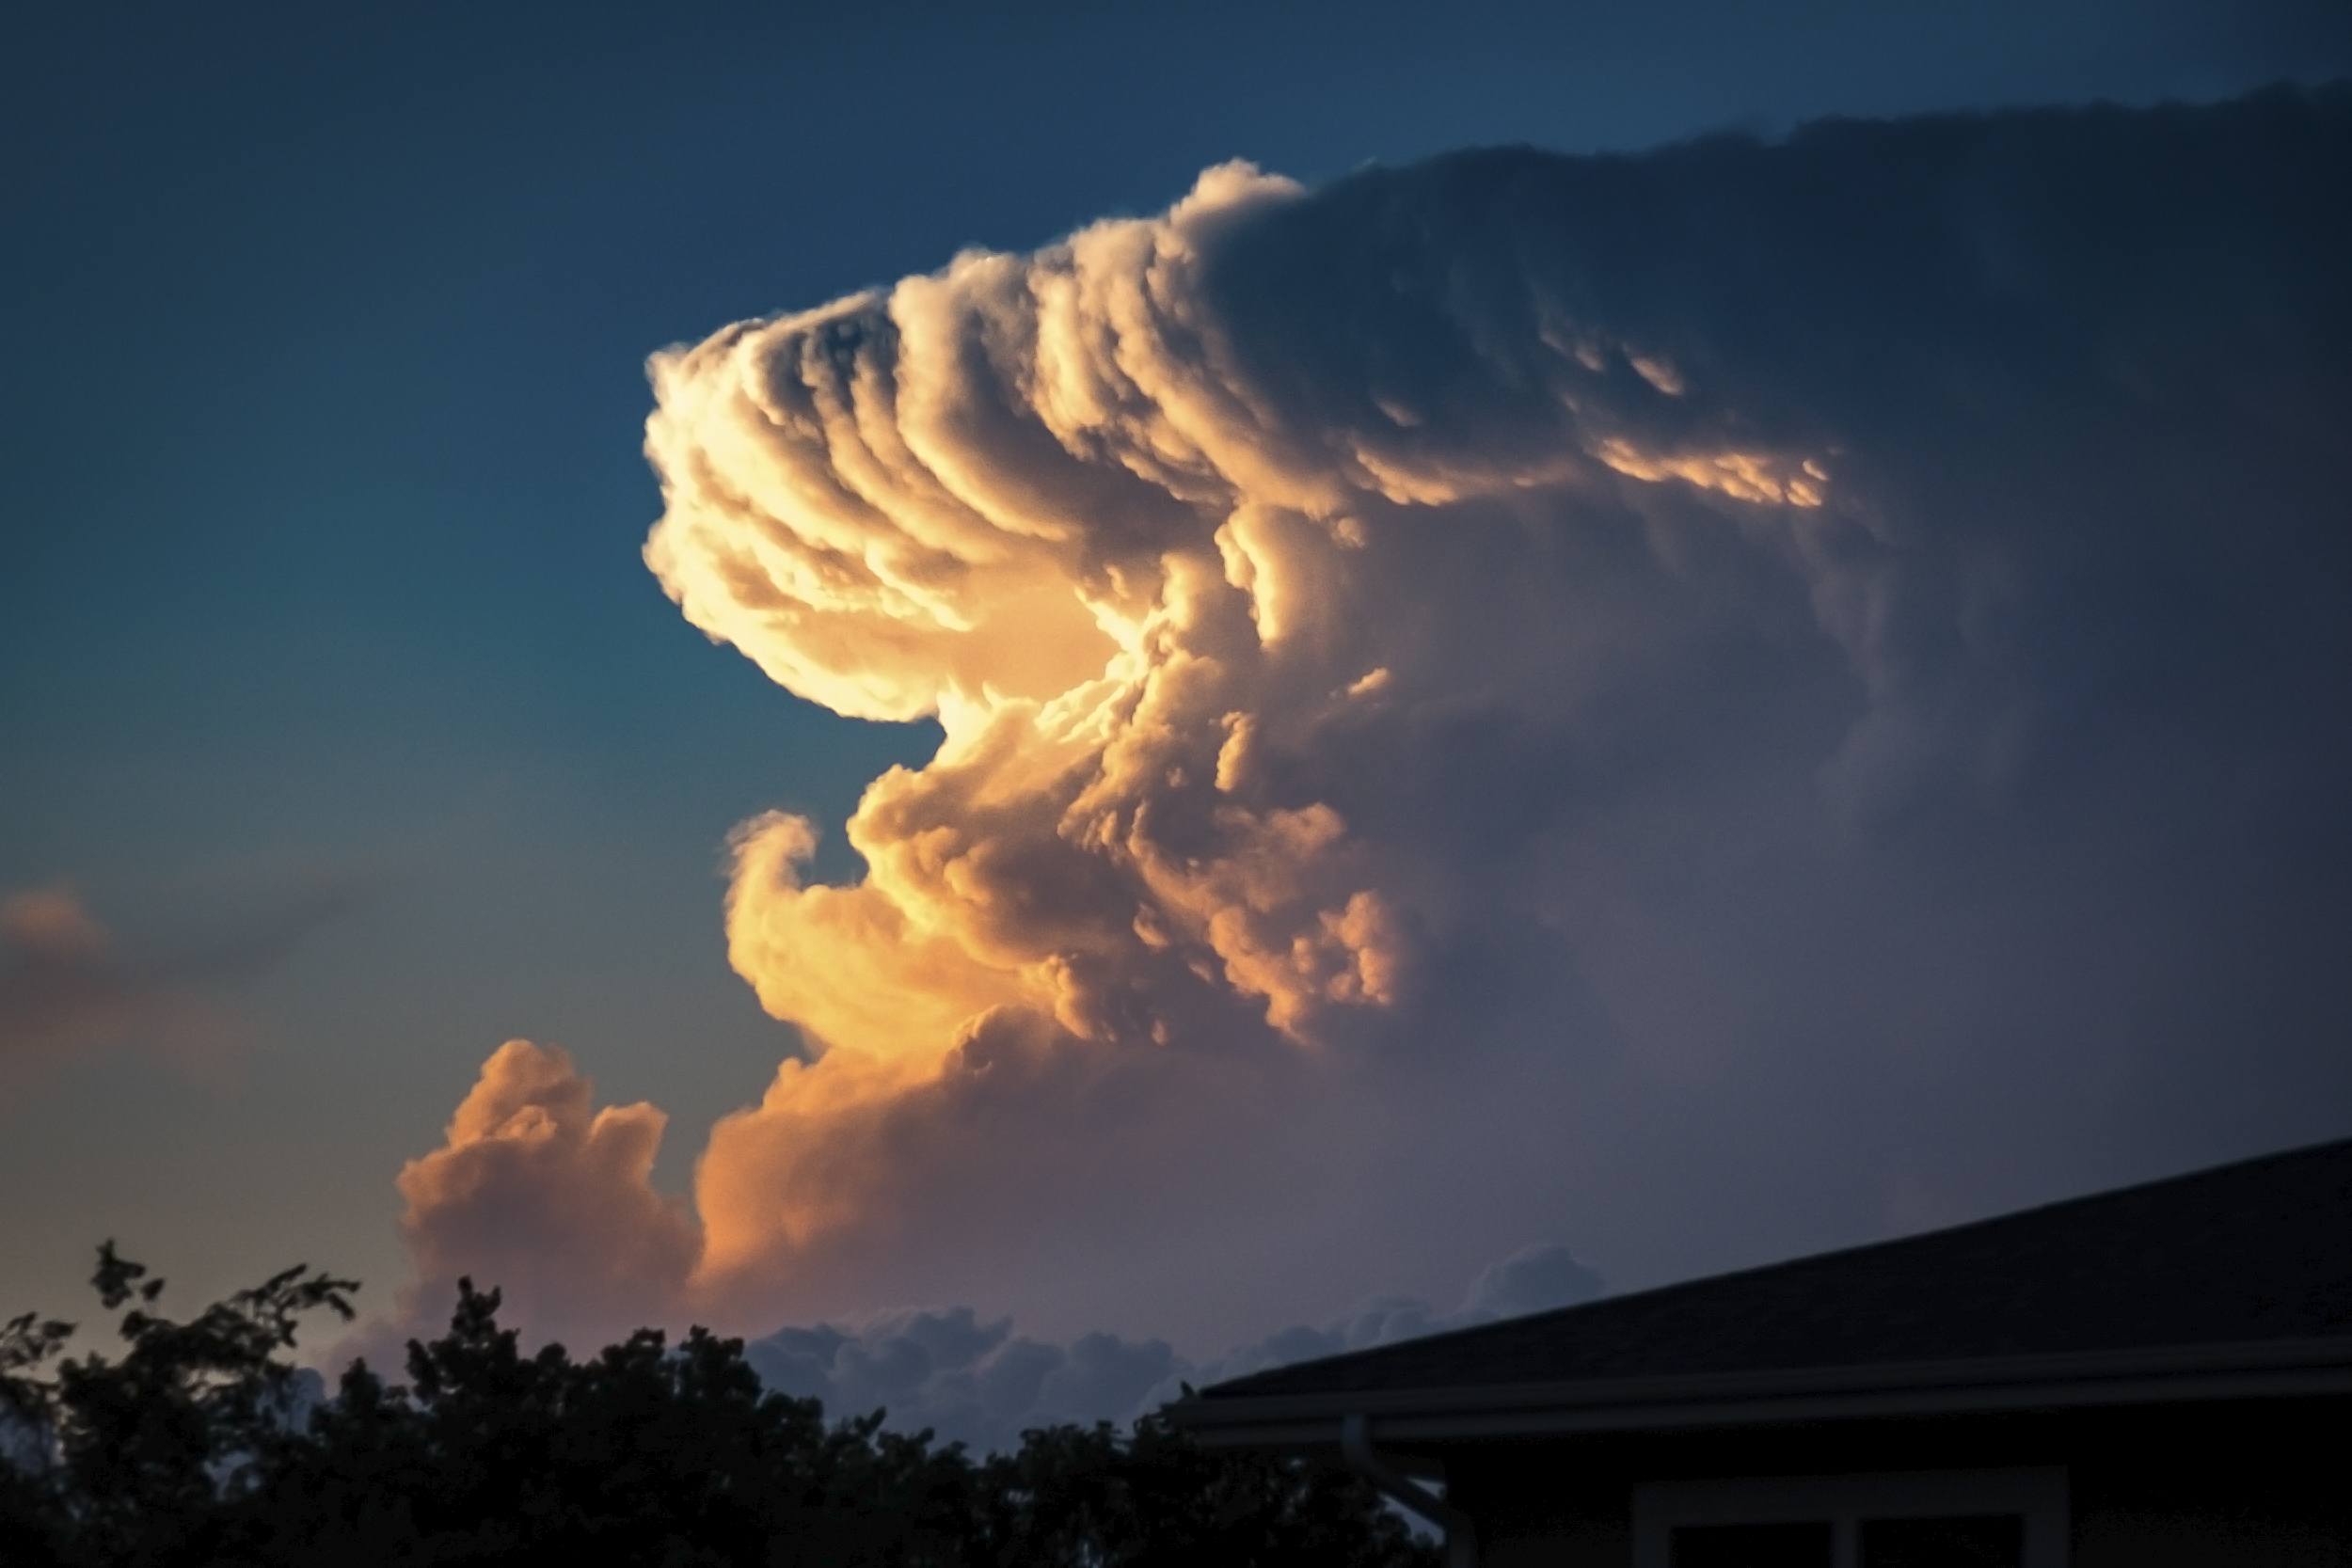
This is a classic anvil thunderhead at sunset. The sun is just out of frame to my left and behind the cloud formation. Photo by Charles Haacker
Key Lesson: When it comes to landscape photography, backlighting is your friend. Direct front lighting on a landscape creates a very flat-looking image. Also, study your angles. Try to put the sun somewhere in a side/rear position to your subject.

I was captivated by the early morning backlit spring green. This is the character of light that first caught my eye years ago. Photo by Charles Haacker
5. Silhouettes
There are different ways to expose for silhouettes. I don’t think foregrounds in silhouettes absolutely must be black with zero detail. I think there can be gradations of detail, from none to little.
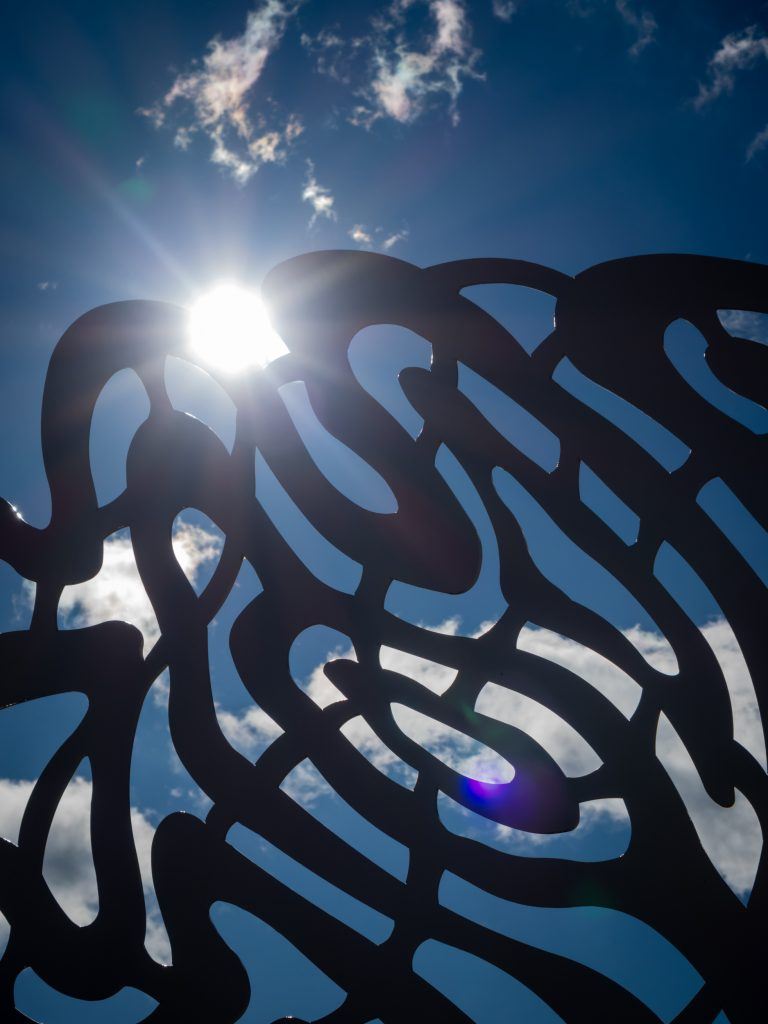
Photo by Charles Haacker
This is an abstract sculpture with the sun in the shot.
This is a pretty straightforward dark black silhouette, exposing for the clouds and letting everything else fall dark. There is a flare spot at lower right because I was shooting straight into the sun.
Key Lesson: If you choose to shoot your photograph with the source of the backlight, clear and unfettered by opaque objects, then there is a strong chance that your image will capture some lens flare. This can be used creatively. However, be careful about where the flare occurs and what it is covering, because lens flare can be extremely difficult and sometimes impossible to remove in postproduction!
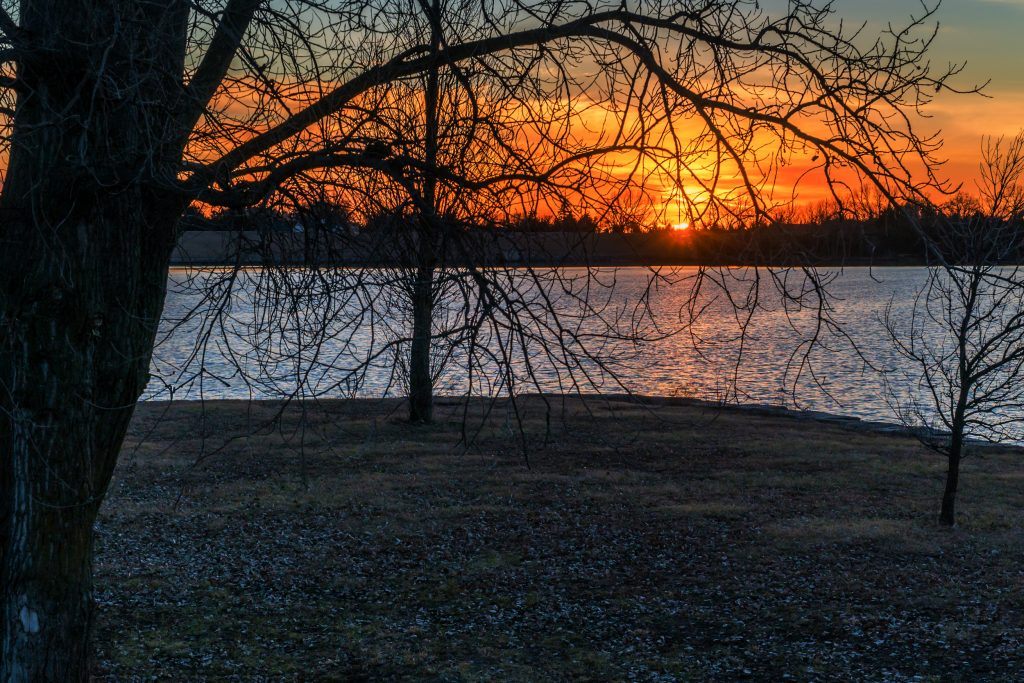
Photo by Charles Haacker
The original image of this wintry scene was a total silhouette, but I like some foreground detail.
I don't think foregrounds in silhouettes absolutely must be black with zero detail. I think there can be gradations of detail, from none to little.
I deliberately framed the sunset through the bare branches, wanting a bleak foreground looking out to the more hopeful blaze of warmth. In this case, the intensity of the backlighting has been reduced to allow foreground details.
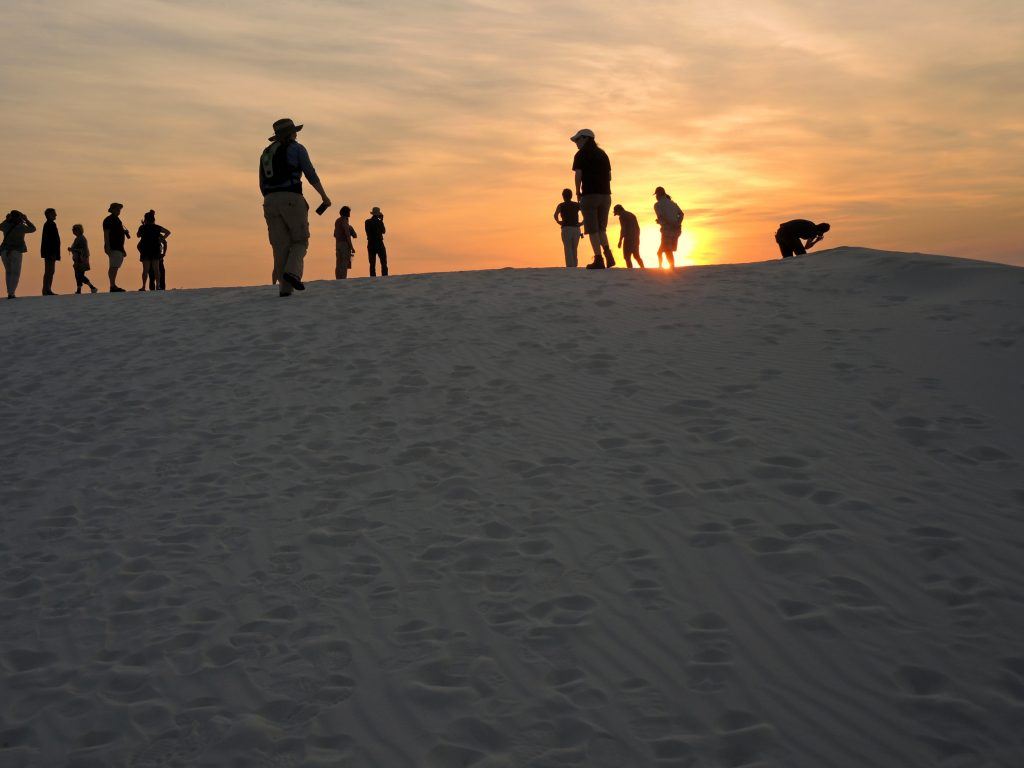
Photo by Charles Haacker
This was made on the White Sands of New Mexico during a sunset ranger walk. I saw it and grabbed it, exposing for the sky. I only got one shot. It has been processed to show the faintest amount of detail in the otherwise silhouetted figures. In this case, the white sand helped fill in the shadows to prevent a completely black silhouette.
Recommended Reading: If you’re interested in learning more about light and how you can use it to improve your photography, grab a copy of Photzy’s bestselling premium guide: Understanding Light Book Two.
6. Exposing for Backlight
Backlight can cause photographers headaches, because it puts your main subject into its own shadow. It can be easy to get an unintended silhouette.
There are different ways to deal with this.
I find exposing for backlight to be fairly straightforward.
I generally leave my cameras in matrix metering, but I also shoot with a mirrorless (live view all the time) so I can see in my EVF if an adjustment needs to be made.
If the subject is translucent, like leaves, I find that matrix metering usually nails it.
If you are using a DSLR or a compact rangefinder-style camera, I see nothing wrong with reviewing the image (thank goodness digital lets us do that) and making corrections as needed.
When shooting backlit opaque subjects, it gets a little trickier.
You need to decide if you want detail in the subject’s shadow, and also how much detail.
You can just expose for the shadow. However, if you are shooting JPEG, you will probably overexpose the sky and clouds beyond post-processing repair; if you are shooting camera raw you have a better chance of recovering some detail.
Key Lesson: I’ve shown you that I like to expose “down the middle,” trusting in my ability to compress the tonal range in post-processing.
One of the reasons that I emphasize shooting raw is that, at least in my experience, I can expose to avoid overexposure in the background details because I can lift out the foreground detail.
Depending on a host of factors, starting with how bright the backlighting is (its intensity), I find that I can do this without creating too much noise in the shadows.
If I do get some noise, most post-processing apps have good noise reduction methods, plus there are other apps or plugins that can do a marvelous job.
Don’t overlook the possibility of bracketing your exposures.
You need to decide if you want detail in the subject's shadow, and also how much detail.
Most modern digitals have onboard means of doing so automatically, usually with choices of three to five exposures and control of the number of EVs of each. Doing this either affords you a chance of getting one perfect photograph, or combining them into an HDR image.
Key Lesson: If you are new to working with backlight, learn how to use the “exposure bracketing” function of your camera. This will help you to get the shot. It will also help you learn what exposure works best for each lighting situation.
My cameras and techniques in Lightroom allow me to “get away with (photographic) murder” by just going for a well-balanced raw exposure and opening the shadows in post-production. However, that takes some experience. Using bracketing can help you gain that experience.
In closing, don’t be intimidated by backlight. You can shoot anything with any camera with it. It’s especially effective with translucent subjects, and most especially during the Golden Hours (the hour or so after sunrise and before sunset). If you’re using a DSLR and having exposure issues, don’t be afraid to “chimp” (I hate the word, but it’s now established slang). Checking a few frames will tell you if you are on the right track, or which way you need to adjust. If you are not shooting raw, I absolutely recommend it, but the plain fact is that you must post-process, like it or not. The advantages of raw so far outweigh the small extra trouble of processing that it’s more than worth it, and you’ve seen examples of what I’ve done using only raw and Lightroom with no reflectors nor flash fill.
Self-Check Quiz:
- True or False: Backlight is exceptionally lovely light.
- True or False: Backlighting must be directly opposite the camera.
- True or False: When using backlight, the light source must be visible in the frame.
- True or False: You can make backlit pictures with any camera.
- True or False: Backlighting works extremely well with translucent subjects.
- True or False: You cannot use backlight with opaque subjects.
- What are two good ways to open up shadows in a backlit picture?
- If shooting something round like a ball, does front light show shape better than backlight?
- True or False: When shooting a silhouette, you should expose for the background.
About the author: