
A Super Quick Guide By Kent DuFault

Photo by: Sombilon Photography
This week our Photzy friends in the United States will be celebrating Thanksgiving. Most everyone in the world will be celebrating some type of holiday within the next month or so.
Holidays often mean family gatherings, and that is the perfect time to capture some portraits of your family and extended family.
Today, I’m going to give you some tips on how to get the best portraits possible in the least amount of time. We need to be quick because, as we all know, the children won’t last long.
It’s always a good idea to pre-plan the location that you’ll use for your family portraits. While you may be tempted to utilize some background props such as a Thanksgiving table filled with food, or a Christmas tree, it is usually best to stay away from those areas and find a clean open area with minimal background clutter.
The first consideration is how many people will be in your largest group shot?
- 1 – 6 people you can do your portrait session almost anywhere
- 7 – 12 people you are going to need some room. Proper posing will help keep the group tight. However if you live in a warmer climate you will definitely want to consider the outdoors as a possible location.
- 13 – and up… you’re going to need a fairly large open area, or an area where you can stagger your subjects, such as a staircase. You’ll definitely want to look around outdoors if you’re in a warm climate.
When choosing your location, you’ll also have to consider your lighting. For example… do you have any? Most of us have at least an electronic flash unit. If you’re shooting indoors, turn on every light in the room. You can even bring in extra lamps if you feel inclined. The goal is to raise that ambient light up as much as possible.
Because we don’t generally have a lot of professional lighting gear, we want to look for a location that has a fair amount of ambient light.
This once again pushes us towards the outdoors, if that’s possible. If not, and we’re forced indoors, try to find an area by a large window that has the tallest ceiling possible. This would generally be on the ground floor in a living room or a family room.
The final consideration for location is the background. Keep it as simple as possible. If you’re outdoors, don’t have a swing set behind your group. Use a group of trees or a hedge line. If you’re indoors look for a plain wall. If there are framed glass pictures hanging on the wall, you may want to remove them so they don’t reflect your flash. If your group is large and you don’t want ugly shadows all over the wall, you can try posing them in front of a large window. While the window may reflect your flash, it’s less to deal with than numerous shadows cast onto a wall.
Bouncing a single flash off of a wall or ceiling can work for smaller groups (four or less), but it won’t work very well for any group portrait larger than that.
Now that our location is set, let’s talk about lighting. We’ve chosen a location that has the best ambient light. However, for the best results we are most likely going to add our electronic flash as a fill light. We don’t want the flash to be the main light as that is quite harsh and unflattering.
Outdoors-
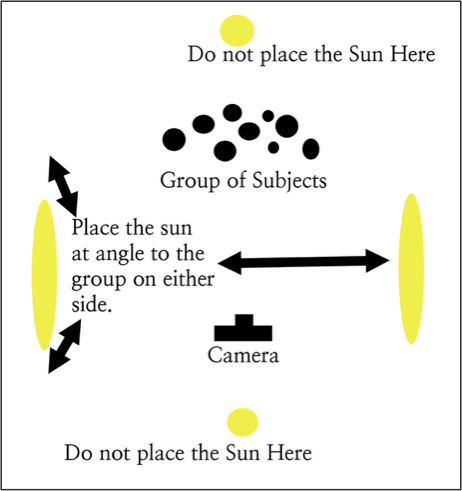
Don’t position your group with the sun directly behind them, or directly in front of them. Place the sun at an angle on either side of the group.
The time of day for creating your portrait will depend on your location. But, typically you want the sun to be lower in the sky, but not so low that your light level drops off too far. I would suggest you check light levels the day before to figure out what would be the best time.
If you’re working with a group, and it includes children, you’ll want your exposure to be something like this: F/8.0 – F/11.0 (depending on the size of the group, thinking DOF) – 1/125th of a second or faster (to capture the squirming kids without a blur) (also make sure to check your sync speed if you’re using a fill flash! You don’t want to exceed the sync speed), ISO 100 to 800 (depending on your camera, lens, lighting, etc. the lower the ISO the better).
Indoors-
Indoors, you’ll still want to maintain a shutter speed of at least 1/125th of a second if there are children in the shot. Now, if there are no small children, you can get away with a slower shutter speed. Just make sure everyone understands that they need to be still.
With proper posing you may be able to open up your f/stop to f/5.6. I would not open it up any more than that, and f/8.0 would be a preference to make sure you have enough depth-of-field.
TIP: To maximize DOF, focus on someone in the front row of the group and exactly in the middle. If you’re using a zoom lens, zoom all the way in on that person, do a critical focus on their eyes, and then turn the auto-focus OFF. Zoom back out to compose the entire group.
Depending on your camera, and the noise that it generates at higher ISO settings, you will need to determine what is most important- using a wider f/stop to keep the ISO lower, or raise the ISO to get a smaller f/stop and more DOF.
Let’s talk about using your electronic flash.
Oddly enough, the first item we need to discuss is what camera-shooting mode you’re going to use. The reason for that is because the shooting mode tells the flash how to operate in ETTL.
I would suggest either manual mode or aperture-priority mode. Most people prefer the aperture-priority mode. In that mode, you set the f/stop, thereby securing your DOF. At that point, you just need to make sure that your ISO is high enough to give you an adequate shutter speed.
Once all that is determined, you turn on your flash and set it to ETTL mode. The flash will automatically act as a fill flash. Once you have your group positioned, take a test shot to determine if the flash is filling in enough light- or too much light. You can adjust the flash output using the flash exposure compensation setting.
(NOTE- If you’re unsure how to set your flash up- you may want to check out our Premium Guide, “Electronic Flash – Parts and Practices”.)
Of course, if you plan on being in the shot, you’re going to need a tripod. Set your camera to the timed release. I like to use ten seconds. When planning your pose, position yourself somewhere on the outside edge of the group.
If you weren’t going to be in the picture, I would still use a tripod.
TIP: If you’re taking the picture and releasing the shutter (ie. you’re not going to be in the picture). Get everything set and then move your face from behind the camera. I like to put my face right above the camera, and I instruct the group being photographed to look right at my face. This engages them, and you’ll get more genuine expressions than if you’re hidden behind the camera.
We now have our location. We have our lighting. Now, we must pose our group.
Posing is an art that can be discussed at length. For the purposes of this article, I’m going to give you three posing tips. These tips have to do with positioning of the individuals within the photo.
Even if you did nothing else, these posing tips would greatly enhance your family portrait.
So here it is…
When you pose your group position the heads to form a Triangle, an X, or an Angled Line.
Let me show you some examples:

Photo by: es1123
The triangle works great for any group size greater than two. It’s also a great posing tool for large groups with multiple families. Start with one family and pose them in a triangle. Then add another family and pose them in a triangle next to the first family. Do this with all of the families. You can stagger your triangles front to back so that the group doesn’t spread out too far horizontally. This is important, especially is you have limited room and lighting.

Photo by: Sombilon Photography
The X pose also works well for groups larger than two. You’ll also find this pose useful when you have an odd number of people in a family. Just like the triangle pose, you can build up multiple families using the X pose. You can also effectively mix the triangle pose and X pose in a larger group photo.

Photo by: Sombilon Photography
The diagonal line pose works well for small groups. I usually use it for 2 or 3 people- no more than that. However, you can mix the diagonal pose, with the triangle pose, and the X pose in a larger group. For example, you have a family of four, a family of five, and a family of two that you’re posing together for one large group portrait. The family of four could be in a triangle, the family of five in an X, and the family of two in a diagonal line. If you’re new to posing sometimes it helps to sketch it out before the event happens.
It would look something like this-

If you’re pre-planning keep everyone’s height in mind. You don’t want anyone blocking the person behind him or her. Also, stagger the heads as much as possible. This will help prevent shadows from falling onto anyone’s face.
There are two things that we are trying to achieve using these posing techniques.
- We try to keep everyone’s head on a slightly different plane. This gets us away from the “line them up” pose we’re all familiar with.
- If you keep the triangle, X, and diagonal poses, in your mind, it greatly increase the speed at which you can pose your group. This is especially helpful when you have children involved who won’t sit still for very long.
I hope you found this guide helpful. Have a happy Holiday Season no matter where you are in the world!
And keep shooting!
