


Fill flash is a great tool when you know how to use it well. Many photographers shy away from using flash because they are not confident. They may have tried to add fill flash to their photos a few times and been disappointed with the results.
Using a flash adds another level of complexity to taking photos. You now not only have to think about what you’re doing with your camera and lens. You also have to think about your flash and how you manage the light it adds.
Adding flash to your photos is like adding an extra component to your exposure calculation. It takes a little more understanding, but with the modern camera and flash technology, you’ll find it is not so difficult to master.
This guide on using fill flash will help you gain confidence. I will walk you through the process of how to use fill flash. I’ll also discuss when to use it and why you’ll want to.
Recommended Reading: If you’d like to learn how to use your flash unit for better photography, grab a copy of Photzy’s Electronic Flash – Parts and Practices premium guide.
What Is Fill Flash and Why Would You Want to Use It?
Fill flash is a technique used to add extra light to photos to complement the ambient light. Flash is only often used when there’s not sufficient light, like at night, to take a picture. Flash is used in the daytime or in other situations where plenty of light is called fill flash.
Adding more light by using a flash helps balance the ambient light. It minimizes the shadows falling on your subject when the ambient light is strong and bright. For example, you might want to use fill flash when making a portrait or photographing a flower on a sunny day. Bright light from the sun causes shadows on people’s faces and flowers. Adding a little flash reduces the shadows’ strength and gives the person or flower a softer look.
Adding more light by using a flash helps balance the ambient light. It minimizes the shadows falling on your subject when the ambient light is strong and bright.
In situations where your subject is backlit, you can also use fill flash to illuminate the front of your subject. This helps balance the light on your subject with the bright light behind your subject.

Photograph by Kevin Landwer-Johan
In this portrait, I used the little pop-up flash on my camera. Typically, I avoid using this flash because it is so tiny, but I had no alternative in this situation. By adding even a small pop of flash, I have illuminated my subject and balanced the light on her with the bright sunlight in the background. It helps that she was not close to anything, so the flash caused no shadows.
Key Lesson: Aim to use some kind of diffuser on your flash whenever possible. Because any flash head is small, the light emitted is hard. This can cause dark shadows and blown-out highlights. Using a diffuser effectively increases the size of the light and softens it.
Key Steps to Balancing Fill Flash
There are a few simple steps to manage fill flash well. The balance between the ambient light and the added light from the flash must be controlled.
Step 1: Take an Exposure Reading From the Background
Use your camera’s spot meter to take a light reading from the background. Set your exposure manually according to the reading you take.

Photograph by Kevin Landwer-Johan
I took a reading from the tabletop behind my subjects and set my exposure manually at f/2.8, 1/320th, and ISO 400. The light behind the women was quite strong coming through the slatted wall. Without adding flash, the shadows on their faces were too dark. If I set my exposure for their faces, then the background would be too bright.
Step 2: Take an Exposure Reading From Your Subject
When you have set your exposure, take another spot meter reading from your subject. I prefer to set my camera on manual exposure mode so that when I take the second reading, I can compare the difference with the light reading I made from the background.

Photograph by Kevin Landwer-Johan
Taking a reading from one of the women’s faces, the light was about one and a half to two stops darker. This reading indicates the amount of light I need to add to create a balance with the light in the background.
Step 3: Set Your Flash
Now that you’ve taken your readings and set your exposure for the background, you need to add the right amount of light to your subject.
You can control your flash to do this manually or automatically. I prefer to manage my flash output in manual mode, especially when I am working in a somewhat uncontrolled environment such as in these photos.
Manual flash output requires a bit of guesswork or a lot of mathematical calculations. I prefer to guess. I’ll set my flash output manually to provide as much light as I think I’ll need. I’ll take a photo and check the result on my camera’s monitor. I’ll also take a look at the histogram. I’ll adjust the flash output if the results are not satisfactory.

Photograph by Kevin Landwer-Johan
In this case, it was 1/4 power. This setting depends on the power of your flash, the distance between the flash and your subject, and whether the flash is diffused or not. For this series of photos, I used a small softbox with my flash to diffuse the light. It was about two meters (two yards) away from my subjects.
Alternatively, you can use the TTL or auto settings on your flash. Take a photo, check the result, and adjust the flash output using the flash’s exposure compensation. This is an easier option, but it can sometimes produce varying flash output. If you or your subject move, more or less light from the background can affect the flash output when it is set to calculate the output automatically.

Photograph by Kevin Landwer-Johan
Key Lesson: Practice using manual camera exposure and flash settings. Auto settings make it quicker and easier to take a photo, but the results are unpredictable. Learning to control the light and exposure manually takes time and practice and is more difficult. But like anything creative, the easiest way to do something will not usually produce the best results.
Tweaking Your Exposure and Flash Output
When using fill flash, it’s common to have to tweak your exposure and/or flash output after taking one or two photos.
Digital cameras make it easy to see the results of adding flash. Make the most of your camera’s monitor and histogram readout. These tools allow you to see how the ambient light and flash combine to make your exposure.
Whether you do set every control manually or rely on the auto settings, it’s important to check that your photos are turning out the way you want them to. Sometimes you might want your subject brighter than the background. At other times, you’ll want less flash on your subject. It depends on the look you want.
Photograph by Kevin Landwer-Johan
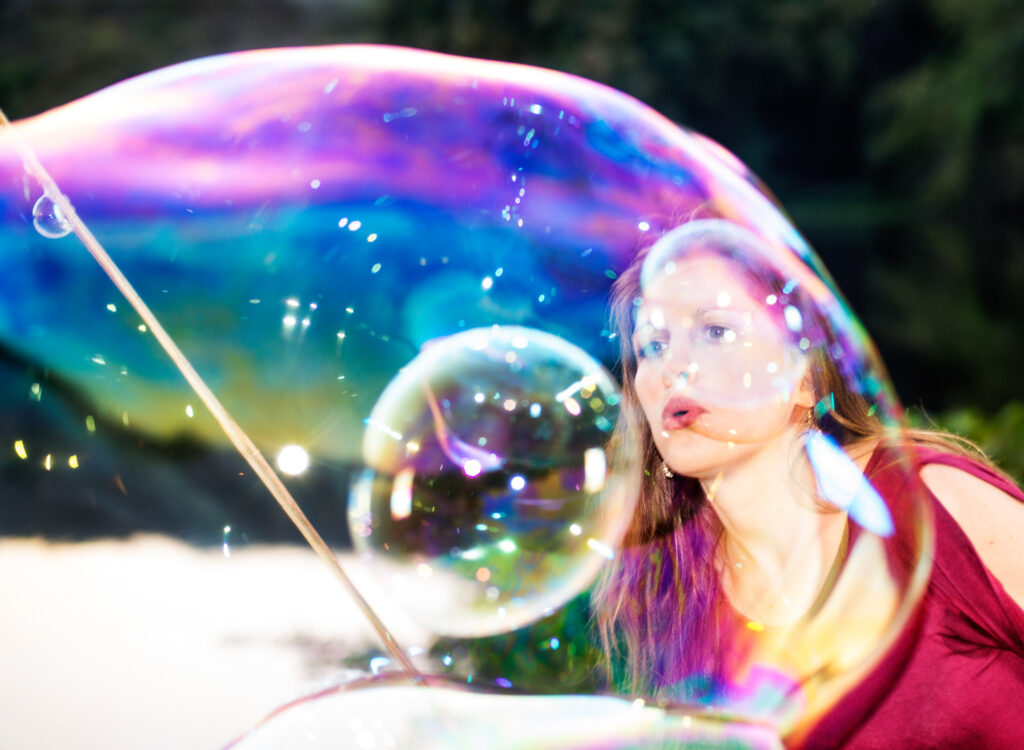
In this photo of the woman making large soap bubbles, I wanted her to be brighter and let the background be darker. This helped isolate my subjects from the background. I dialed up the flash output and set my camera to underexpose the background a little. It didn’t take much tweaking, but it made a pleasing difference.

Photograph by Kevin Landwer-Johan
In this image of the woman taking a photo, I wanted to add a touch of flash to balance the daylight. I didn’t want to eliminate the shadows, only to lighten them. I set my exposure for the sunlight on her face and dialed down my flash output a little. The flash was on a stand to my left and diffused with a small softbox. The effect was to lighten the shadows and reveal some texture in her hair.
Key Lesson: Experiment with your flash and camera settings. This is the best way to learn to use fill flash most effectively. Photograph the same subject from different angles in bright sunshine. Make sure you take some photos with the sun behind your subject.
Recommended Reading: If you’d like to learn how to use your flash unit for better photography, grab a copy of Photzy’s Electronic Flash – Parts and Practices premium guide.
Move closer to your subject and further back. Experiment with different exposure and flash settings. Try some with your flash on auto, TTL, and manual. Take notes about what you are doing and what settings you are using. When you review and compare your photos, have your notes on hand to refer to.

Photograph by Kevin Landwer-Johan
Take Your Flash off the Camera
Whenever you can, use your flash off-camera. Light from a camera-mounted flash is very direct and often looks a bit fake, no matter how well you balance it.
Check your camera and flash manuals, or do an online search to discover how to use off-camera flash. Some camera and flash combinations will need a remote trigger whereas others will not need this.
Whenever you can, use your flash off-camera.
When you position your flash so the light comes from the opposite direction than the main ambient light, your photos can look more natural. I will often hold my flash at arm’s length in my left hand. Even this little added distance makes a more interesting photo. At other times I’ll mount my flash on a light stand and use a small softbox. This is my favorite way to use off-camera flash because it produces a lovely, soft light and I can position it to add light from whatever direction I want.

Photograph by Kevin Landwer-Johan
Conclusion

Photograph by Kevin Landwer-Johan
Using fill flash is not scary. It’s not even too difficult. It just takes a little getting used to.
As you can learn to work with your equipment in manual mode, you’ll realize you have a greater degree of control. Don’t be alarmed if you don’t get the best results straight away. Check your camera’s monitor and histogram. Tweak your settings and try again.
The more you experiment and practice using fill flash, the better you’ll become. Follow through the steps I’ve outlined in this guide. Check your settings on both camera and flash and develop your understanding of what happens when you make adjustments. Before long you’ll be guessing and setting your flash manually and seeing the most consistent results.

Photograph by Kevin Landwer-Johan
Self-Check Quiz:
- What is fill flash?
- Why would you use flash in the daytime?
- Do you have more control over your camera in auto or manual?
- What should you do after taking one or two photos using fill flash?
- What’s the best way to learn to use fill flash?
- Why is it a good idea to use an off-camera flash?


