
After spending about seven hours doing some pretty intense compositing in Photoshop one day, my hand and wrist were curled up like a claw with the muscles so tight and overused. It was painful and took several days to come right. It took me ages to edit that image, as I got tired hanging on to the mouse, had to keep resting, the accuracy wasn’t great, and I kept making mistakes. Overall, the editing experience was pretty awful.
Due to a gardening accident, I also have tendon damage to my right hand, which sometimes flares up for months at a time, during which even using a mouse can aggravate the issue further.
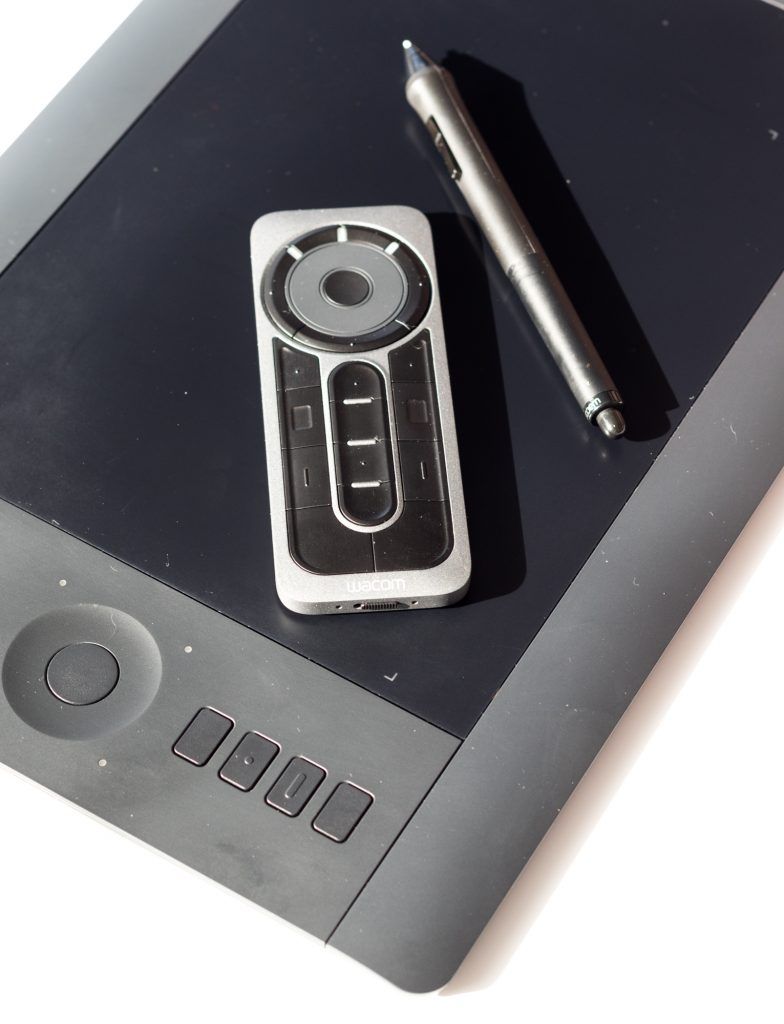
After looking at a lot of options I decided to solve two problems at once and get a drawing tablet. I got a Wacom Intuos Pro Medium size tablet and it was the best decision I made.
Photograph by Stacey Hill
Yes, I still use a mouse occasionally, but the tablet fulfills 95% of my requirements. It’s more comfortable to use for long periods. I can rest my arm/hand in a more natural position and it is easier on my wrist.
Plus, with all the extra buttons and features, it is much quicker and way more efficient to use within Photoshop (and other programs if you set it up like that) as well.
Recommended Reading: If you’re interested in improving your post-processing workflow, check out Photzy’s Understanding Masking premium guide. It has a section for Lightroom and Photoshop, as well as Snapseed for mobile users too.
Introduction
It’s a common question in photography and digital art groups: “Should I get a drawing tablet?” Or in more recent times, “I can’t decide between getting a drawing tablet or an iPad Pro with a Pencil.”
As far as the question about iPad Pro vs. drawing tablet goes, I haven’t personally done a comparison, but plenty of people seem to like the iPad Pro Astropad. Many of the benefits mentioned here will still apply no matter what tablet option you opt for, but I will be specifically addressing the Wacom Intuos Pro model in this guide.
Note that my setup for editing is seated at a corner desk with dual monitors, a keyboard, and a tablet. My main computer is a full desktop; I never edit on a laptop or away from this setup.
Key Lesson: Using a tablet allows you to be more efficient, work more effectively, and helps to reduce the impact of strains or injury.

My editing setup, complete with the cat that insists on sleeping in the way while I’m on the computer. My keyboard is to the left, the tablet is to the right, and in the middle is Cognac the cat with my mouse right beside him. Photograph by Stacey Hill
Benefits of Using A Tablet
More Natural Arm/Hand Positioning
Spending hours with your hand clamped around a mouse, having to pick it up to move it, click on the buttons etc., is not the most natural or ergonomic way to move your body. If you are doing an intense editing session, it can get to be quite painful and isn’t good for you.

Photograph by Stacey Hill
Using a tablet/pen combination is much better. The pen is much lighter and easier to hold on to with a light grip. You can rest your hand on the tablet and do small, quick pen strokes, or you can swing your whole arm freely from the shoulder if doing bigger sweeping strokes.
As previously mentioned, because I have damaged tendons around my thumb/wrist area, the position my arm sits in when using the pen is far more comfortable and natural for me.
Two-Handed Operation
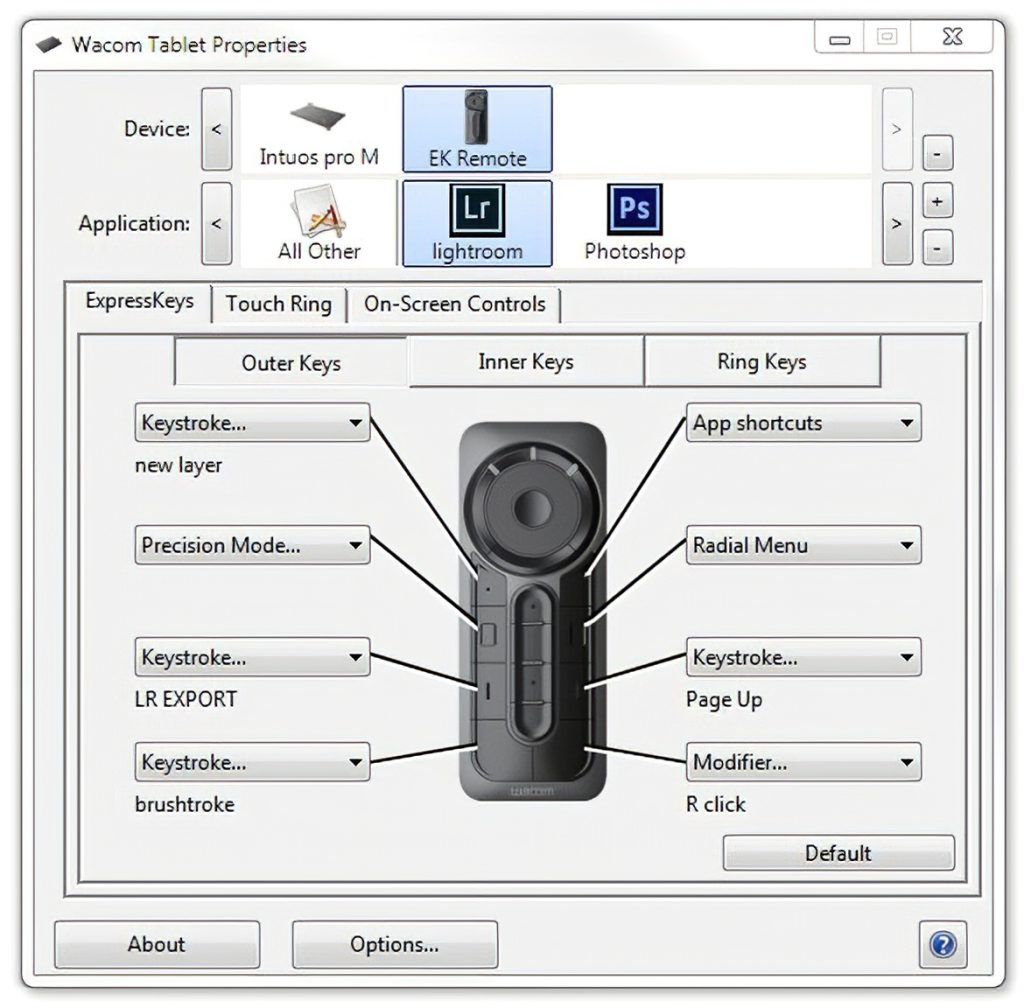
The Intuos has eight Express Key buttons and a touch-sensitive ring that has four separate functions (Scroll, Zoom, Rotate, and Keystroke), which I have set to Scroll as the default top-left option.
I can set specific functions on the Express Key buttons on the tablet, plus the pen has buttons for functions as well.
Coupled with either the keyboard or the optional Express Key Remote, you can then do a great deal with both hands. It’s faster and very efficient, especially if you program in frequently used steps like “Add a New Layer” with a one-button press.
Photograph by Stacey Hill
Multi-Program Functionality
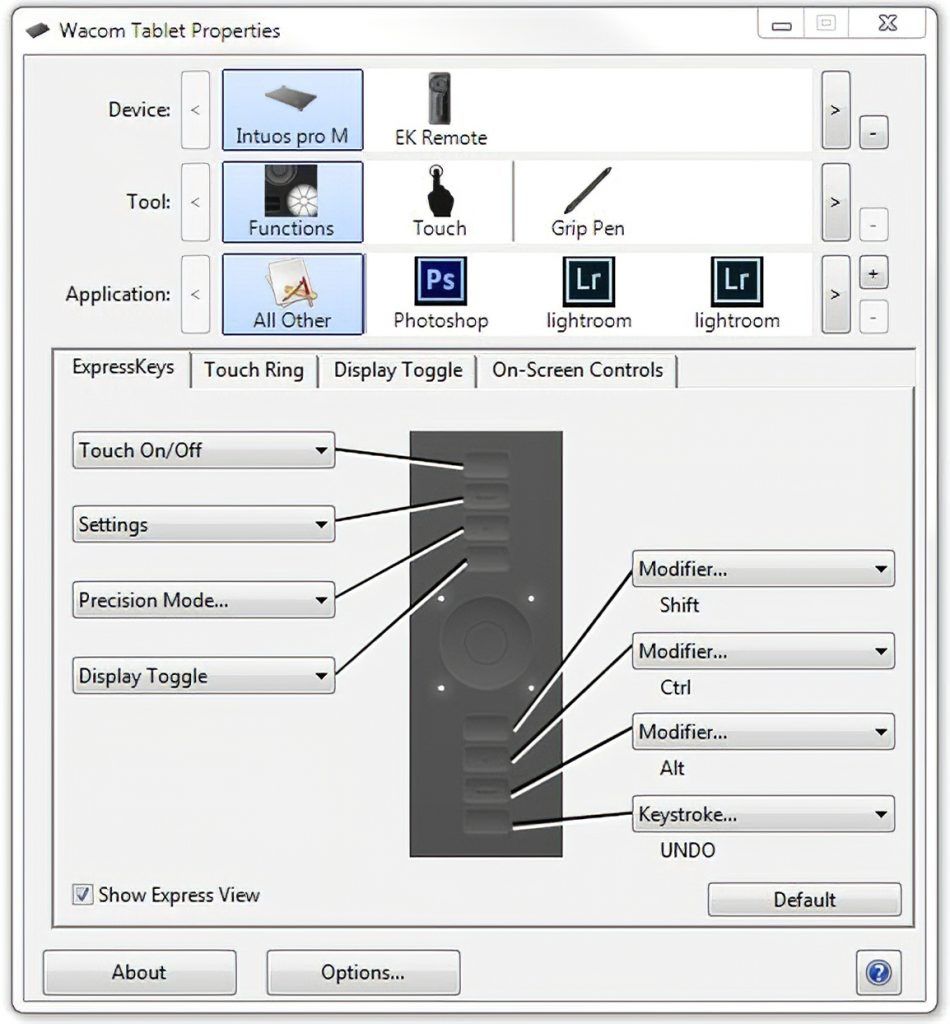
The Wacom tablet software gives a great deal of control and granularity over how you set up the tablet to be used. It can be specifically set up to work one way with one program, and a different way in other programs. You can map the use of the tablet area across one screen or shared across multiple screen views.
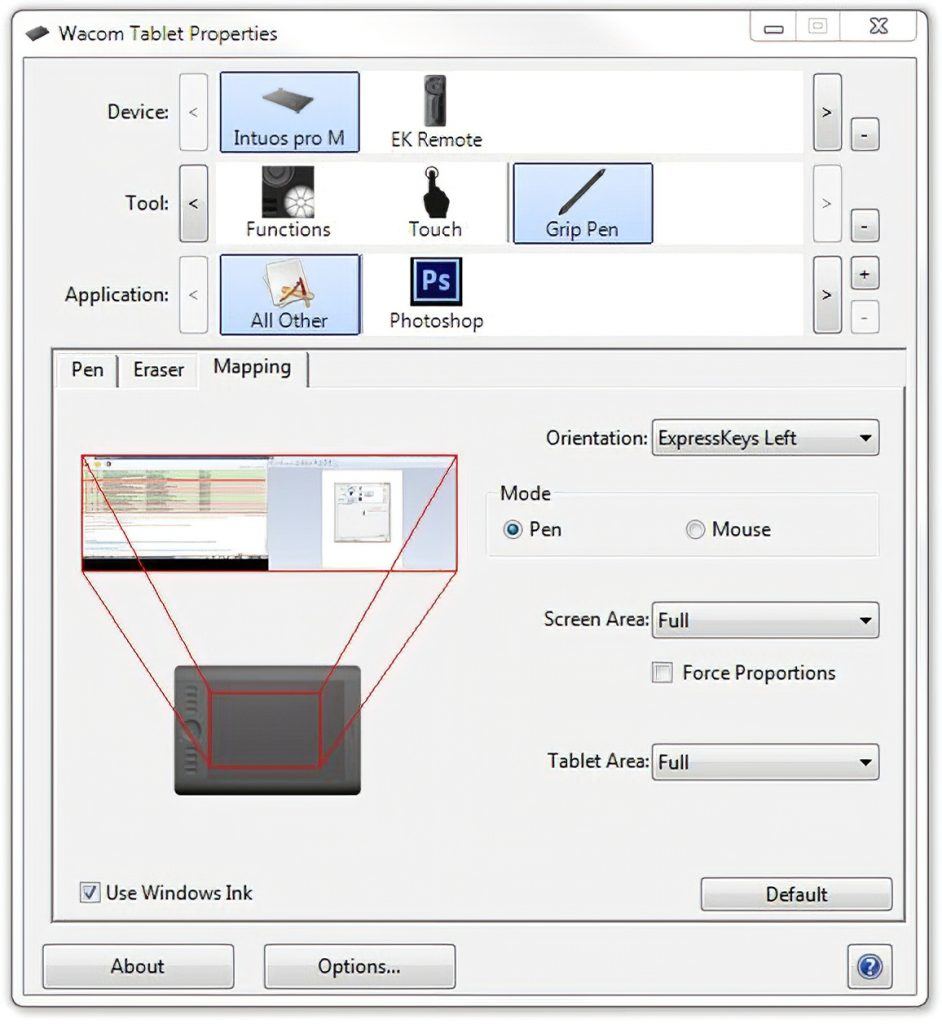
You can set the Touch to work in one program, pen only in another, and so on. It’s extremely customizable and flexible, and can be a little confusing at first to understand all the options and how to set them up for your optimum experience.
I edit using Lightroom and Photoshop and use the tablet as a touch-sensitive mouse surface for general navigation and use.
As an example:
My setup locks focus for pen use within Photoshop to the main window that Photoshop is active in. I do this so that I have full range of use of the whole tablet surface and have more area to work in.
I could span it across two monitors, but that splits the area of the tablet to half per monitor. If I’m doing very fiddly masking work, I want as much control as possible.
However, the finger touch control of the table will work across both screens. Plus my mouse is available as well.
Touch, Pen, and Button Features
The Intuos is fully touch enabled like the track pad on a laptop, so the whole surface can be used that way. I use mine like that and it essentially replaces my mouse for nearly everything I want to do. I find it not the best at doing a “Click and Drag” feature so I still use my mouse for that.
The pen can be used as a pen or as a mouse as well if you prefer.
The scroll function on the touch wheel is super handy. I have the buttons/wheel positioned on the left side of the tablet, as I am right-handed. Using my left hand to scroll means my right hand doesn’t have to do all the work, and that helps a lot with managing pain and reducing overuse.

Photograph by Stacey Hill
Buttons with key features are useful. Having an UNDO button with one press is handy in any program that supports the CTL + ALZ + Z feature.
Plus, the Radial menu is a software function that offers another eight programmable selection choices too.
Pressure Sensitivity
The tablet is pressure sensitive, and levels depend on which one you get. In general, the harder you press, the thicker the line etc.
Plus, if you are drawing with a brush type that changes depending on the angle you might be holding the pen at, that will replicate in the way the stroke comes through as well. So it can mimic real brush strokes.
For photographers this may not be a key feature, but if you want to get creative and play, it can be a lot of fun.
Absolute Positioning
When you first set up the tablet, you calibrate it in all four corners. After that the pen is exactly where the pointer says it is on the screen. You can work at pixel- level accuracy if you want to and know that where you place the pen nib is exactly where it will come down on the screen.
It’s a level of accuracy way above what a mouse can do, and is far more accurate than using your finger on a touchscreen or similar too.
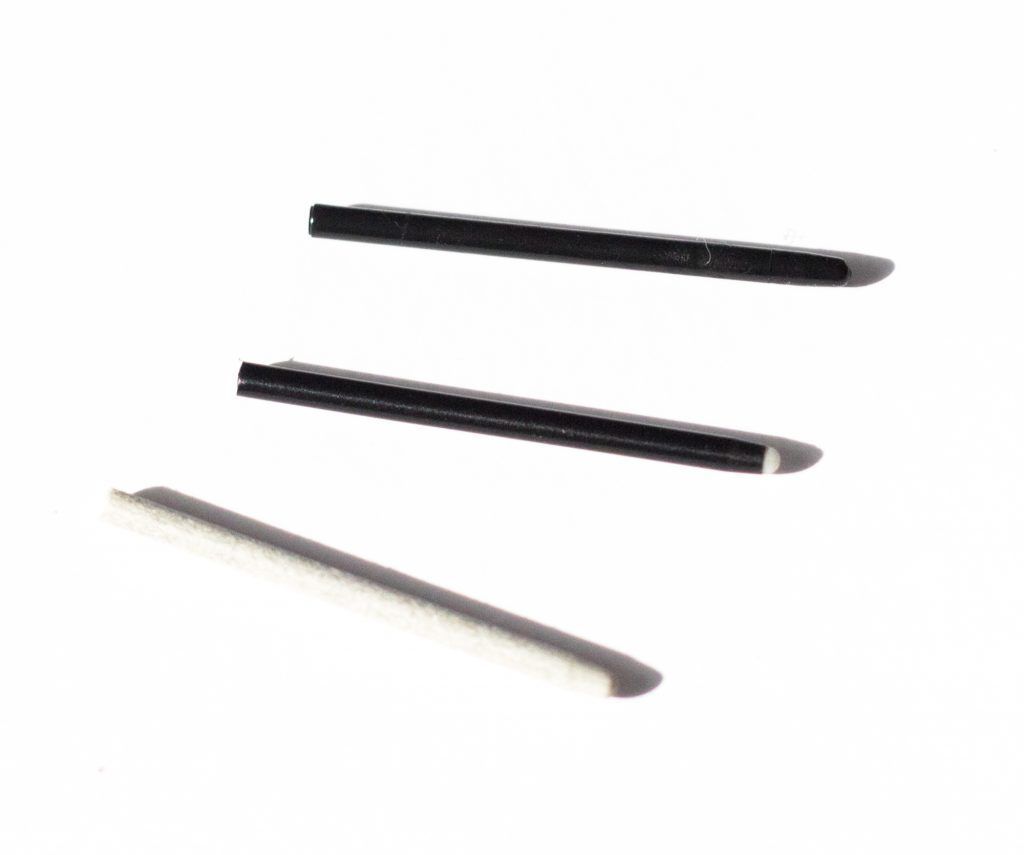
Different Nib Choices
Photograph by Stacey Hill
The Wacom Intuos pen comes in a stand, and hidden within it are a range of different nib types. They give you choices on the experience or the “feel” you want to have when working the pen across the tablet.
Key Lesson: There are lots of benefits to having a tablet, including setting up key functions aligned to a specific program. Depending on the settings, they can be extremely customizable and offer a more natural arm position for comfort.
Recommended Reading: If you’re interested in improving your post-processing workflow, check out Photzy’s Understanding Masking premium guide. It has a section for Lightroom and Photoshop, as well as Snapseed for mobile users too.
Which One Do I Get?
There are lots of choices. Wacom offers several different styles and sizes of tablet; an iPad with a Pencil can offer a lot too. Or if you want to go all in, something like the Wacom Cintiq/MobileStudio Pro or Microsoft Studio combines your computer/screen/ tablet drawing surface into one complete device.
I was lucky enough to borrow an old Bamboo tablet to test for a week, which was enough to help me decide that it would work for my purposes.
Other brands include Huion, XP-Pen, Artisul, Gaomon, Monoprice, Ugee, and Yiynova.
Firstly, you have to identify what a tablet can do and then clarify specifically what you want the tablet to do for you. Then put some thought into the way you work and how the tablet might enhance that process. Next, go shopping!
Firstly, you have to identify what a tablet can do and then clarify specifically what you want the tablet to do for you.
For me personally, I needed a way to be able to work at my computer doing a long editing stint without further aggravating my wrist injury. Plus, I wanted
to be more efficient with my work flow, faster with editing options, and have more control over masking, selecting, and brush painting. Finally I wanted editing to be more fun.

Photograph by Stacey Hill
I also work on two screens, and doing some research online showed me that getting a medium-sized tablet might suit better. The larger surface area gives more area to work your hand around smoothly, but it is not so big that you get tired using it. If I was a more painting/drawing-style artist, the largest size might have been desirable, but for my purposes the Intuos Medium size has been perfect.
It also comes with a wireless module, so you can choose to use it that way if you prefer, which gives you added flexibility with how and where you might choose to work. The Medium size is reasonably portable if you need to carry it around with a laptop, for example.
For someone starting out, not sure whether or not a tablet will work for them, try one of the smaller entry- level options. They have all the basic functionality and will allow you to get used to the idea without spending lots of money.
Key Lesson: Depending on your requirements and budget, there are a lot of options available, so check out reviews, ask other users, and research your best choice.
Is It Hard To Get Used To?
At first, yes – it’s really frustrating. You are so used to reaching for the mouse that it’s a hard habit to break. Many people recommend removing your mouse completely to break those habits.
My biggest challenge was that I had seen videos of people using the tablet features in really cool ways but couldn’t figure out how to set it up to do those things.
However, once I found out where you set up specific functions and how to write them so they align with a specific button click (or combination of pen/tablet buttons), then I started to get the functionality that I wanted from my tablet.
Using it feels very natural for me; I very quickly got used to using the pen or touch surface to navigate my computer in general. You can allocate functions to specific finger tap patterns, strokes or shapes, and also set those to function in certain ways in different programs as well.
Finding out all the different ways you can tweak the settings and make it easier for you personally to use can be a bit frustrating; there doesn’t seem to be one Holy Grail of all this information on the internet. Instead it’s a bit here and there.
But once you do get it all set up and you have the muscle memory built in so it’s your go-to device of choice, then it’s a seamless experience.
Key Lesson: Yes, making the transition from mouse to tablet is initially very difficult and you have to work hard at it; however, once it is properly set up to align with your workflow, it becomes much easier. Stick with it!
Accessories
I have two specific accessories that make my tablet experience better. The first one should be a necessity for any tablet user; the second one is more optional.
1. Art Glove

Photograph by Stacey Hill
The first accessory, and most important, is an art glove. This is a glove that fits over the palm and last two fingers of your hand (i.e. the areas that are in contact with the tablet surface).
Why do I wear the glove?
Firstly, it gives me a smooth, frictionless glide across the surface. Previously I would have issues with my skin catching and juddering across when doing a long sweeping stroke. Also, in summer, your hands can sweat, making it slippery and unpleasant to use.
The glove also helps keep the surface of the tablet clean.
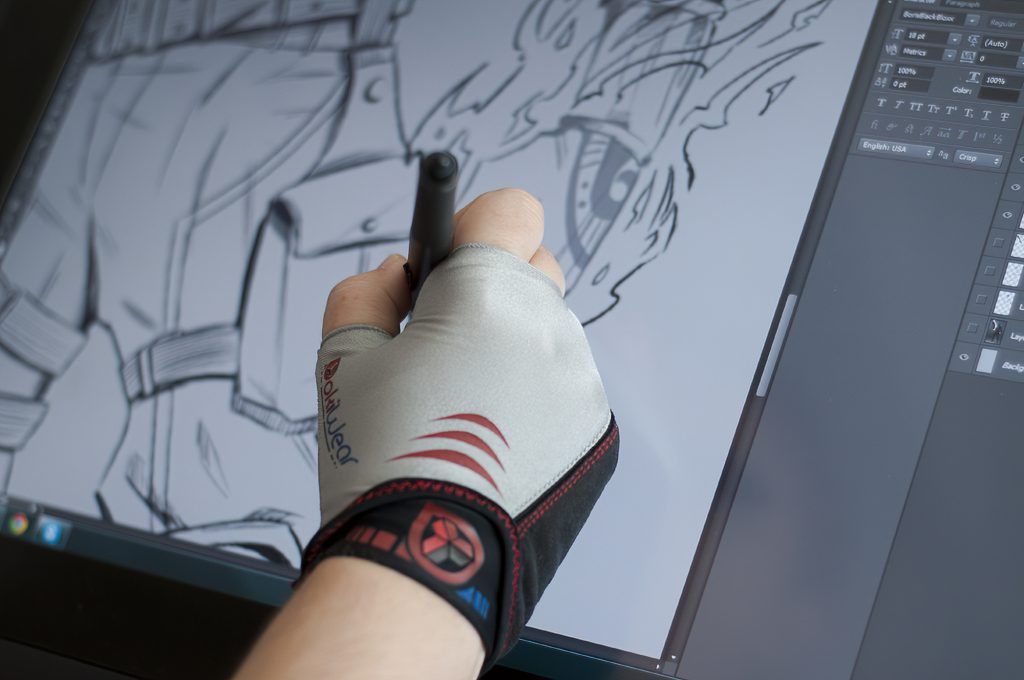
Photo Credit www.dokiwear.com
I got the DokiWear CG Art Glove as they make a range of sizes and colors and it was quite affordable. I wear it every time I use my tablet with the pen, as I use the pen as my mouse, which is pretty much every time I use that computer.
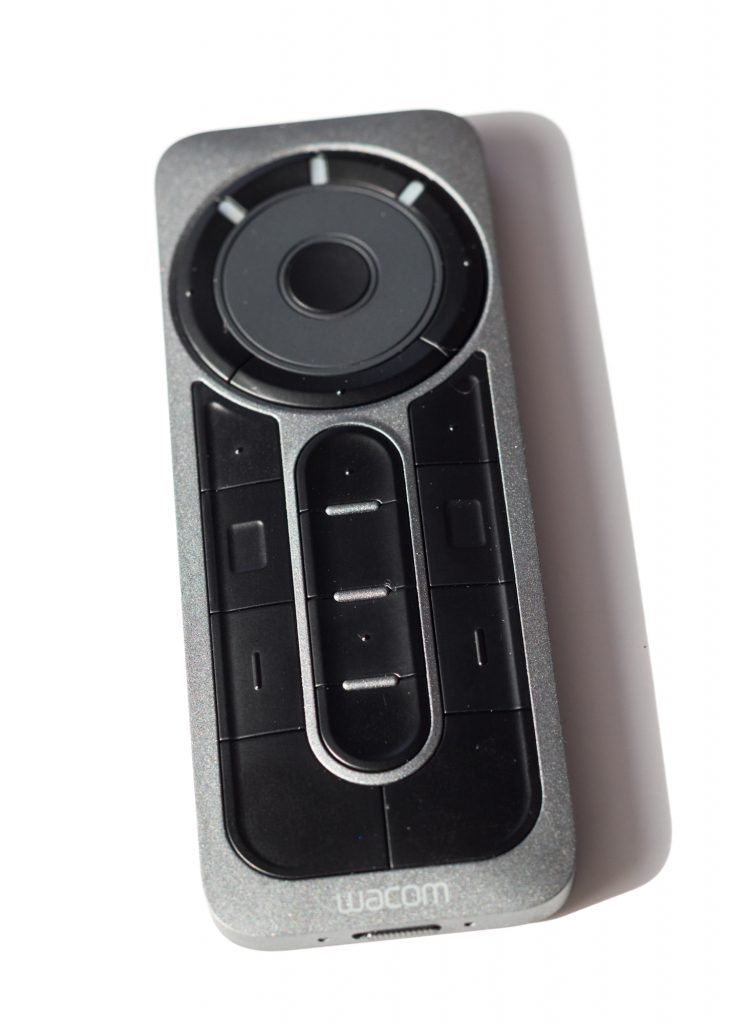
2. Express Key Remote
This is a specific Wacom accessory, and it is a wireless remote that provides 17 customizable buttons at your fingertips.
Photograph by Stacey Hill
I have the two big ones at the base set for my brush functions. If I hold them down while using the pen in brush mode and move my pen left to right, it changes the size of the brush as I move the pen.
If I hold the buttons down while moving the pen up or down, it changes the hardness or softness of the brush.
Photograph by Stacey Hill
I have one button set as Add New Layer. Another button is set to Ctl + Alt + Shift + E: Stamp Visible Layer with one click of a button (instead of having to use four fingers at once).
3. Wacom Accessories
Wacom have a range of other accessories you can use and different pen options (depending on the tablet), including an airbrush pen.

Photograph by Stacey Hill
Your pen likely comes with a range of nibs to experiment with, and you can get replacement ones as they wear down.
Other options like cables, pen grips, carry cases, and protective surface sheets are also available.
Key Lesson: An art glove should be considered a necessity for optimum operation.
Summary
If you have ever looked at a tablet and wondered why people use them, or if there was any benefit, then from my point of view there absolutely are major benefits.
Everyone has a different experience or requirement, but the transition over to the tablet has been completely beneficial to me.
While part of the reason I got one was to reduce strain and overuse on my right hand/ wrist, the other reasons were around workflow and efficiency. Fortunately my injury did get better, but it must be commented on that changing the way I was working to a tablet not only helped it heal, but it has also continued to reduce further stress and strain on my right hand, which, being right-handed, is important to me.
Photograph by Stacey Hill
Plus, the tablet and pen combination is much less tiring to use when sitting at the computer working for extended periods, which is a benefit to everyone. It’s faster and far more accurate to use the pen to work with.
Having two hands to be able to access pre-programmed key combinations with one button click is very efficient. Using both hands balances the load and is less tiring for your main working hand.
Getting a Wacom tablet helped me overcome an injury, but it also made my editing experiences with Lightroom and Photoshop much faster, more accurate, and allowed me to quickly access repeat functions. My workflow is smoother, and I can do better and more complicated work and produce higher quality outputs.
My workflow is smoother, and I can do better and more complicated work and produce higher quality outputs.
Finally, having a tablet makes it fun to work. When you are not experiencing pain from your hand cramping over a mouse when used for hours at a time, it’s easier to be enthusiastic about editing. When you can work faster and more accurately, it takes less time to edit each individual image. That means that when you do have a tablet that you want to really get creative on, you can, knowing it will flow smoothly and not get in the way of your creative process.
For me, a tablet was the right choice. Yes, it took a while to get properly set up and used to, but I am absolutely committed to it now. My mouse gets used for “click and drag” and that’s about it, mostly.
If you are wondering if a tablet is a worthwhile investment, or if it will help improve your workflow, personally I absolutely think it does, and highly recommend getting one – whatever size or brand that suits your requirements.

Photograph by Stacey Hill
Self-Check Quiz:
1) Can I use a tablet in Lightroom?
2) Can a tablet completely replace a mouse?
3) Do I need an art glove?
4) Can I use a tablet with different programs?
5) Can I use a tablet with multiple screens?


