

Hidden deep inside of Lightroom Classic is a tool that is so powerful it may completely change the way you post-process. The tool is easy to miss. It is tucked away under the local adjustment filters. Even if you use these filters often, you may not have noticed the Range Mask tool at the bottom of the panel. It does not look like much. It is a simple line that reads, “Range Mask: Off.” It may even be grayed out when you look at it. But do not be fooled by the understated presence of this tool. Turning on range masks could be the best thing you ever did.
Range masks give you control – a lot of control. You can direct post-processing changes like a conductor leads an orchestra. You can target changes to your image with a surprising amount of precision. The best part is that the tool is easy to use. With a click and a slide, you can make changes that could otherwise take you hours to do. It seems too good to be true.
A luminosity mask is a type of range mask. You may have heard the term. It is an advanced editing technique often done in Photoshop. But luminosity masks have been around for a few years in Lightroom Classic as part of the range mask tool. Many photographers swear by luminosity masks, but they are pretty complicated to achieve in Photoshop. Photographers often download actions or third-party plug-ins to help them use the technique. Lightroom Classic includes a surprisingly simple version of luminosity masking. It gives you a lot of control over where you want your edits applied. You can target levels of brightness or a range of colors.
Range masks give you control - a lot of control.
In this guide, we will explore the range mask tool in Lightroom Classic. Once you know the power of this tool, you will never go back to simple local adjustments.
What we will cover:
- Introduction to local adjustment filters
- Introduction to range masks
- Why use range masks
- How to use range masks in Lightroom Classic
- Range masks for global changes
Range masks let you change highlights and shadows independently. The Radial Filter in this photo is limited to the brightest exposure values. Shadows and blacks will not change with the Radial Filter. Photograph by Jenn Mishra
One note before we get started: The range mask tool is only available in Lightroom Classic. It is absent from Lightroom CC and Lightroom mobile. This may be a choice by Adobe or a feature they plan to include in future versions.
Introduction to Local Adjustment Filters in Lightroom
Range masks work with local adjustment filters in Lightroom Classic. We will start with a short overview of the filter tools. If you work with these tools often, feel free to skip to the next section.
Local adjustments in Lightroom Classic include the Radial Filter, the Graduated Filter, and the Adjustment Brush tool. These tools are above the Basic panel in the Develop module. The Graduated Filter is a shaded rectangle. The Radial Filter is a circle. The Adjustment Brush is represented by a slider. These are called “local adjustments” because they apply edits to only one area of your image rather than the entire photo.
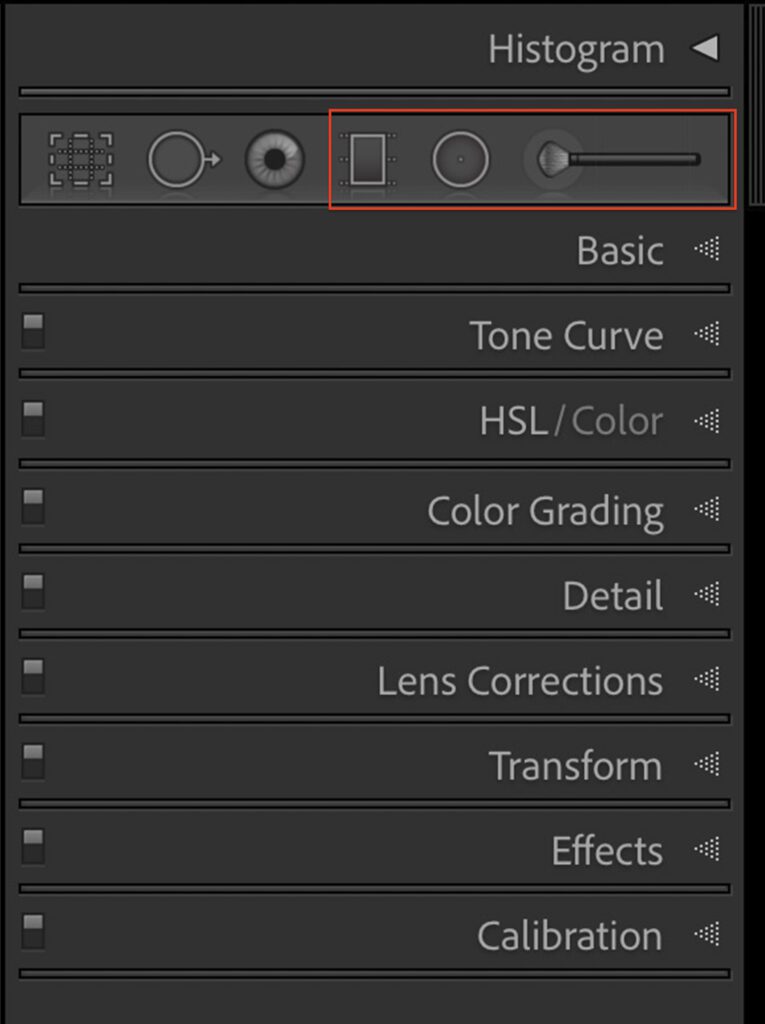
Screenshot of Develop module in Lightroom Classic showing local adjustment filters. From left to right: Graduated Filter, Radial Filter, and Adjustment Brush tool. Photograph by Jenn Mishra
The different filters let you select the size and shape of the area of your photo that you want to edit. The Graduated Filter draws a line across your image. Your edits start strong and fade out. With a Radial Filter, draw a circle or an oval around an area of your photo that you want to change. The Adjustment Brush tool lets you paint edits onto your image.
When you select a tool, more controls appear. For instance, with the Adjustment Brush, you can change the size of your brush and its thickness. Both Flow and Density control how thickly the brush is applied on each stroke. You can choose to brush in the effects all at once by setting Flow and Density at 100, or you can be more subtle and brush on the effect a little at a time by lowering the sliders.

Screenshot showing Adjustment Brush tool sliders. Screenshot by Jenn Mishra
The Adjustment Brush and the Radial Filter also have a Feather slider. Feathering changes how the filter fades out at the edges. At 100, there is a hard edge between the filter and the rest of the image. At the other extreme, fading is gradual. This softens the transition between the changed and the unchanged parts of your photo. For the Graduated Filter, control fading by changing the relationship between the center and bottom line. Pull the bottom line away from the center to blend more gradually.
Screenshot showing adjustment sliders for the filter tools. Screenshot by Jenn Mishra
Each filter includes the same set of adjustment sliders. They are similar to the global changes you can make in the Basic panel. But they also include sharpness, noise, and color adjustments. Basic adjustments affect the entire image. Local adjustments affect only the area under the filter. Set the sliders any way you want and draw a filter onto the part of your photo that you want to change.
Screenshot of a photo edited in Lightroom Classic showing a Radial Filter’s red mask. Photograph by Jenn Mishra
Let me give you an example. In this image, I drew a Radial Filter around a Great Blue Heron to lighten the shadows and increase the clarity. This helps visually separate the bird from the shaded background. The red shading around the bird is the filter’s mask. This shows you where the edits are applied. The mask becomes lighter as the effect fades out. Toggle the “O” key on your keyboard to see the mask or hide it.
I can make as many filters as I want on an image. In this example, you can see other grey dots. These are called pins. Each represents a different Radial Filter.
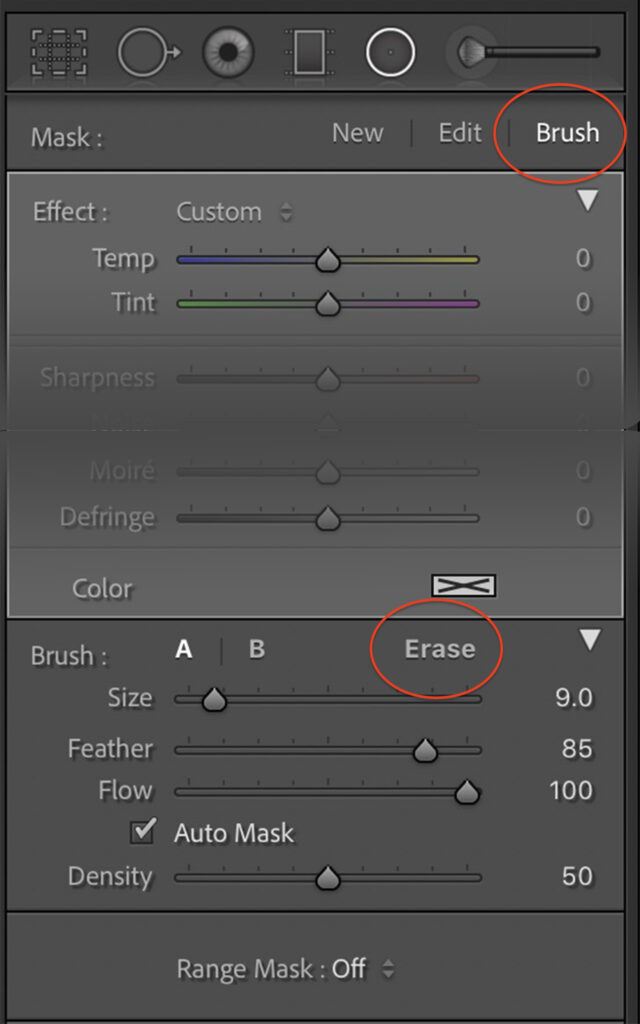
Screenshot showing brush tool within Radial Filter that lets you erase mask. Screenshot by Jenn Mishra
If you make a mistake, you can erase the effect. Select the pin and click Delete to remove the filter. You can also remove some of the filters by using the Erase brush. Within the Radial Filter, click the Brush tool at the top and Erase in the panel that appears. Brush over the area you want to erase. If you have the mask turned on, you will see it begin to disappear.
Local adjustments are very flexible. You can dodge (lighten) and burn (darken) specific areas of your image. This helps guide your viewer’s eye to the most important parts of the photo. Draw a Radial Filter. Add contrast, clarity, and warmth to draw the eye. With a soft edge and subtle changes, the filter seamlessly blends into the image. Explore the power of local adjustments in my Photzy guide Dodging and Burning: Simple Tools, Powerful Results.
But Lightroom Classic gives you even more control over your local adjustments with the range mask tool. Let’s explore this tool waiting patiently at the bottom of each local adjustment panel.
Key Lesson: Local adjustment filters let you target areas of your photo for a change.
What Is a Range Mask?
When you choose a local adjustment filter, a panel of sliders appears. At the bottom is the range mask tool. Let’s start by exploring what this tool does, and then I will show you how to use it.

Screenshot showing range mask tool. Screenshot by Jenn Mishra
A local adjustment selects an area of your photo to apply edits. A range mask targets specific values of luminosity, color, or depth within that area. The edits you make target a range of brightness values or colors. Lightroom applies your edits only to this set of values.

Screenshot showing range of exposure values on a histogram. Screenshot by Jenn Mishra
Take a look at your histogram. Notice that the brightness values lay on a scale. The blacks are on the left; the whites are on the right. Shadows and highlights are more towards the center. With a luminosity range mask, you can choose what tones along the continuum you want to change. Maybe you want to change the blacks and the shadows. Or you want to change the shadows and the mid-tones. It is your choice.
If you use Photoshop, you probably know what masks are. They hide or reveal a layer. Add a mask to a layer, and you can paint white to reveal or black to hide parts of it. The layer may be an image or a post-processing adjustment like exposure. Lightroom does not use layers, but it does have masks. They work on the same principle. You can selectively hide or reveal edits made with local adjustment filters.
Lightroom does not use layers, but it does have masks. They work on the same principle. You can selectively hide or reveal edits made with local adjustment filters.
Anytime you use a local adjustment tool, you can see the mask by pressing the “O” key. The areas covered by the mask are red. You can change the color of the mask by going to the Tools drop-down menu. Select Tools > Adjustment Mask Overlay and choose a different color. Or click “Shift-O” to cycle through the colors.

Screenshot showing luminance mask over Radial Filter. Photograph by Jenn Mishra
In this image, I added a Radial Filter that affected only the darkest tones. You can see the mask (green) is strongest where it is darkest. The mask skips over the rays of the sun coming off the mountain but covers the shadows in between.
Key Lesson: A mask is an overlay that shows you the areas selected for a post-processing change. A Range Mask targets a range of brightness or colors for a change.
Recommended Reading: If you’re interested in improving your post-processing workflow, check out Photzy’s Understanding Masking premium guide. It has sections on Lightroom and Photoshop, as well as Snapseed for mobile users, too.
Why Use Range Masks
Local adjustment filters have a predictable pattern of intensity. The edits are strongest in the middle, and the effect fades towards the edges. How much the effect fades depends on how much the edges are feathered.
But what happens when there is an element inside the filter that you do not want to change. This happens when you are trying to darken a bright sky, but a mountain or tree breaks the horizon. You do not want to darken the tree or mountain as much as the sky. One option is erasing part of the filter. But this can be time-consuming and not very precise. A range mask lets you select the bright sky without selecting the darker tree or mountain.

Original photo (left), Radial Filter mask (middle), and Radial Filter with Luminance range mask (right). Photograph by Jenn Mishra
Let me show you an example. In this image, I wanted to lighten the tree where it gets dark in the reflection. But branches are difficult to mask. I can lighten the area around the tree with a Radial Filter, but the sky also lightens. I can be more precise with the Adjustment Brush, but it is difficult to get to the smaller branches. I often brush on too much, and a halo appears around the branches.
This is where range masks come in handy. If I turn on the range mask tool and target only the dark tones that make up the tree, I get a precise mask. Now, I can adjust the exposure of the tree without affecting the sky around it.
Key Lesson: Local adjustment filters let you selectively change certain areas of your image. A range mask lets you target tonal values within your filter.
How to Use Range Masks in Lightroom Classic
By default, the range mask tool in Lightroom Classic is turned off. The tool may be greyed out, making it harder to notice. Select a filter that you have already made or draw a new one. The range mask tool activates. Let’s explore what happens when we turn on the range mask tool.
First, choose the type of range mask you want. In the 2021 version of Lightroom Classic, you have three options: Color, Luminance, or Depth.

Lightroom Classic screenshot showing range mask options. Screenshot by Jenn Mishra
Luminance Range Mask
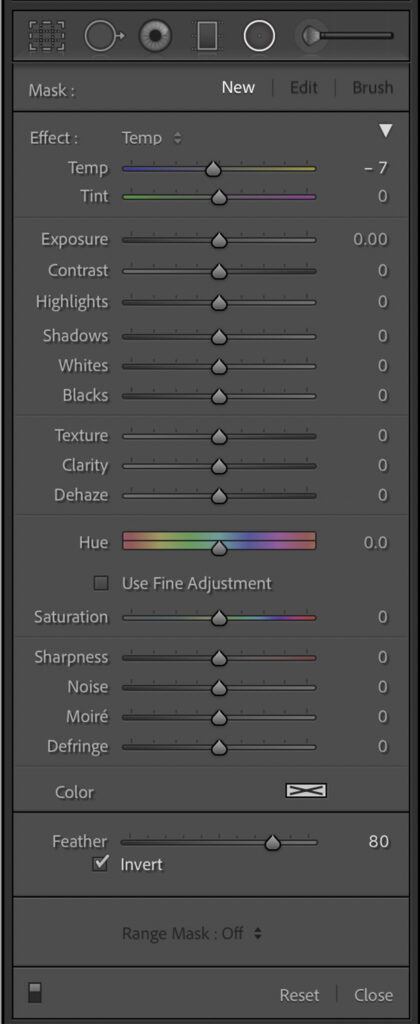
Select the Luminance option under Range Mask. More tools appear.

Screenshot showing luminance range mask options. Screenshot by Jenn Mishra
Using the Range slider, select the brightness levels that you want to change by moving the anchors on each end. Moving the right-hand anchor to the left selects darker tones. Moving the left-hand anchor to the right masks lighter tone values. Move both anchors towards the center to target mid-level tones. For the tree example above, I moved the right-hand anchor all the way to the left. My range was 0/5. I only wanted to affect the darkest tones.
You can see the mask change in real-time as you slide the anchors. Clicking the box next to “Show Luminance Mask” gives you a black and white mask. This may be easier to see than the colored mask overlay. Another option is to hold the Option key as you move an anchor. This shows you a mask that is more like Photoshop. The white parts will be changed by the filter. The black parts will not be changed. Black hides. White reveals.
You can see the mask change in real-time as you slide the anchors.
The Smoothness slider fine-tunes the mask. Smoothness controls the transition between the masked and unmasked areas. It is like using the feathering slider in the Radial Filter and Adjustment Brush. Lowering the smoothness makes the edges harder and more abrupt. Raising the smoothness softens the edges and creates a gradual blend. To mask the tree branches in the photo, I lowered Smoothness to 0. I only wanted to affect the tree. But it usually looks good to have at least some blend. The default setting is 50. This creates some blending between the masked and unmasked areas.
The eyedropper tool lets you select a range of tones by clicking on an area of brightness. This tool is helpful when creating a color range mask.
Color Range Mask
A color range mask targets a color or colors for edits. Select the eyedropper tool and click on a color in your image. Hold the shift key to select more than one color. This is like using the eyedropper tool in the HSL panel. Both target colors.

Screenshot showing color range mask options. Screenshot by Jenn Mishra
But there is an advantage to using the color range mask tool instead of the HSL panel. In the HSL panel, you are limited to changing the hue, saturation, and luminosity of the color. A color range mask lets you change more elements like contrast, clarity, and sharpness.

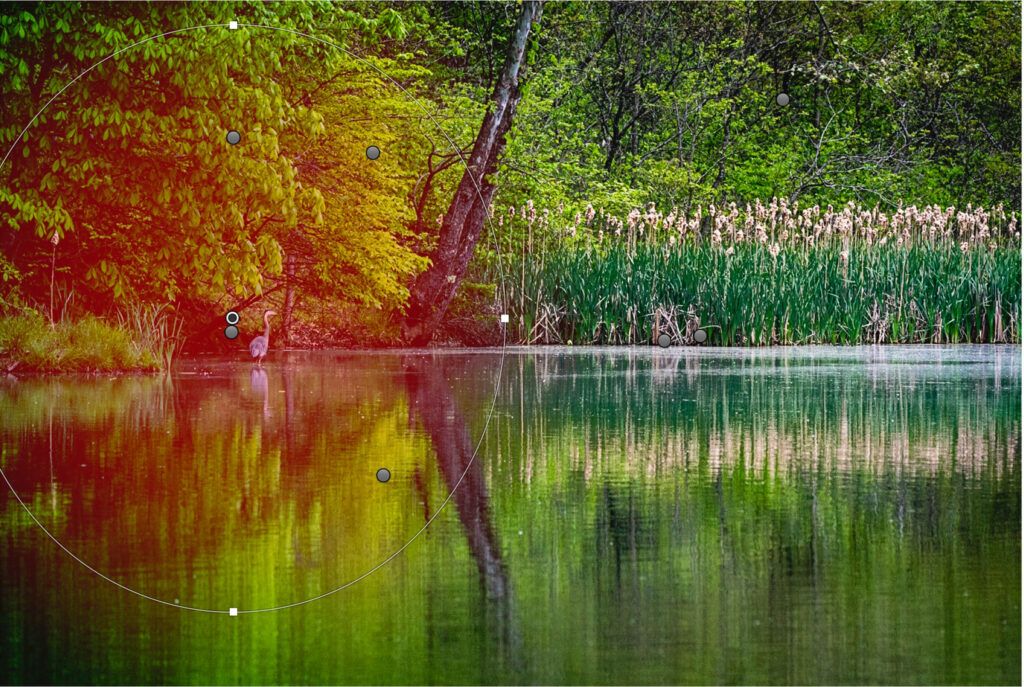
Screenshot showing color mask over Radial Filter. Photograph by Jenn Mishra
You can also change the white balance of a single color. For instance, in this image, I can add a little bit of sunny warmth to the greens in the trees but leave the water blue. Using the eyedropper, click once, and the trees are masked ready for my sun effect Radial Filter.
In the color range mask, the Amount slider fine-tunes the selection. Like the Smoothness slider, it changes the transitions between the masked and unmasked parts of your photo.
Depth Range Mask
The Depth range mask separates the image based on the depth of field or distance from the camera. This option is often grayed out. It only works if depth information is collected by your camera. If you are using an iPhone, you have this option with photos taken in Portrait Mode. The Lightroom mobile app camera also has a Depth setting that collections this information.
Move the slider to the left to mask parts of the image closest to the camera. Move the slider to the right to mask elements further away.

The original photo was taken in iPhone Portrait Mode (left), Depth Range Mask for distant elements (middle), and Depth Range Mask for near elements (right). Photographs by Jenn Mishra
Duplicating Range Masks
Once you create a range mask, you can duplicate it and move it around your image. This saves a lot of time if you are making the same or similar changes in different parts of your image.
To duplicate a filter, highlight the pin, right-click and select Duplicate. This copies the filter with all settings, including the range mask. The two filters sit on top of each other. Grab one and drag it to another part of your photo.

Screenshot showing how to duplicate a Radial Filter. Photographs by Jenn Mishra
Range Masks for Global Changes
Photoshop luminosity masks often are used to affect brightness levels across the image. All the highlights are affected. You can make global luminosity changes in Lightroom Classic, too. Simply draw a large Radial Filter over your entire image. It is ok to draw a circle that is larger than the frame. Rather than using the global edits in the Basic panel, use the Radial Filter panel to make your edits. This limits you a bit, but most of the popular tools are there.
Photoshop luminosity masks often are used to affect brightness levels across the image. All the highlights are affected.
To selectively change shadows, mid-tones, and highlights for your entire image, draw three Radial Filters:
- one for highlights with the luminosity range slider set 70/100
- one for shadows with the range slider set 0/30; and
- one for the mid-tones with the range slider set 35/65.
Using the sliders in the Radial Filter panel, adjust each separately.

Screenshot showing Radial Filter larger than the image. Photographs by Jenn Mishra
Key Lesson: You can use local filters to make global changes by drawing your filter larger than your image.
Recommended Reading: If you’re interested in improving your post-processing workflow, check out Photzy’s Understanding Masking premium guide. It has sections on Lightroom and Photoshop, as well as Snapseed for mobile users, too.
Conclusion

Photograph by Jenn Mishra
Photoshop is still the leader when it comes to luminosity masks. But range masks in Lightroom Classic are incredibly powerful ways to target your post-processing edits. The tool hides at the bottom of the local adjustment panels, making it easy to overlook. With range masks, you can restrict your filters by brightness values, colors, or depth of field. The edits you make the change only tones within a specified range.
If you are just beginning with luminosity masks or find Photoshop a bit too complicated, try the Lightroom option. You have a lot of control over your edits, and it is much simpler than Photoshop.
Self-Check Quiz:
- Where are range masks located in Lightroom Classic?
- Where are range masks located in Lightroom CC?
- What type of range masks are included in Lightroom?
- Name the three types of adjustment filters in Lightroom.
- What does a range mask do?
- What do you do if the Range Mask option is greyed out?
- Name three sliders that are included in the adjustment filter panels that are not included in the Basic panel.
- How do you change the color of a mask in Lightroom?
- What do you do to target only the darkest tones in your image using a range mask?
- How do you use range masks to make global changes in your image?
Assignment:
Choose a couple of practice images. If you do not have your own images to work with, download free images from Pixabay. https://pixabay.com/ Add a Radial or Graduated Filter and make a few changes. The changes are up to you. Try darkening or lightening the area. Try adding contrast and sharpness. Or change the white balance.
With your filter selected, turn on the luminance range mask. Turn on the color overlay (“O” key) or click the button next to “Show Luminance Mask.” Notice the changes when you move the right anchor to the left. Then move the left anchor to the right.
Try the same thing with the color range mask. Create a filter and use the eyedropper to select a color. Hold the shift key and select a second color.


