


Cities are transformed by the cover of night; these labyrinthine centers of concrete, steel and glass seem to magically morph into beacons of colorful light once the sun sets. A photographer doesn’t need to live near mountains or canyons or prairies in order to have access to grand, imposing, natural subjects. Cities, with their bridges, skyscrapers and highways, provide their own brand of topographical texture.
While there are certainly no rules about what time of day you can photograph various city scenes, you might want to be mindful of the role that natural lighting can play in the making of your images. If you are looking to maximize the impact of color and contrast in your cityscapes, you will surely want to consider the following advice.
Plan Ahead
Planning is particularly important if you’re unfamiliar with a city. Take a look at a travel guide or city map and pinpoint a few locations that you think would make a compelling photo — locations that feature lots of lights and interesting structures. If you’re not keen on the idea of unfolding and re-folding an annoying paper map or flipping through the pages of a book, there are plenty of informative travel apps available for your mobile device.
Since you will likely be doing a lot of walking, it’s a good idea to keep your kit as light as possible. At a bare minimum, you will need your camera, a wide angle lens (preferably something wider than 35mm), and a tripod. A neutral density filter and a remote shutter release might also come in handy.

Photo by Gesa Henselmans
Timing and Location
For truly exceptional cityscapes, shooting at twilight is the best decision you can make. Twilight, very roughly speaking, is when the sun has fallen below the horizon, yet there remains enough natural light to easily see everything around you. The light at this point of the daily cycle is also beautifully diffused, but it won’t be long before twilight transitions to a more intense darkness, so you will want to give yourself sufficient time to arrive at your chosen location and set up your camera.
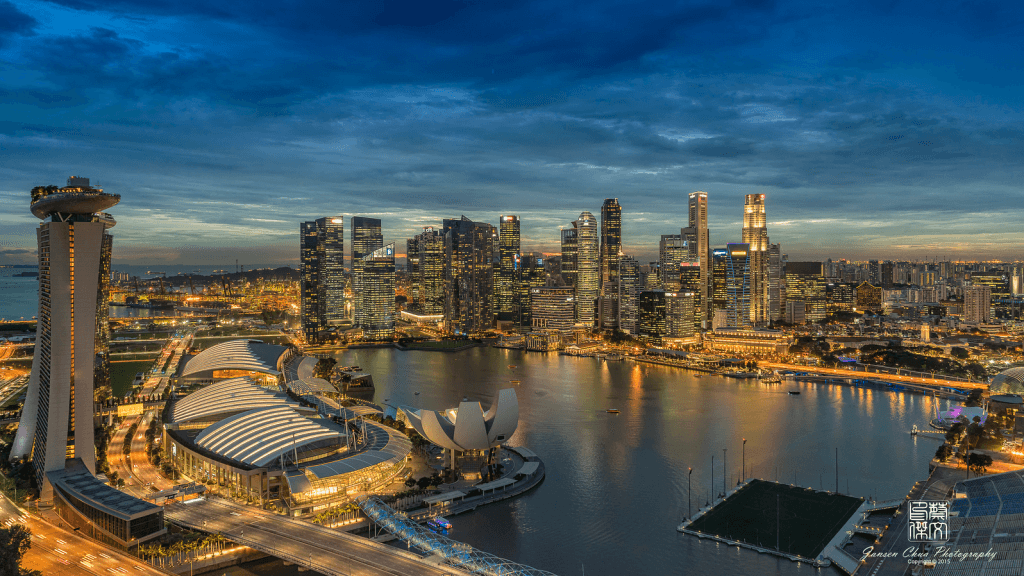
Photo by Jansen Chua
As far as location is concerned, you will probably have a wealth of options at your disposal no matter what city you’re in. It may come across as overly simplistic to suggest that you “choose an interesting location,” but this truly is what it comes down to. Highly reflective buildings, buildings with lots of lights, light or brightly colored structures, storefronts, bridges, major landmarks, waterfronts — it’s all up to you and whatever tickles your fancy.

Photo by Prachanart Viriyaraks
For truly exceptional cityscapes, shooting at twilight is the best decision you can make.
Setup and Settings
A tripod is essential in this scenario, as you will be shooting long exposures. It is possible you might find yourself needing an exposure time of greater than 10 seconds, something that simply can’t be successfully attained by hand holding the camera, even with the aid of image stabilizing technology. For ultimate stability and sharpness, a sturdy tripod is a must. A tripod will also allow you to keep your shot perfectly level, which is particularly important in cityscape/ landscape shots. No matter where you choose to set up your camera and tripod, try to stay out of the way of passersby; this is to protect others as well as yourself and your camera.

Photo by Sean Davis
Newer photographers will often ask, “What should I set my camera to?” for any number of shooting situations. Specific exposure settings are virtually never universally applicable; you will need to adapt to the environment in which you’re working. There are some basic principles you can use as a starting point, however.
- Shooting mode: While experienced photographers might prefer manual mode, cityscapes can be photographed just as well in aperture priority mode.
- Metering mode: Matrix/evaluative metering. Avoid using spot metering.
- Aperture: Cityscapes are no different than landscapes in the sense that you generally want everything in focus; an aperture of at least f/8 will typically provide adequate depth of field, but if the foreground is taking up a considerable portion of the frame, it would be a good idea to go with an aperture of f/16.
- ISO: Keep ISO at 100. This will ensure you get the cleanest possible images.
- Shutter speed: Shooting in aperture priority, shutter speed won’t be your primary concern as the camera will set the shutter speed based on its meter reading.
- Focusing: With the amount of light remaining in the sky, you shouldn’t have much trouble with autofocus. If you do encounter difficulty, simply switch to manual focus or use live view. Live view is an excellent way to get precise focusing, just keep in mind it focuses rather slowly.
If, after taking a test shot, you aren’t satisfied with what these settings are giving you, adjustments can easily be made. If you need to change anything it will probably be the shutter speed. Assuming you were shooting in aperture priority, simply switch to manual mode and dial in the same aperture and ISO settings above and then adapt your shutter speed as needed.
Composition
Composition is about arranging the elements you are photographing in such a way to maximize the visual interest of the overall image.
When shooting cityscapes, you will find that you probably want to go beyond the very functional but basic rule of thirds. In this sort of environment, you will have plenty of geometrical shapes to play with, so consider using leading lines to draw the viewer’s eye toward a specific point of interest.

Photo by Prachanart Viriyaraks
Using a Neutral Density Filter
This isn’t a necessary step in shooting cityscapes, but the use of a ND filter can help you get that silky, blurred effect when capturing moving clouds and water. On the other hand, if you want to make moving cars and people disappear from your shots, this can be accomplished with longer exposures, and ND filters help facilitate long exposures. Once the ND filter is attached to your lens, your exposure time will be affected — namely, it is going to increase. Focus and compose your shot before attaching the filter, then set/adjust your exposure afterward.

Photo by Davide D’Amico
Composition is about arranging the elements you are photographing in such a way to maximize the visual interest of the overall image.
Making the Photo
Location, camera settings, composition, and focus are all in order. Now it’s time to capture the scene before you and commit its splendor to a digital image. All you’ve got to do is fire the shutter. But before you do that, remember that long exposures increase the possibility of noticeable camera shake, which leads to blurry images. You didn’t go through all this just to walk away with less than satisfactory shots, did you? Of course not, so you will want to take every reasonable precaution to avoid camera shake.
Again, using a tripod is your first and best preventative measure. Enabling the mirror lock up function is yet another option. DSLRs are mechanically not much different than traditional SLR cameras — they contain a mirror which generates a noticeable slap and vibration. You can set your camera to flip the mirror up before the shutter opens, thus greatly reducing vibrations.
A remote shutter release is an inexpensive, easy to pack accessory that can help reduce camera vibration by keeping you from having to physically touch the camera’s shutter button. Remote shutter releases can be found in both wired and wireless varieties. If you don’t have a remote shutter release you can use your camera’s timer function as a substitute.

Photo by colink
One final note about stabilization: if you’re using a lens or camera with image stabilization (Nikon VR, Canon IS, etc.) be sure to deactivate it while your camera is on the tripod; image stabilization technology continues to evolve and differs a bit across manufacturers, but in most cases using image stabilization in combination with a tripod can actually result in blurry images.
Conclusion
Cities represent jungles of a different sort; they are just as compelling as traditional landscapes as photographic subjects. While the specific elements may be different and you have to account for the presence of people moving to and fro, the best cityscapes deserve a place right alongside the best landscapes. Indeed, a well-crafted cityscape is one of the most stirring types of images a photographer can create.


