


Let’s face it, folks. Landscape photography is the most popular genre of photo imaging on the entire planet.
It’s challenging to stand out in such a crowded space, especially if you’re like me, where you only get to travel to an exotic location once every couple of years if that.
The cover photos for this guide were all taken by me. One was created in an exotic location, and the other two were taken a few hours away from my home. All three have garnered a lot of attention over the years.
I recently spent some time thinking about how to make my landscape photography better and more attention-grabbing, and something dawned on me.
Before I reveal that thought to you, check this out.
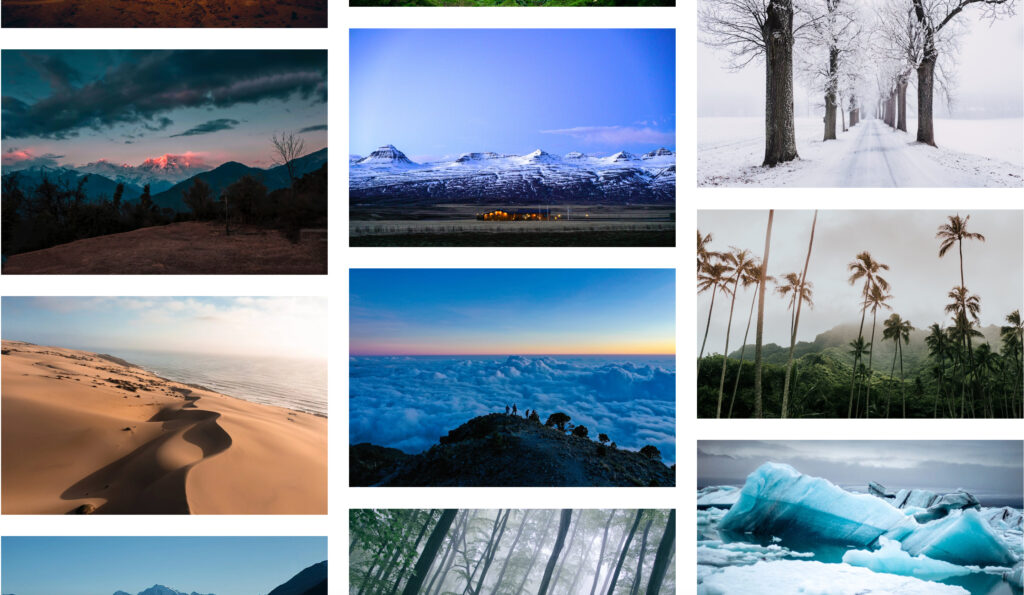
Photographs by various photographers
Do you see a common trait among the photos in the image above? They are all in horizontal landscape orientation. Go to any photo website such as Unsplash, Pexels, Flickr, or simply Google ‘landscape photos.’
Ninety-five percent of the images that will pop up will be in horizontal landscape orientation.
It kind of makes sense, right? When we think of a landscape, we think of a wide vista.
However, if we can compose and professionally execute vertical landscape shots, they will stand out among the crowd even if we take them in our own backyard!
In this guide, you will learn the following:
- Composition planning for vertical landscape photos
- How to identify an excellent potential scene for a vertical composition versus a bad choice
- How left-to-right or right-to-left natural flow can affect your orientation choice
However, if we can compose and professionally execute vertical landscape shots, they will stand out among the crowd even if we take them in our own backyard!
- Why vertical orientation works well for tight spaces
- How a concentration of light can change a scene from a horizontal flow to a vertical flow
- The critical importance of having a point of interest (a subject area) within the vertical landscape image
- Foreground elements vastly improve the vertical landscape idea
- Layering is the frosting on the cake for a vertical landscape composition
- The crucial importance of a composition path
Composition Planning
There are two primary considerations when planning a landscape composition and deciding whether to use a traditional horizontal orientation versus a vertical one.
- Natural image flow
- Balance of space within the frame

Photograph by Kent DuFault
Key Lesson: When viewing a scene, natural flow is the immediate direction of your eye movement. To determine the balance of space, segment the scene into puzzle pieces and question if they work together or if one unimportant part dominates the others. When the space is balanced, the subject area should overpower all other regions of the frame.

This image depicts how a vertical composition would have destroyed the balance and natural flow. The upper 2/3rds of the frame become wasted negative space that dominates and detracts from the subject area in the lower third. Photograph and Cropping by Kent DuFault
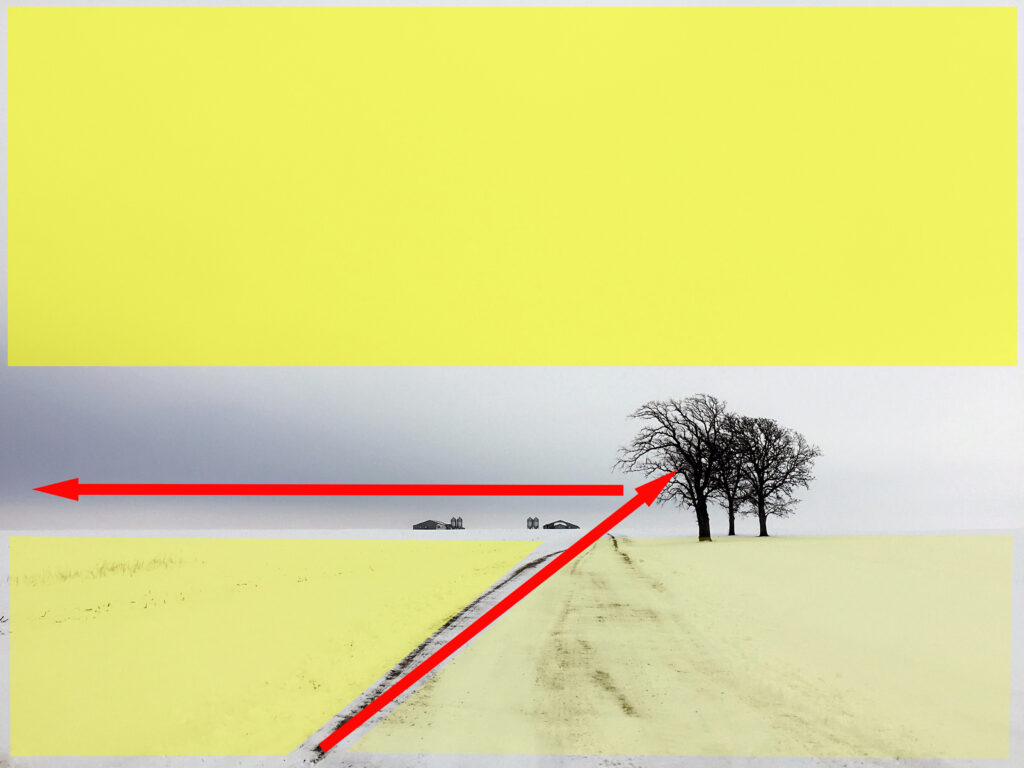
This image depicts the balance of space and the dominant horizontal natural flow. Notice the layering: foreground, middle ground, and background. Photograph and Graphics by Kent DuFault
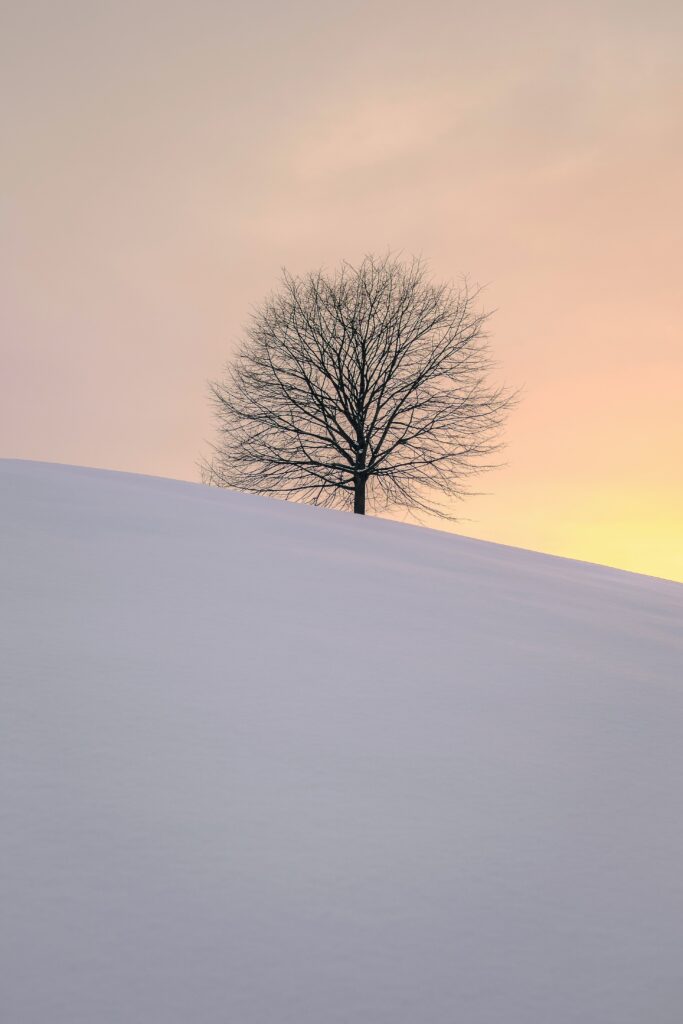
This image is similar in subject matter to the previous example. However, this composition works exquisitely in a vertical orientation. Photograph by Fabrice Villard
Why? The grey-to-orange color contrast creates an upward motion of the eyes (natural flow). Plus, the frame is more evenly divided in the use of space, making good balance in a vertical composition.
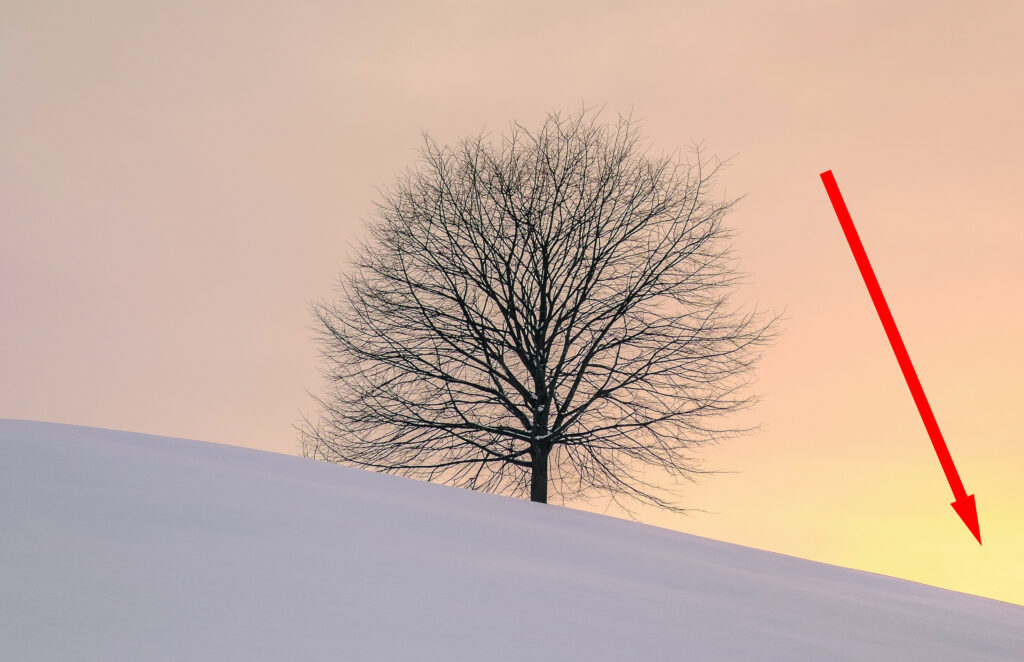
A horizontal orientation disrupts the balance and flow, creating an eye snag (a distracting element) away from the subject area (the tree) in the lower-right corner. Photograph by Fabrice Villard and Cropping by Kent DuFault
Pop Quiz: Which of the two photographs (below) makes the correct use of a vertical orientation?

Photograph (L) by Jorge Vasconez and Photograph (R) by Yohan Marion
Key Lesson: Using a Rule of Thirds grid can help you to determine your best orientation…

Photograph (L) by Jorge Vasconez and Photograph (R) by Yohan Marion, and Graphics by Kent DuFault
Key Lesson (cont’d): On the left image (above), the subject area falls onto the correct spot for the Rule of Thirds. On the right, it does not. Some cameras allow you to turn on an overlay inside the viewfinder that depicts the Rule of Thirds grid. I suggest you do that until you can correctly make that determination in your mind from experience.
Does an Upward Left-To-Right or Right-To-Left Orientation Guarantee That a Vertical Shot Is Best?

Left Photograph and Right Photograph by Mehmet Ali Turan
Both photos in the image on the left and right were taken by the same photographer. Both are composed in a vertical orientation.
Do you think that both work well when considering balance and image flow?
I think one is significantly better than the other, and here’s why.

Photographs by Mehmet Ali Turan and Graphics by Kent DuFault
The shot on the left doesn’t work very well because it creates a natural flow that ends at the two edges of the frame with no subject area in between.
The shot on the right makes a similar upward flow but creates a better use of space because the flow is stopped at a subject area before reaching the edges of the frame.
Could the image on the left have been improved? Yes, if a focal point (such as a person standing there) had been placed somewhere around the blue circle, then this would have created a change in the natural flow by adding a stopping point for the eyes.
Key Lesson: When your vertical landscape composition begins near one edge of the frame, do not extend it to another edge of the frame without some type of disruption. Include an object or person that can serve as a focal point or a subject (stopping) area.
Vertical Orientation Works Well for Tight Spaces
Occasionally, you may find yourself in a landscape situation that could only be described as confined. These moments tend to buck the ‘wide vista’ concept of landscape photography.

This image is a perfect example of a vertical composition making total sense due to the confined space. Photograph by Madhu Shesharam
I know you may look at the image above and think, of course, that’s a vertical composition; what else could it be?!
But I have to say, I have witnessed many photographers taking landscape photos in an obvious vertical flow (due to confined space) while holding their cameras in a horizontal format. I’m not here to judge, but I would like to impress upon you to consider the vertical alternatives when you’re out shooting.

Here is a horizontal version taken in the same location as the previous image. I won’t say this is bad, but it certainly isn’t as visually entertaining or exciting as the vertical option that plays well in tight spaces. Photograph by Matthew Kosloski
Key Lesson: Explore the vertical option when in a tight landscape position.
A Concentration of Light Can Change a Scene From a Horizontal Flow to a Vertical Flow

Key Lesson: A concentration of light or contrasting color will always attract a viewer’s eyes first.
Imagine that you are standing on a mountain viewing the scene depicted in the image above. The sunset highlights the two peaks in front of you, and the rest of the vista lies in shadow. The scenery is beautiful and dramatic, but all the concentrated light is on those two peaks.
It might be tempting to create a horizontal landscape photo because of the vista. However, here is what happens when you do that.
Key Lesson: To capture a horizontal vista (in most cases), you would use a wider focal length lens. One characteristic of wide focal length lenses is that they push the subject area away from you. If you turn the camera vertically, you can use a longer focal length lens, which has the opposite effect; it pulls the subject area closest to you. So, when you have areas of concentrated light on your scene, explore going vertical to pull that area of light closer to the viewer.
The Importance of Having a Point of Interest (A Subject Area) Within the Vertical Landscape

Left Photograph and Right Photograph by Marino Linic
Most landscapes need a point of interest somewhere in the composition’s upper foreground or middle ground. This is especially true for vertical landscapes as they don’t have the advantage of the ‘vista view.’

Photographs by Marino Linic and Graphics by Kent DuFault
The left photo has no point of interest in the foreground or middle ground. This results in the eyes immediately elevating upward toward the horizon line, where there is at least some tonal and color contrast. It’s a very bland photo.
Key Lesson: A point of interest in the foreground or middle ground doesn’t have to be overly dramatic to be successful. It should, however, have some unique quality that catches the eye.
The example photo on the right uses contrast, texture, and shape to create foreground and middle-ground interest. A viewer will ponder this photo more intensely than the example on the left.
Foreground Elements Improve the Vertical Landscape Idea
For these last two points of discussion, I will home in on the importance of establishing a sense of depth in a vertical landscape. While this is also important in horizontal landscape photography, it becomes critical in a vertical format due to perspective compression and the lack of a wide vista to establish distance.
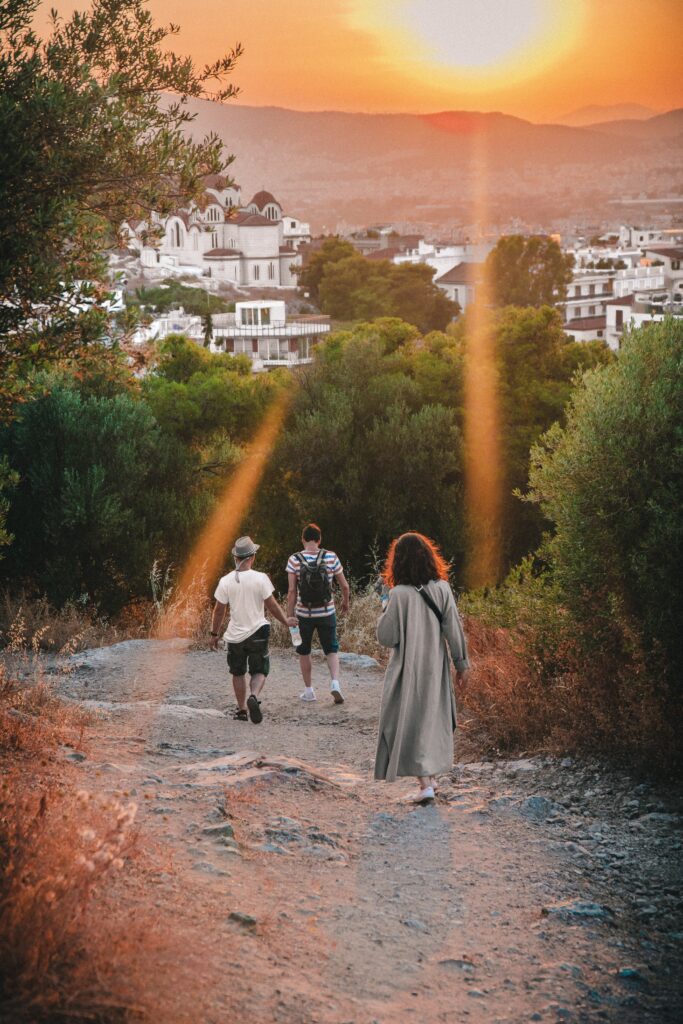
The path and people walking establish foreground interest that adds depth and perspective. Photograph by Peter Chirkov
Key Lesson: Find interesting foreground elements that begin a stepping pattern into your vertical landscape shot. Doing so creates a layering composition. Layering is a composition tool you often rely on when composing vertical landscape images. At the end of this guide, I will share with you a perfectly crafted example.
But before that, one last crucial suggestion.
The Crucial Importance of a Composition Path
I tend to rattle on in my books about the importance of creating a composition path through your pictures. This idea is even more critical with vertical landscapes because of compression.

Look at the image above. Where do your eyes start? Where do they go? Where do they rest? What is the subject area of this photo?
It’s impossible to tell, and each of us would likely have a different answer.
Key Lesson: In vertical landscape photography, a composition path is critical. Without one, your shot becomes a mishmash of confusion.
One Final (Excellent) Example of a Vertical Landscape Photo
This is an outstanding example of a vertical landscape photograph.
Let’s break it down.
- A horizontal vista shot would have pushed the sunset and river too far back to make them as meaningful as the vertical version.
- The rock adds foreground interest.
- There are three distinct layers: foreground rock, middle ground river and sunset, and background sky.
- The river moves right-to-left but does not reach the border of the frame on either end.
- The sunset is a dominant focal point that creates a subject area for the eyes to stop.
Recommended Reading: If you’d like to learn more and improve your landscape photography, grab a copy of Photzy’s bestselling premium guide: The Complete Landscape Photography Guide.
Conclusion
The vertical landscape photo is bound to attract more attention due to the scarcity of supply. When composing a vertical landscape image, look for layering and foreground interest. Keep a viewer’s eyes moving in an upward motion. Have them enter the picture at the bottom of the frame and move upward with a stopping area somewhere in the middle.
When composing a vertical landscape image, look for layering and foreground interest. Keep a viewer’s eyes moving in an upward motion
When determining whether a scene might photograph better as a vertical or horizontal image, dissect the scene into puzzle pieces and study the natural flow and use of space. Always examine the subject area (stopping point) and compare it to a Rule of Thirds grid – either in-camera or in your mind.

Photographs by Kent DuFault
Self-Check Quiz:
- Why does a vertical landscape photo stand out within the genre?
- In landscape photography, name the two primary composition concerns relating to eye movement and space.
- What did you learn about using puzzle pieces?
- What is an eye snag?
- What determines a balanced use of space?
- What composition rule can be used to determine whether you should compose in a vertical or horizontal format?
- True or False: A focal point can stop the eyes when following a natural flow.
- True or False: In tight spaces, always shoot horizontally.
- What does a concentration of light do to a viewer’s eye movement?
- Why are foreground elements necessary in a vertical landscape?
- In a vertical landscape, you must contend with a change in perspective. What is the change?
- Why is a composition path crucial?


