Composition is one of the key elements of every type of photography. A well-composed photo will guide the viewer’s eye through the photo, the way the photographer intends. A poorly composed photo can make even the most interesting of subjects appear dull.
Every time I compose a photo, I’m looking to organize whatever is in my frame in a pleasing manner. I want viewers to look at and linger on my photos.
How we compose our photos has a strong influence on how people view them, no matter what subjects we point our cameras at.
Photography has borrowed rules of composition from painters. These are tried and true. They have been experimented with and tested by artists for centuries. Most can be applied to photography, but not always.
Many photography teachers will encourage you to learn the rules of composition and then break them. I prefer to take a different approach. I’d encourage you to learn the rules so well that you can apply them intuitively. The more you understand and practice the rules of composition, the more they become useful tools to you. Like any craftsperson, the more you use these tools, the more skilled you’ll become with them. In time, you’ll start to use them subconsciously. You’ll know which tool to use instinctively each time you bring your camera to your eye.
Here are my three favorite composition tools.
Recommended Reading: If you’d like to improve your composition skills for better images, grab a copy of Photzy’s best-selling premium guide: Advanced Composition.
Fill the Frame
Most tools in your toolbox are there to perform a specific task. You don’t use them all the time. In my composition toolbox, I have one tool I try to use with every photo I take. I fill the frame.
I had this rule drummed into me by my picture editor and the other photographers when I started as a cadet photographer at a newspaper. Space was at a premium in the paper. Poorly composed photos that did not fill the frame with relevant information were likely to suffer under the sub-editors knife and be cropped. Often badly.
Filling the frame involves being intentional about what you include and exclude from your composition. It’s not about getting in close all the time and cropping tight to your subject. It’s about making intentional and interesting use of how you arrange the elements in your pictures.
Filling the frame involves being intentional about what you include and exclude from your composition.
New photographers often tend to only concentrate on their main subject as they compose. It’s important to look at the edges of your frame, all the way into the corners, and see what’s there. You must make sure that whatever you include is relevant to the story you are telling with your images. While working for the newspaper, this meant I had to understand the story the photos I took would accompany in that evening’s paper. The key thing is to be intentional about what’s in your pictures.

Photograph by Kevin Landwer-Johan
Concentrate on your main subject, but also look around your frame to see what else is there. If any distracting elements or ones don’t fit with your narrative, do something to eliminate them.
Alter your point of view. Moving a little, or zooming in or out, can change the relationship of elements in the frame. Is there something protruding from behind your subject? Moving a little to your left or right may hide this distraction.

Photograph by Kevin Landwer-Johan
Adjust your aperture setting to create more blur in the background if what’s there is not relevant. This is another technique that can help hide unwanted clutter in a composition. Keep reading for more tips on how to manage your depth of field.
Filling the frame does not mean the whole picture needs to be chocka block with stuff. It’s not like packing your suitcase before a vacation. You can leave space, so long as it’s intentional.
Key Lesson: Always pay attention to your main subject. Focus on it. This is where you want to direct a viewer’s attention. Then check the edges of your frame and consider what you can see there. Does it enhance your main subject or distract you from it? If what you see does not fit with your intention, then adjust your composition.
Negative Space
I don’t use this composition tool every time I take a photo, but it’s one I do like to keep handy.
Negative, or empty, space in a composition can often make for a stronger photograph, so long as it’s intentional. This may seem contradictory advice to filling the frame, but it’s not. Intentionally including empty space can help to draw attention to and enhance your main subject. The unintentional inclusion of negative space often weakens a composition.
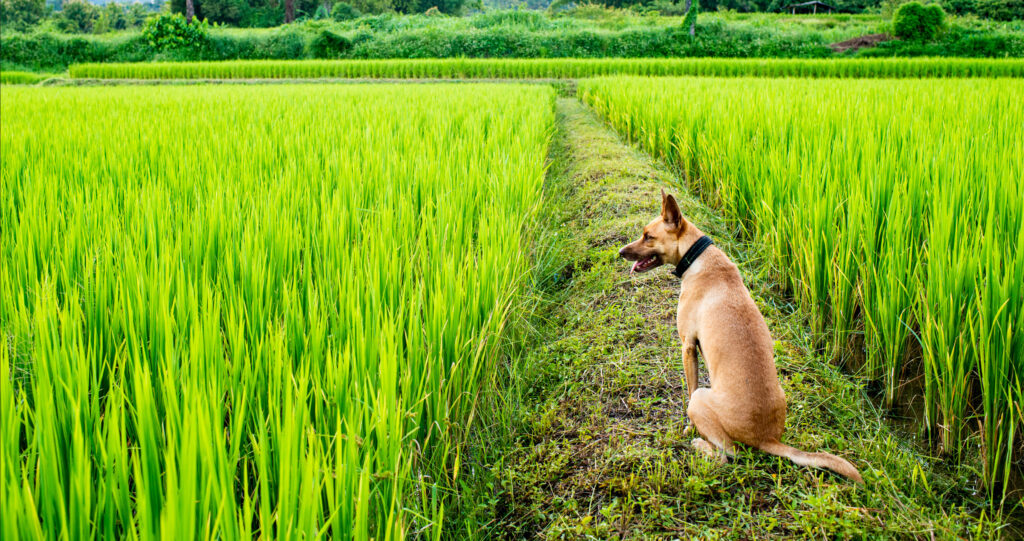
I like to include space in my compositions to help create a sense of mystery, peace, or loneliness. The more my subject holds attention, the stronger the influence of the negative space. This is particularly so in portraits.

Photograph by Kevin Landwer-Johan
Even a portrait taken against a plain background can convey a different meaning when there’s negative space included. A tight-cropped portrait may not carry the same weight, especially when the subject is not looking at the camera.

Photograph by Kevin Landwer-Johan
When you choose to use this tool is very much up to your intuition. I find that many photographers don’t know what to do with negative space, so they don’t make use of it well. Practice intentionally including space around, above, below, or to one side of your subject. The more often you try this technique, the more comfortable you’ll become with it. Then you’ll instinctively see opportunities to make the best use of negative space in your compositions.
Key Lesson: One of the most common portrait mistakes I see is excessive space left above a subject’s head. This is not often a good use of negative space and is a result of the photographer not paying enough attention to their framing. When composing a portrait and you have the desire to include negative space, leave it to one side of your subject. Or at least be very intentional about how you position your subject in the space.
Controlled Depth of Field
Depth of field is a key component of good composition. How you control it can make or break a photo. Having too much focus can prove distracting. Not enough can exclude elements that would enhance the composition.
Often, discussions around the depth of field are concentrated on hyper-focus or rich bokeh. These are both fine when used appropriately, but they are not exclusive options. Managing how much of your composition is in focus helps to draw attention to your main subject. It can also help provide a viewer with more visual information, even if what they see is not completely sharp.
Managing how much of your composition is in focus helps to draw attention to your main subject.
Landscape and street photographers love to capture images with a very deep depth of field. Portrait photographers often isolate their subjects using a very shallow depth of field. But there is an in-between!
Photograph by Kevin Landwer-Johan
Don’t get me wrong, I love my fast lenses and using them to capture silky soft backgrounds when appropriate. Using any lens well means managing the aperture setting both for exposure and controlling the depth of field. Choice of focal length and how close you are to your subject also come into play.
The better you manage how much of your composition is in focus, the more interesting your photos can be. Including enough of the surroundings in your composition to help tell the story is important. How sharp these other details are can make the difference between enhancing your subject and distracting from it.

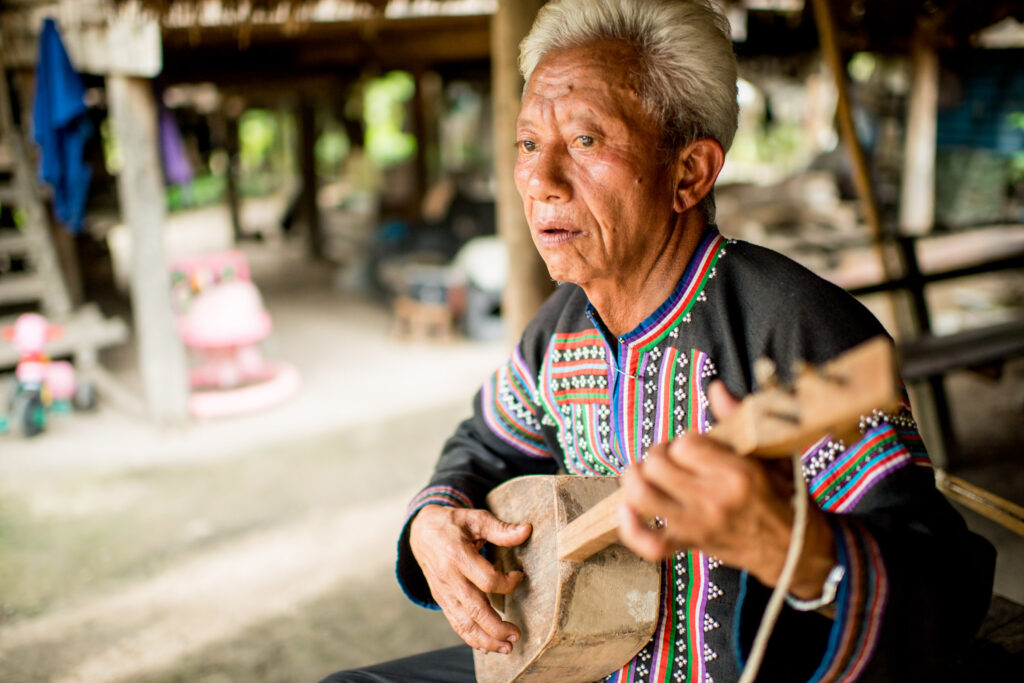
Photograph by Kevin Landwer-Johan
In this environmental portrait of a vendor at our local market, I used an aperture of f/5 on my 35mm lens. Had I set my aperture to f/1.4, I would have lost relevant information from the background. Showing more of her surroundings, even though everything is not sharp, helps to tell more of a story.
Macro photography can be most challenging when you want to control the depth of field. As you need to be close to your subject, getting a whole lot in focus is challenging. Even with your aperture set to the highest f-stop, you may not achieve a deep enough depth of field. Focus staking becomes a good option if you’re photographing a static subject and you have your camera on a tripod. Take multiple photos and focus each on a different part of your subject. You can then combine these images, blending them together to show more of your subject in focus.

Photograph by Kevin Landwer-Johan
Key Lesson: There are some great smartphone apps for calculating depth of field. You can add information about your lens and the distance you have it focused at. The app will show you how much of your composition is in acceptably sharp focus. You can use this type of tool to help you manage the depth of field in your compositions.
Recommended Reading: If you’d like to improve your composition skills for better images, grab a copy of Photzy’s best-selling premium guide: Advanced Composition.
Conclusion

Photograph by Kevin Landwer-Johan
Learn the rules of composition. Practice them so much that you can apply them intuitively.
Like anything you want to learn, the more you study without practicing, the more challenging it is to effectively apply your knowledge. Practice makes all the difference.
Pick three of your favorite composition tools (or use the ones I’ve outlined in this guide.) Then practice with them. Use them as often as you can every time you pick up your camera. Become an expert with them. Then you’ll find yourself applying them without even consciously thinking about how you’re composing.

Photograph by Kevin Landwer-Johan
Self-Check Quiz:
- Where does photography borrow its composition rules from?
- What do many photography teachers encourage you to do?
- Which composition tool does the author use most frequently?
- What do new photographers concentrate on most when composing photos?
- What is negative space in a photo?
- Can you use negative space in portrait photography?
- What two things are mainly considered when discussing depth of field?
- What can you use to help calculate the depth of field in a photo?