
The landscape is, hands down, the most popular genre of photography.
In this article, I will look at some top tips for getting the best when in the field.
Shooting landscapes is easy. They don’t move (mostly), they don’t bite, nor do they sue you for invasion of privacy (mostly). But even so, creating a truly beautiful landscape takes skill, considerable patience, and, like many genres of this awesome hobby, a generous chunk of luck.
I have a theory why so many people favor the landscape over many of the other classic photographic genres such as weddings, portraiture, news, documentary, or sport.
One significant reason why landscape photography is so popular is that it does not involve dealing with people. You can just go somewhere and immerse yourself in the landscape and just let it all happen.
Now, I don’t know this for sure, but I do know from years of experience as a wedding photographer that dealing with people can be a very stressful business, something that many folks shies away from, and with good reason. So it makes sense that being in a landscape poses a significantly less stressful opportunity to make great pictures.
One significant reason why landscape photography is so popular is that it does not involve dealing with people.
I’m sure you have all seen those wonderfully perfect unsolicited PowerPoint slideshows that get passed around the internet, with recipients often scratching their heads and asking, “how can I take pictures like this?”
I also get this question quite a lot. It’s reasonable to ask, and the solution is right there, in the result.
The answer is simple: learn the craft, go to fabulous places, and wait for the light to make it all perfect. So, there it is, three instant tips that are guaranteed to make your landscapes shine with a brilliance that might match those once seemingly impossible-to-emulate internet slideshows.
Key Lesson: The three critical elements to outstanding landscape photography are: 1) learn the craft, 2) visit fabulous locations, 3) wait for the light.
Recommended Reading: If you’d like to learn more and improve your landscape photography, grab a copy of Photzy’s bestselling premium guide: Complete Landscape Photography.
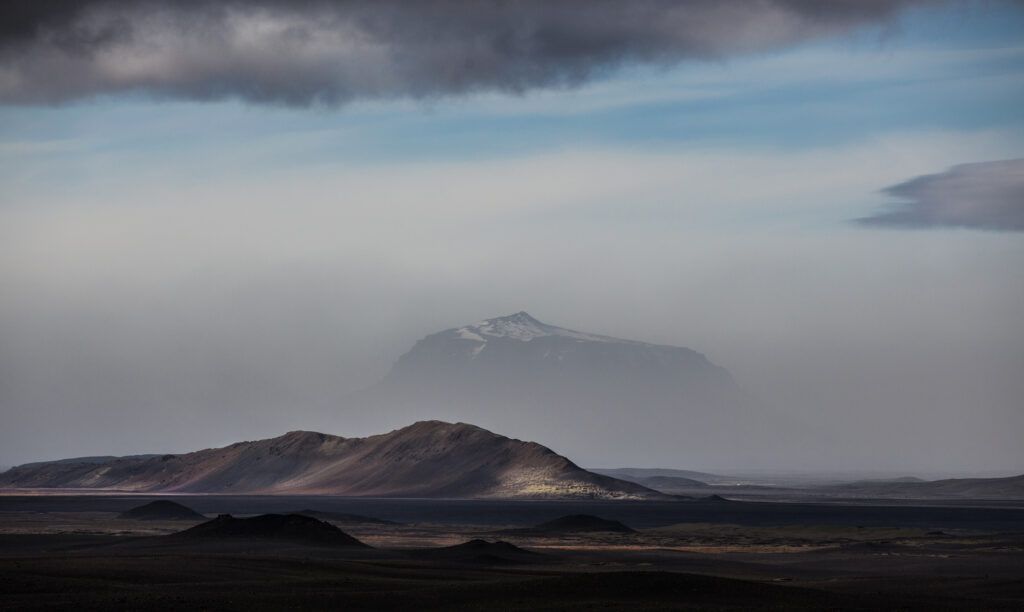
Barren Landscape: Central Iceland is a starkly beautiful place, with towering mountains and treeless plains composed of black larval rock. Sometimes it’s hard to know whether to shoot in color or convert the file to black and white. Here, I found a great vantage spot for this image and was lucky with the weather because the distant mountain was only visible for a few minutes before it disappeared back into the cloud. In terms of timing, this was a lucky shot. Photograph by Robin Nichols
What you’ll learn in this guide:
- Identify the basic requirements of a perfect landscape
- Learn about climate spotting
- Use filters
- Try HDR photography
- Go with panoramic photography!
- Software tools available for the landscape shooter
- Essential gear for the landscape shooter
In the Right Light
I have met a lot of landscape photographers in my time – some are truly brilliant and others, well most have been pretty good, so what’s their secret, if there is one?
Because landscapes are part of the natural world, landscape photographers often struggle with having to rely almost entirely on the available light.
Most other genres of photography can employ some sort of technology to assist in the picture-making process, such as high-speed drive modes, speedlights, studio lighting, light modifiers, models, art directors, stylists, and so on.
So, when I look at one of those internet slideshows that does the rounds, I see images shot in light that’s so sweet as to be almost unbelievable. How is this achieved?
Not surprisingly, it always comes back to the light. If the illumination at your favorite landscape location is dull, gray, and unassuming, then the chances are that any image you make will also be dull and uninteresting.
As a landscape photographer, it pays to watch the local weather patterns, to understand the changes that different seasons bring to the nature of the light, its color, modeling, reliability, and atmospheric qualities.

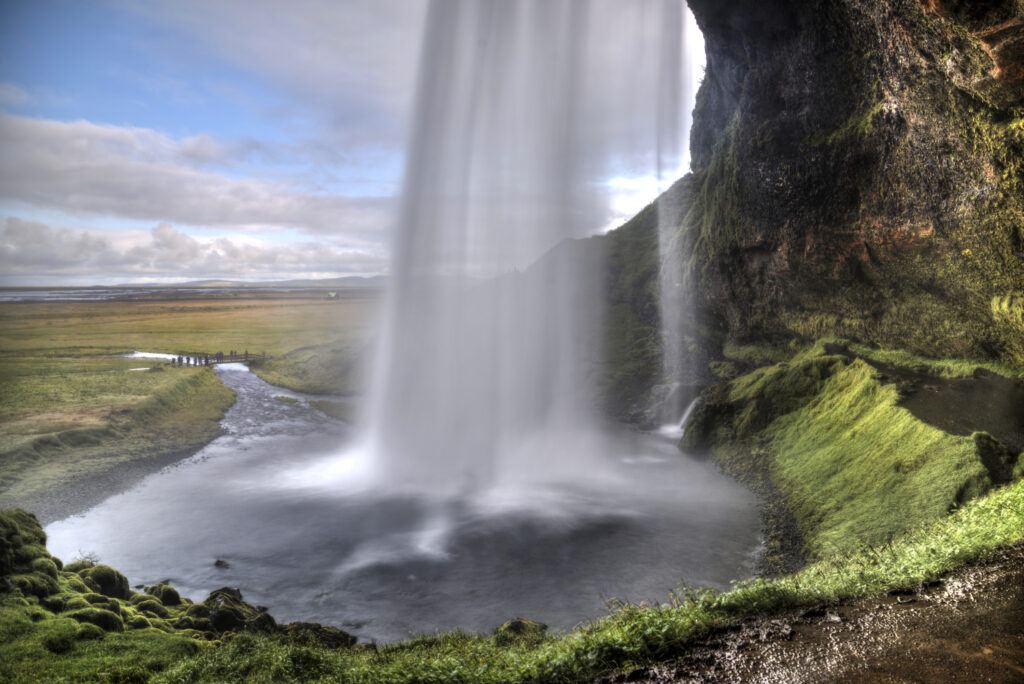
Picture postcard subject: Seljalandsfoss is the number one waterfall to visit in Iceland. It’s near the main road, easy to walk around (and behind), and is quite close to the capital. But it’s also a very wet location, muddy, and quite windy. The volume of water dropping over the falls generates its own local weather, so it’s not the easiest of places to do justice with a camera. You need a tripod and a six or ten-stop ND filter to get this smooth water effect. And all the time you are there, the spray coming off the falls is settling on the lens making it tough to get a truly clear shot. Photograph by Robin Nichols
So, understanding weather patterns is a fundamental part of success. These days you can use any one of dozens of smartphone apps that deal with local weather predictions, cloud cover, sunrise and sunset times, tide, and even the astrological charts.
Key Lesson: If this is beginning to sound like the job of a climatologist, you’d be correct. Arriving at a location when the sun is in the wrong position, too low in the sky, or during the rainy season, for example, is going to waste your time.
Conversely, if you are shooting a news assignment, then that’s completely different. You have to adapt to the local conditions and just get the story regardless, but if you are a landscape photographer, you often have to return again and again until you capture the light at ‘that’ moment.
Key Lesson: Rarely do we get great shots by snapping out of a car window on our first visit.
One Australian photographer, I recall, was responsible for raising public awareness of the beauty in the South Western part of Tasmania, where he lived.
In 1983, this area was on the verge of being destroyed by a hydroelectric dam project, but thanks in part to his amazing images, the project was stopped.
Even today, the cancellation of this scheme is seen as one of the most significant environmental campaigns in Australian history, benefitting the local environment and tourism, but, also in part, affecting the fortunes of the then Prime Minister.
How do you make such history-changing landscapes?
On the Franklin River, it was partly due to the timing. The photographer, Peter Dombrovskis, happened to be photographing in that area as the political fight mainstreamed, but he got these incredible shots because he was prepared to spend days and weeks camping on his own in the wilderness so never missed the opportunity to capture the best light.
Sadly, in 1996, while out on a photographic trip, he died in the wilderness he so loved. Something to think about when considering a trip into the bush.
Location, Location, Location
Referring back to those wonderfully beautiful internet presentations, I’d say that location is almost as important as the quality of the light. Although to be fair, if the light is stunning, you can make even the most mundane of locations appear otherworldly and interesting.
Over the years I have been very lucky to have traveled a lot, so I recognize many of the places highlighted in online blogs, Pinterest boards, 500px collections, and Instagram posts. In some examples, I think my shots are better, but in others, what I saw was far improved over anything I’d ever experienced.
Although to be fair, if the light is stunning, you can make even the most mundane of locations appear otherworldly and interesting.
Although I have no way of knowing if the photographer lived at the location, or whether they returned 50 times before they got ‘the shot,’ it seems to me that on a personal level, many of my ‘better’ shots were achieved because I’d visited the same place over several years, so I had a better chance of being there ‘for the shot.’
There’s a degree of chance and luck in the process, but knowing the location fully is also a terrific asset.

A quality neutral density (ND) filter is a must-have item for landscape photography. It’s used to control exposure in bright lighting where ISO, aperture, and shutter speed are rendered ineffectual. Most photographers will use the darker ND8 (or darker) filter seen here, which reduces the exposure by three exposure steps. Photograph by Robin Nichols
And don’t forget, when traveling to a new destination, it’s all going to feel new and special. The biggest challenge for any photographer is being able to produce great shots wherever they might be, on location, or at home. Making your own environment appear as enticing as a fancy overseas destination is a tough task.
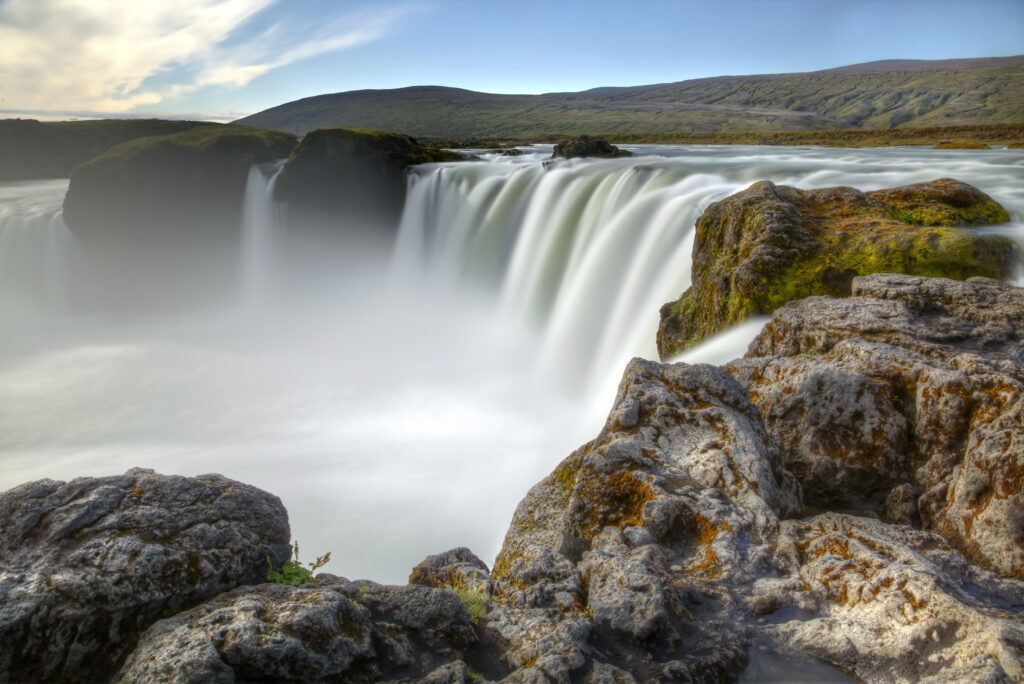
Extra gear: How can you create long exposures in bright lightings, like this 13-second exposure of Godafoss waterfall in central Iceland? The simple answer is to pack a few high-quality neutral densities (ND) filters. Most shops only stock pale density, one or two-stop ND filters. To get this kind of smoky waterfall effect with a long shutter speed, you’d need a six or ten-stop ND filter. The latter is almost black and is perfect for all kinds of landscape photography, from waterfalls to passing cloudscapes. Photograph by Robin Nichols
Recommended Reading: If you’d like to learn more and improve your landscape photography, grab a copy of Photzy’s bestselling premium guide: Complete Landscape Photography.
Prepare, Prepare, Prepare
One trick I have picked up over the years is to learn as much about your next destination as possible before you get there. For starters, research the geography as well as the climate, but also take a look at what local photographers have produced. I check out books, posters, postcards, and anything that tells me more about a specific location before I arrive or in the first couple of days of my visit.
More often than not, this kind of pre-trip research can pay huge dividends, both in saving time if on a flying visit, but also allowing you to focus just on the relevant locations for great results.

Go prepared: Available in four languages, this is a go-to asset for any serious photographer traveling to Iceland. For just €20, you’ll be set for the trip of a [photographer’s] lifetime! Photograph by Robin Nichols
Key Lesson: Another tip I learned is to be sure to pack a good map.
Sure, you can use Google Earth, and you can try TripAdvisor, but both sources play host to some of the worst location images I have ever seen. I far prefer a large map over a tiny smartphone screen any day.
On one trip to Iceland, I discovered a really neat tearproof and waterproof foldable map designed specifically for photographers. I had to have this and was delighted to find that it was not only a good quality product but it was also stuffed full of excellent photo location suggestions.
In fact, it almost made it too easy. The author had clearly visited Iceland on many occasions, and while the entire island was not represented (my map was version 3.0), there was more than enough great information to keep me going for more than three weeks.
It proved to be a serious asset for my trip.
In the Bag
It’s not essential to own the best or the most expensive gear to capture great landscape shots, but having the basics is a good place to start. Here are a few suggestions:
- DSLR or mirrorless camera
- Wide and semi-wide lenses, preferably prime lenses
- Tripod c/w ball head
- Electronic shutter release
- Neutral density (ND) filters (six or ten stop)
- Graduated ND filters
- Special effects filters (color tints)
- Polarizing filters
Consider HDR
Once you get past the eternal search for the best light and most pleasing location for your landscape adventure, another hurdle to surmount is that of contrast. I live in Australia where the light is mostly bright and very contrasty, and this can cause exposure issues. In fact, as I write, the outside temperature is just over 40 Celsius – not very nice for a day shooting landscapes.

Exposure bracketing: Most cameras have a bracketing function. Use this to shoot a series of different exposures of the same subject, then import to a specialist HDR application to produce an image with a far greater tonal range and visual impact than would have been possible by snapping just one frame. This sequence was shot at -2, -1, 0, +1, and +2 f-stops of exposure. In bracketing mode, cameras can usually shoot three, five, seven, and even nine shots in a bracket (check the camera specifications for your make and model). Photograph by Robin Nichols
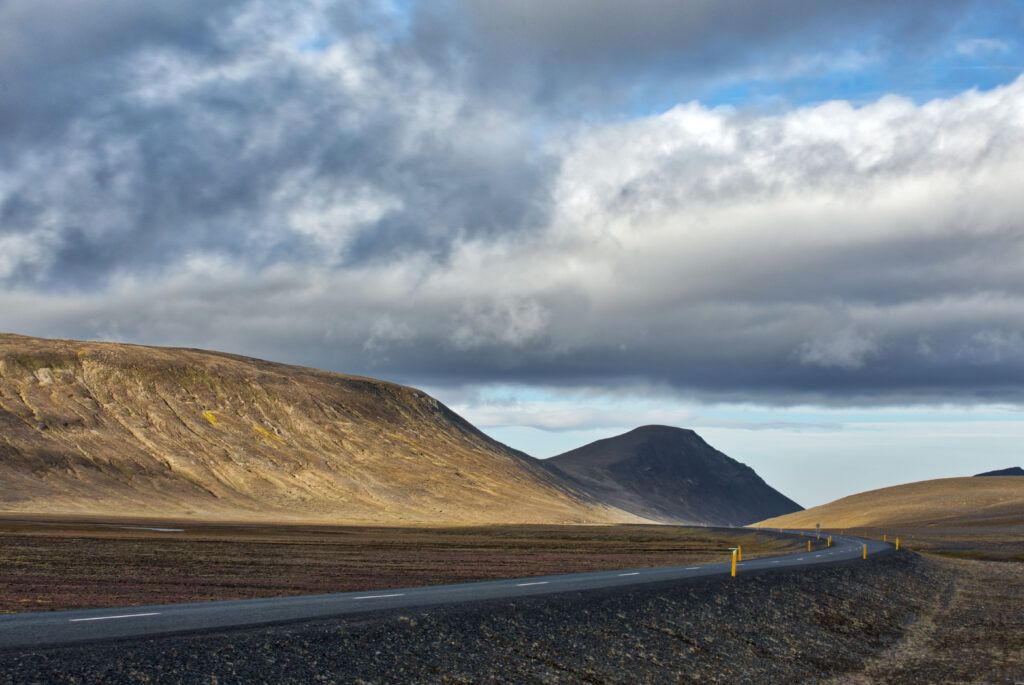
Even in Iceland, contrast can be a problem. In this example, it’s because of the brightness of the sun and clouds which contrasts starkly with the deep shadows and the black volcanic rock upon which the land is built.
It's not essential to own the best or the most expensive gear to capture great landscape shots, but having the basics is a good place to start.
Neither DSLRs nor mirrorless cameras have the same wide tonal range of the human eye, so when you see a really good landscape, the onscreen results might not be quite as good as you remember them. This is not about fading memory, rather it’s about capturing a contrast range that’s wider than the camera’s capability.
One way to achieve this is to shoot several different exposures of the same scene and then use a third-party software application to put them together to create an image that appears to have more tones than those possible in a single frame. Some cameras have a better dynamic range capability than others (check online to see a listing), but even so, putting multiple images together can produce exceptional tonal results.
The finished HDR: HDR enabled me to create this dramatic landscape, combining the best tones from the foreground with the high contrast sky details. The five frames were ‘assembled’ using Aurora HDR Pro software. Photograph by Robin Nichols
Another way to control contrast differences in your landscapes is to slide a graduated ND filter over the lens while shooting. These resin filters are designed to reduce the exposure on the top half of the frame (usually in the sky, the brightest area) to give the camera’s sensor a chance of capturing tones across a very wide dynamic range. They work well, but are expensive, can be fiddly to use, and at the end of the day only work in straight lines across the scene.
Recommended Reading: If you’d like to learn more and improve your landscape photography, grab a copy of Photzy’s bestselling premium guide: Complete Landscape Photography.
Explore Panoramas
Landscape photographers typically find themselves in wide-open parts of the land where a single frame might struggle to encompass the width and breadth of the scene.
For these types of locations, I’d suggest shooting a panorama – break the landscape up into two or more sections, shoot vertically, and overlap the frames by up to 20% or so.
The more you overlap the frames, the more sections you might need to cover the width of the scene. Most photo editing software has a panorama stitching utility. I have been using the one in Photoshop Elements and it does the job of stitching the scene together fantastically.
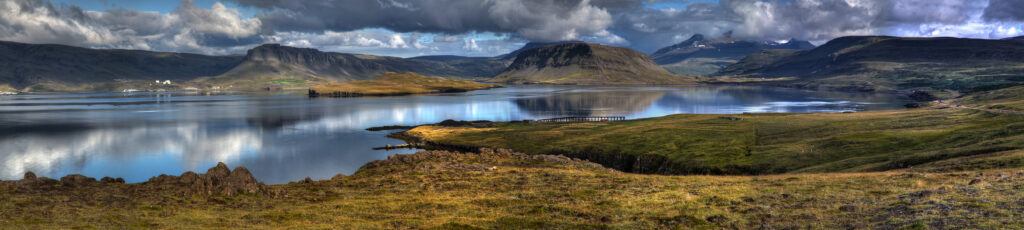
Wide scenes: This was a particularly beautiful fjord called Hvalfjordur, just north of Iceland’s capital Reykjavik. At the time it had a stunning cloudscape, along with little or no wind, thus producing the almost glass-like effect on the water’s surface. This panorama is a combination of eight vertical frames. Photograph by Robin Nichols
Software Suggestions
We all have our own software preferences, but if HDR or panorama-making is a new concept for you, here are a few suggestions:
HDR
- Serif Affinity Photo
- Aurora HDR Pro
- Photomatix Pro
- Zoner Studio
Panorama Stitching
- Adobe Lightroom
- Adobe Photoshop CC
- Adobe Photoshop Elements 2021
- Zoner Studio
- What are the three critical elements of outstanding landscape photography?
- What type of lighting must landscape photographers rely on?
- As a landscape photographer, it pays to watch the local _______ ________, to understand the changes different seasons bring to the nature of the light, its color, modeling, reliability, and atmospheric qualities.
- What glass filters are essential for the landscape photographer?
- Can pre-trip research provide the landscape photographer with helpful insight?
- Should you carry physical maps and why?
- Why is the HDR technique a valuable one for landscape photographers?
- Why would the panoramic picture format be valuable to landscape photographers?