

If you have ever lugged around a bag full of 35mm film canisters (exposed or unexposed), you probably have a greater appreciation than most people for the incredible innovations that have come about with digital photography. Getting through airports without film being damaged was (and still is for some) a scary experience due to X-Ray machines (they can create fogging and other problems). The advent of high quality digital camera image sensors and reliable media cards with storage capacities exceeding 500GB is nothing short of amazing.
However, managing those cards, including how to label them, where to store them, and how to easily determine if they’ve been used so that your data does not become lost in space (like a favorite sock or pair of sunglasses), can be confusing and frustrating.
In this Quick Guide I will cover all of the above items with the goal of making your relationship with your media cards much happier and harmonious. I will use the
Macintosh OS for my tutorials and screen shots, and I’ll mention Windows-specific
tips where appropriate.

A look at some of my past and current media cards, including a 16MB Canon SD card (white label), Lexar 64GB SDXC card, and a SanDisk 1GB CF card. The card holder shown was designed for CF (CompactFlash) cards, but SD cards can also fit in it. Below the card holder is a 64GB SanDisk microSDXC card with a microSD card adapter.
How to Label Media Cards
Labeling the front or back of media cards is something I do, though it is optional. Most people today are using a variation of the SD card (SD, SDHC, SDXC), which are relatively small in size (32.0×24.0×2.1mm, or 1.260×0.945×0.083in), but they still allow enough space to write about 10-30 characters. For the purposes of this article, I will use the terms “SD cards” and “microSD cards” to cover all SD and microSD card variations. The same recommendations apply to any other media card type that’s large enough to accept enough written type to be useful.
The challenge with labeling SD cards is that few cards have a label with a large blank area on which to write with a fine-point black pen. My solution to this issue is to use a silver marker on the blank (plastic) side of the card. The one I use is the Sharpie® Silver Metallic Fine Point Permanent Marker. A pack of two costs about US $4 and the manufacturer’s part number is SAN39108PP. One of the big advantages of this pen is that it is nontoxic and does not drip like many “paint pens”. However, it tends to bleed a bit on plastics, so use caution and a light touch when writing with it.
Labeling the front or back of media cards is something I do, though it is optional.
In the case of CF (CompactFlash) and XQD cards, they tend to have large blank areas of white or silver. For those cards, a standard fine-point black Sharpie brand marker works well.
Now that you have a marker, what should you write on your cards? I like to write the year in which I purchased the card and started using it (I buy all my cards new), my name, cell phone number, and the name of the camera that I plan to use with the card.
Note: Before writing anything on the back of a card, you may want to take a photo of the serial number and other information that’s found on every card in case there is a product recall, or if you have it repaired or replaced. It will be more difficult to read if covered with silver ink. And if you need to remove the ink at any time, gently rubbing the surface with a cotton tipped applicator (Q-tips is a popular brand of these) coated lightly in isopropyl alcohol will do the job with just a bit of effort. Just be sure not to apply too much force when wiping the surface, and keep the card on a flat, stable surface when removing the ink. You may also want to protect the gold pins by holding a small piece of paper towel over the pins with one hand as you remove the ink with the other hand.
Writing the year helps me to remember the age of the card. If you want to be more specific, you can label your card to correspond with the invoice for the retailer where you purchased the card. Just print out the invoice and write a code next to each card, or keep the invoice in a folder with a file name that has a code, such as 15CS16A. ‘15’ could stand for the year, ‘CS’ could be for the retailer, the number (in this case, ‘16’) could represent the size of the card, and ‘A’ could stand for the specific card. 15CS16B would be another card purchased on the same invoice.
If you purchase more cards from the same retailer later in the year, you can just use the next letter in the alphabet. That makes it easier to return a specific card for any reason. Another variation, as I’ve shown in the photo below, is to use two digits for the year, with a name.
Writing a cell phone number greatly increases the chances of a kind person calling you (wherever you might be) in case you become separated from one or more of your media cards.
The last item I like to write on my cards is the name of the camera. By allocating specific cards to specific cameras I can make sure that I’m using the most appropriate cards based on what the camera can handle. This is particularly important when using the video features of a DSLR or mirrorless camera. Also, after labeling any card, let it dry in the open air for at least 30 minutes before storing it away.

One of my SD cards, labeled with a Sharpie Silver Marker (note: phone number was changed for privacy).
Where to Store Media Cards
Because I’ve used quite a few digital cameras since 2001, I own a wide range of cards from about 16MB (yes, that’s not a typo!) to 64GB, in three formats: CF, SD and microSD. Here are a few suggestions for dealing with one or more card types:
- Store media cards like you would film slides or negatives. They are not nearly as fragile as film, but extreme temperatures, large temperature shifts, or very low or high humidity levels may cause problems over time.
- Keep all cards that you consider “active” in one main location (like a desk drawer) so that you can easily transfer them to your “on-the-go” card holder(s) when you need them. See #3 (below) for more on that. I keep my CF cards separated from my SD cards so that I have fewer cards to go through when preparing for a shoot. I’m sure some photographers bring all of their cards (regardless of how many they own) with them wherever they go, but just think about how you would feel if they were all lost or stolen.
- Instead, I would bring 2-3 times as much media card storage as you think you might need, and 3-4 times as much as you think you might need for paying jobs. For example, if you expect to use no more than 8GB of card storage, just double, triple or quadruple it. And while I’m on that point, always have a minimum of two cards for each of your cameras. Cards can just stop working (you might see an error message suddenly appear on your camera’s LCD screen) or cards can become damaged due to being dropped or while being inserted into or removed from a camera.
- Create an “on-the-go” card holder. After many years of dealing with this issue, I generally prefer using two separate card cases (connected to each other). There are a few reasons why. The main reason is that regardless of the situation I’m in, I always know which case has empty cards ready for shooting and which case has cards that are full. Another reason is that small card holders can fit into tight spaces, like cell phone pouches or other accessory pouches that can be attached to camera straps.

My single Eco-Fused case (top right) and two-case (bottom) “on-the-go” media card holders with the Carl Zeiss pouch I describe in the text. The single case can be seen opened in the next photo.
Note: phone number was retouched with a line for privacy
There are countless memory card holders on the market. My recommendation for finding one or multiple card holders would be to look online or at a camera store for holders that fill the following needs:
- Both card holders should be the same size so that there is room in the “full” holder if you use all the cards in the “empty” holder.
- Both card holders should be able to be securely connected to each other (many come with “snap rings” which makes it easy to then use a small carabiner clip, like the excellent Nite Ize Size-1 S-Biner, Item number SB1-2PK-01, to hold the card cases together). Or, you can use very strong hook and loop material to put two cases together. A good product for this is Velcro Brand’s Industrial Strength Hook and Loop Fastener Strips (Item number VEK90200).
- Like with media cards, I would also clearly mark both holders with, at a minimum, your phone number and the word “FULL” or “EMPTY”.
After searching locally and online for very small zippered cases, I found the cases pictured above (with the letter “m” on them) on Amazon.com. You can find them by searching for this term: “Vktech New Carrying Case Wallet for 6 Memory Cards”. You can also find the same exact products (at a lower cost) on eBay by doing a search for “Mini Carrying Case Wallet for Memory Cards”. Just look carefully at seller feedback as well as expected shipping times before ordering.
Clearly mark holders with your phone number and the word "FULL" or "EMPTY."
The Single Case Option
With all that being said, another good option is to use a single media card case (for example, one with about 8 pages and room for 24 media cards). Then attach a piece of paper, label or white tape inside showing a clear separation between the cards that are full and those that are empty. If you use white tape and write EMPTY and FULL with a Sharpie pen, you will probably want to cover the writing with clear plastic tape to protect it from smudging.
You can see an example in the photo below of an outstanding case with a zipper that costs under US $8. The one I own is called the Eco-Fused Memory Card Carrying Case, but there appear to be many other versions of the same case available online. It’s very well made and the zipper feels as though it will last a very long time. The zipper pull even has a relatively large hole in it, which makes it possible to attach it to the inside of a bag for extra security. If the clip you plan to attach it to is too large to fit in the small hole, you can first attach a small snap ring (key ring) to the small hole. That will enlarge the hole enough to attach almost any typical clip or S-clip, like the Nite Ize S-Biners mentioned earlier.
Another advantage of the case is that it has space for four Compact Flash cards in addition to 18 SD cards. Using the system I recommend, that number will be reduced to two CF cards and nine SD cards if you dedicate one half to empty cards and the other half to full cards.

My single Eco-Fused Memory Card Carrying Case shown open, with the center area labeled so that I can quickly determine which cards are empty and which are full.
How to Label Media Card Cases
I highly recommend labeling the outside of your media card cases with your contact information (name and cell phone number) as well as the words EMPTY or FULL if you are using a two media case system. This can be especially helpful in case your media card cases are lost or stolen. The same Sharpie silver markers I recommended for labeling cards usually work well on the imitation leather or fabric surfaces that you’ll find used by manufacturers of most media card cases. If you dedicate specific cases to specific types of cards (SD, CF, etc.) and/or specific cameras, that information would be perfect to add to the outside. In Figure 3, you can see how I labeled my two mini SD card cases
A Note About MicroSD Cards
With the advent of small, battery-powered action cameras like the GoPro and flying drones with cameras, more and more photographers are buying and using microSD cards. They are about the size of an adult’s thumbnail, and they are very easily dropped or lost. I highly recommend keeping microSD cards nested inside of the microSD adapters that come with virtually all microSD cards. You can then just label each microSD card with the capacity and a letter (for example, 32A) and then label the back of the adapter you are using for it with the same information I suggested in the section on labeling your media cards.
Holding Your Cards Close
Just like in poker, you want to treat your cards with care, and that means keeping them attached to your body whenever possible. I’m a bit embarrassed to admit that one time when on vacation at a restaurant with my family, I left a camera bag with my media cards inside. Luckily, a very nice person gave it to the restaurant staff and thankfully I realized it within just a few minutes after I left the location. That taught me a valuable lesson.
Because I want to have my media cards and other gear as close to me as possible, I now almost always either wear a photographer’s vest (I use and love the Wedding Photographer Vest from TheVestGuy.com) or I will keep my media cards in a very small compact camera case that I can keep attached to me even when driving. There are many of them on the market, and the best advice I can give is to get one that has a belt loop that has no hook and loop closure on the back (you need to actually thread your belt through it so it is much more securely attached to you). The photo vest I use has a few zippered mesh pockets that are ideal for keeping media cards, as well as a gray card/ color calibration card, lens caps and other non-bulky items. Another popular source for clothing that has pockets for different gear is SCOTTeVEST (scottevest.com).
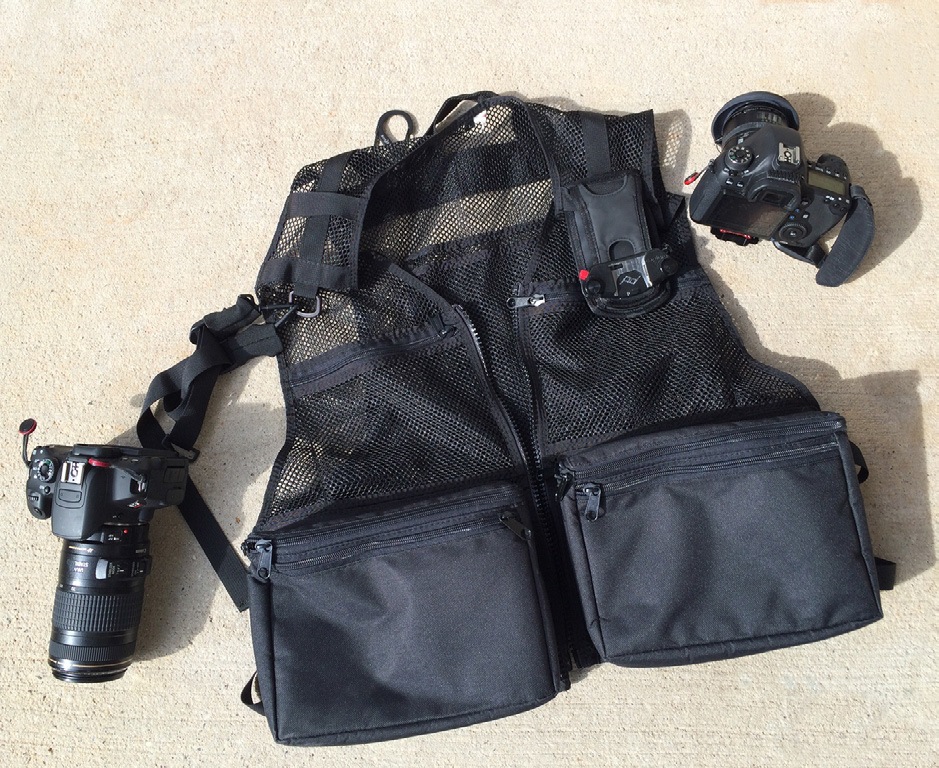
This is the photo vest I use often. It’s called the Wedding Photographer Vest and it’s made by The Vest Guy (TheVestGuy.com). The mesh pockets are ideal for storing media cards.
Also, it’s best to keep the cards in a zippered pouch or one that has a locking closure as opposed to one that just unfolds or pops open with a snap or hook and loop closure. That being said, I was very impressed by the pouch that comes with the Zeiss Complete Optics Cleaning Kit (Item number 2096-685). It has a hook-and-loop closure, but it closes in a very secure way, and I’ve found it quite comfortable even when sitting and driving.
It holds either my two-case setup or the single Eco-Fused Memory Card Carrying Case perfectly, with space left over for batteries, a small gray card or some of the fantastic Zeiss lens cleaning wipes that come with the kit.

A photo of me using the Wedding Photographer Vest at a balloon festival.
What About the Card Lock Switch?
Every SD card (not microSD cards) has a small plastic switch that allows you to “write protect” the contents of the card. It’s a useful option to have, but I prefer not to use it unless I am extremely concerned about the photos that are on a specific SD card. For example, if I have to hand one or more cards off to someone else before I have two backups of the data, I feel better if the write protect switch is on. My feeling is that moving a small plastic switch like the ones on SD cards on a consistent basis greatly increase the odds of something malfunctioning. Plus, it can be very annoying to put a card in a camera, only to find out via a message on the camera’s LCD screen that the card is write-protected.
Moving a small plastic switch like the ones on SD cards on a consistent basis greatly increase the odds of something malfunctioning.
When Should You Retire a Card?
It’s rare that a photographer will read and write so many times from and to a card that it stops working properly, but every card does have a finite number of read/write cycles. It’s more likely that you will replace a card with a faster or higher capacity card before a card has stopped performing properly. If you are a very active shooter, and you find that you’ve used the same card for about 1000 read/write cycles, I would recommend retiring the card, though I must underscore that this is just my personal opinion.
If you do retire a card, it can then be used as an extra backup for important data, like business records, Lightroom catalogs, etc. However, some experts caution the use of flash media for longterm storage (more than about 5-10 years without being used), so I would treat the media as a 3rd or 4th copy in addition to other backup strategies.
Speaking of card longevity, you should take a look at the warranty for any card prior to purchase. Some manufacturers offer a limited lifetime warranty on some or all of the cards they sell. That can be useful, especially if you plan to invest a lot in one or more high-capacity cards.
I hope this Quick Guide helps you to think less about your media cards and more about taking great photos!
All the best!
Andrew


