

Walking into a dimly lit room can be a photographer’s worst nightmare. Dark walls, low lighting, and weird shadows are enough to give even the calmest photographer a case of anxiety. Does this sound familiar? It did to me when I was first starting out and I claimed to be a natural light photographer.
Because let’s face it. In reality, I did not know how to use my flash. And more importantly, I did not know how to read light. As a photographer, you not only see light but also need to learn the art of reading light – the type of light, the quality of light, the direction of light and also how the light will affect your final image.
The more I started to photograph people and places, the more I realized that finding light among the shadows wasn’t really that scary or daunting.
Imagine for a moment the confidence you would feel if you could walk into any indoor lighting situation and think to yourself, “Yes, I got this”. And I don’t mean using your off-camera flash or strobes to light up the whole scene like the Fourth of July fireworks display. I mean using only available light to create some magical photos.
Here is what we will discuss in this article:
- What it means to read the light and shadows
- Why you may want a prime lens in your kit
- Why spot metering is important
- The trick of slight overexposure
- Starting with a single light source
- Using shadows to direct viewer attention
- How shadows create visual drama
- The role that light plays in creating a ‘type’ of shadow
- The mathematics of light and shadow
- Changing the light – and changing the shadow
Recommended Reading: After learning about camera settings, improve your photographs by understanding how light works! Grab a copy of Photzy’s premium guide, Understanding Light Book One.
Now don’t get me wrong; I still love images taken in natural light, as they feel really light, airy, and inviting to me. That is my style of photography. I find those images uplifting and ‘breathable’. But shooting in a low-key style and embracing shadows to create some dramatic portraits is just as fun and exciting.
The more I started to photograph people and places, the more I realized that finding light among the shadows wasn’t really that scary or daunting.
For the past few years, I have felt a little limited in my photography in terms of only photographing in bright, open, natural light conditions. Living in Chicago, our summers are quite short and fall is usually a mix of rain, thunderstorms and more rain. I learned very quickly that I needed to get out of my comfort zone and figure out how to photograph indoors and do it confidently and creatively.
I quickly learned that shadows play such an important role in shaping light, setting the mood, rendering depth, and creating drama. In the absence of floorto-ceiling multi-windowed, light-filled rooms to photograph in, embracing shadows may be the perfect solution for unleashing your creativity.
Gear Choices
Would you believe me if I told you this was taken on a bright sunny day by the side of my house that actually doesn’t get much sun? Gear choices and camera settings can make or break an image sometimes.
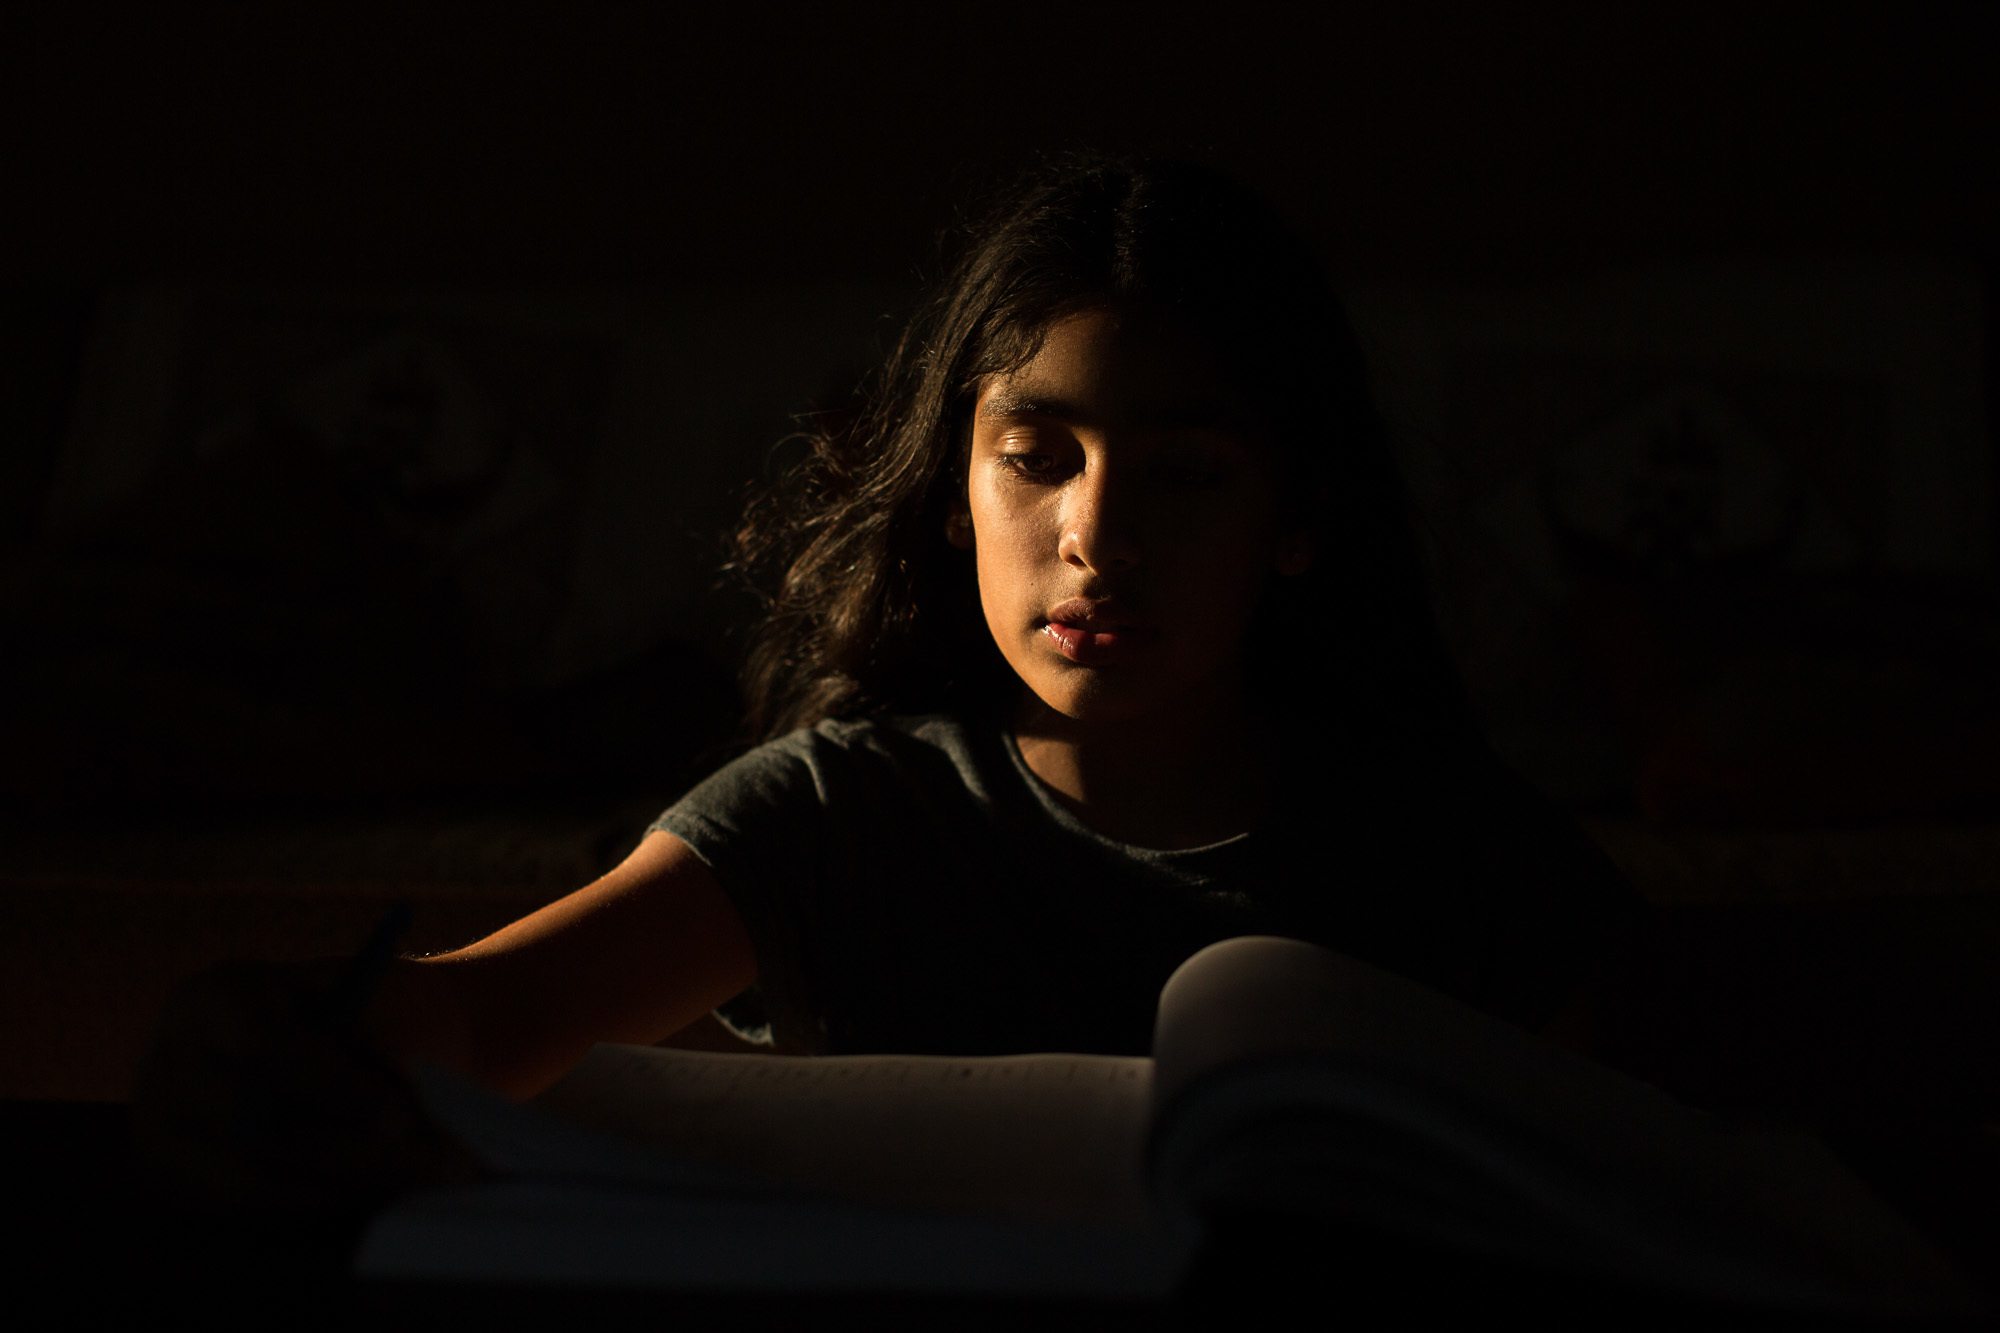
If you have a choice between prime and zoom lenses, choose the former. Primes are generally considered fast lenses with an aperture of f/1.8 or larger and allow what light there is to reach the camera’s sensor. My Canon 50mm f/1.2 is on my camera 80% of the time I am photographing indoors.
Make sure to also meter appropriately when dealing with light and shadows. I use spot metering most of the time and have my center spot set to the brightest area on my subject’s face/skin. This, in itself, will help to get a dramatically lit image. It will expose the highlights properly and allow the rest of the scene to have shadows for a range of tones.
Photograph by Karthika Gupta
Ensure you expose properly as well. If the capture is underexposed, attempting to correct it in postprocessing only adds grain and noise, which might not be the most ideal. In general, I tend to overexpose my photos by at least 1/3 stop no matter where I am photographing. I have found that this allows me to minimize noise and retain as much detail as possible in the shadows.

Photograph by Karthika Gupta
The white balance in my camera is set to Auto because I find that adjusting white balance in post is easier for me that figuring out the Kelvin values while I am photographing. You can choose to set white balance via the custom Kelvin function so that it can cut down processing time later. I find that being in Auto works really well in most cases, and I am okay with minor adjustments in post-processing if required. Learn to embrace a bit of noise by increasing the ISO, especially if the room is really dark.
Single Light Source
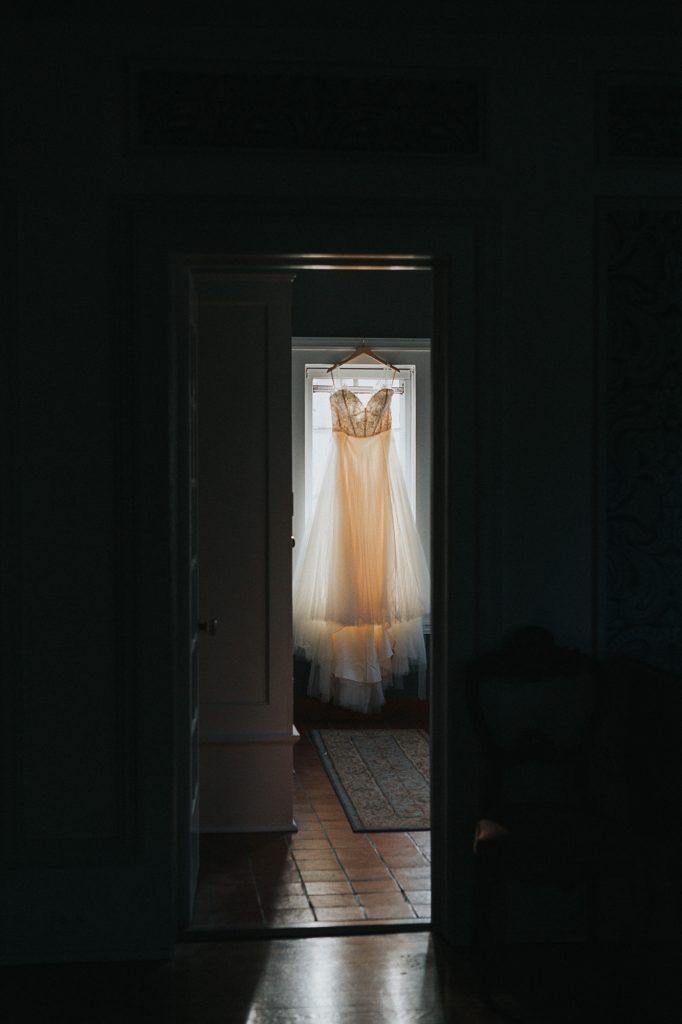
A case of backlight where the window light is used to highlight the dress and everything else is dark/shadows to bring focus to that one solitary object. Photograph by Karthika Gupta
A single light source, such as a small window or open door, can work wonders for your image. When you are working with dark spaces and limited light, you’ll be surprised how little light you actually need.
If you have north-facing windows, they tend to bring in a softer and more directional light as opposed to east- or west-facing. Those tend to bring strong light depending on where the sun is in the sky at the time you are photographing.
Recommended Reading: After learning about camera settings, improve your photographs by understanding how light works! Grab a copy of Photzy’s premium guide, Understanding Light Book One.
Direction and Quality of Light
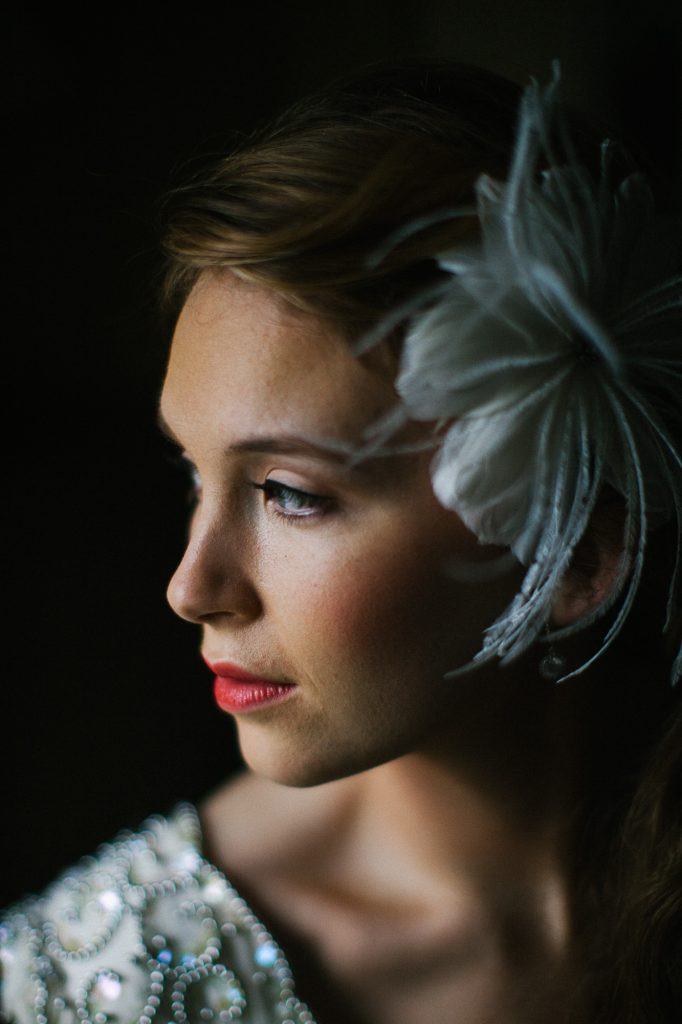
Both the direction and the quality of light play significant roles in the mood of an image, so understanding the variety, nature, and use of each will help you make informed decisions about how to achieve your end goal.
Hard, focused light tends to amp up the overall drama of the image, emphasizing texture and detail, and producing ‘contrasty’ shadows with sharp, defined edges. Diffused light gives shadows soft feathered edges that recede gently (dither away), making it flattering and versatile for human subjects for the way it minimizes texture and detail (i.e., flaws).
The angle and direction of the light you choose depend on your shooting style and your intent for the image or session. Typically, I do not position the subject facing the light source because it gives a flat, one-dimensional look to the subject’s features. I prefer lighting my subjects from the side for the depth and dimension the shadows give the subject’s features and the rest of the frame.
Backlighting the subject has its uses, particularly if your intent is to make the image somewhat abstract to get an airy, dreamlike feel.
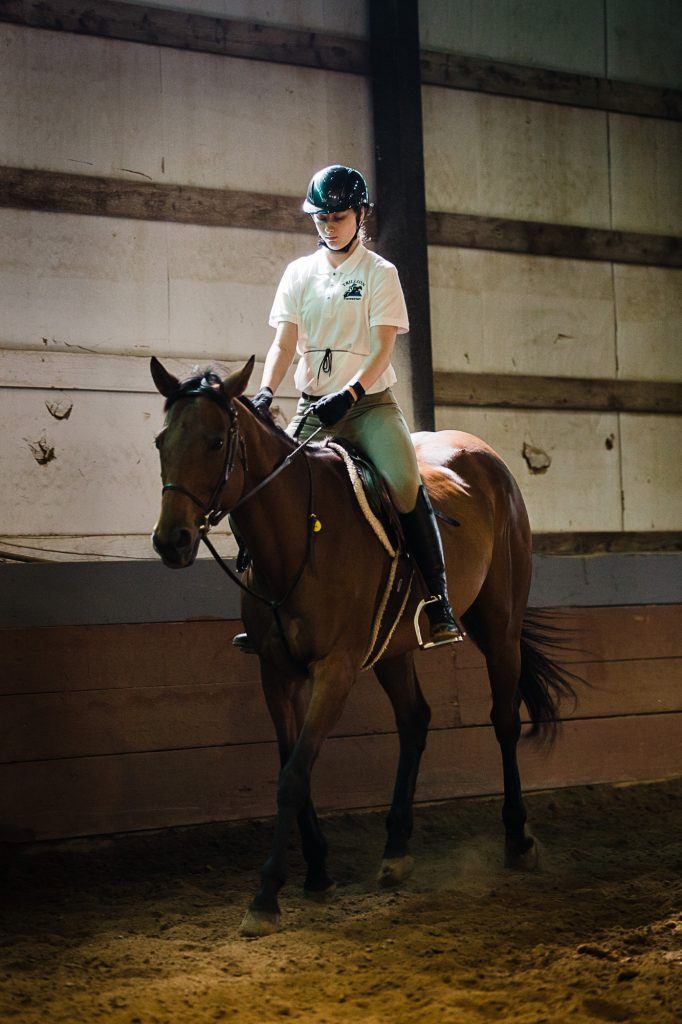
Light was filtering in through the barn and creating a soft spotlight for this rider and her horse. I saw the light first and then just had to wait for her to pass by at the right time. The beam of light falling on her helmet accentuates her face and a bit of her horse! Photograph by Karthika Gupta
Mathematics in Photography
The Inverse Square Law describes how the illumination from a light source diminishes over distances.
Imagine the beam of a spotlight as it widens and grows dimmer in the distance. Now center a subject in the beam close to spotlight itself; the light will be harsh. But if you move the subject in a straight line to stand about 6 feet from the light, how much less light is hitting the subject? With the distance doubled, the light hitting the subject is diminished by three-quarters.
In a real-world context, let’s say you’ve got a background to work with and maybe a surface to bounce light into the scene, plus all kinds of diffusers and filters to modify the light source, and a choice of where to place the subject in relation to the background and the light source as well as placing yourself and the camera.
Generally, you can add drama to the image by positioning your subject close to the light source and away from the background. The light will illuminate the subject and everything behind her will dwindle into shadow. That’s a quick and easy way to create a dark background incamera. Conversely, placing the subject further from the light source and closer to the background will create a more evenly lit scene with a more gradual shift between light and shadow; the background will be lighter as well.
Recommended Reading: After learning about camera settings, improve your photographs by understanding how light works! Grab a copy of Photzy’s premium guide, Understanding Light Book One.

By simply placing the model at the edge of the light streaming through the canyon wall, we were able to automatically darken the background and put emphasis on her. She is looking towards the light source, the sun, streaming through the trees. Photograph by Karthika Gupta
Modify or Mold Your Light Source
If you find yourself with an overabundance of natural/available light, using modifiers is an easy way to control the amount and intensity of the lighting on your subject.
Sheer curtains and blinds can be used to reduce or diffuse light, making it softer and subtler. You can decrease the size of the light source to increase shadows and increase drama with the use of blackout curtains or by partially shutting doors. Remember, the more light you let in, the less intense the shadows.
Remember, the more light you let in, the less intense the shadows.
I hope these examples motivate you to look differently at shadows. There are no photography monsters hiding in them! They are, in fact, quite useful in adding some drama and interest in your photographs. Plus, photographing in different lighting situations will make you a stronger photographer (figuratively speaking of course!).

Photograph by Karthika Gupta
- Shadows play such an important role in shaping _____, setting the mood, rendering _____, and creating drama.
- If the capture is ____________, attempting to correct it in post-processing only adds grain and noise, which might not be the most ideal.
- If you have _____-facing windows, they tend to bring in a softer and more directional light as opposed to east- or west-facing.
- Hard, focused light tends to amp up the overall drama of the image, emphasizing texture and detail, and producing _________ shadows with sharp, defined edges.
- Diffused light gives shadows soft feathered edges that recede gently (dither away), making it flattering and versatile for human subjects for the way it ____________ texture and detail (i.e., flaws).
- Generally, you can add _____to the image by positioning your subject _____ to the light source and away from the background.
- You can decrease the size of the light source to __________ shadows.


