Because all digital images have some recorded noise
by Kent DuFault
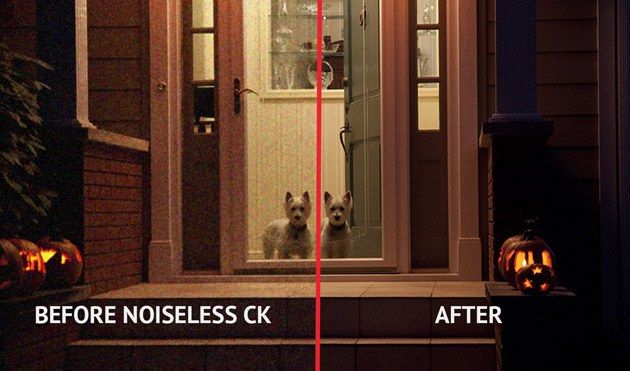
Today, I’m going to write a review of a software product named, “Noiseless CK”. I want to make sure that everyone understands that this is not the version that is sold on the Apple App Store for $9.99 USD. This version is what was formerly known as “Noiseless Pro”. It sells on the Macphun website for $59.99 USD ($29.99 During February). I spent some time poking around trying to find out the difference between these two versions. That wasn’t easy. From what I could tell- there are two main differences. The cheaper APP Store version does not work as a plugin within editing software packages such as Photoshop or Lightroom. Secondly, the cheaper version does not offer support of the raw file format.
Now that we have that out of the way, I would like to tell you a little story.
Back in 2010, I purchased a brand new Canon 7D camera body. I had never been so excited to acquire a new digital camera. At that time, I already owned a Canon 30D and a Canon 20D. I paid around $1600.00 USD for the 7D.
My excitement was short-lived.
In the summer of 2010, I was working freelance for a very busy outdoor location portrait studio on the eastern seaboard of the United States. And when I say busy, I mean very busy. For three months out of the year it was twelve-hour days- five to six days a week. The studio was set up so that the photographer did a pre-edit and sold his or her own work. That meant shooting when the light was right, editing into the night, and up early the next day to sell the work before going back out to do it all over again.
The Canon 7D was going to be my flagship camera for that year. However, it didn’t take long before I realized that there was a huge problem. My 7D had the worst noise of any digital DSLR camera that I had used up until that point. Now, I don’t want to have all kinds of arguments with you about that statement. Maybe, I got a bad one. I don’t know. (Although, I know many others who had the same complaint.) The noise was horrible: it was truly acceptable at only ISO 200 or less. Even at ISO 400, the noise was extremely visible.
Here was the problem. The studio that I worked for routinely sold prints as large as 24 x 36 inches… and occasionally as large as 30 x 40 inches. That’s a big print. Our income, as freelancers, was totally based on sales. Selling a lot of prints, and big prints, was important.
I quickly realized that with my new Canon 7D camera- any image shot with an ISO higher than 200 wasn’t going to be acceptable to the clients. It was at that point in time that I became thoroughly familiar with noise reduction software. It saved my hinder. Literally.
I wanted to tell you that story because I think many photographers don’t really pay much attention to the noise in their photographs.
I see it all the time on 500px and Flickr. Some photograph is getting all kinds of accolades.
But obviously no one is taking the time to examine the photograph closely. I know this because I do look at them closely, and I often see them riddled with noise.
What does that mean to you?
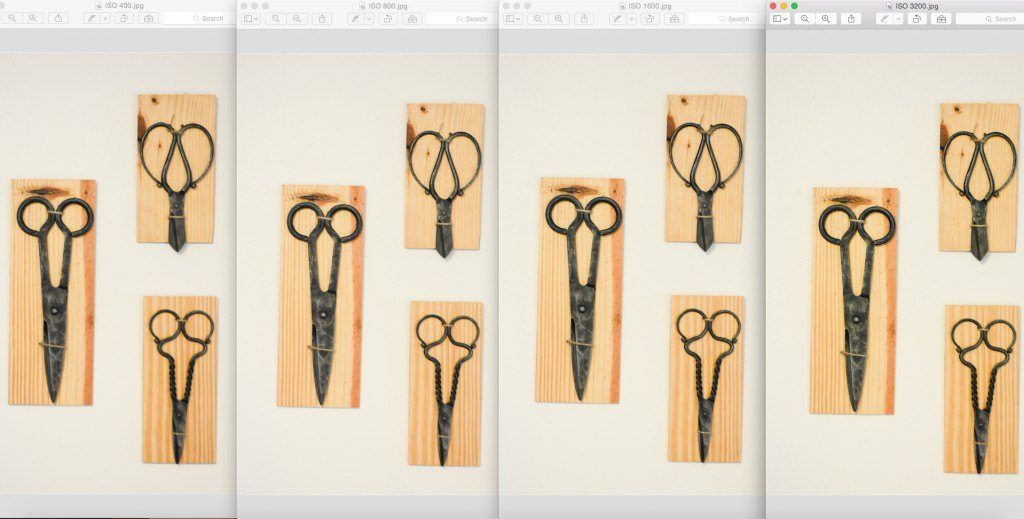 Figure 1 Photograph by Kent DuFault
The first thing you need to know is that every camera records a different level of noise. If you haven’t done it, you should set up a test like this and test your own camera. I took these with a Nikon D7100 using an AF-S Micro-Nikkor 60mm macro lens in relatively low light. This test yielded some surprising results to me, which I will discuss with you in a moment. First, let’s talk about this photograph. It is a composite of four photographs. They were all shot and processed exactly the same. The only difference was the ISO setting, which caused a change in shutter speed. I began the test at ISO 400 and I increased the ISO in one-stop increments until I reached ISO 6400. In this photograph, you see the 400, 800, 1600, and 3200 examples. Here is my point; they don’t look different at all in this photograph. Do they? This is why folks don’t notice the noise when they view an image online. They are seeing it at a significantly reduced magnification. But, what happens if you want to sell a large print? Or, a company contacts you and wants to use your image in an advertisement?
For your images to be the BEST they can be- you must invest in some good noise reduction software.
I’m going to let the cat-out-of-the-bag and tell you- “Noiseless CK” is the best noise reduction software that I have ever used, and I’ve used most of the programs available out there. In my review, I’m going to tell you why.
Now, there is one potential snafu for some of you… it only works on Apple products.
So, if you’re a PC user… Awe… Read my review anyway. I’ll keep it entertaining, and maybe you’ll learn a thing or two about digital noise and the software that deals with it.
Earlier, I eluded that my test photographs provided me with a surprise. I want to share that with you quickly.
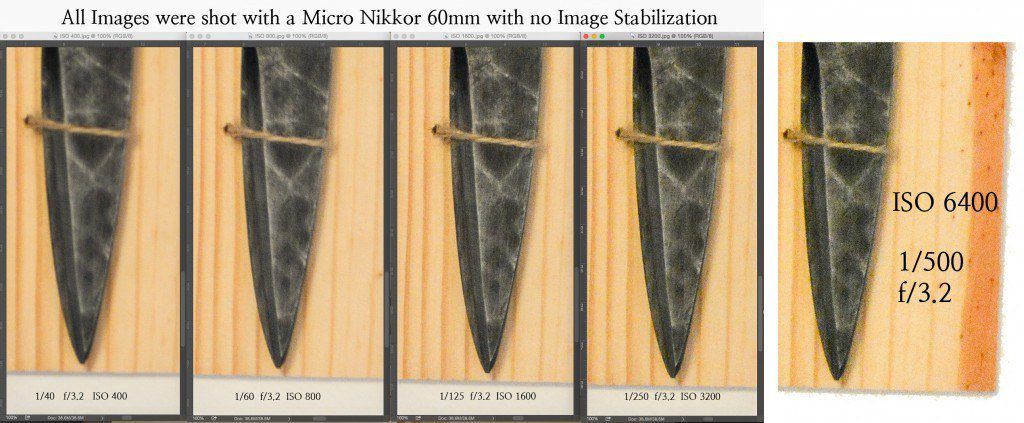
Figure 2 Photograph by Kent DuFault
Okay. You need to look at this photograph. If you can’t see the difference in noise clearly in the .PDF magazine produced by Photzy- then click the link and go to Flickr to look at it LARGE. First of all, the Nikon D7100 (which cost almost half of the Canon 7D) produces much lower noise than the Canon 7D. The noise at ISO 800 on my Canon 7D was pretty close to the noise produced by the Nikon D7100 at ISO 6400. I just had to get that out of my system. Now, here was my surprise lesson! I’ve always been the lowest ISO possible type of photographer- even in low light. I would only raise the ISO when I absolutely had to. But, this test taught me something. The best looking image of the group is the ISO 1600 image! In the light levels that I took these photographs, I would never have gone to ISO 1600. Never. But, I’ve now realized that with my camera, (you must do your own testing for your camera), I can go to higher ISO settings with superb results!
But enough of this! Let’s talk about Macphun software and Noiseless CK.
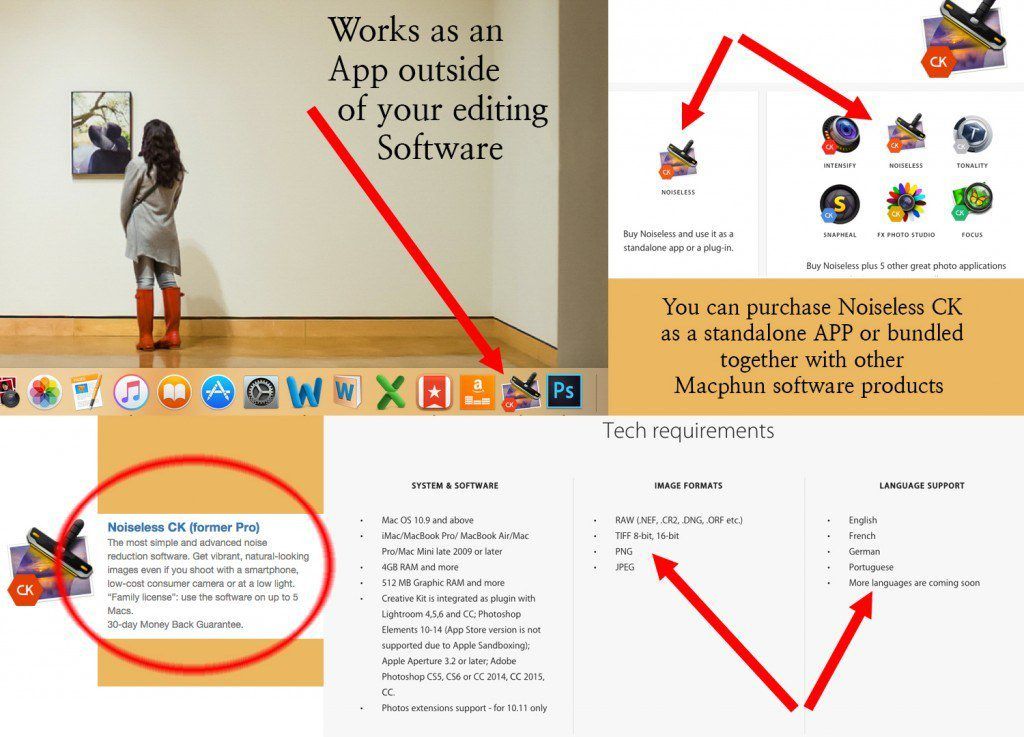
Figure 3 Photo Illustration by Kent DuFault
One of the real benefits of Noiseless CK is that it can be utilized as an APP, or with an editing program as a plugin.
Why is this good? Maybe you don’t want to go through the baloney of waiting on Photoshop to load up. Maybe, you simply want to do a quick noise reduction and upload your image to Facebook or Flickr? Or, maybe you don’t own any editing software- but you would like the opportunity to make your images the best they can be! Boom. With the APP you can do so.
This is another beautiful thing about Macphun Software Company. When you purchase a product- you get a “Family license”. This means you don’t have to go through a bunch of rigmarole to install the software on up to five computers. You can install it on your computer in the home office. Your spouse gets it on theirs in the den, and that teenage child even gets it on the Mac laptop they have sitting in their bedroom.
Check out the specs in figure 3; make sure the software will work for you.
You can purchase Noiseless CK alone, or as part of a bundle. The bundle contains a bevy of software editing features, and all of them operate as APPs. Macphun definitely gives you a financial incentive to buy the bundle- but you don’t have to. Plus, they back up all of their products with a 30-day money back guarantee.
I know it might sound like I’m singing the praises of this company because I got some kind of deal with them or something. The truth is- I was singing their praises long before I decided to approach “them” about doing the review. I wanted to do the review because I love their products, and they seem like a good company.
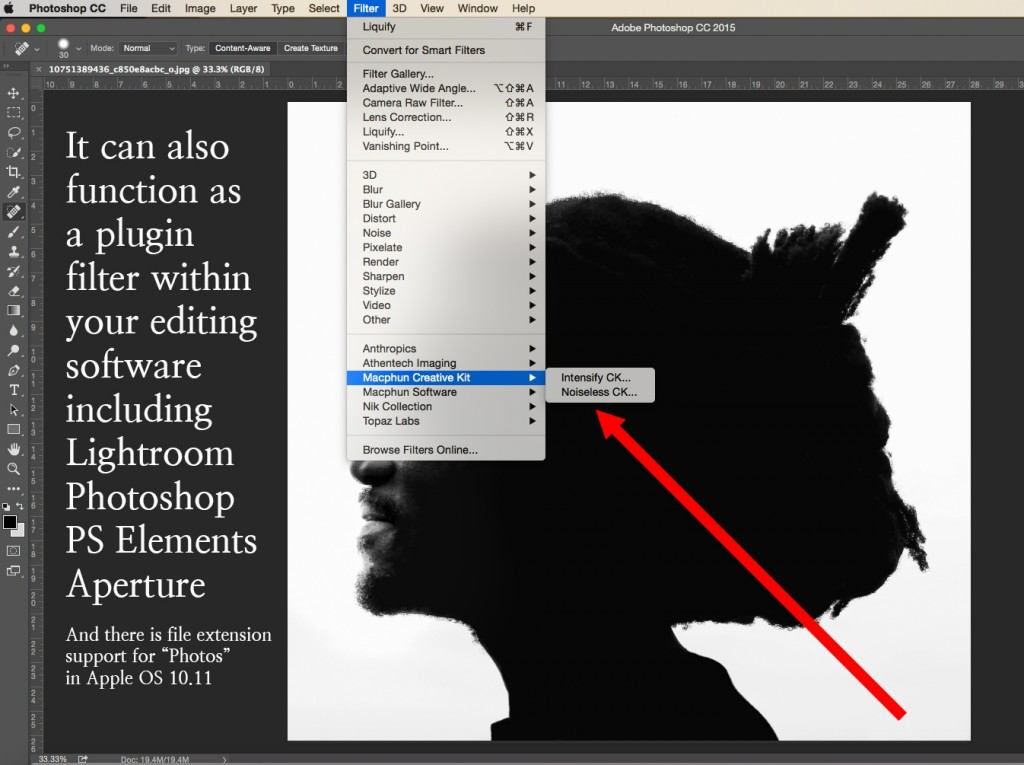
Figure 4 Photograph by Kent DuFault
Now, don’t forget. The program can also work as a plugin within your editing software. That includes Lightroom, Photoshop, PS Elements, and Aperture. Just recently, Macphun announced that their programs will now work as file extensions for the ‘Photos” program that is integrated into the Apple OS System. But, be aware. That’s only Apple OS 10.11 or later.
The program is easy peasy to install, just like all MAC computer programs.
Ok then… Let’s take a look at the interface and workspace, which by the way looks exactly the same whether you’re using the program as an APP or as a plugin filter within your editing software.
In order to demonstrate how Noiseless CK works, I have chosen two photographs to work with.
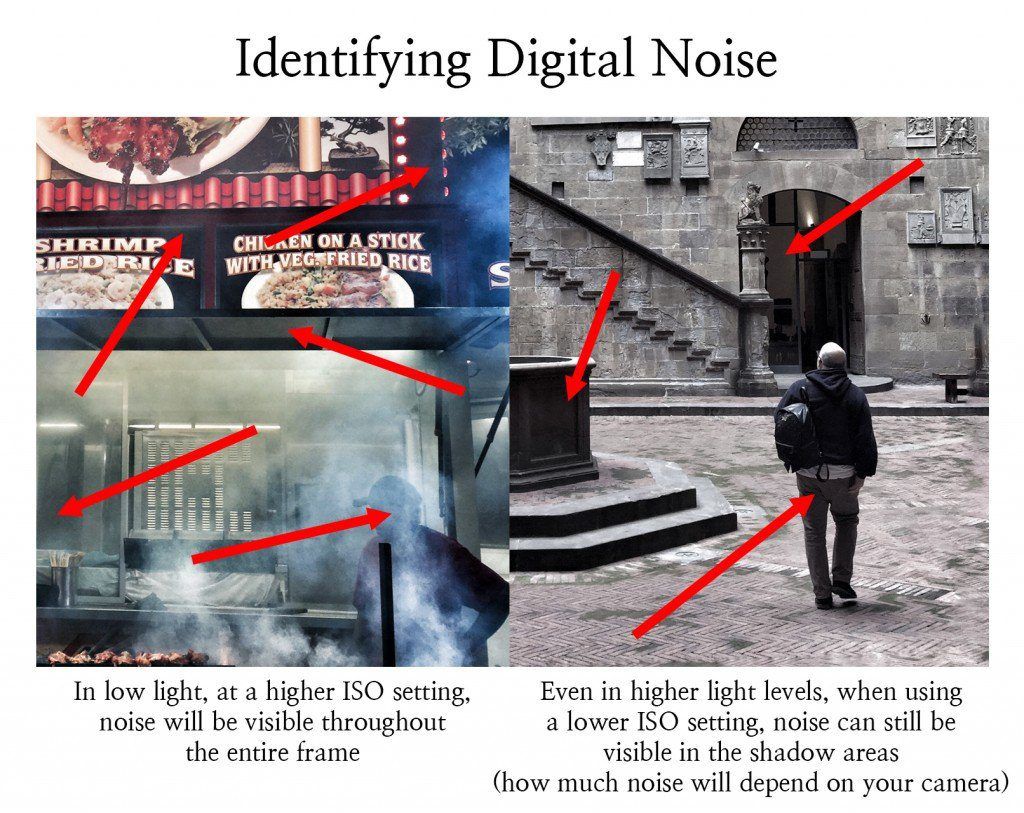
Figure 5 Left photograph by Kent DuFault – Right photograph by Clarisa Ponce de Leon
When you’re using a higher ISO, you increase the chance of having visible noise throughout your entire image. How much noise, that will be recorded, is dependent on your camera. The image to the left displays a lot of noise. It was shot under very low light. The image on the right was shot in bright light. However, there is still visible noise in the shadows. Dealing with these two shots in Noiseless CK would be quite different.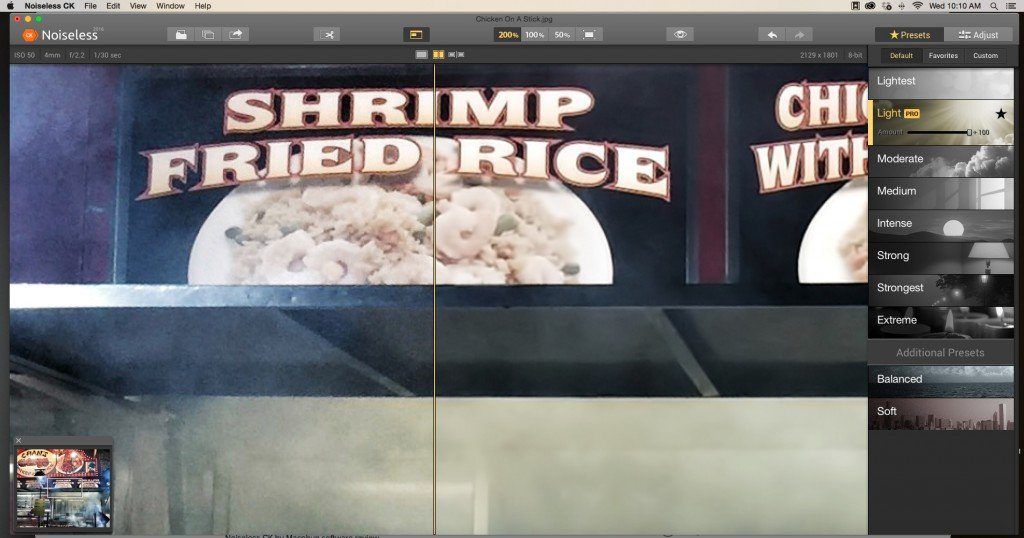 Figure 6 Photograph by Kent DuFault
This is the default view for the Noiseless CK workspace.
First lets talk about the things that I like about the interface.
- The window is adjustable so you can make the space as large, or as small, as you like on your monitor.
- The view is open and uncluttered.
- The updates in the preview window work in real time (automatically).
- The Navigation window can be opened or closed.
- The presets provide any easy interface for beginners. Yet, they are powerful enough for professional users.
- The controls across the top, in the toolbar, are well labeled and simple to understand.
- The software opens an image, after calculating what “it” thinks is the appropriate Preset to apply. It doesn’t always get it right, but it gives you a great starting point.
Here is what I’m not fond of. I won’t go so far as to say, “I don’t like it. But, if Macphun read this review and made some adjustments- it wouldn’t hurt my feelings.”
✓ The program always opens an image at a 200% preview. I don’t want to start at a 200% preview. I like a 100% preview. To me, that represents a more accurate rendition of the results. So, I end up having to change it after every image that I open. I don’t know what their reasoning was for setting it to 200%, but it would be nice if there were a “preferences” selection so that I could change it to what I would like to use.
That’s it folks. That’s really the only thing that bugs me about the workspace.
Let’s check out the controls.
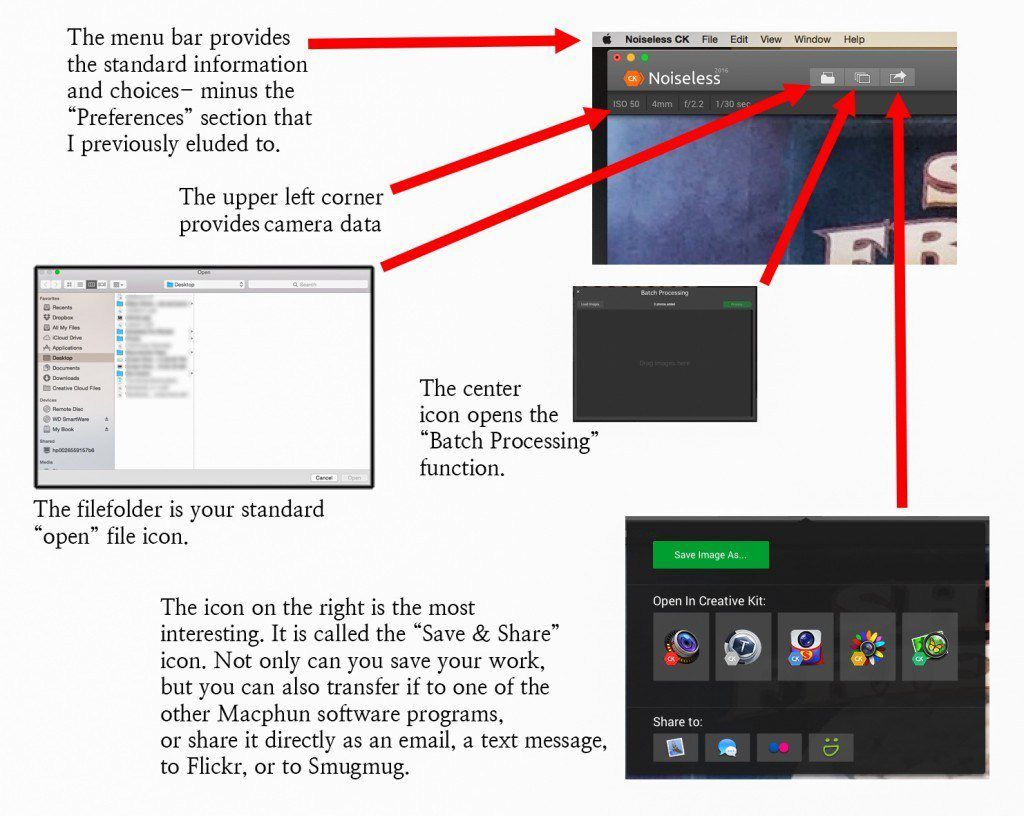
Figure 7 Photo Illustration by Kent DuFault
Figure 7 is pretty self-explanatory. I would like to point out that each of those icons turns “yellow” when you’ve selected them. This helps to keep you focused on where you are located in the workspace. I really like the “Save & Share” function. It can really help speed up your workflow. The one thing that is missing, and I can’t understand why, is they didn’t provide a share function to Facebook. Seems odd, because Facebook is the largest photo sharing space on the planet.
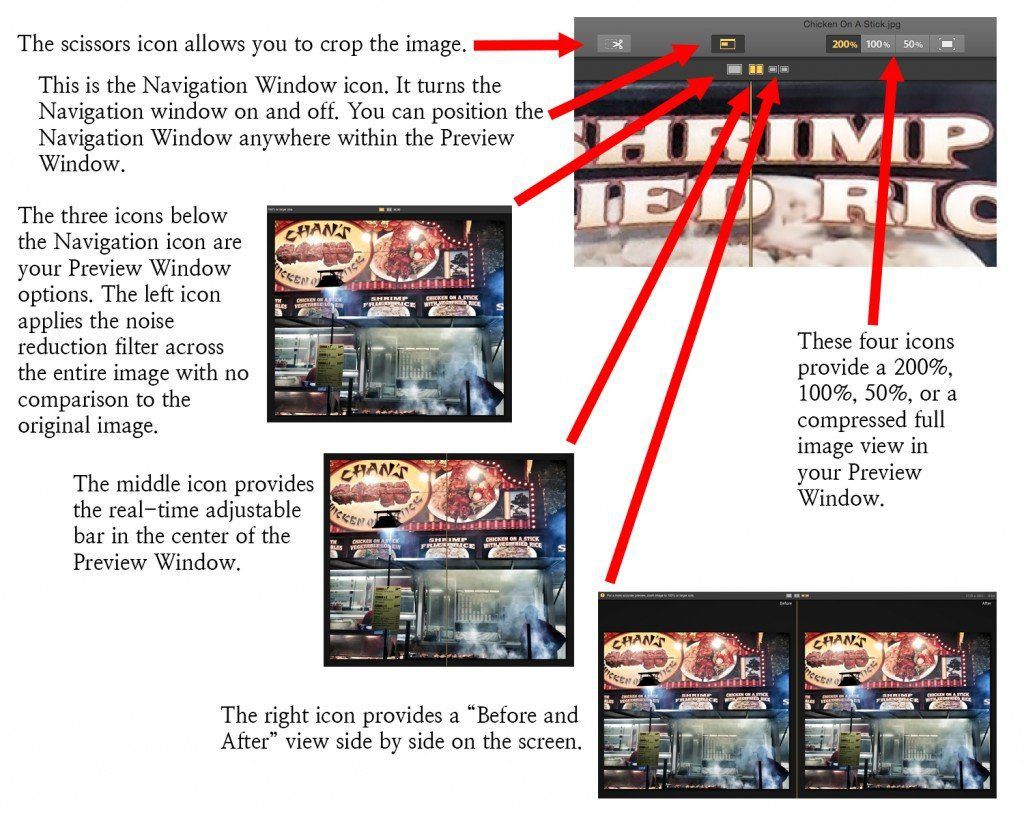
Figure 8 Photo Illustration by Kent DuFault
At first, I found the inclusion of the “Crop Tool” as a strange option. But, then it occurred to me. Macphun software operates as an APP- as well as a plugin for editing software. So, maybe you don’t like the idea of spending a lot of time in Photoshop or Lightroom. With the Noiseless CK APP there is no reason to go outside of the program unless you want to! You can crop it, reduce the noise, and send it directly to your social media or portfolio right within the program. Pretty cool! The Preview Window options are personal taste. I like the real-time moveable bar. It provides a nice large image to judge the affect as you slide it back and forth.
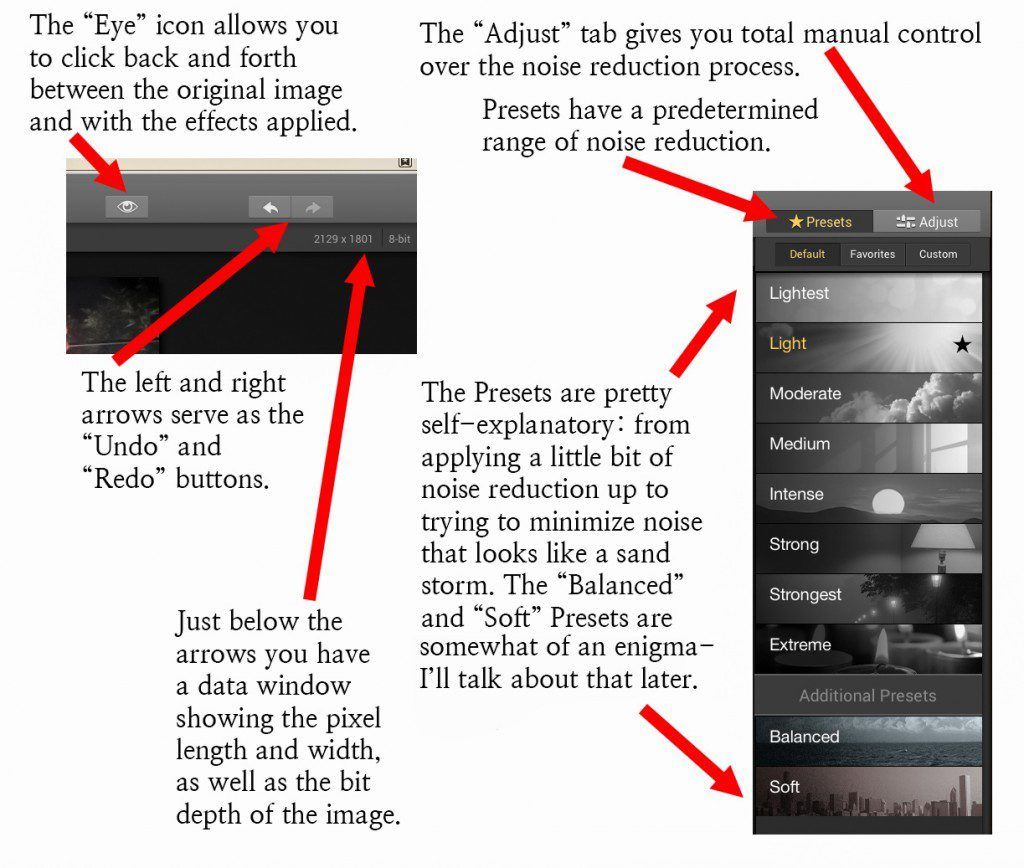
Figure 9 Photo Illustration by Kent DuFault
Figure 9 rounds out the last of the default tools within the main workspace window. Now we are going to focus in a little bit more closely on that gray toolbar on the right.
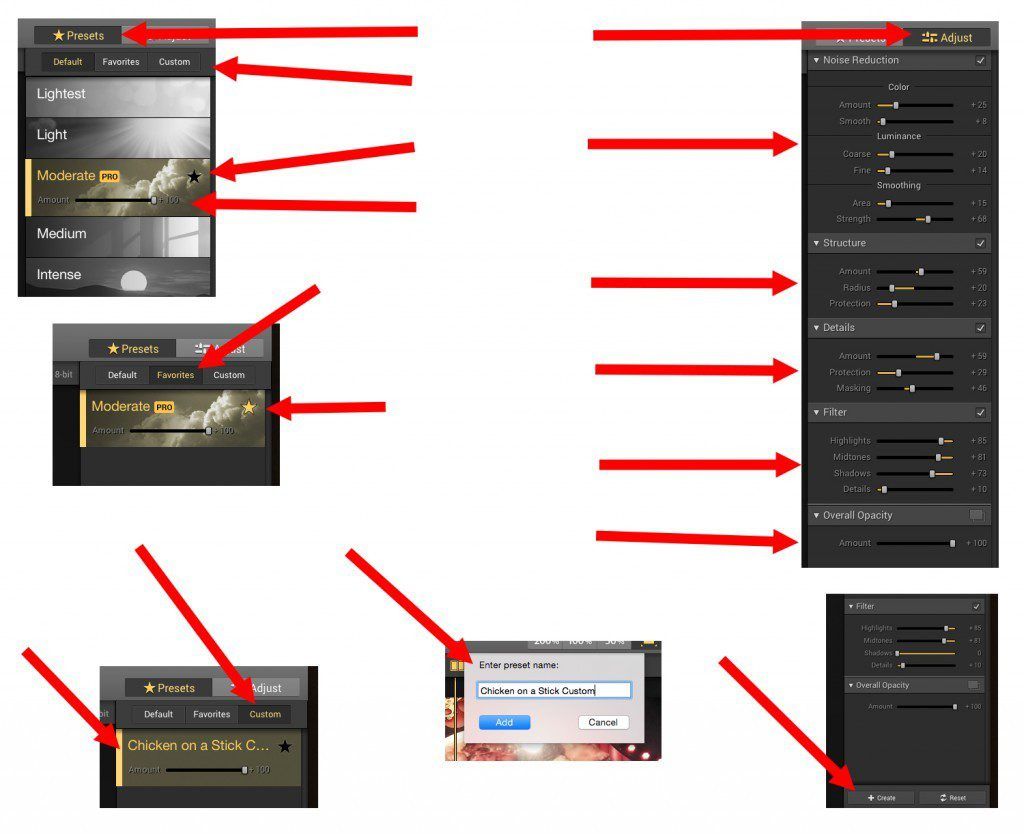
Figure 10 Photo Illustration by Kent DuFault
There is a lot going on in figure 10. Let’s take it one arrow at a time. On the upper and middle left we are talking about the “Preset” functions within that gray tool bar. On the right and bottom we get into the “Adjust” functions and how to create a “Custom” noise reduction setting.
1. The first red arrow on the upper left shows that we are working in the “Presets” tab. Again, when you are working with a tool it’s highlighted in yellow.
2. The second arrow shows that there are three separate areas to store and find the Presets. The “Default” tab brings up the main Presets, which we saw when we studied the “Workspace”. The “Favorites” tab is a place to store Presets that you find that you use over and over again. The “Custom” tab is where you store presets that you created yourself.
3. The Third and Fourth arrows on the left point to a “chosen” preset. You can see that this “Preset” is chosen because it is highlighted in yellow. This means that I selected it. Once a preset is selected. Two additional functions are revealed. If you click the star, that preset is added to your Favorites tab. The “Amount” slider allows you to quickly, and easily; fine-tune the noise reduction from that preset that will be applied to your image. (Love That Function!)
4. The 5th and 6th arrows (still on the left) show how that Preset was selected as a “Favorite” (the yellow star indicates this), and it will now appear in the Favorites tab.
5. Moving to the right- the top arrow shows that we are now in the “Adjust” window. Here is how the adjust window works. Let’s say, I have the “Moderate Preset” applied to my image. I’ve tweaked the amount slider, but I want more control. Click the “Adjust” tab. All of the settings from the “Preset” are now visible with individual sliders for you to adjust. You can grab each one individually and tweak them to your hearts desire. Just so you know… this is for the hardcore editor buff in my opinion. I never use this window, and I’m really picky about my images. I’m not saying it’s bad. What I am saying is that one of the REAL benefits of this software is the ease of use. Pick a preset, adjust the amount, BOOM; you’re done! And, it looks great.
6. But, let’s say you tweaked the individual Adjust sliders, and you really like the results and you think you think you might apply it to other photographs. You can save your changes as a “Custom” preset. On the lower right, you’ll see where it says “Create”. Click that button.
7. A window will pop up like the one in the middle of my illustration. There, you give your “Custom Preset” a name, and click “Add”.
8. Now, if you click on the “Custom” tab your preset will show up. Look at that! There’s a “Chicken on a Stick” Custom Preset!
I’m going to take you through my workflow process, using the software.
Before I do that, I want to talk to you about an issue that I saw floating around the Internet.
There were a number of folks complaining that this program was slow doing its thing. I don’t really get that. Macphun did announce that the latest version, (which I have) increased processing speed by 20%. My computer is not souped-up at all, and wowie, Noiseless CK is mega-fast for me- much faster than Topaz, and somewhat faster than Nik Define.
Another complaint that was out there was the lack of a “Brush” to apply the reduction to a localized area. I… don’t know. I think that’s a mega-editor thing once again. If that were a concern, I would apply a global noise reduction using Noiseless CK and then apply the localized noise reduction in the raw (ACR) processing window using the “Adjustment Brush”.
What do you say; let’s fix a photo!
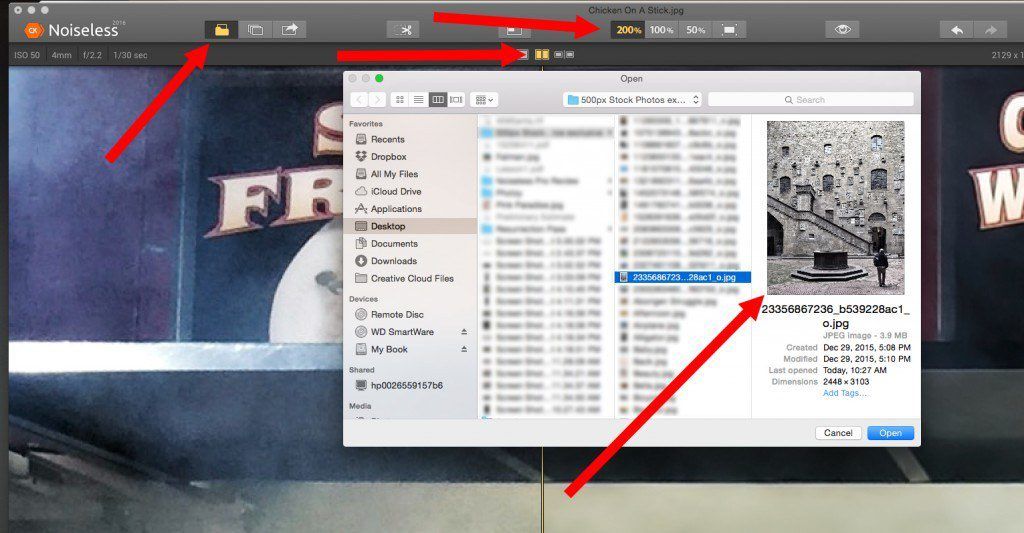
Figure 11 Photo Illustration by Kent DuFault
Step one is that we must open up an image to work on. Take notice of a couple of things in figure 11. “Chicken on a Stick” is still open in the background. Whenever you open the program, it automatically brings up the last image that you worked on. I find this kind of annoying because it involves extra steps to get to the image that I really want to work on. It’s NOT a big deal. But, it would be nice if Macphun had included a “Preference” section where I could turn that off. I’m opening the image using the “Open” icon in the upper left. You can also select “Open” from the tool bar at the very top of the window- just like most other programs. The program defaults to that 200% view as well as the “Sliding Bar” preview. Again, you can’t preference this to another option. A standard open file window appears, and you select your image.
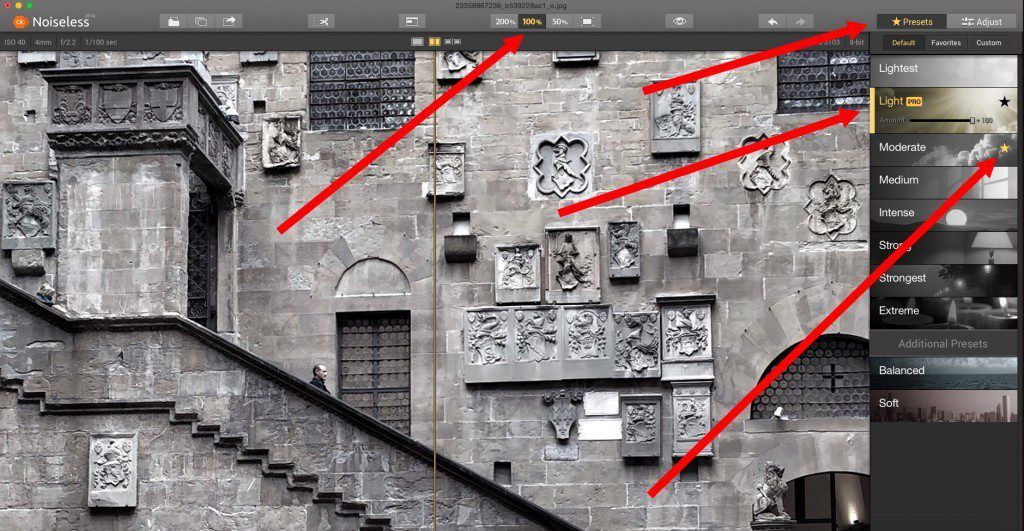
Figure 12 Photo Illustration by Kent DuFault
In figure 12, you can see that I changed my “View” to 100%; this is where I like to start. I might click up to 200% to see what that view looks like- but truthfully- I rarely do that, and I never use the 50% setting. In my mind, the 100% view gives an accurate rendition of what it would look like if I wanted to create a photographic print at any size. The top arrow, on the right, shows you that the program defaults to the “Default Presets” tab. This doesn’t bother because I rarely use any of the others. When Noiseless CK opened this image, it analyzed the photo and determined that the “Light” preset was the appropriate setting for this photograph. You can tell that it’s selected because it is highlighted in yellow. (God forbid that you’re color blind to yellow.) The “Amount” slider is visible, and it always defaults to +100. Take notice that the star on that tab is black. That’s because I haven’t selected it as “Favorite”, and it won’t appear in the Favorites tab. Notice that the “Moderate” tab just below has a yellow star. That preset has been selected as a Favorite, and it would appear in the Favorites tab.
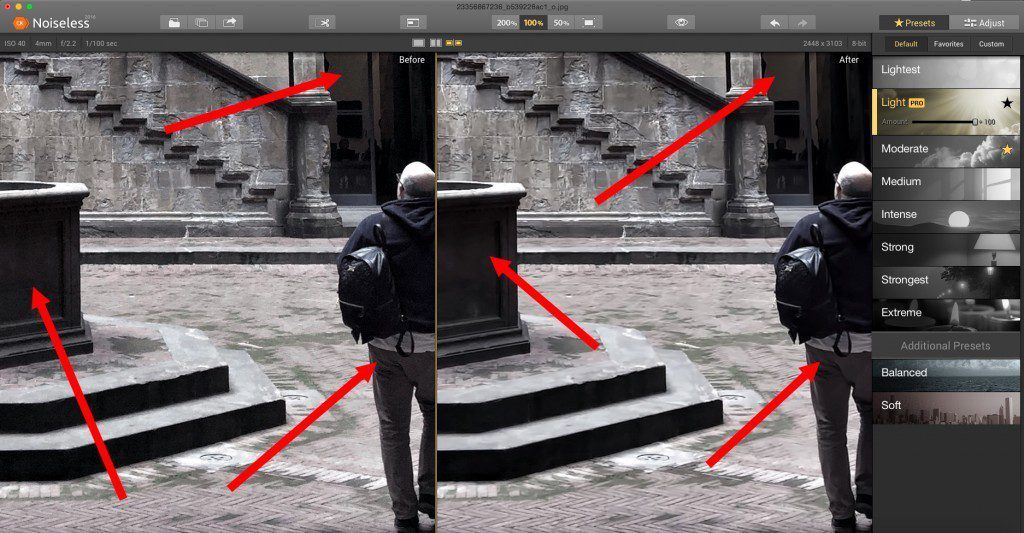
Figure 13 Photo Illustration by Kent DuFault
I told you that I don’t normally use the “Before and After” preview window. In this case, I’m using it so that you can see what the Noiseless CK processing did to the image. Noiseless CK works in real-time. So, every adjustment you make updates automatically. This image did not have a lot of noise to begin with. What noise there was- was mostly in the shadows. If you can’t really see it, here in the .PDF magazine, then click on the link and go look at it on Flickr- large.
If you’re new to noise reduction, pay special attention. Noise reduction software works by “softening” your picture. If you go too far, your picture will look soft, and you don’t want that.
All noise reduction software works hard at trying to eliminate the noise while keeping the details sharp. They all offer different ways to try and achieve that. Many of the programs can get quite complicated.
This is where Noiseless CK really shines in my opinion. Each of the presets offers a slightly different, and stronger, softening effect. And, within each preset you can fine-tune the effect using the “Amount” slider.
It’s simple, easy, and it works really well.
When noise reduction goes too far. Your image will take on a “plastic look”. That’s why; my personal workflow is to identify the noise problem areas before I go into the noise reduction program. I already know how much noise reduction I want.
Like I said earlier, when Noiseless CK selects a “Preset” upon opening an image, it often selects the right one. But not always, even if my initial impression is that the selected preset looks good, I’ll often experiment with the presets above and below the chosen one to see if I like it better.
I should mention that no matter what “Preview” window you’ve selected, a “Hand” icon pops up when your cursor is within the preview window. You engage the “Hand” icon by left clicking your mouse and holding down. This will allow you to navigate around the image. When you release the “Hand”, the noise reduction effect is automatically updated. This is very useful when you’re concerned about noise in just a certain part of a photograph (like the one of the man walking in the courtyard).
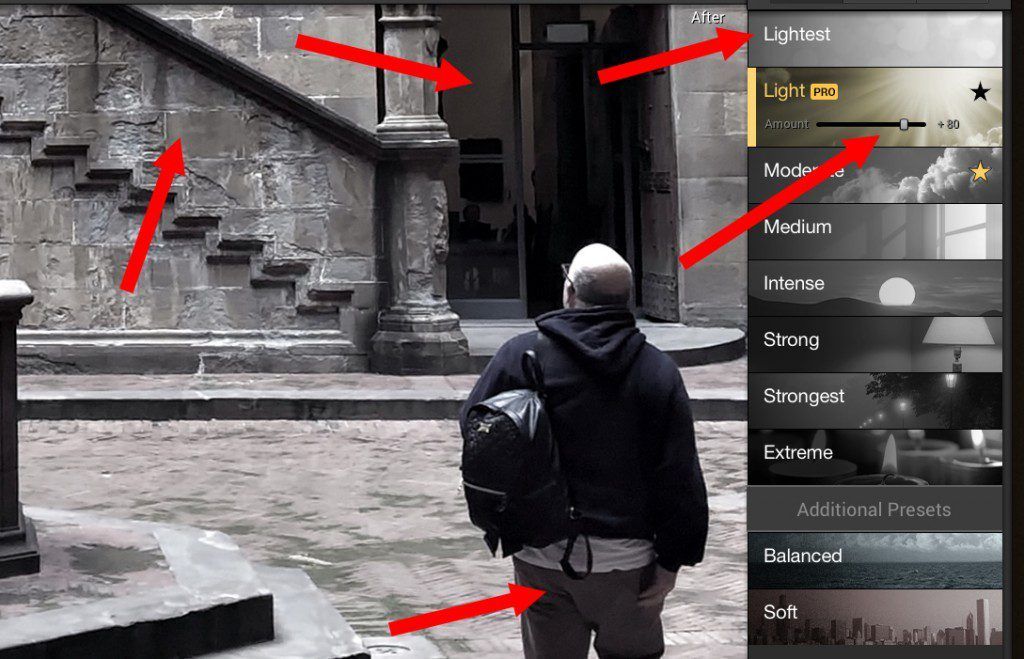
Figure 14 Photo Illustration by Kent DuFault
Let me walk you through figure 14.
- The “Light” preset chosen by the software looked a little heavy handed on the softening, especially on the wall to the left.
- I knew that I didn’t want to go any stronger than the “Light” preset because all of the visible noise was gone.
- I then tried the “Lightest” preset. However, it did not eliminate the noise in the shadow areas to my satisfaction. So, I returned to the “Light” preset.
- I then began adjusting the “Amount” slider while studying the shadow areas of the pants and the wall in the back.
- The +80 setting got rid of my noise, without disturbing the wall and other surrounding areas.
- I saved my photo, and I was done. This may seem like a lot of information. However, you can literally accomplish this in seconds. And if you feel inclined, you can batch process your images.
I’m not going to go into the batch processing function. It works really easy, and Macphun has a nice tutorial video on their website about batch processing. I will say, “I’m not a fan of batch processing noise reduction. Every photograph can record slightly different noise levels- even when they were shot in the same location. I think the best results come from doing a good edit on your shoot. Select the very best images. And, do all of your post-processing on that group separately, including noise reduction.”
If you’re new to noise reduction, I would like to make a quick comment.
I see a lot of photographers abuse noise reduction. It’s as if they feel there should be no texture in the photograph whatsoever. I don’t believe in that philosophy, and I think it makes an image look fake. You’ll need to make your own judgments. If you click the link and look at figure 14 large, you’ll notice some texture (very light noise) still visible in my problem areas. That is how I think it should be. Macphun Noiseless CK could easily wipe out any hint of noise. I just don’t like my images looking that way. Even in the days of film, there was always a little grain that enhanced the image.
I’m going to over-process this same shot, so you can see a comparison.
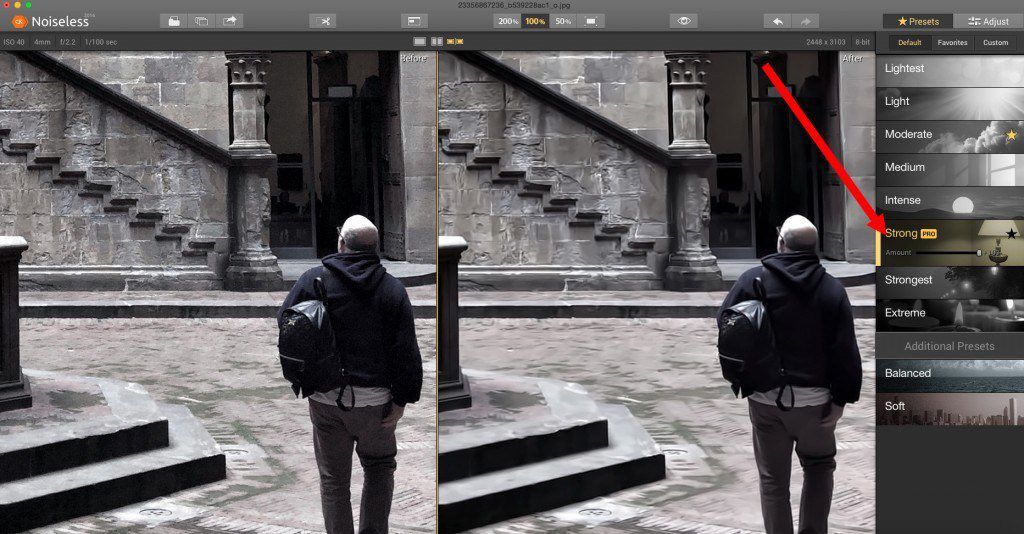
Figure 15 Photo Illustration by Kent DuFault
I processed it at the “Strong” preset. Look at it large on Flickr, if you can’t see it here. All texture has been removed. The image now has that “plastic” look.
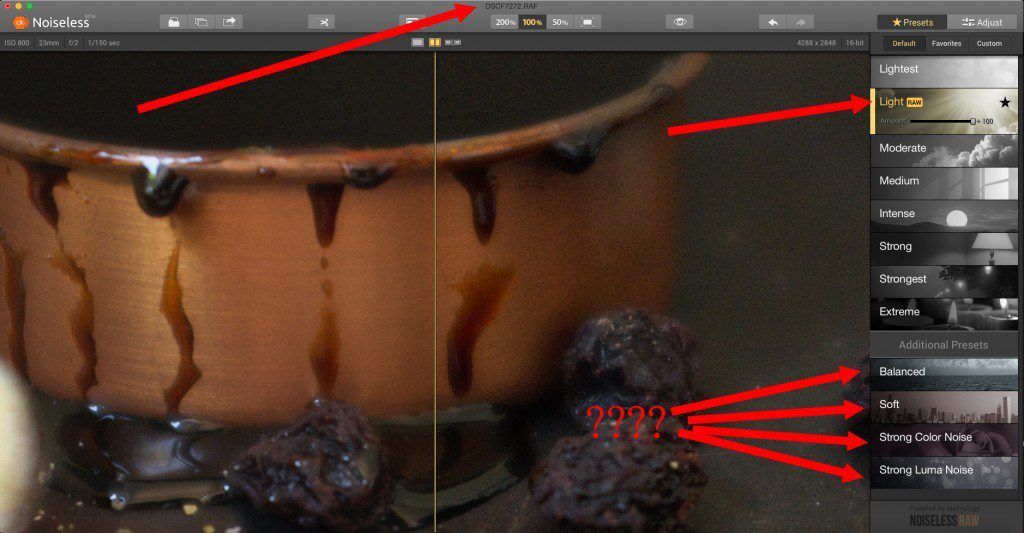
Figure 16 Photo Illustration by Kent DuFault
SURPRISE! Are you surprised? I sure was! Macphun boasts that Noiseless CK is compatible for working on raw files. Despite the fact that I’ve been using the program for a while now, I had never bothered to open a raw file before. So I did, and boy was I surprised. The “Preset” tool bar changed, including two new presets that I had never come across, either using the program, or researching on the Macphun website. That brings up a negative point for this review.
I love the Macphun software. But they are not up to par when it comes to documentation, FAQS, and their website. The website is riddled with broken links, and some may find this confusing… In 2015, Macphun changed the name of the software package from “Noiseless Pro” to “Noiseless CK”. That wouldn’t be a problem except… some areas of the website, and documentation, still refer to Noiseless Pro, while other areas refer to Noiseless CK. That can be confusing. I’m pretty familiar with the company, and their products, and even I got confused wondering if there were more versions than I was aware of. On top of that, there is no FAQ section. I wanted to know what was the difference was between the “Noiseless” version that is available on the APP Store and Noiseless CK. It took a fair amount of digging for me to find that answer. Also, when you have presets that you’ve given names to like “Balanced” and “Soft”- what does that mean? What do those presets do? I probed all over their website looking for answers to those questions, and I couldn’t find any. And, a beginning photographer will not know what the difference is between “noise”, “color noise”, and “luma noise”. I think Macphun could do a better job of explaining the software and how to use it. Now, I should mention that they have some tutorial videos, but honestly, they’re not even as in-depth as this review is.
Now, having said all of that. My big question with the raw file support was- could you apply the noise reduction and that information was stored in the raw META data file?
The answer is sort of a yes and no. Again, some documentation would have been nice!
My raw file, which I opened up in figure 16, was a .RAF. That is the Fujifilm extension for their raw format files. You know that each manufacturer has their proprietary file extension.
Noiseless CK allowed me to open the raw file and make adjustments. However, in order to preserve those changes, I had to do one, of two things-
- Do a “Save As”, which changed the file format to whatever I saved it as. So no raw META data-
- But, then I discovered, that if I just closed the file without doing a “Save As” – the program prompted me, and asked me if I wanted to save it. I said, Yes”. And, it created a file in a proprietary format called .mpn. And I thought, Okay. It did create a META data file. BUT- the file cannot be opened by either Photoshop or Lightroom. It can’t even be opened up the other Macphun software apps- I tried. It can only be opened up by Noiseless CK. That makes that function pretty worthless in my opinion.
With that knowledge, I’m back to saying that the raw support is simply that you can open up a raw file, work on it, and save it in another format.
CONCLUSION
I’ve said it several times, so this is no surprise to you; I like Noiseless CK a lot. In fact, I’ll go so far as to say that I think it is the best noise reduction software that I’ve used to date.
I like that it is super easy, but allows you to take greater control if you want to.
The actual noise reduction is cleaner, and leaves more detail in the areas that you want it to, than any of the other software reduction programs that I’ve used. The “Amount” slider is just a phenomenal tool!
It can be used as an APP or a plugin, and purchased separately or in a bundle.
Macphun provides the “Family License”, which is totally awesome!
The workspace is clean and uncluttered.
Finally, the real-time updating is lovely. There is no having to press an apply button every time you change something.
On the downside, you must be an Apple Computer user.
The documentation is poor. I didn’t try their support help because they only have two options: email or telephone support. In today’s environment, especially from a tech company, you would expect them to have online chat. Email is too slow, and I hate sitting on hold for the telephone. With chat, I could have simply opened a chat window and asked, “What does the Balanced preset do? When would I use it?”
There is no preferences adjustments tab, which is probably my biggest concern. I get really tired of constantly navigating out of the 200% preview.
There should be a Facebook share option.
Finally, their website needs an overhaul. I say that, not for the buying experience, which actually went very smoothly- but for the passing on of information. Plus, it’s frustrating to click links that don’t work, or spend mucho time trying to find some pertinent piece of information.
Would any of these negatives keep me from buying Noiseless CK? Absolutely not!
Digital images must have noise reduction software run on them, and this is the very best program out there in my opinion.
Right now you can get a copy of Noiseless CK for 50% off. Make sure you head over here now to take a look. (There’s some amazing before and after examples to see as well) Go here now: https://macphun.evyy.net/c/222378/262698/3255


