
Do people often tell you that your photos are too dark? Do you often break the rule that says, “expose to the right”? If you like dark and moody photographs, low key photography is for you.
Low key is a style of photography that emphasizes darkness and shadow. The photographs have a shadowed, maybe even completely black, background. The subject seems to almost swim out of the shadows. It is not that light is unimportant. After all, photography is painting with light. Light is used to shape the darkness. Without it, your picture would be subjectless and completely black.
Low key photography is as much about feeling as it is about technique. The photos are moody and mysterious. They are dark and dramatic. If you are new to photography, the low-key style goes against many of the rules you have learned about properly exposing an image. Low key is not a “well exposed” image. It is an intentionally darkened picture created for effect.
Low key photography is about controlling light and using shadows as a feature of your image. In this article, we will explore how to create low-key images. We will show you how to achieve this mysterious look in a studio with controlled lighting. But we will also search out dramatic opportunities in nature and landscape. Finally, we will give you some tips to heighten the low-key effect in post-processing.
What we will cover:
- Low Key vs. High Key
- Elements of a low-key photography
- Creating a low-key image in a studio
- Creating low-key nature and landscape images
- Post-processing low key images
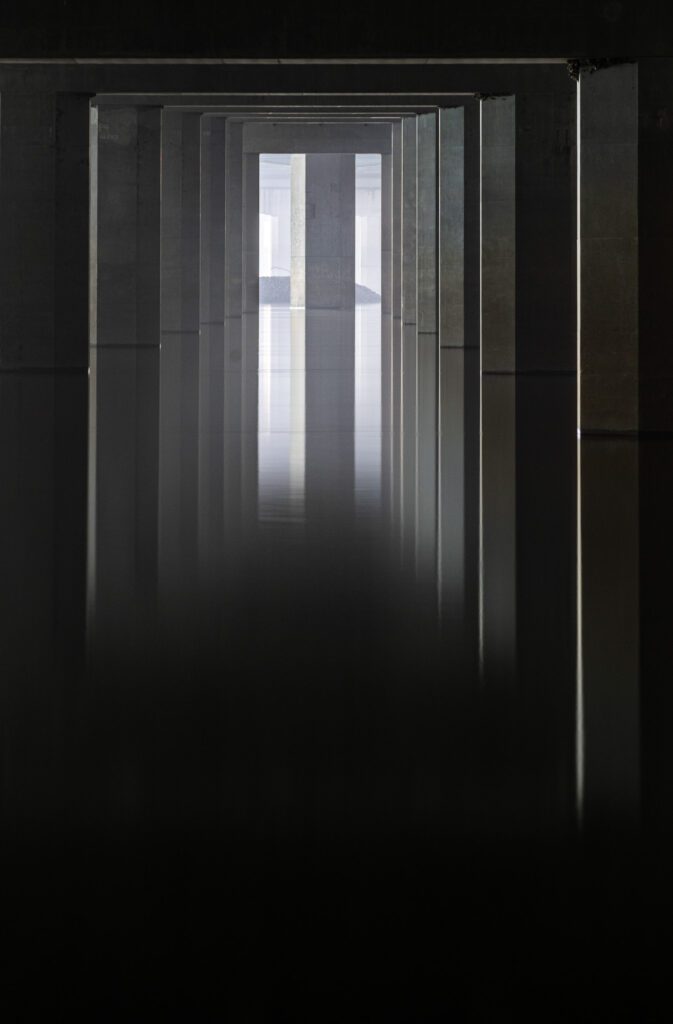
Low key photograph was taken under a bridge at night. The reflection of the river and most of the bridge is in darkness. Only the vertical lines of the bridge structure are illuminated by the moon and the lights on the bridge. My settings were 30 seconds at f/8.0, ISO 800. Photograph by Jenn Mishra
Recommended Reading: After learning about camera settings, improve your photographs by understanding how light works! Grab a copy of Photzy’s premium guide, Understanding Light Book One.
Low Key vs. High Key
Low key is the flip side of high key photography. Low key emphasizes blacks and shadows. High-key image favors whites and light tones. Low-key photos are dark and moody. High-key photos are bright and airy. They feel like they could float off the page.

A high-key image of birds on a foggy lake. High key has an ethereal look that emphasizes whites and highlights. This photo has no shadow detail or blacks. Photograph by Jenn Mishra
Comparing the histogram of a high and low-key image shows just how different the tonal values are. If you are new to histograms, they chart the range of light in your image. From left to right, they show how much black, shadow, mid-tone, highlight, and white are included in your photo. The higher the peak, the more of that tone is found.
Low-key photos are dark and moody. High-key photos are bright and airy.
In a high key image, the peaks favor the right side of the histogram. This shows that there are a lot of highlights and whites in the picture.
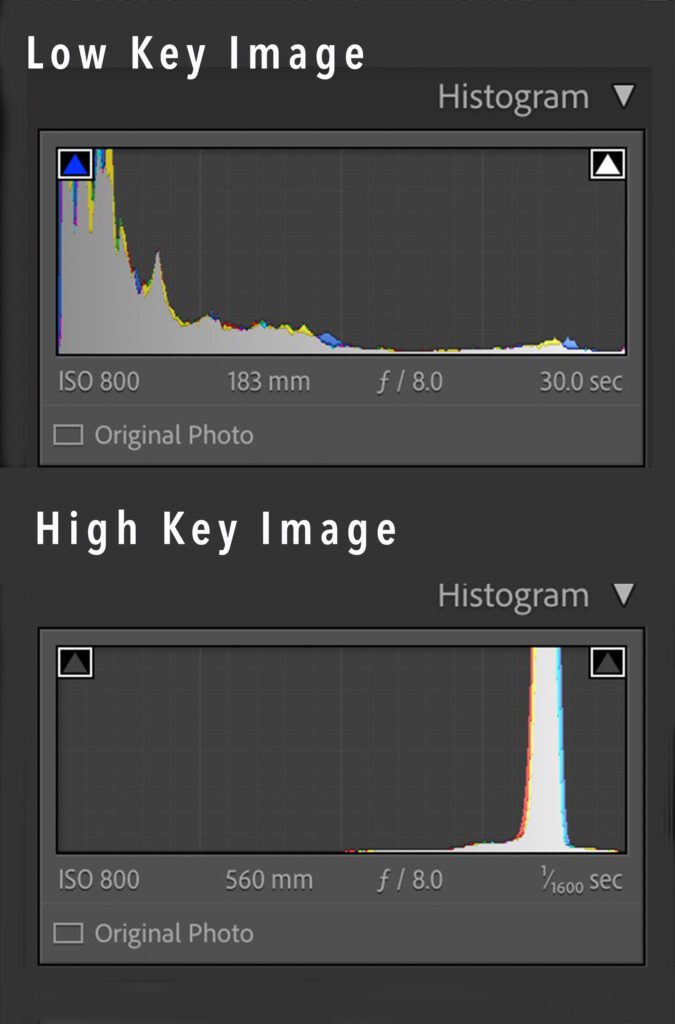
Compare the histogram for a low-key image (top) with one from a high key image (bottom). The low-key histogram is of the bridge photo from the previous section. The high key histogram is of the swan image above. In both histograms, peaks are less distributed across the graph than you would expect from an evenly exposed image. Photograph by Jenn Mishra
In the example above, the high key histogram (bottom) shows an extreme peak in the highlighted area of the graph. There are no blacks or shadows at all in the image.
The histogram of a low-key image (top) is the opposite. Peaks push towards the left favoring the blacks and shadows. “Expose to the right,” a popular exposure rule, is no longer the goal. An evenly exposed image will usually show peaks near the center, mid-tone range.
Elements of a Low-Key Photo
Low key photos are dark. But there is more to the style than simply underexposing your image. Decide where you want the light. Also, how much light to use. The subject of a low-key photo is illuminated with a targeted light source, like a low-level flash. There is no need to light up an entire subject. The shadows are as much a part of a low-key image as the light. Highlight an edge or half of your subject. Let the rest of the shape fall into darkness. Some low-key images show only a hint of a line or a shape. The result may be almost abstract. Low-key photography is about mystery. Your viewer wonders what you have hidden in the darkness.
Also, decide how much detail to show in the background shadows. It is ok if you fade to black or near black. But you can also show some detail. It will look more natural to brighten the shadows around the light source. Then fade into the darkness at the edges of your frame.
Consider Textured Surfaces
Many low-key images emphasize texture. This is a result of heavy shadows, especially those created by a sidelight. A surface can look flat and two-dimensional in bright light from in front of the camera. But it becomes textured and deep when the lights emphasize shadows. Low-key photographs are often more interesting if you photograph subjects with a lot of surface texture.

Compare the histogram for a low-key image (top) with one from a high key image (bottom). The low-key histogram is of the bridge photo from the previous section. The high key histogram is of the swan image above. In both histograms, peaks are less distributed across the graph than you would expect from an evenly exposed image. Photograph by Jenn Mishra
Portrait photographers often use lighting setups that reduce the appearance of age. But low-key portraiture can have the opposite effect. Shadows emphasize skin texture. This includes wrinkles and imperfections on the surface of the skin. Embrace the difference. Low-key lighting artistically shows the age of your model.
High vs. Low Contrast Low Key Photography
Contrast describes the range of lights and darks in your image. In a high-contrast photo, there is a large difference between lights and darks. A low contrast image can look flat by comparison. The tones fall closely together in a similar range.
In a high-contrast photo, there is a large difference between lights and darks. A low contrast image can look flat by comparison.
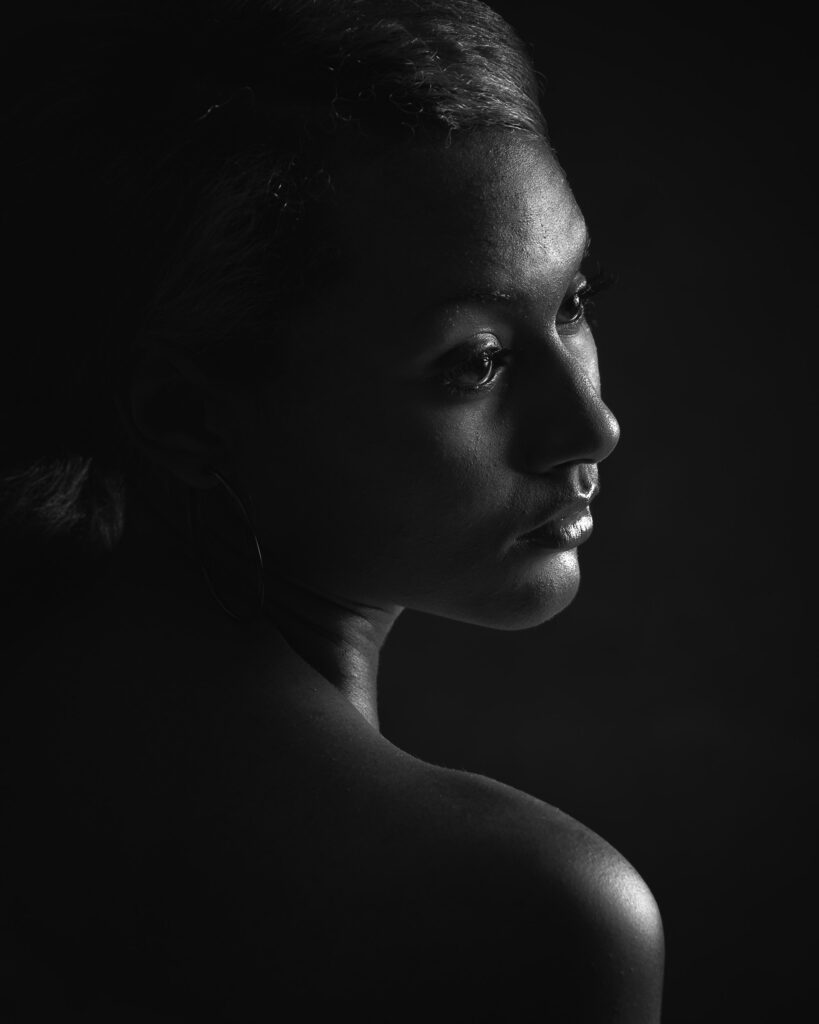
A low contrast, low-key portrait of a woman in sidelight. There is very little tonal difference between the lightest and darkest parts of the image. Photograph by Jenn Mishra
A low-key photo can be high or low contrast. In high contrast and low-key photography, there is a big difference between the lightest and darkest parts of your image. You may see a completely white shape on a predominately black background. Low contrast and low-key photograph have less difference between the tonal values. The brightest parts of the image are in comparative shadow or fall in the mid-tone range.
On a high contrast image, the histogram will show a peak in the whites or highlights in addition to the more predominant peaks in the blacks and shadows. In a low contrast image, the histogram will have little spread. Most of the tones will cluster together.
Color vs. Black and White in Low Key Imagery

A musician plays at midnight on Bourbon street in New Orleans. Compare a black and white, low-key photograph with the color version. Bright colors can detract from the dark tonal values. Desaturating the colors will help reduce the distracting effect of color. Photograph by Jenn Mishra
Low key photos can be in color or converted to black and white. Many photographers favor monochrome because it emphasizes light and shape. These are also two major features of the low-key style.
Color draws the eye and can distract from the important balance of light and dark. But low-key photography does not have to be in black and white. Use darker colors that lend themselves to shadowing. A bright red in an otherwise low-key image will draw attention and diminish the overall effect. Favor darker blues and muted reds. Also, consider desaturating bright colors to emphasize a darker feel.
Recommended Reading: After learning about camera settings, improve your photographs by understanding how light works! Grab a copy of Photzy’s premium guide, Understanding Light Book One.
Low Key Studio Portraiture
In the studio, producing the low-key style takes a lot of control. You may be using one light or multiple lights. They are placed to selectively target part of a face or object. A reflector is useful to bounce the light to a particular area. This can lighten deep shadows. You will have to adjust the power of external light sources manually. The automatic TTL (through the lens) setting is not your friend when creating low-key portraits.
The quality and direction of the light are key to creating shapes in the shadows. Move the light source or your subject around until the light falls just where you want it. Low-key lighting is used when photographing implied nudes. The shape of the body is highlighted. But nudity is hidden in deep shadows.

We used a two-light set up to create this moody, low-key portrait. One lit the model’s hair. The other was a rim light along her face. My settings were 1/100th of a second at f/9.0, ISO 100. Photograph by Jenn Mishra
Use a dark background to heighten the effect. Move your subject away from the backdrop and angle your lights so they will not illuminate it. This may mean moving the light or blocking the light from hitting the background.
The quality and direction of the light are key to creating shapes in the shadows.
Most portrait photographers avoid casting shadows onto their models’ faces. But with dramatic, low-key images, you can be more artistic and break this rule. Some photographers cast deep, even harsh shadows onto their models’ faces. But you can choose to let the light fall off the illuminated elements more gradually.
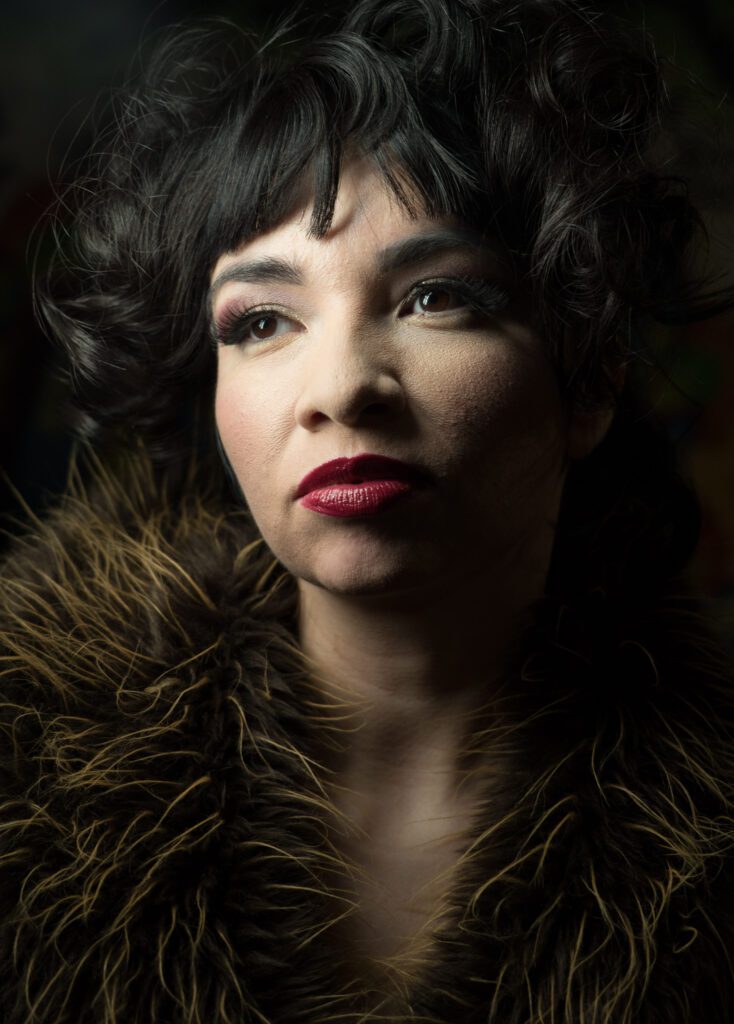
A Westcott Ice Light is a flexible, hand-held constant light source. It allows me to adjust the light on my model’s face. The light was held close to her face on one side. This side lighting emphasizes the texture of the model’s skin. My settings were 1/60th of a second at f/5.6, ISO 800. Photograph by Jenn Mishra
Shutter speed is important when creating a low-key portrait. A fast shutter speed lets in very little light. Only the brightest part of the scene is illuminated. A low ISO creates a clean image and reduces how sensitive your sensor is to light. Generally, this helps create a darker image. If you are shooting portraiture, use a wide-open aperture. This creates a shallow depth of field. Focus drops away from the subject and fades into the shadows.
Low Key Nature and Landscape
It is not just portrait and product photographers in the studio who create low-key images. Nature and landscape photographers can also explore the dramatic, low-key look.
You might think that only night photography can be low-key. But there are ways to achieve a low-key look during the day. The sun is likely your primary light source in landscape and nature photography. But you may also take advantage of artificial light like illumination from streetlights. Like with studio lighting, low-key photography is all about controlling the light. Block some of the light by looking for shade or dappled light. You may be able to play with interesting light patterns. Shooting at dusk and dawn limits the amount of light available and takes advantage of the sidelight possibilities.
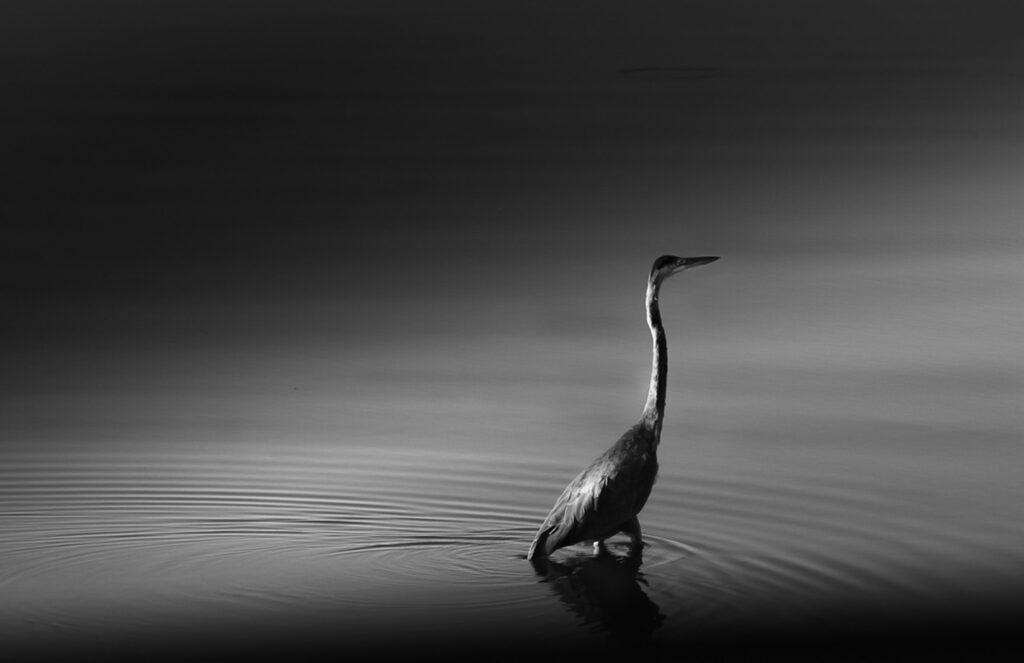
A single beam of light at dawn illuminates this Great Blue Heron on a lake. I enhanced the effect in post-processing. My settings were 1/250th of a second at f/16, ISO 1000. Photograph by Jenn Mishra
Underexpose of the image by adjusting shutter speed. Even in bright sunlight, 1/4000th of a second will probably result in a dark image. Another way to limit the light entering your camera is to use neutral density filters. Photographers use ND filters to create blurred effects in water or clouds. ND filters block the light, but photographers lengthen the shutter speed to compensate. Any movement in the scene blurs. But if you do not lengthen the shutter speed to compensate for the limited light, the result is an underexposed image.
Low Key Post-Processing
A large part of creating a low-key look is in how you choose to post-process an image. Start by changing the exposure to make your image completely black. Then, slowly brighten the image. Stop when you can see the light starting to show. This shows you where the natural highlights are in the scene. Do the same thing with shadows. Change the exposure to make your image completely white. Then, slowly lower the exposure. Stop when you start seeing shadows. When post-processing, you do not have to follow the natural highlights and shadows. But they provide a useful guide.
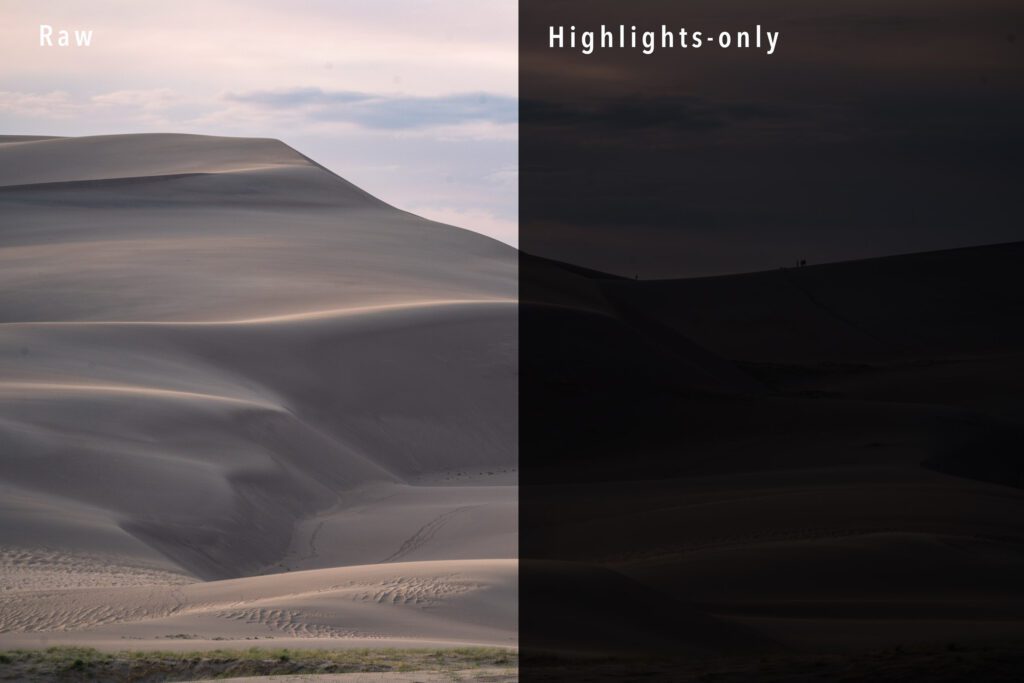
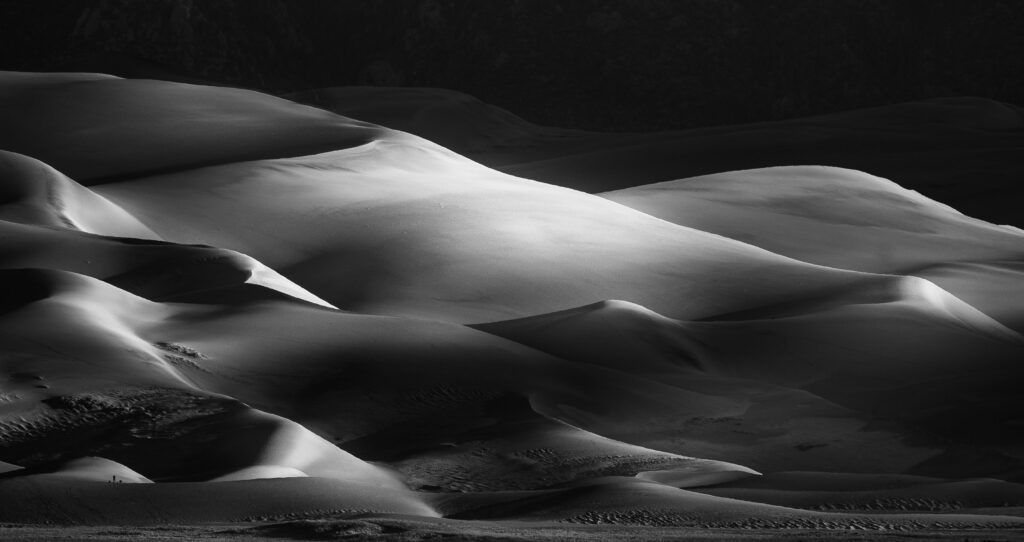
This comparison shows the original Raw image of a sand dune landscape before low-key processing (left). The scene is evenly lit favoring mid-tones. At -3.0 exposure, highlights begin to show. Photograph by Jenn Mishra
Add radial filters or use an adjustment brush to lighten areas of interest and darken areas of shadow. I often use luminosity masking available in Lightroom to target a particular tonal range. Your image will look more natural if you gradually build up the light, letting it spill off into the darkness.
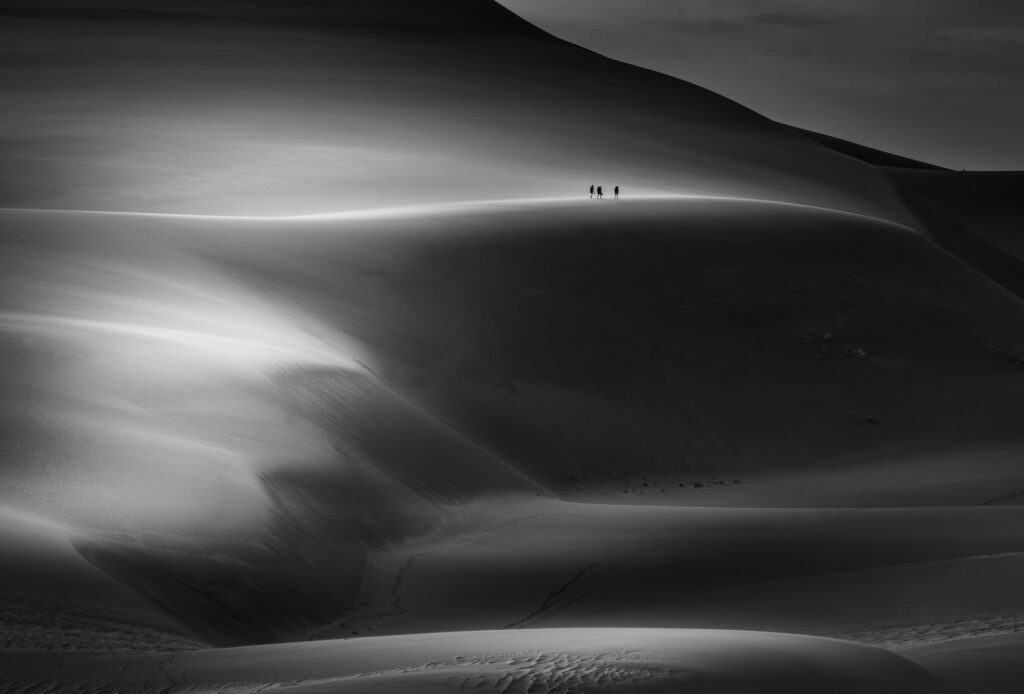
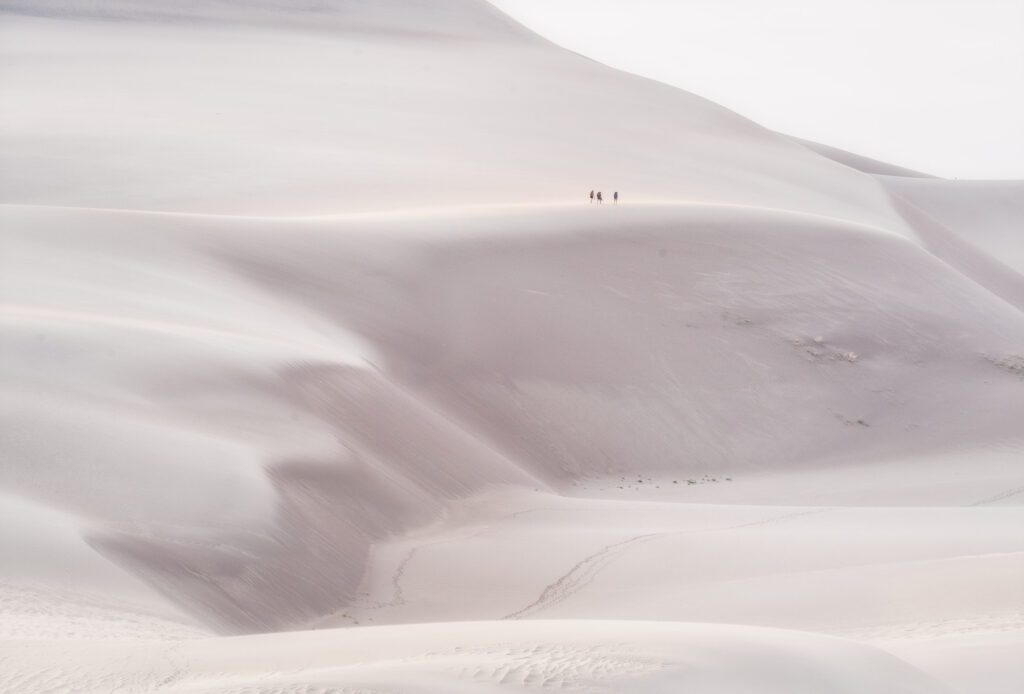
I created the low-key look to this sand dune landscape in post-processing using radial filters to bring out the light from the darkness. Photograph by Jenn Mishra
In addition to exposure, also adjust contrast and saturation. Explore lowering contrast and saturation, especially in the shadows. Desaturating can also limit the distraction created by bright colors. Finally, add a dark vignette to bring visual focus to the center of the frame and further darken the edges.
The low-key look is not inherent in the scene. With different post-processing decisions, I can emphasize the lighter tones and create a high-key image.
An alternate way of post-processing sand dune landscape favoring lighter tones. This creates a high key effect. Photograph by Jenn Mishra
Recommended Reading: After learning about camera settings, improve your photographs by understanding how light works! Grab a copy of Photzy’s premium guide, Understanding Light Book One.
Conclusion

Photograph by Jenn Mishra
In a low-key image, the shadows are as much a part of the image as the illuminated elements. Light serves to shape the darkness. The effect is mysterious because the light may only hint at the outline of a form. Low-key photography is less concerned with details, especially in the shadows. Parts of the image may fall completely to black.
Self-Check Quiz:
- What features define a low-key image?
- How is a low-key photo different from a high-key image?
- Describe how the histogram looks for a low-key image.
- What is the difference between a low and high contrast, low key image?
- What are some things to consider when including color in a low-key photo?
- Describe the camera settings used for a low-key portrait.
- How might neutral density filters be used when creating a low light image?
- What type of light most enhances texture?
- True or False. Portrait photographers should avoid casting harsh shadows on their models’ faces when creating low-light portraits.
- In low-light portraits, the background should be dark. How might you fix the situation if too much light falls on the background?