Are you an avid Adobe Lightroom user, but you’re unsure of how exactly to use the tools in the Detail Tab?
Photzy has you covered.
Author and photographer Kevin Landwer-Johan is going to walk you through step-by-step how to use the Sharpening and Noise Reduction tools that are located in the Detail Tab section of Lightroom.
For example, did you know that the Sharpening Tool has a masking option that will allow you to control where the sharpening is placed? Plus, this masking tool is ridiculously easy to use once you know how to use it!
Here are the skills that Kevin will discuss with you:
- What is the purpose of the Details Tab in Lightroom?
- How to access the Details Tab
- How to increase productivity while accessing tabs and working in Lightroom
- An in-depth explanation of the Sharpening Tools
- How the Sharpening Masking function works and why you should use it
- An in-depth explanation of the Noise Reduction Tools
- The difference between luminance noise and color noise (chromatic noise).
Lightroom is a powerful and versatile program that gives you the ability to control how your photos look. This control can happen on both macro and micro levels. Many users make macro alterations to manipulate the appearance of their images, but fewer venture into using the Detail Tab. The Detail Tab is an excellent tool for making more subtle adjustments that can make your photos pop.
Photo Credit: Kevin Landwer-Johan
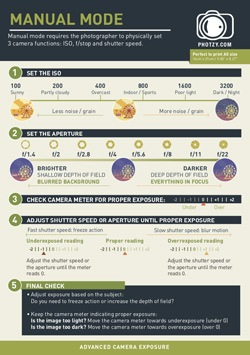
Want More? Get the Snap Cards Essentials cheat sheet set. With these extra cheat sheets (20 in total) you’ll never have to fumble with your settings and miss that great photo opportunity again!
Not only will these Snap Cards give you a simple and beautiful way to learn photography on-the-go… They’ll also give you the confidence to experiment. Because now, if you get stuck with a problem, you’ll have the answer right there with you in your camera bag! Go here now to find out more – The Snap Cards