Using the cropping tool well in Lightroom can help you gain a deeper understanding of composition in photography. A strong composition is one of the key aspects of every good photograph.
In this article, you’ll learn techniques for how to use the cropping tool in Lightroom to strengthen your compositions. You’ll also learn that taking the time to crop as you post-process your photos, will help you appreciate the rules of composition more. This will also help you when you take photos.
Recommended Reading: If you’d like to improve your composition skills for better images, grab a copy of Photzy’s best-selling premium guide: Advanced Composition.
What the Cropping Tool Does in Lightroom
The cropping tool in Adobe Lightroom is used to reshape and straighten your photos. You can use it so the aspect ratio of the photograph remains the same, or to create a rectangle or square of different proportions.
A strong composition is one of the key aspects of every good photograph.
When you have a sloping horizon or leaning vertical line, you can use the cropping tool to straighten it.
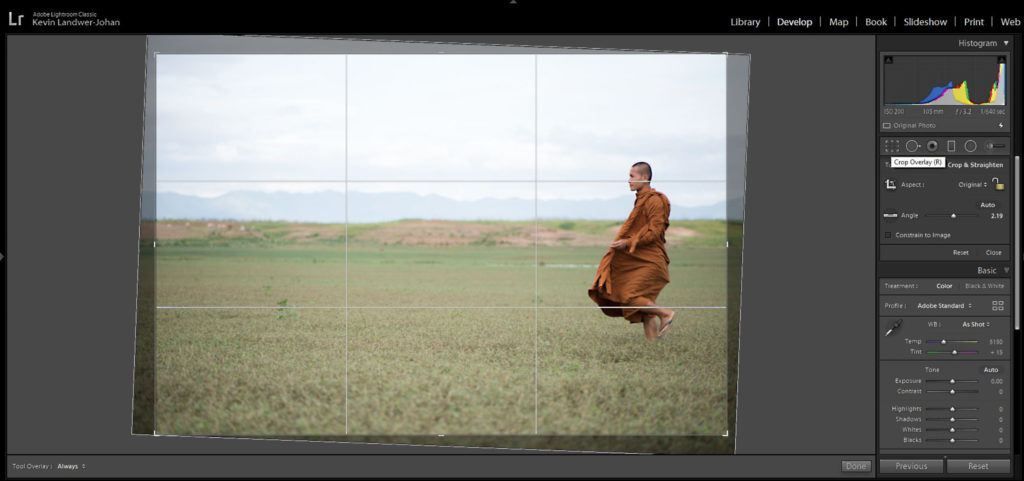
The cropping tool is located in the tool strip between the Histogram and Basic panel on the right side of the Develop module. You can also press the ‘R’ key to select this tool.
Photograph by Kevin Landwer-Johan
This image shows the location of the cropping tool and how it can be used to straighten a photo where the horizon is not level.
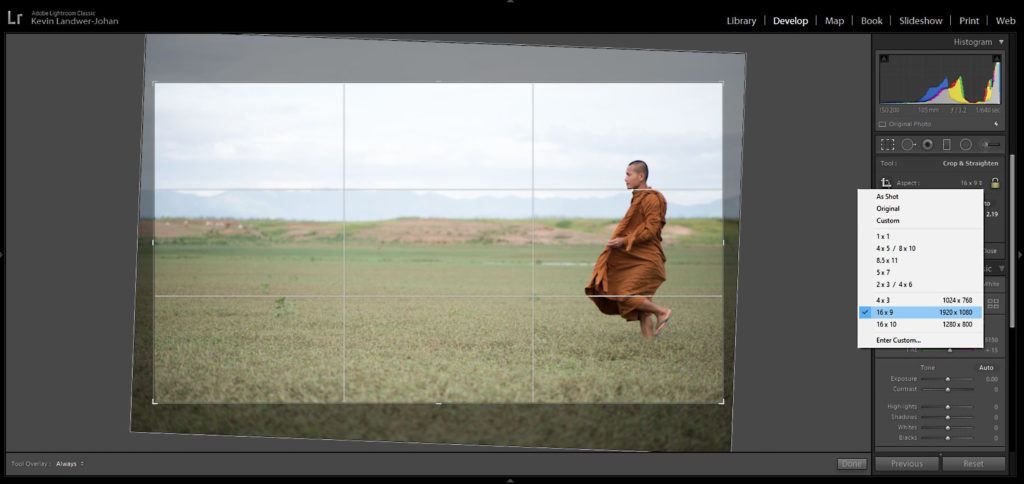
With the crop tool selected, you can click and drag the handles that appear on the edges of the frame to resize. Click and drag on the corners to straighten your photos. The cursor will change to a curved double-headed arrow when straightening is active.
Photograph by Kevin Landwer-Johan
Click on the padlock icon to lock the aspect ratio of your photo. Or click beside it to select an alternative aspect ratio from the drop-down list or create a custom ratio.
Once you’ve adjusted the crop of your image so you’re happy with it, hit the ‘Enter’ key to commit your changes.
Key Lesson: As with all editing in Lightroom, the crop tool is nondestructive. You can reset your photo to the original crop by clicking the ‘Reset’ button at the bottom of the panel when you have the crop tool selected.
Use the Cropping Tool to Improve Composition
I learned photography using film, so cropping in-camera was more practical as I was mostly using slide film and did not often have prints made. With digital photography, cropping is much easier when working on your photos in Lightroom.
I still believe it’s good practice to crop well in-camera, but I am not averse to making good use of the cropping tool in Lightroom to improve my images.
Often, I’ll see an image differently on my computer screen than how I saw it when taking the photo. This is particularly so when I’m photographing people or any sort of action. When I’m sitting editing my pictures, I have more time to study this style of the image than when I am out with my camera.
When you are learning composition, using the cropping tool can help you see your photos in new ways. For me, this is an ongoing experience. Because cropping well is an essential element of good photography, I think it’s healthy to keep experimenting and learning how to do it better.
Take your time to study photos in Lightroom and consider how they can be improved by cropping. You’ll become better at seeing good compositions as you are taking your photos.

Photograph by Kevin Landwer-Johan
Applying Composition Rules With the Lightroom Cropping Tool
Sometimes it can be easier to see how a photograph you’ve taken can conform to a particular composition rule once you’re looking at it on your computer. It’s possible that the rule of thirds, symmetry, the golden ratio, and others can all be applied when cropping in Lightroom.
When you’ve been sitting looking at an image you’ve taken for a while, you can begin to see it differently. You can start to experiment with the crop tool and alter the shape of the photograph to make it more pleasing to look at.
By simply dragging in the left or right edge, you might be able to contain your main subject so it appears precisely on one of the vertical third lines. Dragging the top or bottom edge can bring your subject onto one of the horizontal thirds.

Photograph by Kevin Landwer-Johan
These cropping changes can be very subtle at times, and other times you can end up cropping out large portions of an image to make it conform to a rule. As with any rule, don’t adhere to it just because you think you have to. Design your compositions by using the cropping tool to improve your photos. Make them look how you want them to. If the rule of thirds, or any other rule, does not suit the picture, don’t crop it that way.
Key Lesson: The only composition rule I try to stick to most of the time is to fill my frame. Making sure that whatever is in your frame is relevant makes for more compelling compositions. The strongest images are often those with one clear main subject. Only include in the frame elements that support your main subject. This strengthens the narrative of your photograph. Sometimes leaving empty space helps to fill the frame when it’s intentional.
Recommended Reading: If you’d like to improve your composition skills for better images, grab a copy of Photzy’s best-selling premium guide: Advanced Composition.
Composition Tools and Guides in Lightroom
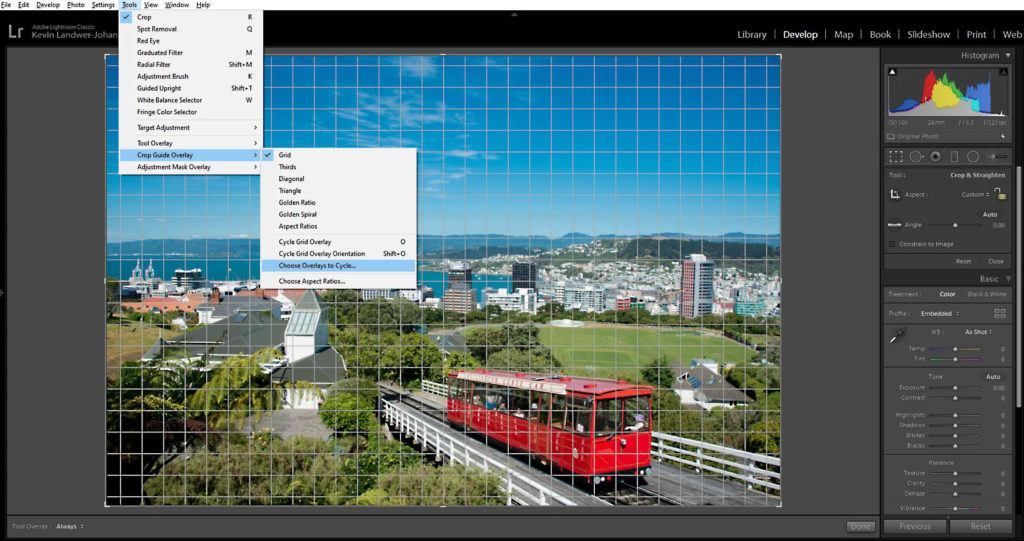
Within the Lightroom cropping tool, there are a series of overlays you can use to help guide your compositions. “O” is the shortcut key to turn on the grid overlay when you have the crop tool selected. Each time you press the “O” key, you will see the grid overlay change.
You can manage the overlays you see when you cycle through by going to Tools in the top menu. Then choose Crop Overlay Guide > Choose Overlays to Cycle.
Photograph by Kevin Landwer-Johan
Here you can select the overlays you use most frequently and turn the others off. The options are as follows:
- Grid
- Thirds
- Diagonal
- Triangle
- Golden Ratio
- Golden Spiral
- Aspect Ratios
When you have the crop tool selected, you can choose to show or hide the overlays. At the bottom-left of your image, you will find the place to turn the overlays on or off or to Auto. When you select Auto, the overlays will only show when you click and drag on the cropping tool.
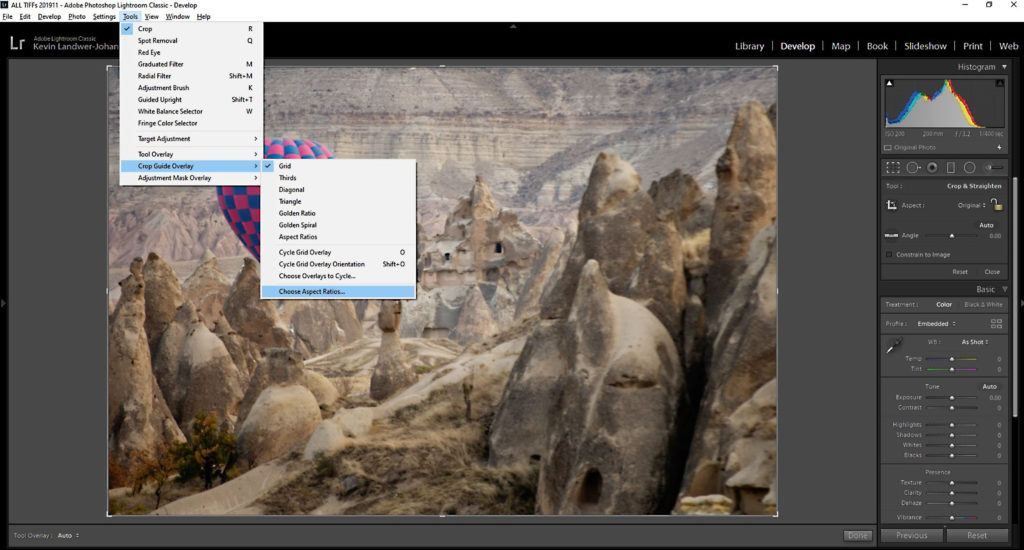
Also, under the Tools menu you can select Crop Guide Overlay > Choose Aspect Ratios to turn various aspect ratios on and off.
Photograph by Kevin Landwer-Johan
Here you can select to display only the aspect ratios that you prefer to use.
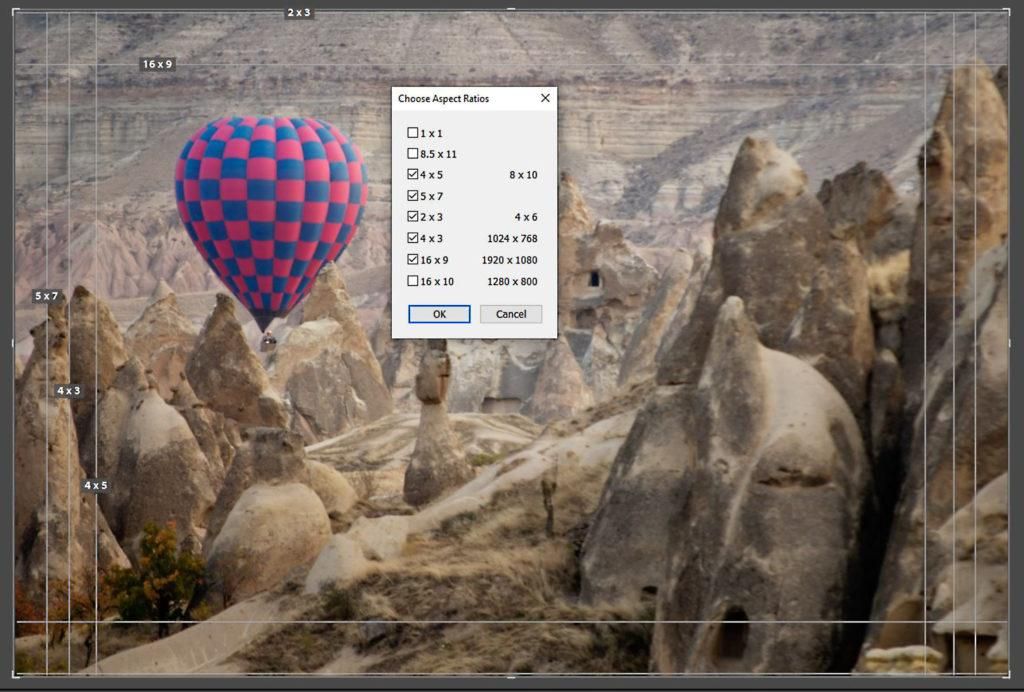
Photograph by Kevin Landwer-Johan
Key Lesson: Pressing Shift+O when you have any of the overlays that are not symmetrical displayed rotates them. So, if you are using the Golden Spiral overlay, for example, and you need to flip it, press Shift+O repeatedly until the spiral overlay is oriented to how you want it.
How Overlays Can Help Improve Your Composition Skills
Any of the overlays in Lightroom can be used to help improve your composition skills. When you’re learning the rules of composition, it can be challenging to know which one to use. Applying the rules is usually best done when you’re taking photos. But when you’re viewing your photos in Lightroom, you can experiment and learn.
Design your compositions by using the cropping tool to improve your photos.
When you have a photo on the screen that you like but are not sure if your composition is as strong as it could be, select the cropping tool and turn on the overlays. Scroll through each of the options slowly. Experiment by dragging the edges to discover if what’s in your photo will conform to one or more of the overlays.
Practicing this with a series of images will help you see how you compose the different subjects you photograph. Do you typically center your subject? Do you usually place it on one of the thirds? How often do you apply the Golden Ratio?
Thinking about these habits you see emerging can help you next time you’re out and about taking photos. You’ll be able to imagine them as you compose your pictures and become more creative with your in-camera cropping.
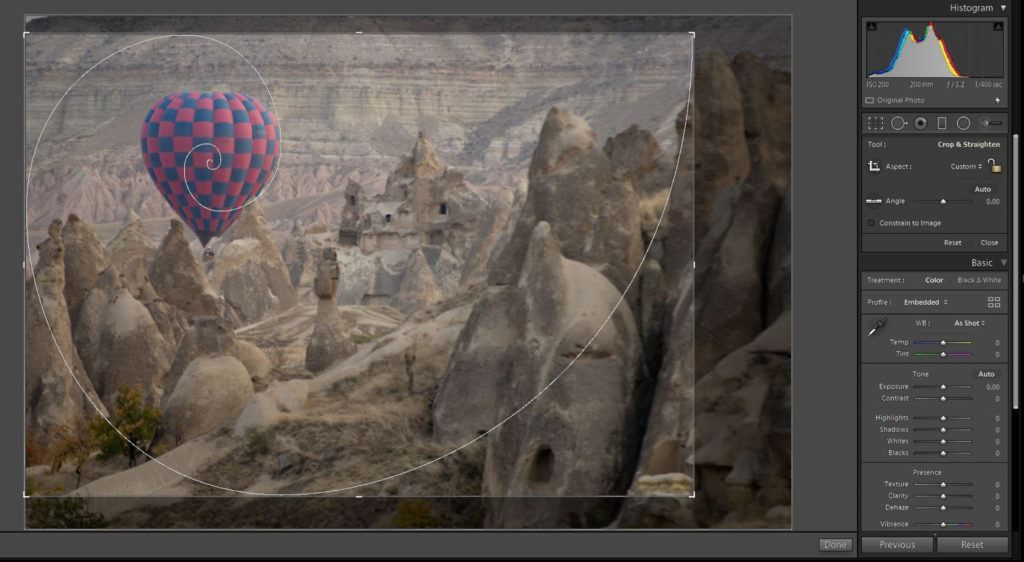
Photograph by Kevin Landwer-Johan
Recommended Reading: If you’d like to improve your composition skills for better images, grab a copy of Photzy’s best-selling premium guide: Advanced Composition.

Photograph by Kevin Landwer-Johan
Conclusion
The cropping tool in Lightroom should not be overlooked. Some people feel strongly about never cropping an image. I prefer to use the tool sparingly, as getting it right in-camera is a noble goal. But, when you don’t, the crop tool is there for you.
When you’re learning, which can be an ongoing experience for as long as you want to continue, the crop tool is helpful. Make use of the guides. Experiment. Try new things. This will help you learn to see in new ways when you have your camera in your hands.
Self-Check Quiz:
- What is one of the key aspects of every good photograph?
- What are the two main things you can use the cropping tool in Lightroom for?
- What is the shortcut key for the cropping tool?
- What is the shortcut key to display the overlays?
- Can you lock the aspect ratio of an image as you are cropping it?
- Is the cropping tool destructive or non-destructive?
- What is the only composition rule I try to stick to?
- How can you use the overlay grids to help you learn composition?


