The first step taken when editing a photo in Lightroom is often making global adjustments. These are edits you make that affect the whole of your image. Lightroom also has a great selection of tools with which you can make secondary adjustments that are more localized. One of these tools, which is the main topic of this guide, is the Linear Graduating Tool. It’s also known as the Graduated Filter.
This Lightroom tool takes its name from the photographic accessory commonly used by photographers to darken a bright sky when taking landscape photos. This tool in Lightroom is far more versatile than the traditional glass filter, so don’t let its name limit your thinking about what you can do with it. The graduated filter in Lightroom is far more powerful and useful than you may think if you have not experimented with it yet.
In this guide, I’ll walk you through enough of how to use the Linear Graduating Tool to get you started. I’ll also present some ideas for how you can use it to enhance your photos. Then it’s up to you to experiment with it and be as creative as you like.
How to Apply the Linear Graduating Tool in Lightroom
Photograph by Kevin Landwer-Johan
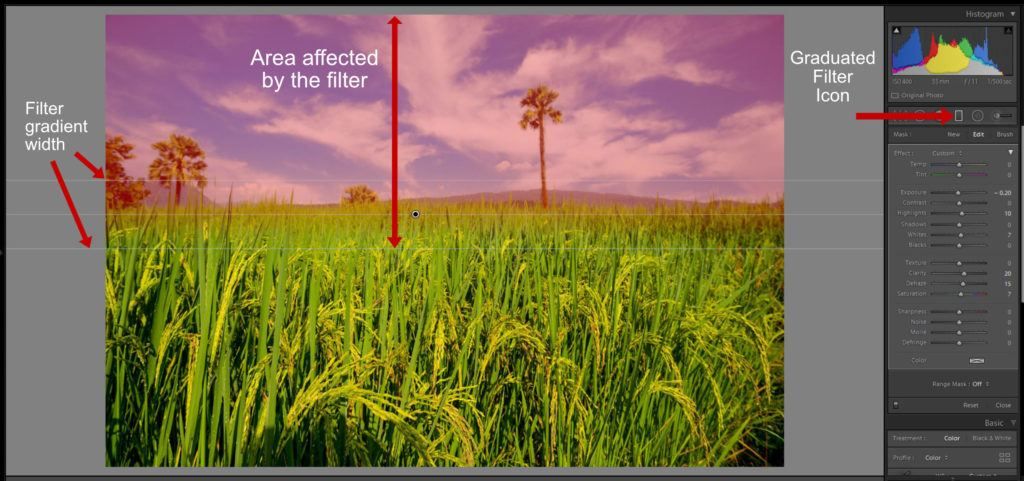
You’ll find the Linear Graduating Tool below the histogram in the right-hand panel when you’re in the Develop module. The icon is a rectangular shape. You can also activate this tool by pressing ‘M’ on your keyboard.
Apply the graduated filter by left-clicking and dragging your mouse across the area in your image that requires adjustment. You can vary the degree of the gradient by how long you hold and drag your mouse for. Dragging a short distance creates a filter with a very short gradient range. Making the filter wider creates a smoother, wider gradient.
The graduated filter in Lightroom is far more powerful and useful than you may think if you have not experimented with it yet.
Holding the Shift key as you drag your mouse to create the filter will keep it parallel with the edge you are dragging from. By hovering your mouse to one side of the pin, you will notice the pointer becomes a curved double-headed arrow. You can now rotate your graduated filter.
After releasing your mouse button, you can click and drag on the pin on the filter to reposition it. You can also drag either of the outside lines of the filter to adjust the degree of smoothness of the gradient. When the spot on the pin is black, you know the filter is active.
Key Lesson: Hovering your mouse over the pin or pressing the ‘O’ key shows you the area of your image affected by the filter. The default highlight color is red, but you can change this by pressing the Shift key as you tap the ‘O’ key. This can be helpful when there’s a lot of the color red in the image you’re working on.
Recommended Reading: If you’re interested in improving your post-processing workflow, check out Photzy’s Understanding Masking premium guide. It has sections on Lightroom and Photoshop, as well as Snapseed for mobile users, too.

Photograph by Kevin Landwer-Johan
Here I have used the Linear Graduating Tool to darken the bright wall of the house and alter its color slightly. I used a very narrow gradient because I did not want it to affect the wooden window frame, only the light-colored wall.
How to Selectively Erase Parts of the Gradient Filter
Often you will have an image that does not have a straight line as I have in the previous example. This is common when using the filter to darken a sky. In these cases, you can erase parts of the filter so it’s only affecting areas of the image you want it to.

Photograph by Kevin Landwer-Johan
Key Lesson: When the spot on the filter is black and the filter is active, click on ‘Brush’ at the top of the panel. You can also use the keyboard shortcut, which is Shift+T. This opens up an additional window in the panel below the adjustment sliders. Here you should select ‘Erase.’
You can control the size, feather, flow, and density of the brush. This allows you to have more control to be more precise as you are erasing parts of the filter. Tapping the ‘Z’ key will zoom into the image allowing for even more precision. This will help you avoid erasing parts of the filter you want to keep active.
You can also add to the filter by selecting ‘A’ or ‘B’ rather than ‘Erase’ and painting on additional areas where you want to see the effect of your filter.
Using the ‘O’ key to activate the visibility of the mask is most helpful when you are using the brush to either erase or add to the filter.
What You Can Use the Linear Graduated Filter For
Probably the most popular use for this filter is to darken bright skies. This is certainly a bona fide use, but there are so many ways you can make use of this filter in creative ways.
The key for how to make the best use of it is in how you make adjustments with the sliders. How you combine the level of each slider allows you to alter the filter in endless ways. Apart from using it to darken a sky, you can:
- blur parts of your photo,
- adjust the contrast and clarity,
- control highlights and shadows,
- darken the edges of a photo, and
- add color to an area.
This list could go on and on. As you look at an image you are working on, see if there’s any part of it that needs some local adjustments. If the part of the image has a relatively straight dividing line between it and the rest of the photo, consider adding a Linear Gradient. Remember that you can erase parts of the gradient that you don’t want to affect, like trees that project above a horizon into a bright sky.
Blurring Using the Gradient Tool
To create a new gradient, you can use the Sharpness slider and drag it to the extreme left. Then take the Clarity slider and drag it to the left also. The effect is to soften the area so you can highlight one portion of an image you’d like to keep sharp.

Photograph by Kevin Landwer-Johan
In this image, I have used four gradients so the piece of fruit in the center is the only one that appears sharp.
You can duplicate a filter to enhance the effect it has on your photo. So, if you want more blur, just right-click on the pin and select ‘Duplicate.’
Recommended Reading: If you’re interested in improving your post-processing workflow, check out Photzy’s Understanding Masking premium guide. It has sections on Lightroom and Photoshop, as well as Snapseed for mobile users, too.
Adjusting Contrast, Clarity, and Texture
Photograph by Kevin Landwer-Johan
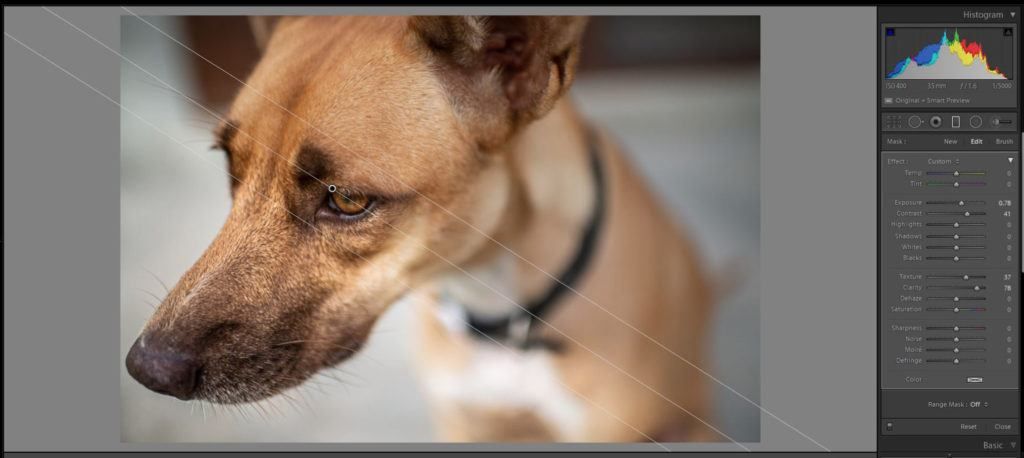
Sometimes you may have an image in which you want part of it to pop a little more.
I made a gradient over part of this image, dragging on a diagonal from the bottom left towards the center. This covers the dog’s face, which is in sharp focus, but not most of the image which is not sharp.
I then used the clarity, contrast, and texture sliders to make the dog’s fur and features stand out more. I also adjusted the exposure slightly because when I made the other changes, the gradient area darkened a little.
Control Highlights and Shadows
Photograph by Kevin Landwer-Johan
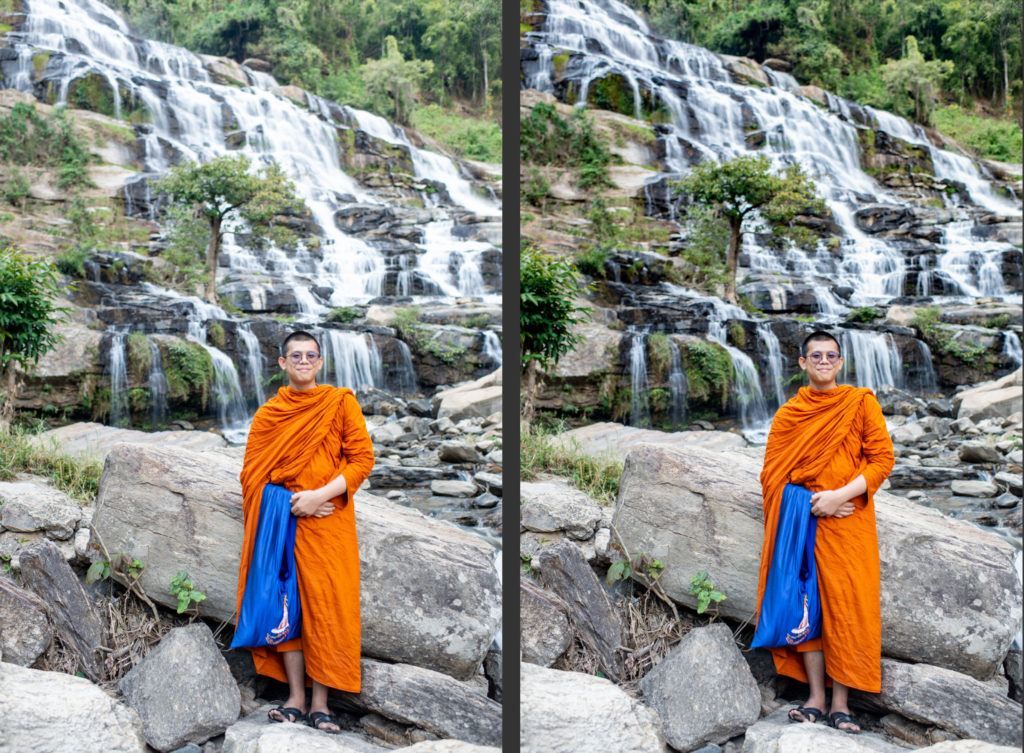
Controlling highlights and shadows in certain areas of an image is another way you can make good use of the Gradient Tool.
In the image above, I created a gradient from the top of the image down to the monk’s head. I decreased both the highlights and shadows. I also dragged the Dehaze slider a little to the right. In this ‘before and after’ comparison, you can see that this has enhanced the waterfall nicely.
Darken the Edges of a Photo
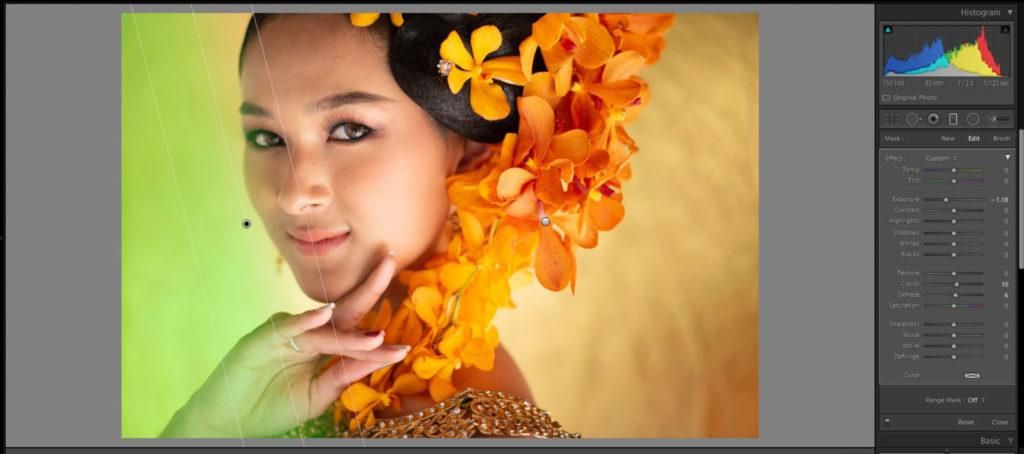
Sometimes a vignette with an oval shape will not suit a photo so well. You can use a number of gradients to easily darken the edges of an image. Using the Exposure slider is often the most effective tool to do this with. Depending on the content of an image, the Blacks, Dehaze, and Contrast sliders can also work well.
Photograph by Kevin Landwer-Johan
In this photograph, I added a gradient on the right and used the Exposure slider to darken the edge. Then I duplicated the filter, rotated it, and dragged it across so it darkened the left side of the image.
Add Color to an Area
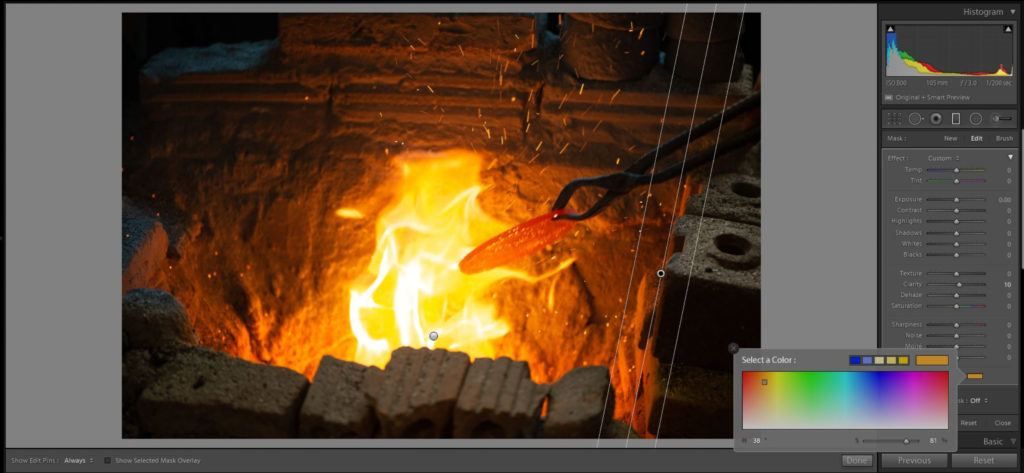
You can add life to a sunrise or sunset by adding color in a gradient filter. Making a clear sky appear bluer is another option. Anywhere you can drag a Linear Gradient filter, you can add any color you want.
Photograph by Kevin Landwer-Johan
In this image, the bricks on the right and the bottom of the frame appeared a little blue. I created a filter and then clicked on the color picker. This is a small rectangle at the bottom of the window below the adjustment sliders. Here you can choose a color you want to add to your gradient. You can also make other changes with any of the sliders if you want to.
Key Lesson: Being subtle with the Linear Graduating Tool often makes for a more natural-looking edit.
Recommended Reading: If you’re interested in improving your post-processing workflow, check out Photzy’s Understanding Masking premium guide. It has sections on Lightroom and Photoshop, as well as Snapseed for mobile users, too.

Photograph by Kevin Landwer-Johan
Conclusion
Linear Gradients are powerful tools that you can manipulate so they will look precisely how you want them to. This digital tool is far more flexible than using a traditional graduated filter over your lens when you take a photo.
Using the brush tool in conjunction with the filter gives you a great deal of control over what areas of the image are affected.
As with any of the tools in Lightroom, the best way to learn is to experiment. Each time you look at an image you’re working on, think about how you could make improvements if you use the Linear Gradient Tool.
Self-Check Quiz:
- What is the Linear Graduating Tool also known as?
- What letter is the keyboard shortcut for the Linear Gradient Tool?
- How can you see the area affected by the filter?
- How can you refine the area the filter affects?
- What is one of the most popular uses of this filter?
- What is one of the best ways to learn to use this tool?


