

The clone and healing brush in Lightroom has evolved into a very useful tool for photographers who prefer not to work in Photoshop. As Lightroom has continued to develop, the healing brush has morphed. It is now a more powerful and practical means to remove spots and blemishes from photos.
Typically, Lightroom has been favored as a program for balancing light and color in images. Over time, this is changing to add functionality for manipulating other aspects of photos.
In this guide, I’ll walk you through ways to use the clone and healing brush. I’ll show you how to remove unwanted imperfections without the need to switch to Photoshop. I’ll also take a look at some of the pros and cons of using the clone and healing brush in Lightroom compared to using it in Photoshop.
Recommended Reading: If you want to learn how to enhance your photos and create better images, grab a copy of Photzy’s premium guide: Ultimate Guide to Fundamental Editing.
Pros and Cons of the Lightroom Healing Brush
One of the most appreciated aspects of Lightroom for many photographers is that it’s a dedicated photo program. It’s designed to work lossless with RAW files, thus allowing the artist to take them from the camera to a finished state ready for presentation.
There are plenty of bells and whistles, but they are all dedicated to some aspect of helping you enhance your photos. Options to add graphics, text, or even multiple layers are non-existent. As you edit, your focus must remain on your image because the options to go off on editing tangents are just not there.
This all means a cleaner, leaner workspace. The sets of tools are comprehensive enough without being overwhelming. Glancing at the array of tools in Photoshop can make your head spin. There are so many options that it’s hard to know where to start and what to use.
With Lightroom, the tools provided are dedicated to developing your RAW files without adding anything extra. Using the clone and healing brush tool is, however, more limited than it is in Photoshop. For cleaning up an image and removing small blemishes, you will find it’s more than adequate.
The cloning and healing tools in Photoshop allow you to edit in greater detail and with more flexibility. You have more scope to configure the healing brush or to use any of the five options available to help achieve your desired result. Plus, you have the added ability to use masks and multiple layers to refine the task of removing (or adding) elements from photos. All this complexity makes these tools more suited to what I would consider image alteration, rather than image clean-up.
Key Lesson: Lightroom is a dedicated photo editing program. It does not contain many of the distractions that Photoshop provides. You can use the healing brush to remove small unwanted blemishes. But for more complex cloning tasks, Photoshop is often a more suitable option.
How to Use the Lightroom Healing Brush
With a RAW file open in the Develop module of Lightroom, hitting Z and zooming in will often reveal aspects of the image you’d prefer not to see. Sensor spots, facial blemishes, and light-colored lint on dark clothing are a few examples.
Using the healing brush tool in Lightroom makes it painless to clean up these imperfections from your images.
Using the healing brush tool in Lightroom makes it painless to clean up these imperfections from your images.
You can find the healing brush, also known as the spot removal tool when you are in Develop mode in Lightroom. It’s located below the histogram and above the Basic windows in the right-hand panel. Pressing Q on your keyboard will also activate the tool.
There are some simple options for configuring this tool. You can choose between Clone and Healing.

Photograph by Kevin Landwer-Johan
Using the Clone Brush Option
By choosing the clone brush, you can replace the target area you make a sample from. Before using the clone brush, you can set the size, feather, and opacity. Keeping the size close to the size of the spot you wish to remove usually makes for a cleaner-looking result. Adding some feathering helps to blend the area you are replacing with the surroundings. Adjusting the opacity can also help make the edit look better at times.
Under your image in the main window, you’ll notice a few more options in the lower-left corner. Here you can turn the Tool Overlay function on and off. With the overlay visible, you can see where the sample is being taken from. I find using the Auto option works well. It shows the overlay for the spot you are working on and hides it when you are not.
Clicking on this circle allows you to drag and reposition it if the location Lightroom has chosen is not the best. Hover your mouse over the circle indicating the area the clone will be made from. Your cursor will change to a hand. Then click and drag to reposition the sample area.

Photograph by Kevin Landwer-Johan
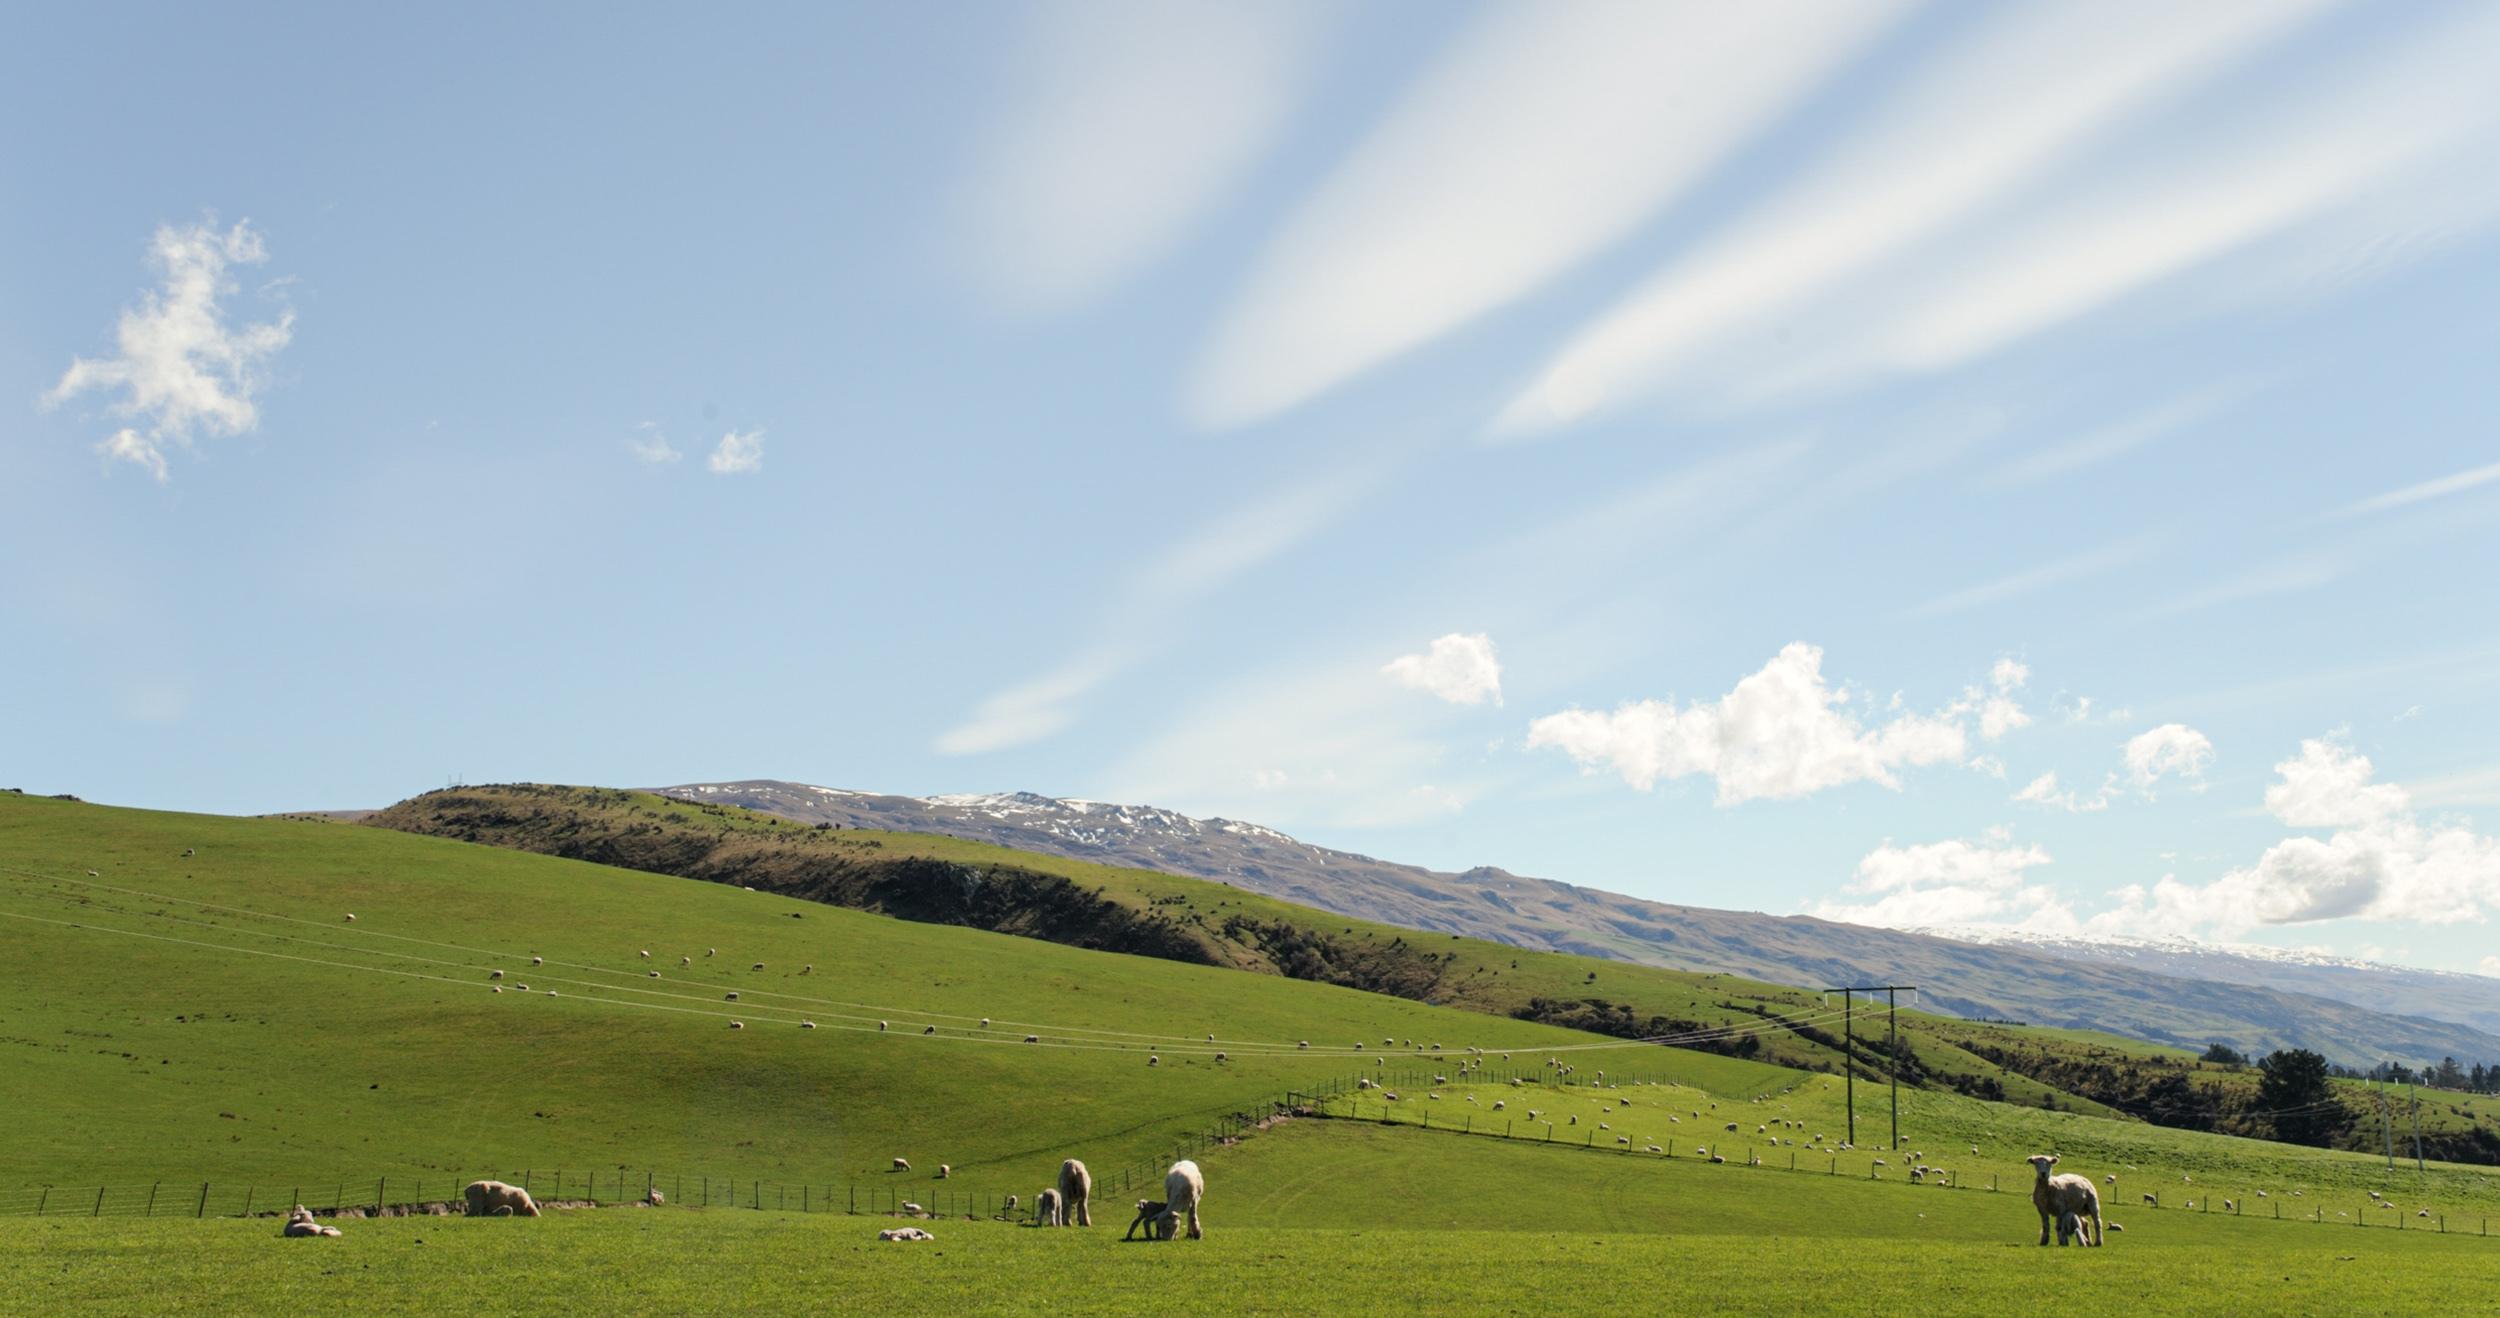
In the image above, I wanted to remove the sheep and her lamb. I used the location Lightroom chose. I had no feathering on the brush. You can see the result is not ideal as the cloned area is quite obvious.

Photograph by Kevin Landwer-Johan
Lightroom picked an area where there was no fence and the change of tone in the grass is very obvious. I manually shifted the location for the clone to the right of the area I was working on so it included some of the fences. This gave me a less obvious clone.
There were still a couple of marks I wanted to remove, so I resized my brush smaller. Then I clicked and dragged over the lines I wanted to clone out. I also had to manually position the replacement location, so I had a clean transition.

Photograph by Kevin Landwer-Johan
By sizing and feathering your brush well, you can then click and drag it over the area you want to replace. This gives you much more flexibility than using one click with the circular brush. Adding further brush strokes allows you to clean up any anomalies that may appear when using the clone brush.
After making your selection, you can alter the feather and the opacity by adjusting the sliders. If you have used a single click to select the area, this can also be resized if necessary. You can do this by dragging the slider or by hovering your pointer over the edge of the selection area. The cursor changes to a double-headed arrow that you can use to receive the circular area.

Photograph by Kevin Landwer-Johan
At times you may want to replicate a certain area of your image, so the clone brush will do this better than the healing brush. Then you can use the healing brush tool to clean up, as I have done in the image above. It’s not perfect, but you can get the idea.
I used a small brush size and painted over the sheep and her lamb. I then repositioned my painted selection. Then I moved the area it would clone too. This allowed me to be more accurate.
Key Lesson: Selecting an area slightly bigger than what you are cloning allows for more accurate, less obvious, feathering. This is most important when you are painting with a brush.
Using the Healing Brush Option

Photograph by Kevin Landwer-Johan
Where the clone brush makes an exact copy to replace the areas you paint over, the healing brush in Lightroom interprets the area. You can paint with the healing brush the same way you paint with the cloning brush. Lightroom works internal magic to read from the area you paint and calculate how best to seamlessly replace it with another part of your image.
The healing brush tool often provides a cleaner, less obvious result on the first try. You may still have to reposition where the sample is taken from as Lightroom makes rather odd choices at times.
Usually, when I am using this tool, I leave it set to the healing brush option because I find this produces great results.

Photograph by Kevin Landwer-Johan
Key Lesson: Below the main image when you’re working with the spot removal tool, you’ll find a very helpful feature. It’s a check box labeled Visualize Spots. Checking this box changes the view of the image to black and white and highlights where dust on the camera sensor is. Sometimes this can be challenging to find. The Visualize Spots tool does a pretty good job of showing you where they are. You can see one big main spot in this image in the sky, about a third of the way down from the top and right of the center. There are a few that were less obvious as well.
Recommended Reading: If you want to learn how to enhance your photos and create better images, grab a copy of Photzy’s premium guide: Ultimate Guide to Fundamental Editing.
Conclusion
As with any tool in Lightroom, there are many ways to make use of the healing brush. Now I’ve given you a run-through of how the tool works, the best way to figure out how to do this is to practice. The more you work with the healing brush and clone brush, the more you’ll get a feel for the differences. Before long you’ll automatically know when to choose each one for the best results.
If you’re new to using this tool, start with something simple. Don’t race into it and start cloning sheep. Pick out a few sensor spots to work on until you get the hang of how this tool works.
Switch between the clone and healing brushes. Choose one and make your edit. Then undo it and choose the other brush and make the same edit. Doing this a few times will show you which one works best on different types of spots and blemishes.
If you’re new to using this tool, start with something simple.
Make adjustments to the size, feathering, and opacity. You can do this before and after you paint with the brush on your photo. Remember, too, that you can click and paint with the brushes. You don’t have to be confined to working with a single click and a circular shape.
Key Lesson: Crucial Point! The higher the resolution you want to display your edited image, the fussier and more accurate you’ll need to be with your healing brush editing.
Take your time. Practice and perfect your technique when working with this editing tool and your photos will often look far better.
Self-Check Quiz:
- What is one of the most appreciated aspects of Lightroom?
- What is the healing brush in Lightroom most suitable for?
- What is the shortcut key that activates the spot removal tool?
- Name three things you can alter to refine how you can use this tool.
- Does Lightroom always automatically choose the best location to clone from?
- Is it possible to change this location?
- Is it better to select a bigger or a smaller area than the blemish you want to remove?
- What feature of the healing brush can help you see sensor spots on your photos?


