


Guess what? Today, I, Robin Nichols, will detail a great way to breathe new life into an older camera!
All photographers are inveterate gear buyers. A new camera, lens, or other gear comes on the market and they immediately want it, even if they can’t afford it.
Because of this desire for the latest, fastest, and greatest gear, we inevitably end up with a bunch of superseded equipment that sits at the back of the office, slowly decaying through negligence and disuse.
One trick is to sell the gear that you have just made redundant. But you have to be quick; otherwise, you won’t be able to ask for much for it. After all, no one really wants to buy an old camera, for the very reason you bought the new one. Stepping backwards in terms of speed, resolution, and feature set is hard to take unless you literally have very little money.
So, unless you place the item on sale as soon as the new one comes out of its box, you’re unlikely to get much recompense for your old gear – unless it’s an eminently collectible model, such as a digital Leica, in which case it’s more of an investment than a working tool.
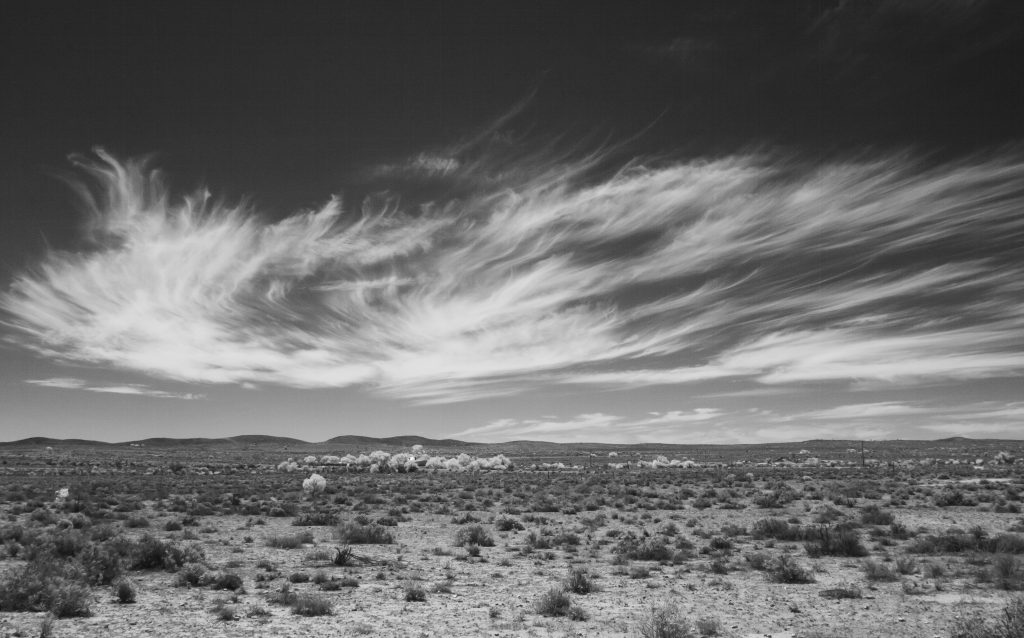
Infrared conversions are great for that different look. You can create something similar by using a red filter over the lens (when shooting BW film or by modifying your color controls inside the camera). Photograph by Robin Nichols
It seems a crying shame not to do something with our old gear; you can’t just leave it in a cupboard to quietly die in ignominy.
Some photographers prefer to hand their old kit to their kids or grandkids. But unless they have a specific interest in learning the craft, I suspect most would prefer a smartphone over a five-pound brick! Another deal I’m familiar with is to donate your unwanted kit to a school. Knowing what college budgets are like, I’m sure that any art class or multimedia department would be happy to receive camera equipment, even if it’s a bit old.
It seems a crying shame not to do something with our old gear; you can’t just leave it in a cupboard to quietly die in ignominy.
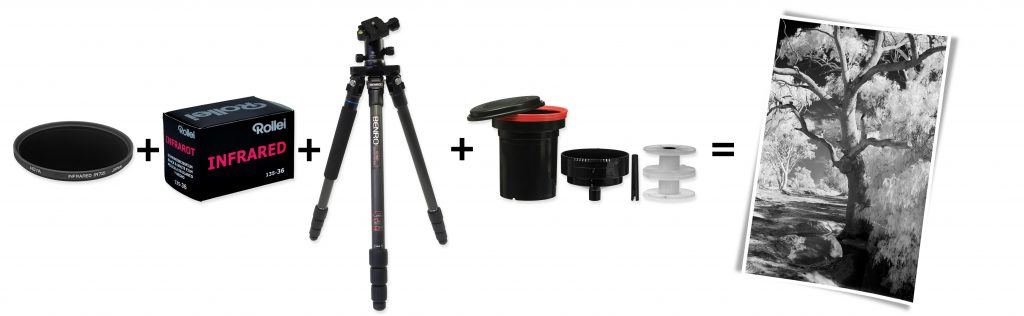
My solution was to try and recreate a type of infrared photography that I loved doing when I was shooting film years ago. I did this by sending my old 10Mp Canon 400D to a company that converts cameras to shoot infrared only. This produces a very similar look to ‘real’ infrared film, which back in the day was a film product made by Kodak or Konica (i.e. Kodak High Speed Infrared film). Both these products were black and white; although, from memory, you could also buy a color infrared film (Kodak Ekta chrome infrared), which was mostly used in scientific photography. It’s since been taken off the market due to low sales; although, interestingly, you can still buy infrared film from the German company Rolle.
Here is what you will learn in today’s article:
- What infrared photography looks like
- How it was created in the days of film (and still available today)!
- What type of filter is required for infrared film photography
- How digital infrared photography is created
- How to convert a digital camera for infrared photography
- Seven tips on how to obtain the best results
- Some general information on post-processing
- How to create an infrared ‘look’ using software!
Recommended Reading: If you’d like a comprehensive guide on using ND filters and producing gorgeous long exposures, grab a copy of Photzy’s premium guide: The Complete Guide to Long Exposure Photography.
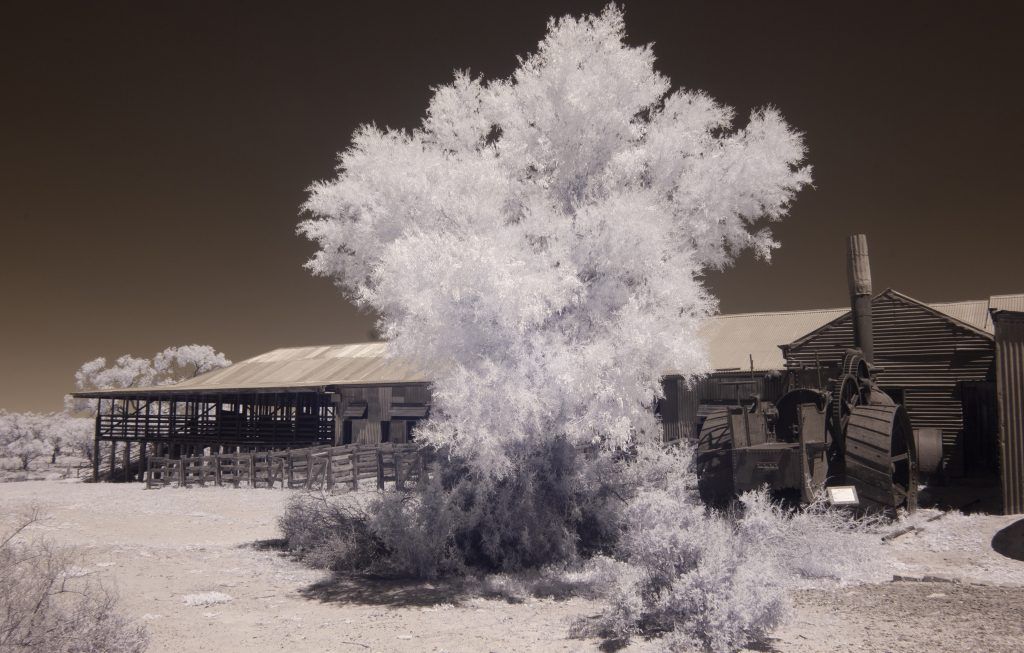
Kinchega shearing sheds, Western NSW, Australia. This shot has had very little post-production other than a bit of global darkening. Normally I’d convert the RAW file to black and white and then add some contrast, but in this instance I quite liked the sepia look produced by the infrared filter. Photograph by Robin Nichols
What Does Black and White Infrared Look Like?
The signature look of black and white infrared film is that all green foliage reproduces as white, while other colors, such as blue skies, reproduce as very dark or almost black tonal areas. It’s a very dramatic look. Realism went out of the window to be replaced with a surreal, dream-like tonality that was very characteristic of the genre, and often a favorite process for landscape photographers. That said, black and white infrared film was also quite effective when shooting portraits, producing porcelain-like pale skin tones.
How It Was Shot
I used to shoot quite a lot of black and white infrared film, but it was quite tricky to produce good results.
To begin with, infrared film responds to a part of the spectrum that humans don’t see, so you had to sort of guess how the scene would reproduce in print, using luck to begin with and then experience, once you’d shot a few rolls of film.
To filter the right wavelength, you’d use a dark red infrared filter (the standard at the time was a Kodak Wratten 87 filter) which was opaque to the visible spectrum. Filters like this had an effective 10-stop density which forced the photographer to shoot with very slow shutter speeds. (In those days, of course, you couldn’t just reset the ISO from 400 to 6400 with the turn of a digital dial.) As the filter was so dark, it forced the photographer to use long exposures. This in turn made using a tripod mandatory, photographing moving subjects very tricky, and focusing almost impossible.
The technique involved the photographer composing and focusing the scene and then placing the dark filter over the lens to take the shot. However, because infrared light has a different wavelength to visible light, it focuses at a different point, so you have to set your lens to a different focus scale to the regular one. Older readers might recall seeing a separate red infrared focus mark on manual focus lenses. The red mark or line, usually slightly offset from the regular focus point, was used for focusing when using infrared film. Some lenses still sport this red dot or mark for infrared focusing.
Though hard to illustrate, the process of infrared black and white photography was (and still is) a long process, fraught with possible errors. To start, you had to use a tripod. Then you composed the shot, adjusted the focus (using the infrared mark on the lens), added the infrared filter, and then calculated the exposure before processing the film and making prints in a wet bench darkroom. Now it’s a bit easier because you can get the negatives scanned to produce a digital file. Even so, this is not an instant process. Photograph by Robin Nichols
Digital Infrared
By converting a digital camera to record only specific wavelengths from the infrared spectrum, you can create an almost exact replica ‘look’ to that of infrared film but without the hassle of darkroom processing and printing, excessively long exposures, or the need to have an opaque filter on every lens. In fact, once converted and calibrated, you can use the camera just as if it were a normal camera, so getting good results is far easier than in the days of film. Getting images sharp is also a cinch provided you use the slower but more accurate focusing process in the camera’s Live View function.
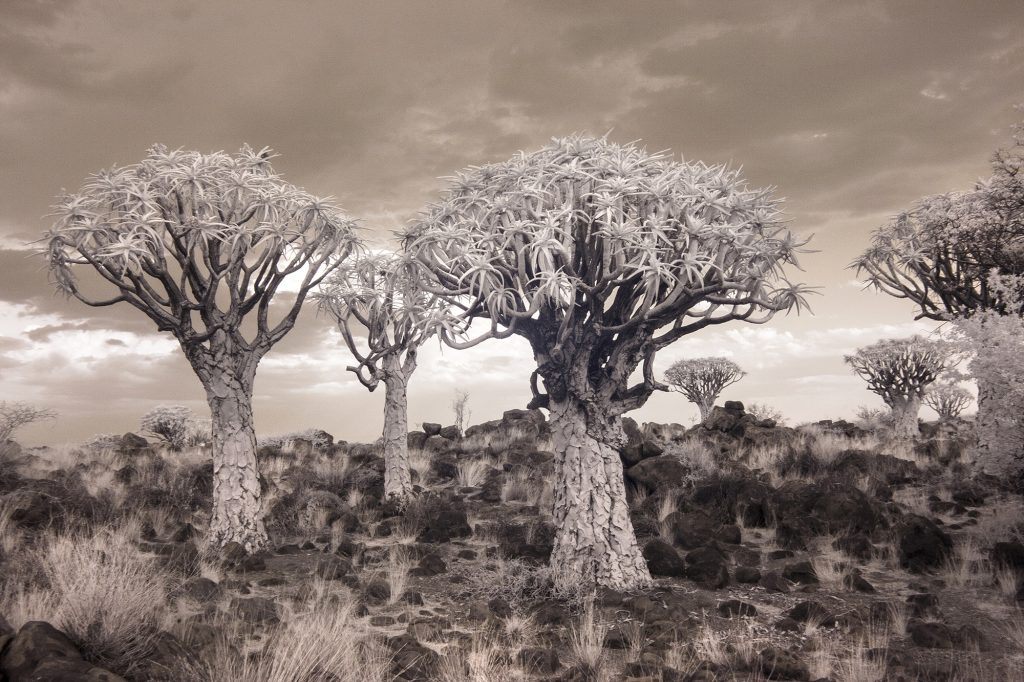
One of my all-time favorite landscape locations in Africa, Keetmanskoop in Namibia. At the time a storm was approaching, which made the sky very dark and moody among the forest of quiver or kokerboom trees. Photograph by Robin Nichols
How Can I Convert My Camera?
Firstly, it’s good to know that you can get any type of camera converted: compact, bridge, mirrorless, or DSLR. And while it’s possible to do the conversion yourself, I’d recommend that you send the camera to a professional specialist for a couple of reasons. Firstly, the process is not simple, and if you are not 110% handy with a small screwdriver you might end up damaging your camera, which would be a shame. Another reason is that companies offer a wide range of different infrared wavelength conversions for both color and black and white wavelengths.
Basic costs range from US$275 for a Canon/Nikon/Sony DSLR, and the same for a mirrorless camera, and US$100 less for a point-and-shoot camera (prices quoted from www.lifepixel.com). Costs can go up if ordering from outside of the States (add a freight charge) or if you need to have a specific lens calibrated.

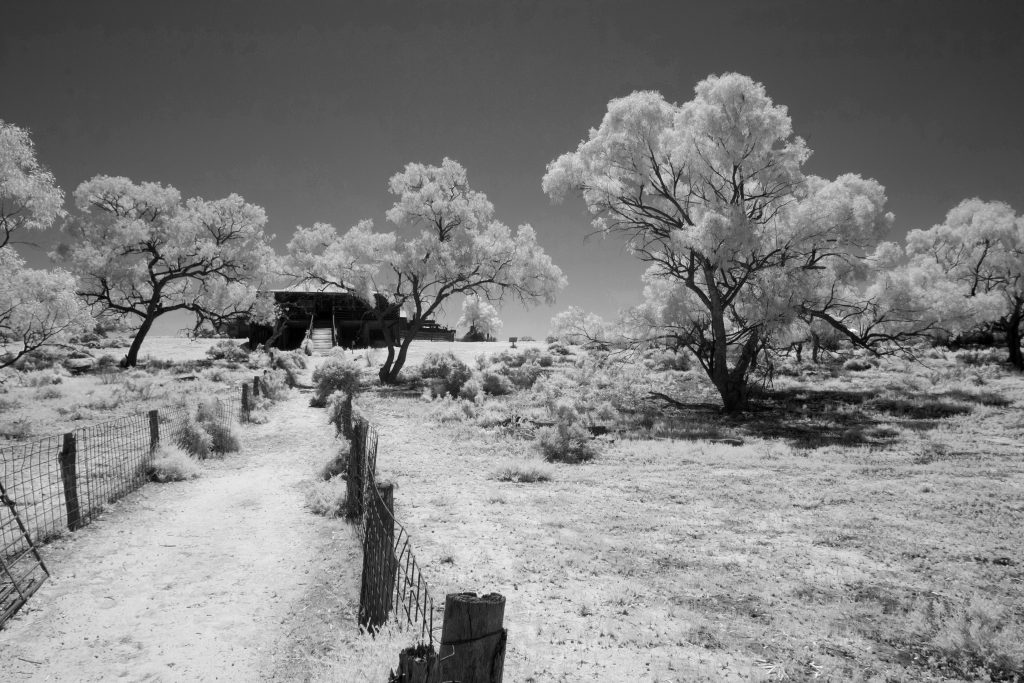
This is another good example of the infrared black and white effect. These are Australian ghost gums growing along a dried-up creek bed, made even more ghostly with the black and white infrared effect. Photograph by Robin Nichols
I got my old Canon 400D converted by a company based in the US a few years ago and it was still cheaper to ship it to Washington State than to post it to a local company for conversion here in Australia.
Top Tips for Getting the Best Infrared Results
- There are a number of infrared camera conversion companies available. I made my choice on the basis of cost and the type of infrared filter effect being offered and chose www.lifepixel.com.
- Test your white balance settings, but usually the conversion preset is best.
- Use the camera’s Live View AF as this is more accurate than TTL focusing.
- If using manual focus, try shooting with different focusing settings for each scene.
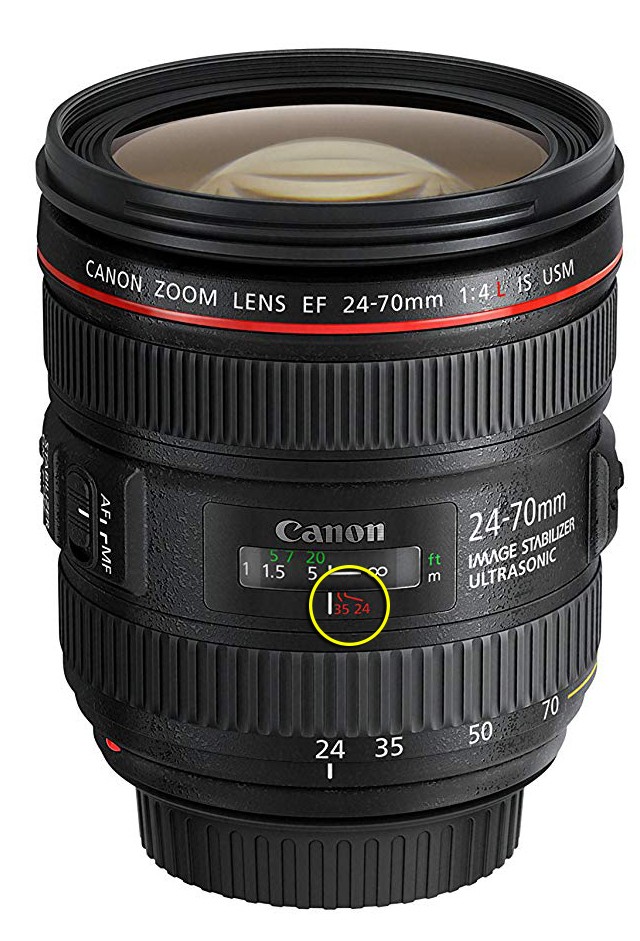
- Use the lens’ infrared focusing mark, if the lens has one (see picture of Canon 24-70mm f4 lens. The infrared focus point is ringed in yellow).
- If you shoot test images and discover the true focus position of the lens, mark it on the outside of the lens with a dab of nail polish.
- Set the camera to a small aperture (i.e. f11 or f16) to assist in holding clarity if the focus is slightly out.
Photograph by Robin Nichols
Post-Processing
My conversion choice was to go for a traditional black and white infrared look (called a standard infrared 720nm conversion). If you check out the options, you’ll see that there are a number of black and white and color conversion options. What you choose just depends on the ‘look’ you are after. I wanted to recreate the feel I used to get when using Kodak High Speed infrared film.
Part of the conversion cost goes toward creating a custom white balance setting. You really need this because you are no longer dealing with the visible light spectrum. It was set on my 400D and has not been changed since. Its RAW files look sepia-toned, but once converted to monochrome, all that’s needed is a small contrast tweak to produce the signature infrared ‘look’ in the file.
If you check out the options, you’ll see that there are a number of black and white and color conversion options. What you choose just depends on the ‘look’ you are after.
Photograph by Robin Nichols
Creating an Infrared ‘Look’ Using Software
Of course, you can also recreate the look of infrared using any layer-capable picture editing program, and while the results are not as good as the real thing, they are fun to experiment with.
One technique is to use Photoshop’s Black and White Adjustments feature (in the Window > Adjustments panel).
Using this not only converts a color image to black and white, but one of the dropdown menus is specifically for an ‘Infrared’ effect. This is essentially a preset from the Channel Mixer. If the infrared effect is not strong enough, just tweak the color sliders in Adjustment’s Properties panel for a better effect.
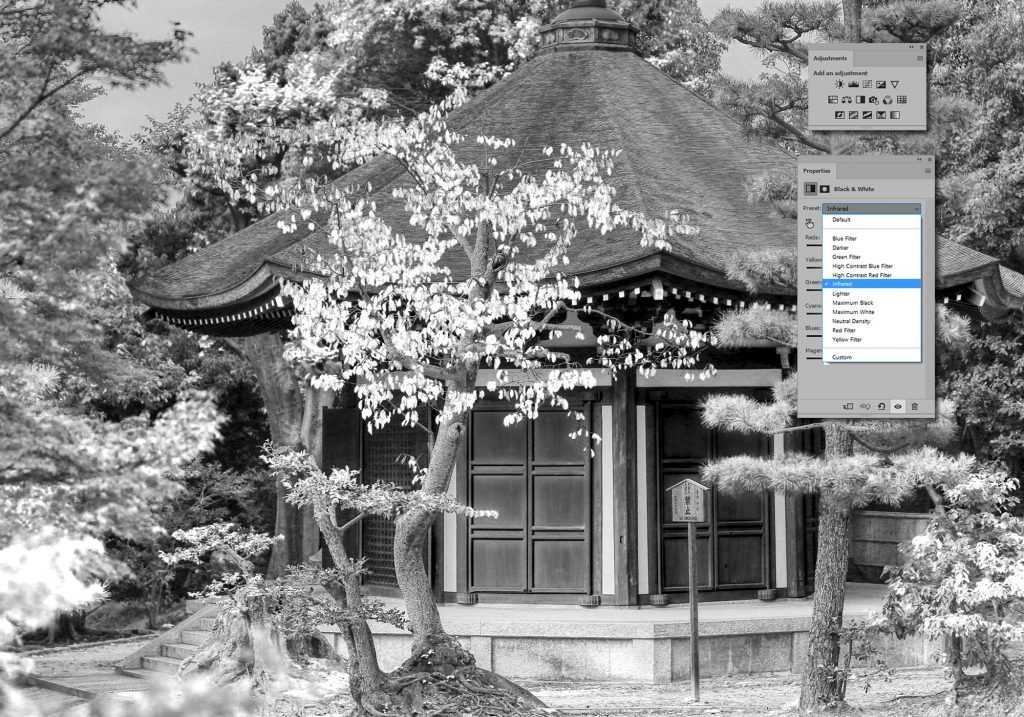
In this screenshot I have converted a color shot into monochrome using Photoshop’s Adjustments panel, and then applied the infrared preset from the Properties panel. It’s fast and quite effective, although it never really produces the same effect as you witness using an infrared-converted camera. Photograph by Robin Nichols
Another tip would be to manipulate your color settings inside the digital camera itself. All cameras give this process a slightly different name; on a Canon it’s Picture Style, Nikon calls it Picture Control, while Sony refers to the process as its Creative Styles. In the camera menu, choose Monochrome (or black and white), increase the contrast slider (if available), and then turn the filter effect ‘on.’ You can choose between yellow, orange, and red to boost the contrast and to darken blue skies, much in the same way that infrared does. The red filter is the most dramatic. It can produce quite a dramatic result that’s similar to a true infrared effect.
Recommended Reading: If you’d like a comprehensive guide on using ND filters and producing gorgeous long exposures, grab a copy of Photzy’s premium guide: The Complete Guide to Long Exposure Photography.
Self-Check Quiz:
- In black and white photography, what color reproduces as the color white?
- In film infrared photography, what filter do you need?
- Name one reason why digital infrared photography is far easier than film.
- Can any type of camera be converted to infrared capability?
- What does www.lifepixel.com do for infrared photography?
- True or False: Do not use the Live View function for focusing!
- True or False: Your lens focusing mark needs a slight adjustment for infrared photography.
- What is a recommended aperture setting for infrared photography?


