

Getting a new camera can bring a steep learning curve as you learn all the ins and outs of your new equipment. But a special bonus is that you can often find new tools to utilize. This was the case for me this past year when I discovered that I could create incamera multiple exposures.
In the years of film photography, a multiple exposure image was created by shooting and then manually winding the film back to the already exposed film and shooting again. By doing this, photographers layered two or more scenes on the same image. The effect can be quite stunning and allows for another level of creativity in your images.
The same effect can be achieved in post-production, using a program like Photoshop to layer the images. The results can be very precise as you have control overhow to line your images up and adjust the exposures of them to get exactly what you want.
In-camera multiple exposure images are a little more random, but learning the process of shooting these images in-camera can teach you a fair bit about exposure and composition. They can also lead to some fun surprises which lead to further creativity in your images.
Many newer DSLRs and mirrorless cameras offer the capability to create multiple exposure images incamera. The features vary quite a bit from different camera models to different brands, so be sure to do some research if you decide to buy a camera for this purpose.
In this article, you will learn:
- how understanding the basics of exposure can help you create better multiple exposure shots,
- some of the camera tools that allow for multiple exposure shots and how to use them, and
- ways that you can use in-camera multiple exposure images to get creative and shoot some outstanding pictures.
Recommended Reading: Want to create gorgeous, perfectly lit flower photographs? Grab a copy of Photzy’s premium guide: Photographing Fabulous Flowers.
Understanding Exposure
In order to create multiple exposures that work, you need to first understand how exposure works. Exposure, in its simplest form, is the amount of light that reaches your sensor.
In order to create multiple exposures that work, you need to first understand how exposure works. Exposure, in its simplest form, is the amount of light that reaches your sensor.
Think of a single image as a blank canvas, except that instead of that canvas being white, it is black. You fill parts of that blank, black canvas with light, from a single shot.
If no light or only a small amount reaches it, then that canvas is going to continue to appear mostly black and be underexposed. If it gets a big blast of light, or for too long, then details in the image are lost in an overexposed shot that appears bright white on your black canvas.
If that black blank canvas gets the right amount of light to expose your image properly, then you should see all the details in a range of tones from darkest to lightest, provided your scene allows for that.

This simple graphic illustrates how white wins when combining two images. The white circle has “used up” that part of the canvas so that the stars in the second image won’t show up if they are positioned in that spot. The stars will show up on the parts that are black, because they haven’t been exposed yet.
Understanding this allows you to consider a double exposure image a little better. Picture that black blank canvas again. You “paint” it with a single shot of a white object shot against a dark background. Where that white object is, you have “used up” that part of the canvas. But there is still “room” to paint more on the dark parts of the canvas. Your second image will fill in those darker spots, if there is something to fill them with.
The way to ensure that your second image adds something to the canvas is by making sure that your photos overlap in a way that allows for details from your second image to show in those darker areas of the first image. You also need to make sure that your second image is exposed properly, to allow those details to show. And finally, a little bit of contrast can go a long way toward helping things along.
A good thing to remember when shooting images for use in double exposures is that white wins. What I mean by that is that any white in either of your images will use up that black canvas, so be careful about where you place your white and use it to your advantage.
Key Lesson: Imagining that your image starts out as a black, blank canvas that you paint with a variety of tones all the way up to white helps you to visualize where things will appear in a multiple exposure image. White wins will help you recall that places where your exposed image is white have “used up” the canvas and there isn’t room for anything more.
Camera Settings
More new cameras are offering ways to create in-camera multiple exposures.
Popular brands like Canon, Nikon, Sony, Fuji, and many others all have a variety of camera models that will do so. As always, check your guide or do a quick online search to see what your camera is capable of.
In the Nikon D750, which I use, there are a couple of options for shooting multiple images. From the Photo Shooting menu (with a camera icon) I can select Multiple Exposure. I have the ability to adjust for a single shot or a series and two or three images layered. There is also an option to use “auto gain” which will adjust the exposure for each frame automatically.
I recommend you start with double exposures and get a good feel for what works and doesn’t work before trying multiple exposure shots of three or more. I should note that some camera brands offer more than three images in a single exposure, so if you are thinking that this is a technique you will use a lot, do your research first.

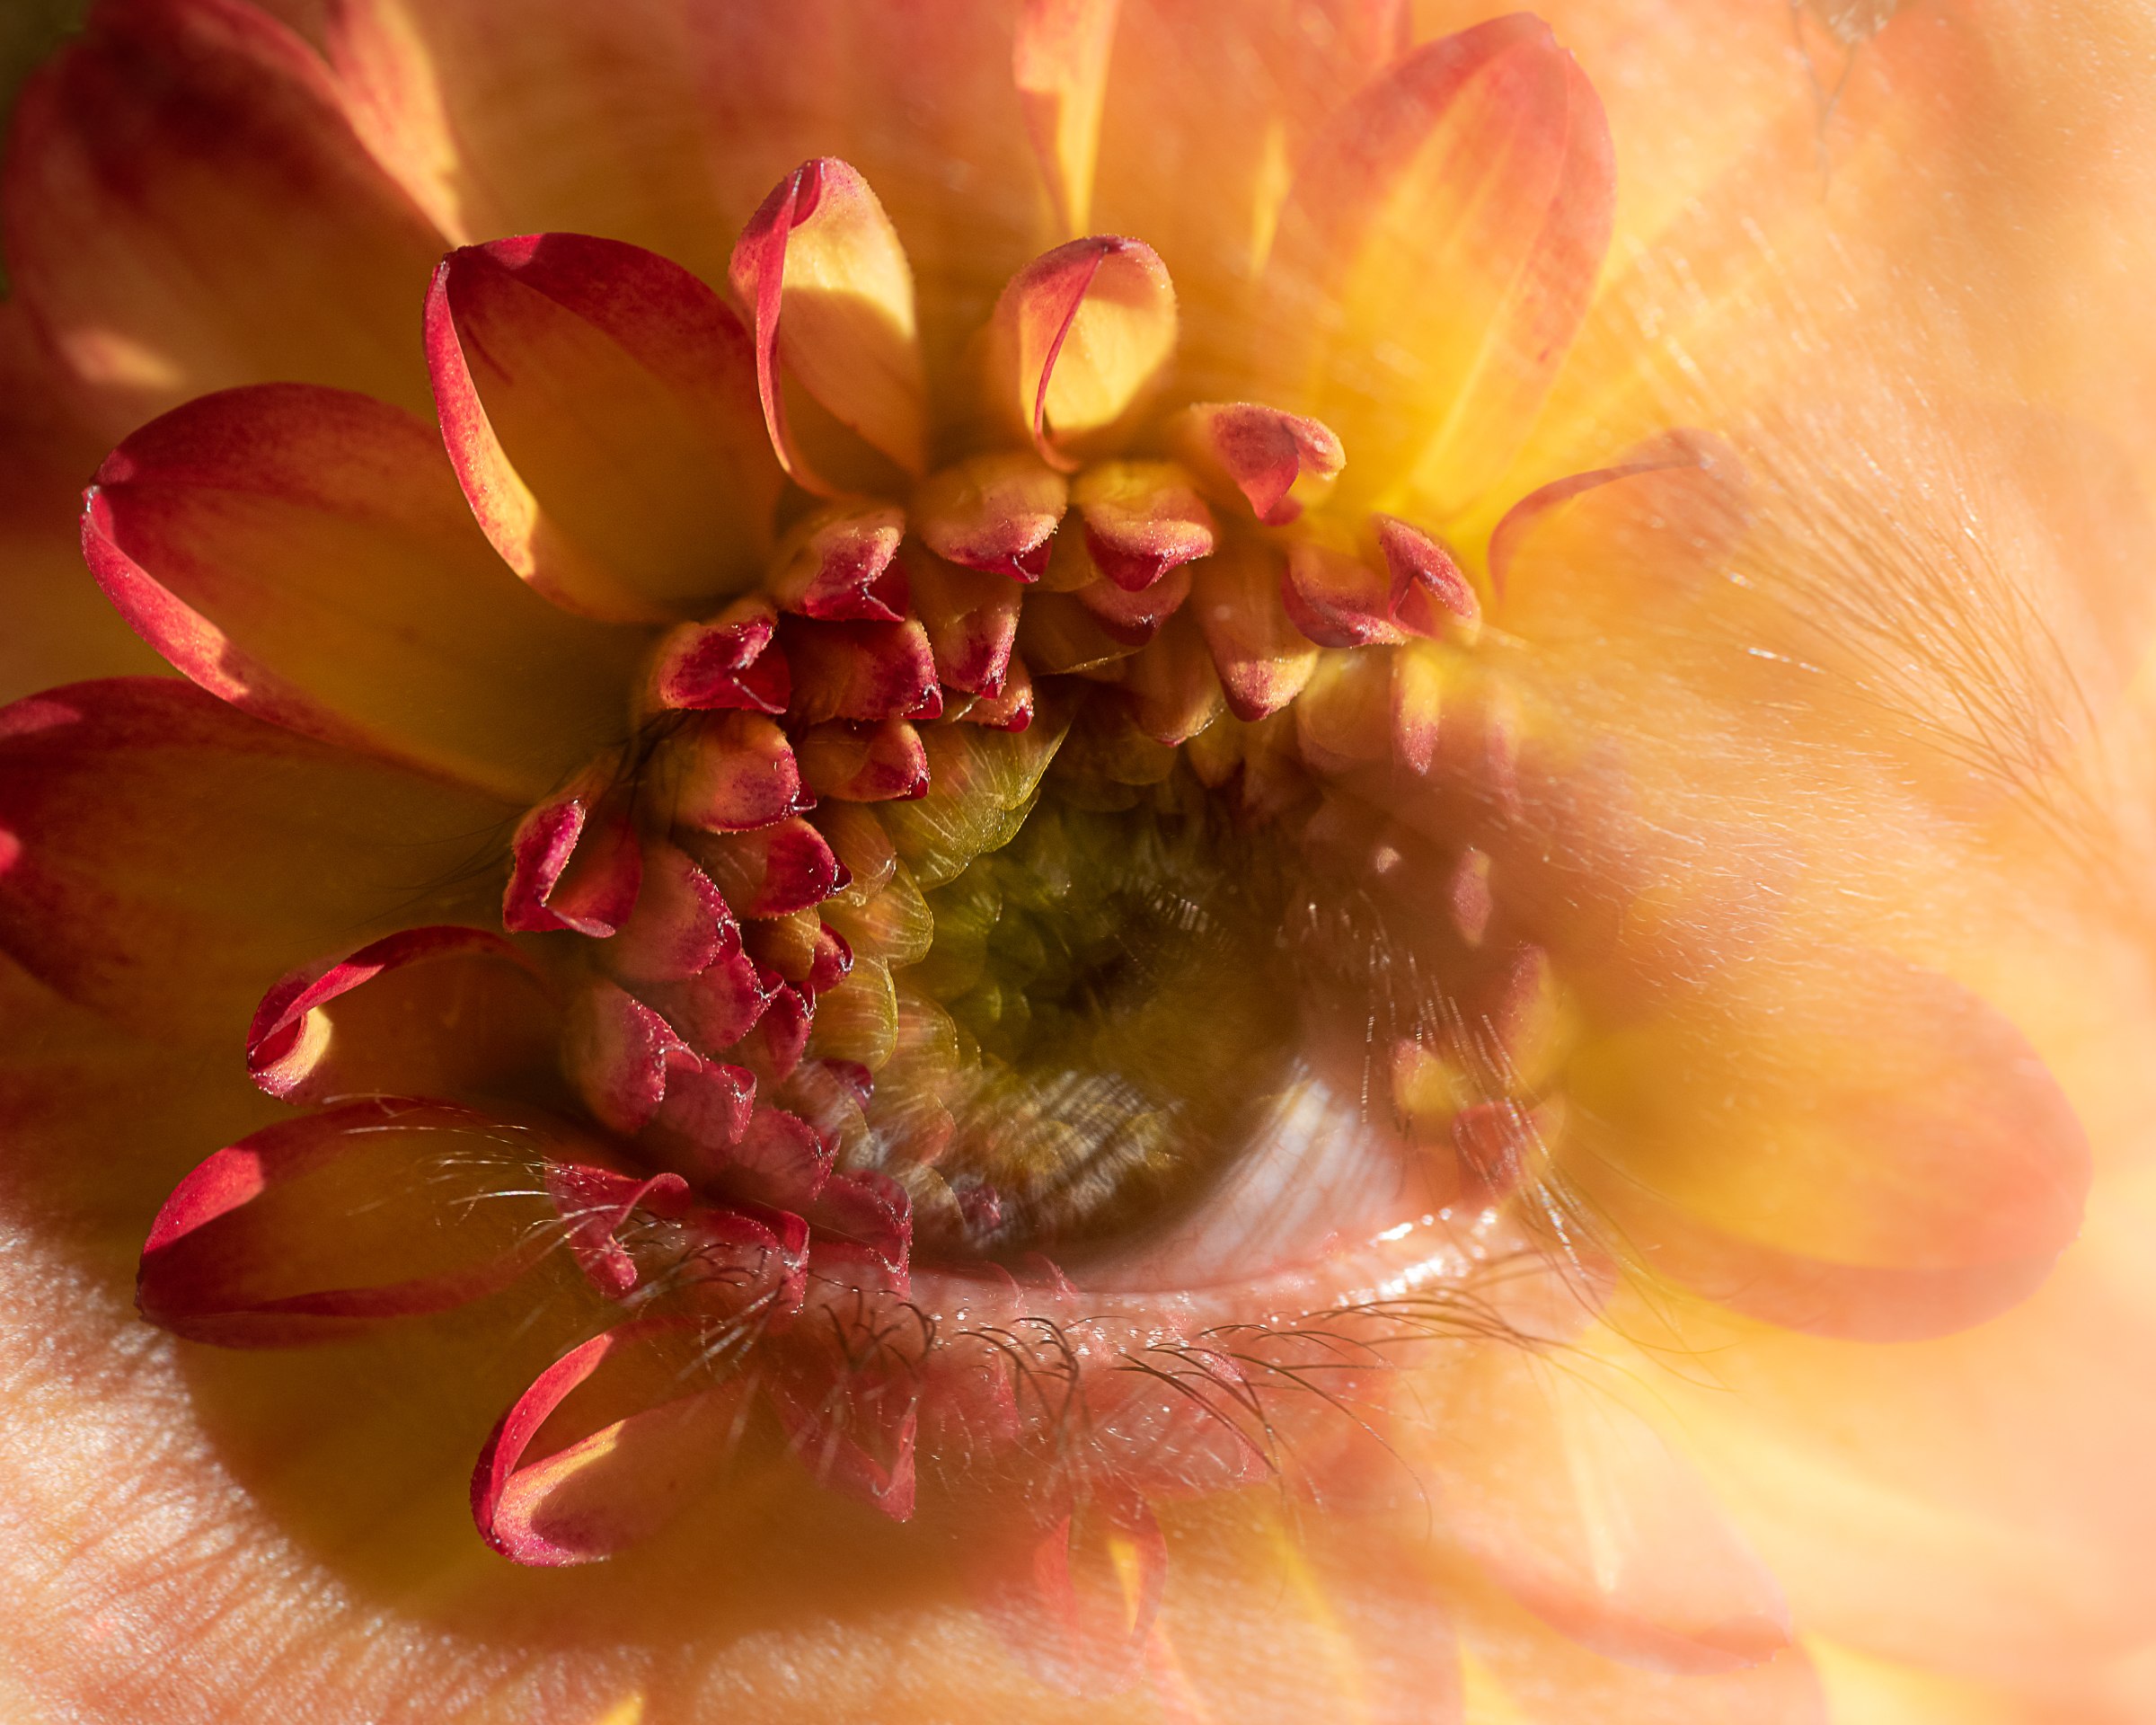
Combining two shots using in-camera multiple exposures can lead to some very creative and interesting shots, such as this image which combined a chrysanthemum and a human eye. Photograph by Leanne Cleaveley
My camera also offers another way of combining shots, with a tool called Image Overlay, which is found in the Retouch Menu. This feature allows you to combine two previously taken images into one double exposure. There are options to increase or decrease the exposure of the two shots so you can see how they best overlap.
Some cameras will allow you to use a shot that you have already taken as a base image when creating a double exposure, whereas others will allow you to “see” both images when using live view. This is a great advantage as you can line up your images until you are happy with the composition.
Photograph by Leanne Cleaveley
With different ways to achieve the same end, you just have to find the technique that works best for you and spend some time working with it until you are comfortable.

This image was created by combining two existing images (shown on the previous photographs) using the Image Overlay feature in my camera. The tool allowed for some adjustment in exposure and I followed up with some simple touch ups and cropping in Adobe Lightroom. Photograph by Leanne Cleaveley
Try This
Getting started can often be the most challenging part of a new technique, so I am going to offer you a few ideas for starting out with multiple exposure images.
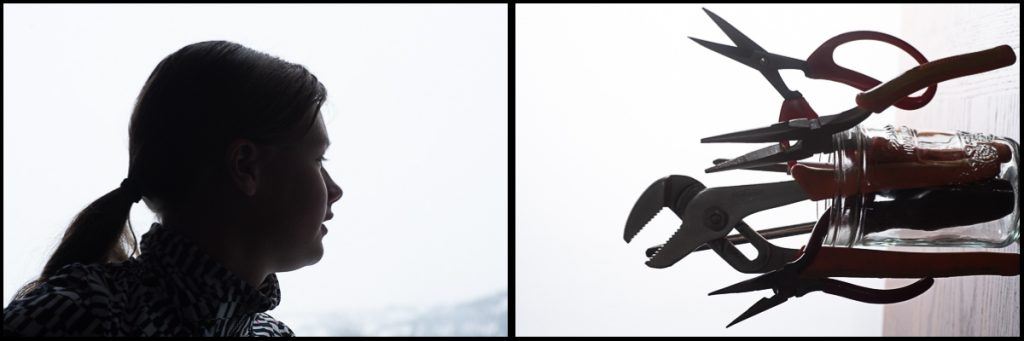
For the first technique, you will use two household items to create your image. I like the items to be linked in some way, but you can choose two different subjects for an effect, such as juxtaposition. Try to avoid things that are white or light in tone for the first subject. For my shot, I used a spoon.
Shoot your first subject against a light background – the whiter, the better.
Your second subject should be something that has great texture, and a bit of contrast doesn’t hurt. I chose some loose-leaf tea. You don’t have to worry about lining anything up, because you are going to fill the second shot with your second subject.

Photograph by Leanne Cleaveley
This image shows the results of my two shots. Remember when I said earlier that white wins? You can see that in the spots that were white or almost white, the tea doesn’t show up or it shows as a “ghost image.” In the places where the first shot was dark, there was still room to expose the second shot, so the tea is much darker where the spoon and its shadow is.
This technique is a great practice and reminder of how exposure will affect your future shots.

This image was also taken using the first technique I just described. I shot the sunglasses on a white counter, then combined them with a shot of some straw flowers, for a bright and sunny shot. I could have brought the exposure of the sunglass image up a bit, to neutralize the straw flowers that appear in the background, but in the end I liked how they appeared to be bursting out of the frames and left them that way. Photograph by Leanne Cleaveley
The second technique is quite popular, and you will find a variety of images that utilize it online. This technique requires a model (using a tripod and remote shutter release you can use yourself), a bright background, and a subject with some great texture.
For the first image, you should shoot an image of your model, with the bright background behind them. Shooting in daylight, from a lower vantage point, works quite well. You can capture their whole body or do a head shot. You can allow this image to expose as a silhouette or, if you like, use a bit of fill flash to bring out some details. The main thing is that the model is dark and the sky is white.
Shooting in daylight, from a lower vantage point, works quite well.
Unless you can shoot using live view, take note of where your model is in the frame for the first image. I like to use my grid lines on my viewfinder to mark the outside edges of the model so that I know where they are when shooting my second image.
Key Lesson: If your camera doesn’t have a live view option for shooting multiple exposures, then utilize your camera’s gridlines for lining up parts of your images.
Recommended Reading: Want to create gorgeous, perfectly lit flower photographs? Grab a copy of Photzy’s premium guide: Photographing Fabulous Flowers.
For the second image, find a subject with some great texture and contrast. Things from nature, such as trees and leaves, are great to utilize. Remember that where your model is in the frame (the dark spot) is where you will see the second image exposed. Where there was white sky, you will get little to none of the second image showing.
Once lined up, snap away and view your results.
Key Lesson: If you want to get a nice bright background, try shooting your model from a lower vantage point against the sky. Avoid any distractions, such as tree branches or lamp posts, in the background, unless they add to your image.
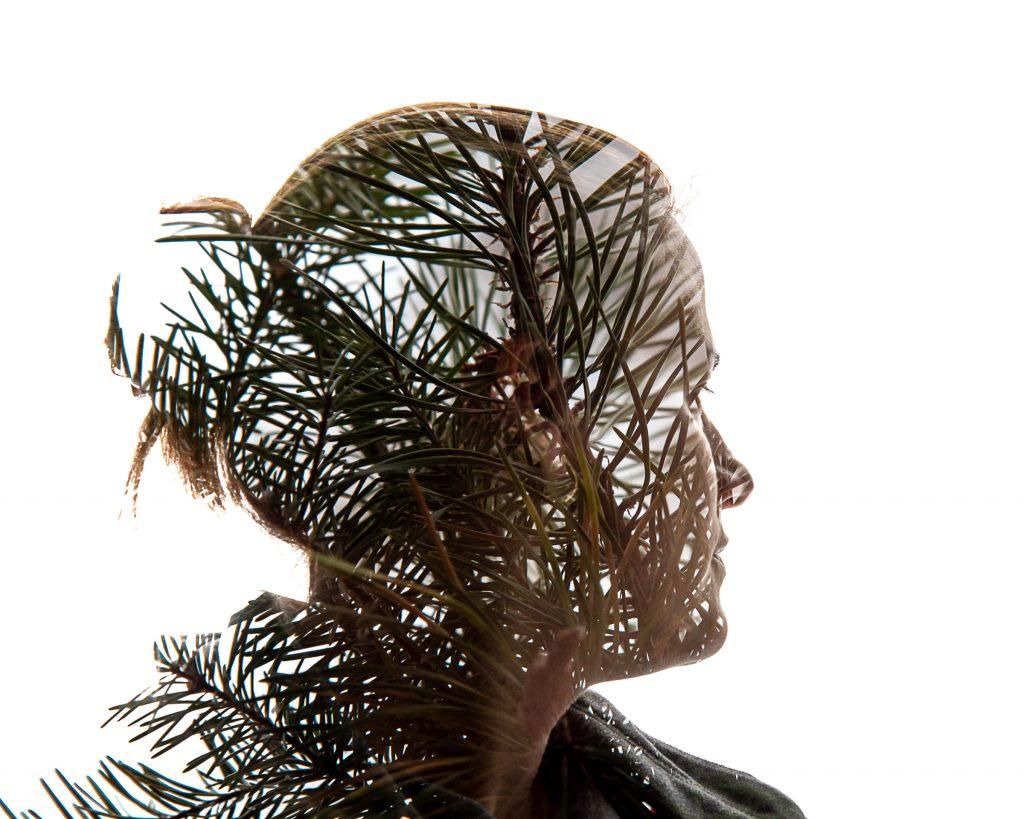
This image was taken using the second technique I described. The first image was shot against a window from a slightly lower vantage point, to almost blow out the background sky. The second image, of some pine boughs, was also shot against a white background, paying careful attention to include any white spots near the back of the model’s head, so that the facial features were still distinct while the back of the hair and shoulder disappear in the pine needles. Photograph by Leanne Cleaveley
Don’t worry if your exposure isn’t spot-on in your first shot. You can adjust by lowering your f-stop (opening your aperture) or decreasing your camera speed (to allow for more light) and shooting again. If it isn’t too far off, do some quick adjustments in post-production, as I did for the image above.

This image utilized a similar technique as the previous image; however, the silhouette was created with the use of a flash. The second image, of the guitar, was added to get the final image seen here. Photograph by Leanne Cleaveley
The next technique involves keeping the rules about exposure in mind but not letting them hinder your creativity. Far too often we become obsessed with “doing things right” and forget to just play. This technique is more about playing.
You can try this shot while walking or even as a passenger in a car. I enjoy shooting city images, but rural ones work quite well too. You can do two or more exposures combined.

Photograph by Leanne Cleaveley
Take a shot and then another a little further down the road. You can photograph an older and newer building for an interesting juxtaposition, or you can utilize road signs in your shot. Don’t worry too much about those white spots, but keep ‘white wins’ in the back of your mind so that you don’t lose too many interesting details.

This image, and the previous one, were both snapped from the passenger seat of a vehicle. What better time to play with double exposure than when you are stuck in a roadblock! Photograph by Leanne Cleaveley
Finally, you can create some great images by flipping your camera over when shooting double exposures. You can use this technique for shooting virtually anything, but I have seen some amazing city and landscapes shot this way.

I created this image of my Papa’s organ by keeping the keyboard in the upper part of the frame and leaving “room” to replicate the shot when I flipped the camera upside down. You can eyeball it or use your gridlines for help. Photograph by Leanne Cleaveley
You should make sure that you have some areas of your photo that are more uniform, like the foreground or sky, to avoid having your final image feel too busy.
You can create some great images by flipping your camera over when shooting double exposures.
Some people like to use a tripod when shooting flipped images. The tripod you use will need to have the capability to hold your camera upside down. Some have a reversible center column for that purpose.
Practice and play are such an important part of any new technique. Now that you have a better grasp of what double exposures are and the key ingredients to make them work, get out there and play.

I had a vague idea of how this image might appear when taking this double image, but I was pleasantly surprised by the interplay of the light and dark parts of the water over the image of my daughter fishing. Photograph by Leanne Cleaveley
The wonderful thing that makes in-camera double exposures so interesting is the element of surprise. Even when you think you know what will happen when you are combining your two shots, you often find elements in the shot that you didn’t expect. Embrace this unpredictability and enjoy creating something truly unique and artistic.
Recommended Reading: Want to create gorgeous, perfectly lit flower photographs? Grab a copy of Photzy’s premium guide: Photographing Fabulous Flowers.
Happy shooting!

I call this image ‘Apparitions.’ It was a fun endeavor that had me combining a macro image of my daughter’s eye with part of one of her favorite book covers. The ghostly result was a pleasant surprise.Photograph by Leanne Cleaveley
Self-Check Quiz:
- True or False: You can create multiple exposure shots with any DSLR or mirrorless camera.
- The Image Overlay tool allows you to use photos ____________________ taken and you have some control over ________________________ when adjusting your shots.
- When considering exposure, picturing your image as ____________ ____________ _ may help you understand how light creates your shot.
- True or False: Parts of your second image may not show up where the first image is white.
- What camera tool can you utilize if your model doesn’t allow you to use live view when shooting multiple exposures?
- Two tricks that you can use to get a nice white background are ________________ and _____________.
- For more control when creating flipped images, you can use a tripod with a ________________________ center column.
- Shooting multiple exposure images in-camera means that you give up some of the control and precision of creating them in an editing program. What are some of the benefits of shooting in-camera?
- What phrase should you keep in mind when shooting multiple images to ensure that you don’t lose important details? Hint: W_ _ _ _ w _ _ _!


