
The Clone Tool (or Stamp) was the first tool I ever used in Photoshop (Elements 2.0). I did the cover image with it.
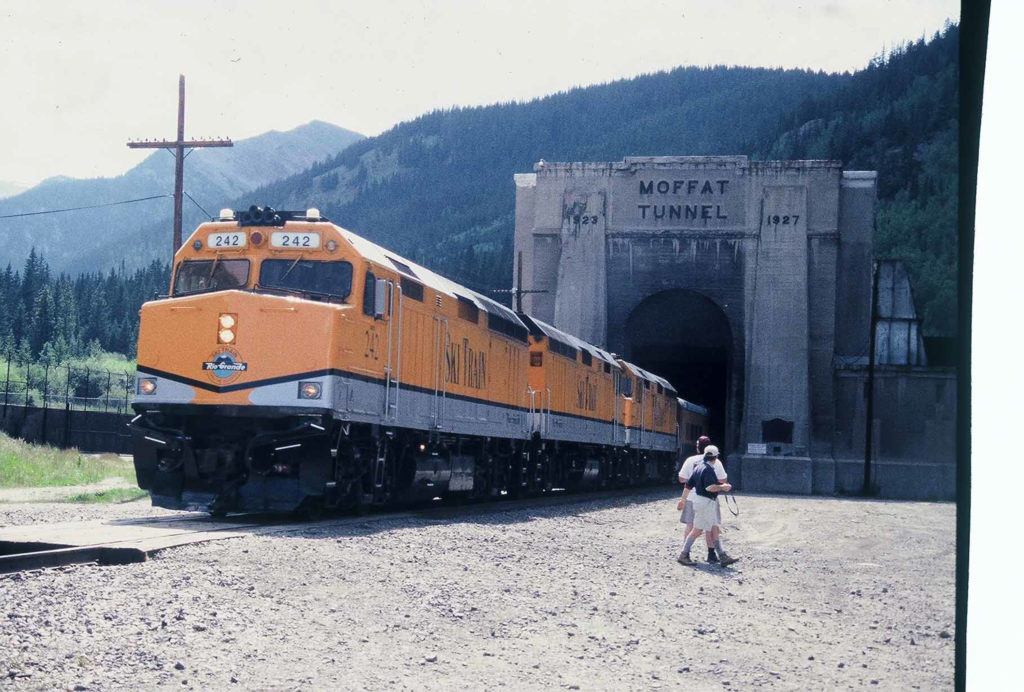
In summer 2006 I had exactly one frame of film left in my camera (oops) and no more in the bag. We waited in the blazing sun outside the East Portal of Colorado’s Moffat Tunnel at 9,200 feet elevation, getting cheerfully sunburned while waiting for a train to pop out. We knew it was in there because the exhaust blowers were deafening. The Moffat is 6.2 miles long with a speed limit of 15 mph; the train needed about half an hour to transit. In the heat it seemed longer.
I was only going to get one shot; win, lose, or draw. You can see the end of the roll was right there; I nearly tore the film off the spool.
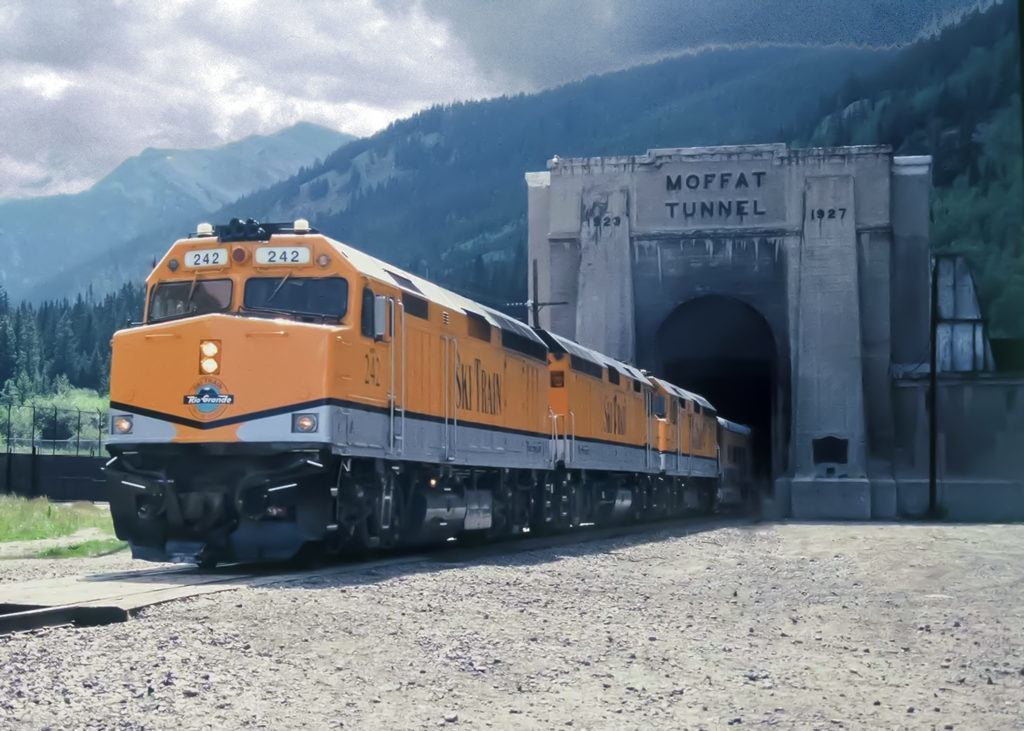
The curtain literally rose (they are there to aid in venting), the Ski Train emerged, and I made my single preplanned shot, but there were those other two fellas (not what I called them at the time) in my frame! I was NOT a happy camper. But back home I had an untried but powerful secret weapon: a copy of Adobe Photoshop Elements 2.0, with a clone stamp! Maybe I could rescue the shot.
We had my slides developed and a CD made. I popped the CD into the drive and went to work. I straightened the vertical, cloned out the distracting walkers(!), and while I was at it, I also removed some poles and wires and opened up the shadows.
The removal of the walkers and the poles and wires was all thanks to that astonishing clone stamp, taking pixels from one place and painting them over another. The walkers were actually easy since there was so much bare gravelly ground for source material. I learned quickly. I was hooked!
Back in the day (he wheezed), to do something like that required making a master print to be sent to an airbrusher. All of the work you see in that finished picture could be done by a skilled retouch artist, but it was expensive and time-consuming, plus the airbrushed master had to be re-photographed to get a new negative. Inevitably there was some loss of image quality no matter how good the work.
The clone stamp and its ancillary tools makes it possible to do seamless, undetectable work that once was no more than a pipe dream.
This article will give you some very basic tips on the use of Adobe Photoshop’s Clone Stamp:
- What is the clone tool or stamp?
- How is it used?
- What are its best uses?
- Are there adjunct tools that work well with the clone tool? • Are there good tutorials on the clone stamp?
Recommended Reading: If you’re interested in improving your post-processing workflow, check out Photzy’s Understanding Masking premium guide. It has a section for Lightroom and Photoshop, as well as Snapseed for mobile users.
What Is the Clone Tool?
The word ‘clone’ is both a noun and a verb, meaning to make something identical to something else. The clone tool is represented by a rubber stamp icon, because what it does is take pixels from one part of an image—the “stamp pad”—and precisely replicate them—“stamp” them—somewhere else.
The clone tool differs from the healing brush in that it doesn’t automatically blend into the target area, but recent upgrades to Photoshop allow the healing brush to function nearly identically to the clone stamp by selecting ‘replicate’ instead of ‘heal.’
Key Lesson: Photoshop 2020’s latest healing brush has a replicate option that makes it function nearly like the clone stamp.
How Do We Use It?
- First, get in the habit of duplicating your background layer (control- or command+J). You can work on your base layer, but it can make it harder to back out. If necessary, you can delete your working layer and start over.
Key Lesson: In Photoshop or any app using layers, it’s smart to keep your background layer untouched.
- Select the clone stamp tool (the little rubber stamp), position your cursor—your brush— over the area you want to clone from, then Altclick (Windows) or Option-click (Mac). Now you have defined the clone source.
- While holding down Alt or Option, your brush will change to a little target with crosshairs. That’s the center of your clone source, or the stamp pad.
- Shift your cursor over the area where you want to replace pixels with cloned pixels and start painting.
- If you are at 100% opacity, you will see pixels from the source obliterating the target. At the source, you will see a plain crosshair + moving, picking up cloned pixels as you paint anywhere.
- You can vary the size of the brush. The selected source stays where it is but gets bigger as your brush gets bigger.
The clone stamp and its ancillary tools makes it possible to do seamless, undetectable work that once was no more than a pipe dream.
- If your source is a large area you have more freedom of movement. If it is small, you must work tighter. If you clone away from the source, just undo and go again. Keep an eye on the crosshairs at the source. Resample as often as needed.
- You can set the source brush to be aligned with the cloning brush, or not aligned. Both are useful. Aligning the brushes is less likely to cause obvious repeating pixels because the source and clone stay together, but it also usually requires a larger source area.
Key Lesson: The clone stamp tool is just the ticket for hiding things that take attention away from your subject.
Photograph by Charles Haacker
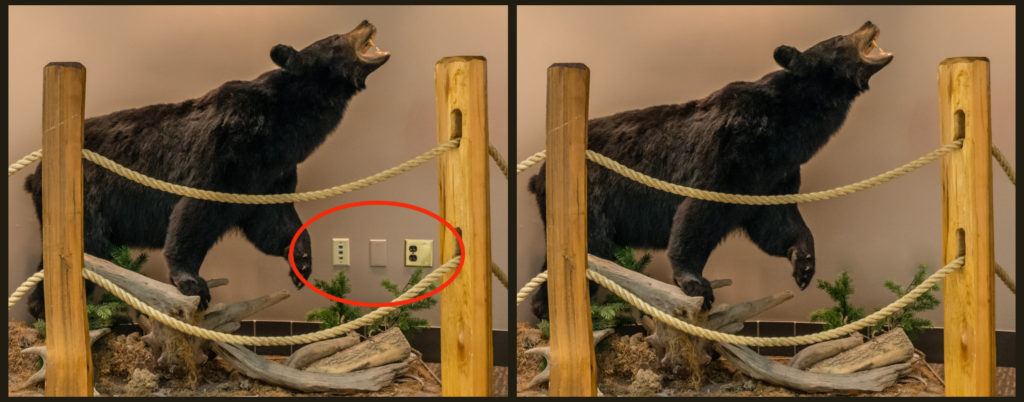
In this instance, the picture of the black bear was marred by inconvenient wall outlets. I used the clone stamp with a small brush feathered about 30%, sourced a spot on the wall directly above each outlet, made sure I had a little room to move my brush up and down without accidentally cloning the outlet itself, and painted over the outlet. By not aligning the source to the brush I could brush my way down, painting perfectly matched plain wall over the outlet below it.
If you look closely, the graduated shadow of the bear made the wall a slightly different color and density above each outlet moving to the right, so it was necessary to resample (Alt/Option-click) directly above each one so the work would be invisible. The single most important thing in retouching is hiding it; if you can see it, it’s not done well enough. This simple job took three minutes at most.
Photograph by Charles Haacker
Key Lesson: Good retouching is invisible to even the expert eye. That is your goal. If it is hard, just stay with it. The only way to truly learn this is to patiently practice.

Photograph by Charles Haacker
What Are the Clone Stamp's Best Uses?

Photograph by Charles Haacker
The clone stamp can be used alone or as part of a retouching arsenal of a combination of tools to arrive at the goal: retouching that is invisible to the naked eye. To remove distracting elements, I first reach for my clone tool, but if I can see where I cloned then I know that I need to redo it, break it into sections, or blend it using another tool (the blur tool can be handy here). When you are done, you should not see the work even though you know where it is.
Are There Adjunct Tools That Work Well With the Clone Tool?
There are several tools that work well with the clone tool, and I often use some or all of them in combination:
- The spot healing brush
- The healing brush (uses a sample similarly to the clone stamp)
- The patch tool
- Content-aware fill
Key Lesson: The clone stamp can do a lot, but it needn’t work alone. If it isn’t doing the job (you can see the work), try something else. The only rule is to make your edits invisible.
Recommended Reading: If you’re interested in improving your post-processing workflow, check out Photzy’s Understanding Masking premium guide. It has a section for Lightroom and Photoshop, as well as Snapseed for mobile users.
Cover Photograph by Charles Haacker
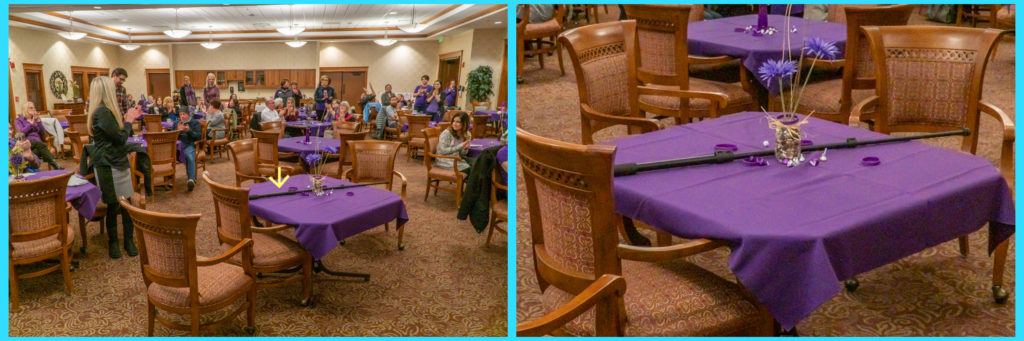
At an awards event I was sitting at the front to photograph speakers at the lectern when suddenly the speaker asked that certain VIPs stand up. I whipped around to make the picture, forgetting my own monopod in plain sight on my table. Oops!

Photograph by Charles Haacker
This looked like a job for Clone Stamp Man! (Ba-dum Tttsssssssh.)
The dotted line shows where I still needed to rebuild the wrist band that had originally been obscured by the monopod. Patient and careful cloning did it. Photograph by Charles Haacker
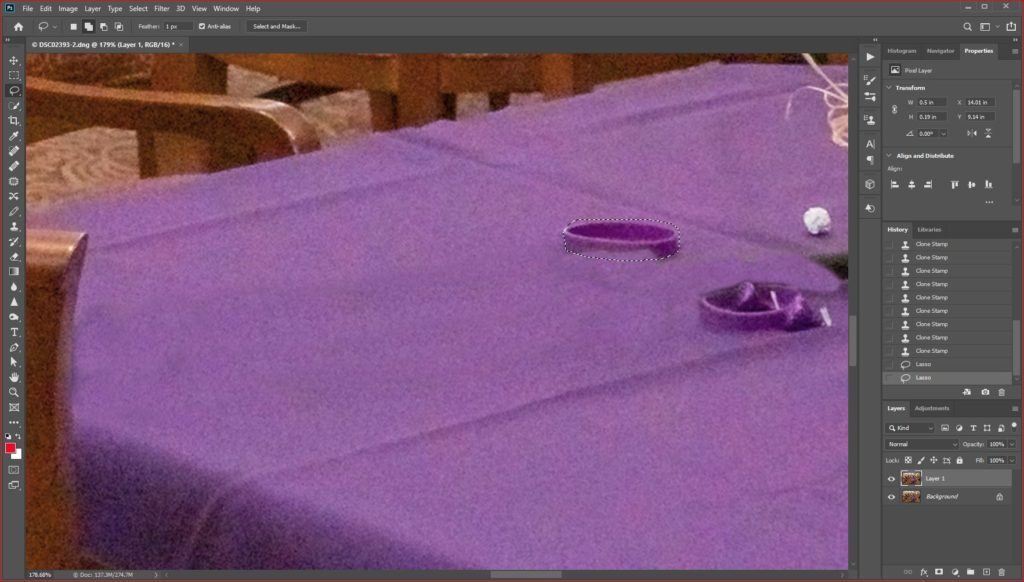
This magnified screenshot was made when I was about halfway through the edits. You can still see some slight shadowing where the monopod was, but I went back and blended it. Because of ripples and shadows, I had to constantly resample to blend the tablecloth believably. Where there was a fold, I kept my eye on the crosshairs at the source instead of where I was painting so I could carefully steer the cloning realistically along the length of the fold. If something didn’t look right, I deleted it and went again. I will not try to kid you: this can be very tedious. You need lots of patience to develop the skill, and Control-/ Command+Z (undo) is your best friend.
Photograph by Charles Haacker
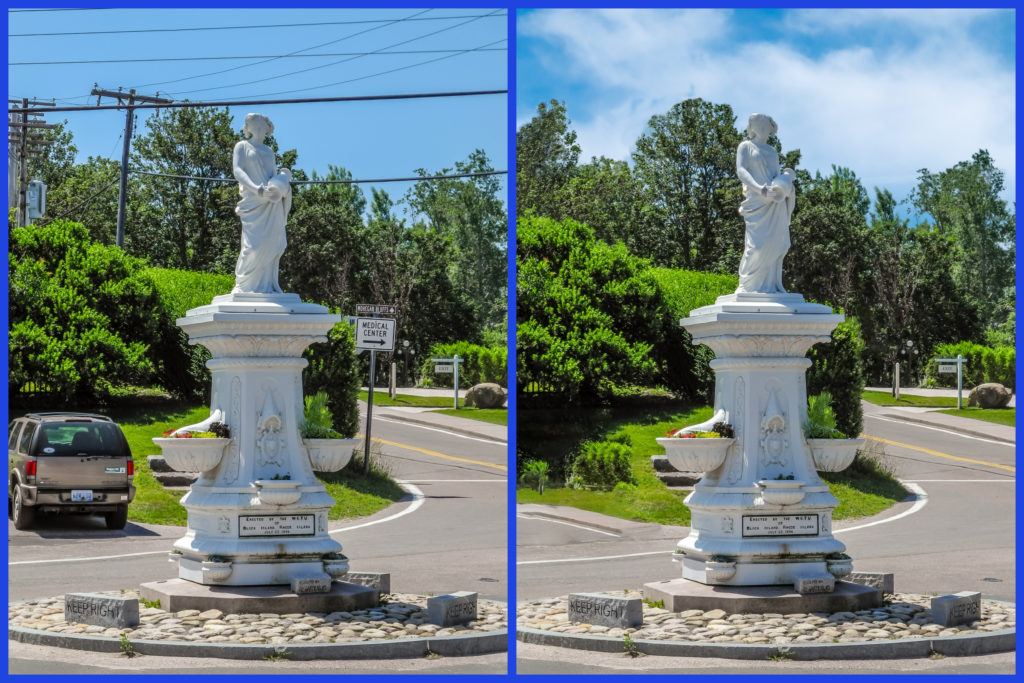
This is one of the toughest jobs I have done—four times so far. This edited image five layers and required masking, content-aware fill, and lots of clone stamping to get what I hope is a convincing render.
A little backstory about New Shoreham’s Statue of Rebecca at the Well, from BlockIslandGuide.com:
“Named for the biblical Rebekahat-the-well, Block Island’s ‘Rebecca’ stands proudly at the intersection of four Old Harbor roads. This iconic Block Island lady was put in place in 1896 by the local Women’s Christian Temperance Movement, which hoped to curb the consumption of alcohol on Block Island. Temperance fountains were installed in hundreds of communities; the idea was to offer clean water as a healthier option than the ubiquitous refresher of the time, beer. Restoration experts have concluded that Rebecca is in fact Hebe, cupbearer to the Gods at Mt. Olympus, also goddess of youth and wife of Hercules. Hebe was said to have diluted the wine she served with water. The statue was recast in 2001 and still succeeds in reminding the public to be mindful of what we drink.”
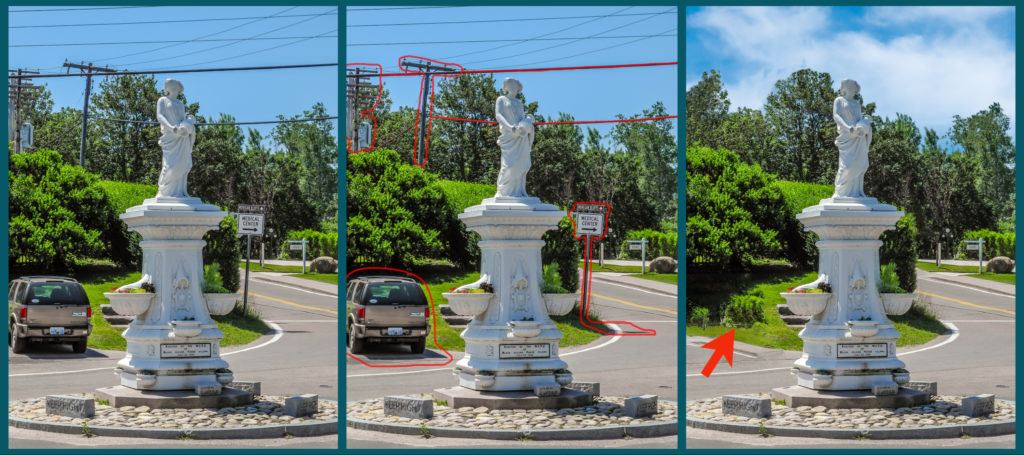
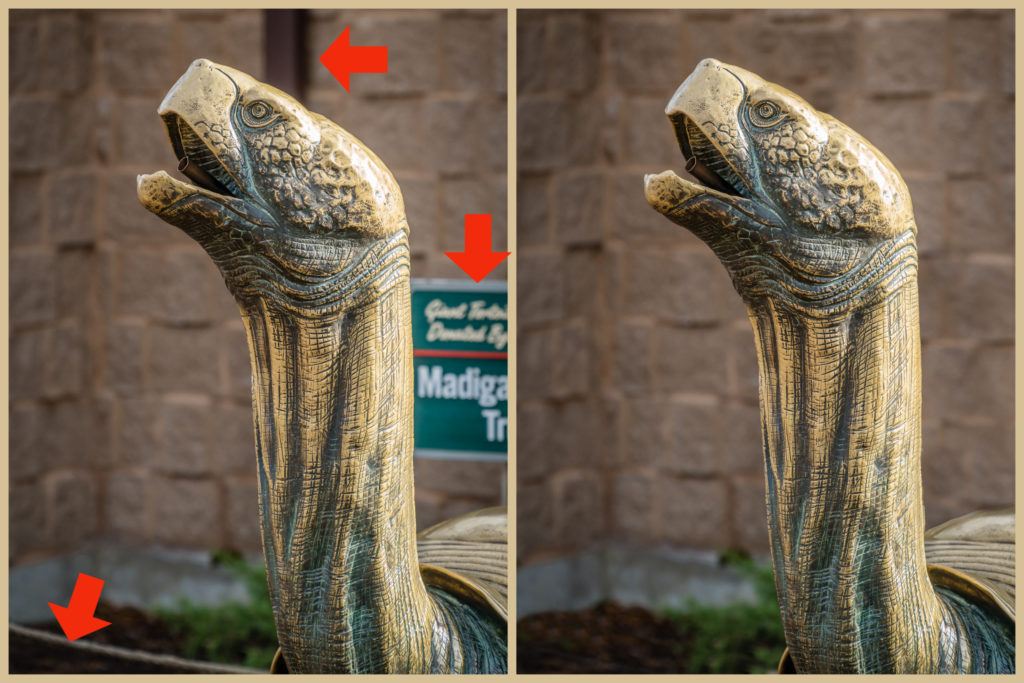
The red outlines are where the work is to be done. The red arrow in the last frame shows a case of repetition, a strong clue that cloning has been done. It needed to be blended in the final version. Photograph by Charles Haacker
I summered on Block Island, Rhode Island, for several years with my grandparents. I went back in 2013 to make some new memories with a tiny pocket compact. I have always hated that rat’s nest of poles and wires behind her, not to mention other annoyances such as the parked car and signage, but it was what it was, so I held my nose and shot it.
I will not try to kid you: this can be very tedious. You need lots of patience to develop the skill...
About a year ago I decided to see if I now had the skills to remove that mess in a manner that no one who had ever been there would question. I’ve outlined the stuff I wanted to remove in red, but I very much wanted to restore the actual trees as much as possible, which was what stymied me on my first two attempts.

And here she is, Miss New Shoreham, 1896. Photograph by Charles Haacker
Removing the car and the sign (and their shadows) was done with a combination of content-aware fill and cloning, with even some healing. Things got more complicated with the trees and skyline; nothing but the clone stamp and/or the healing brush in replace mode would work. The bush on the lawn on the left has had its obvious cloning repaired. I always save all the layers so I can go back and easily remedy my mistakes. I only recently learned that I could do all my retouching on blank layers.
Key Lessons:
- It’s always wise to do everything on multiple layers so you can easily back up. Once you are completely done and satisfied, you can always combine layers or even flatten the image.
- You can create a blank layer, a “clear overlay,” and do all your work on it. If it gets too messed up, just delete the whole overlay and start again.
- Don’t overlook things such as shadows cast by stuff you’ve removed; they are a dead giveaway.
Photograph by Charles Haacker
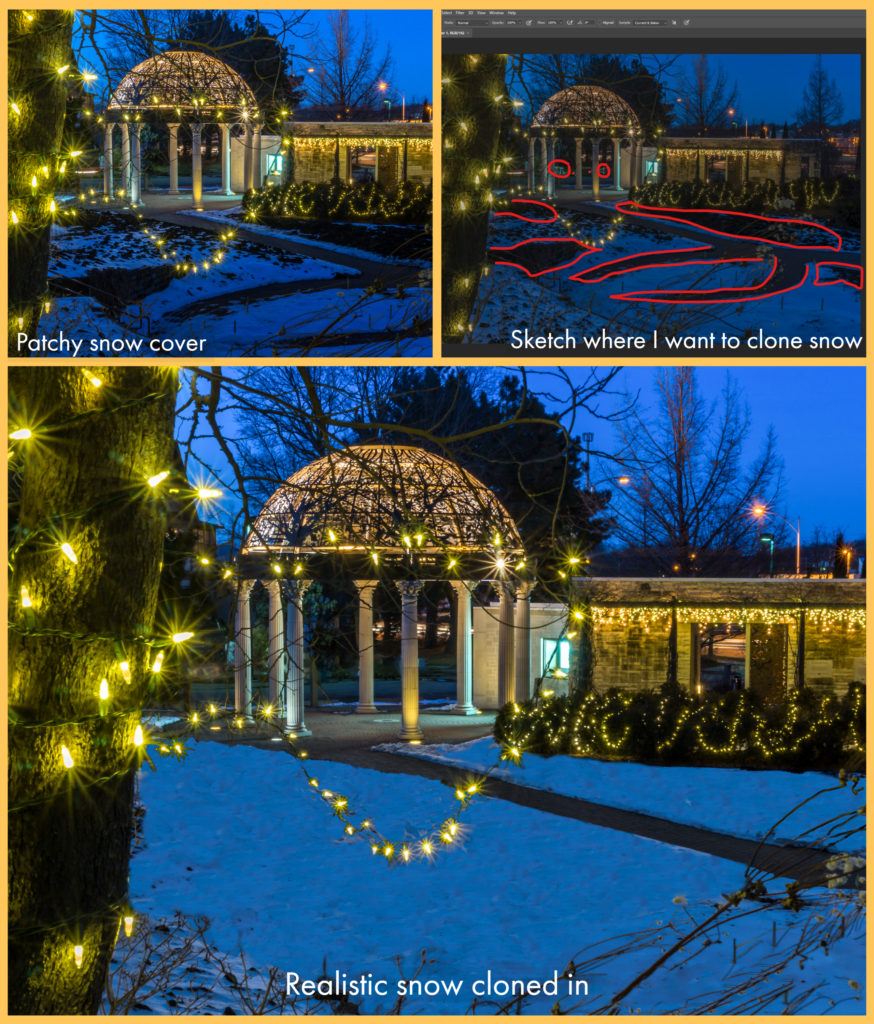
I took this image as an exercise specifically for this article. I was always disappointed in this picture because of the patchy snow, but I knew it would take a lot of very patient cloning since I had to start with very small source areas. As you build up the cloning, though, the areas you can source from get bigger. Don’t forget to move your source around to avoid repetitive pixels—a dead giveaway that cloning has been done. Aligning the brushes also helps to avoid repetition.
Recommended Reading: If you’re interested in improving your post-processing workflow, check out Photzy’s Understanding Masking premium guide. It has a section for Lightroom and Photoshop, as well as Snapseed for mobile users.
In closing, I want to assure you that I am no expert or master re-toucher, which is why I am sure you can do this. Nothing in Photoshop is really “easy” because it is so powerful, but my approach has been to find a need and then dig deep into the tools and techniques that will fill it. I mess up—a lot—and have to back out and try again. Cloning can be especially tedious and frustrating, but if you stick with it, it doesn’t take too long to figure it out and develop skill and finesse (and it’s a lot of fun!).
Self-Check Quiz:
- Is it okay if you can see the retouching?
- Can you do invisible work with the clone tool alone?
- Where would you not use the clone tool?
- What tool(s) could you substitute?
- True or False: You should always work directly on the base layer.
“I don’t bite. Really!” Photograph by Charles Haacker
Assignment:
Take a picture or find an image in your files that has a distracting element that you’d like to seamlessly remove. Go for it, and if you mess up don’t be discouraged; nobody learns this overnight.
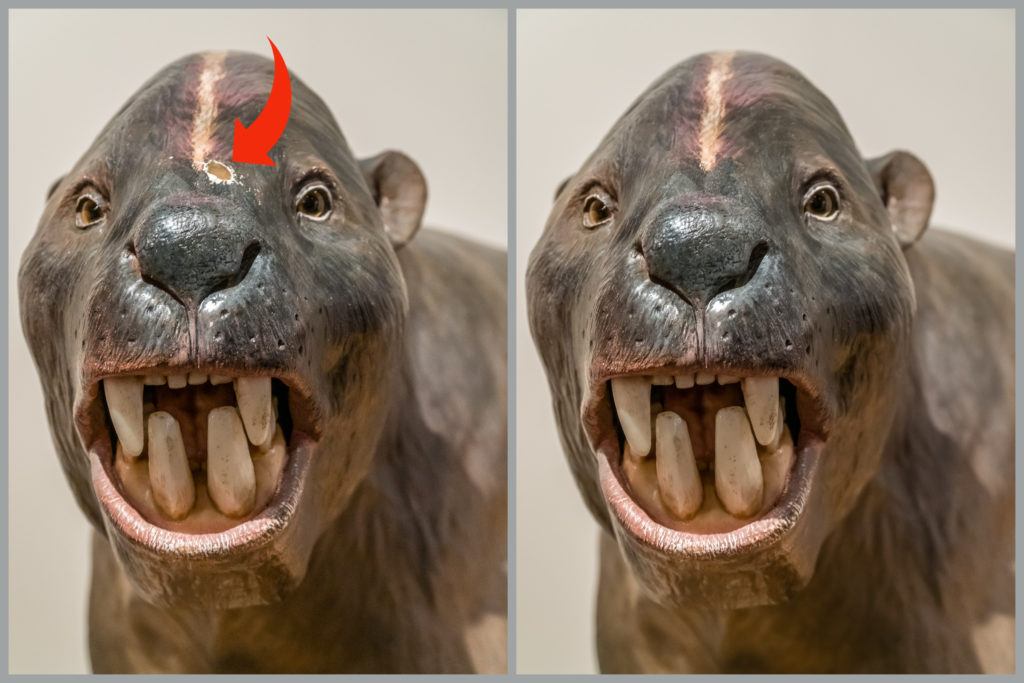
Duplicate your background layer: Command-/ Control+J (just in case). In my files I found this image (above) of a cheerfully smiling sweetie-pie, Stylinodon mirus, that lived some 45 million years ago during the middle Eocene in North America. Most likely, it fed on tough roots and tubers. Somebody maybe gave this grinning model a warning whack on the schnozz, so I decided to see if I could fix the damage with my good old clone stamp tool.
This was not actually an easy job (it’s deceptive), but it was done 100% with the clone tool. I had to resample a lot to rebuild the missing parts of the hole without giving it away with repetition.