


Many of the edits you make in Lightroom are probably global edits. These adjustments affect the whole image. When you need to zero in on a particular part of an image, this is when the brush tool becomes your new best friend.
If you’re used to using the adjustment brush tool in Lightroom, then you’ll have noticed some significant changes. If you have not yet discovered how powerful this tool is, then strap in because you’re in for quite a ride.
What Is the Brush Tool and What Does It Do?
Photograph by Kevin Landwer-Johan
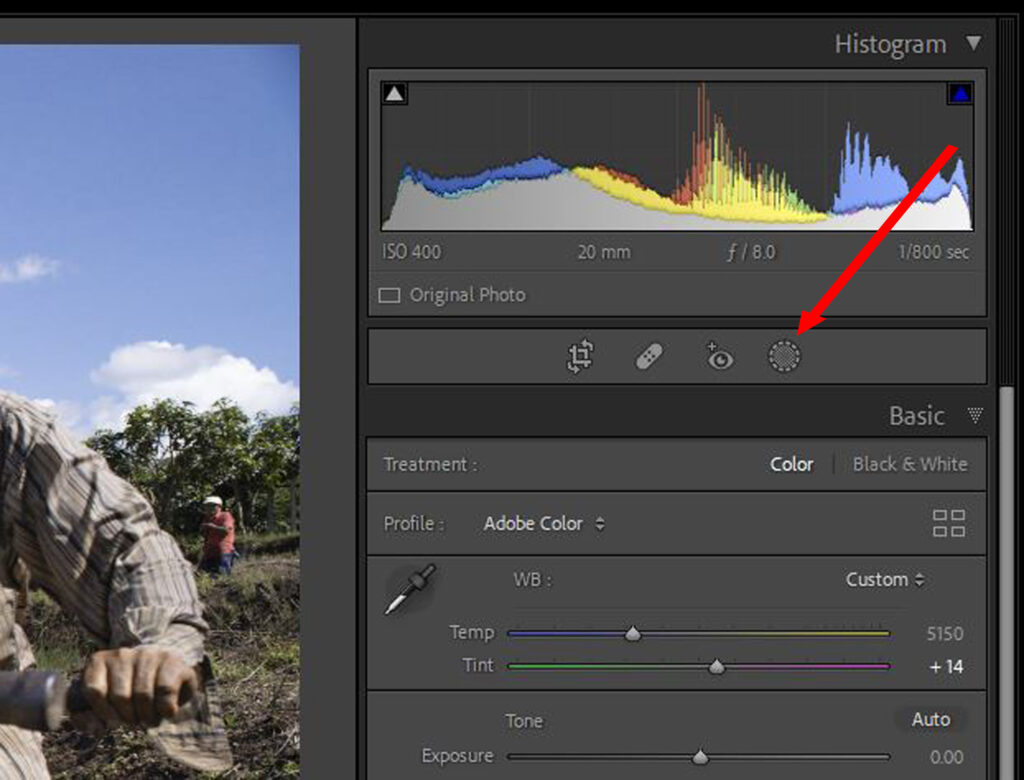
You’ll find the adjustment brush by clicking the Masking icon that’s in the left panel between the histogram and the Basic panels. You can also tap the ‘K’ key as a shortcut.
The adjustment brush functions as a regular paintbrush tool, except that you are not painting with color so much as painting with light. When you open this tool, you’ll see a range of options for how you can control the light in the areas you paint over. This may be overwhelming the first time you venture into this area of Lightroom, but don’t be intimidated.
Once you learn how effective this tool is to make detailed changes to specific areas of a photo you want to work on, you’ll love it.
The brush tool functionality is impressive. With each upgrade, Lightroom increases the scope of what you can achieve and the level of control you have. Each time there’s a new upgrade, I find myself using Lightroom more and doing less editing in Photoshop.
Key Lesson: Learning to use this powerful tool effectively takes time and practice but is well worth the effort. Take it to step by step and become comfortable and confident using this powerful tool.
Recommended Reading: If you want to learn how to enhance your photos and create better images, grab a copy of Photzy’s premium guide: Ultimate Guide to Fundamental Editing.
Painting With the Brush Tool
Photograph by Kevin Landwer-Johan
When you paint with the adjustment brush tool you are creating a mask that you can then adjust using any of the many sliders in the left panel.
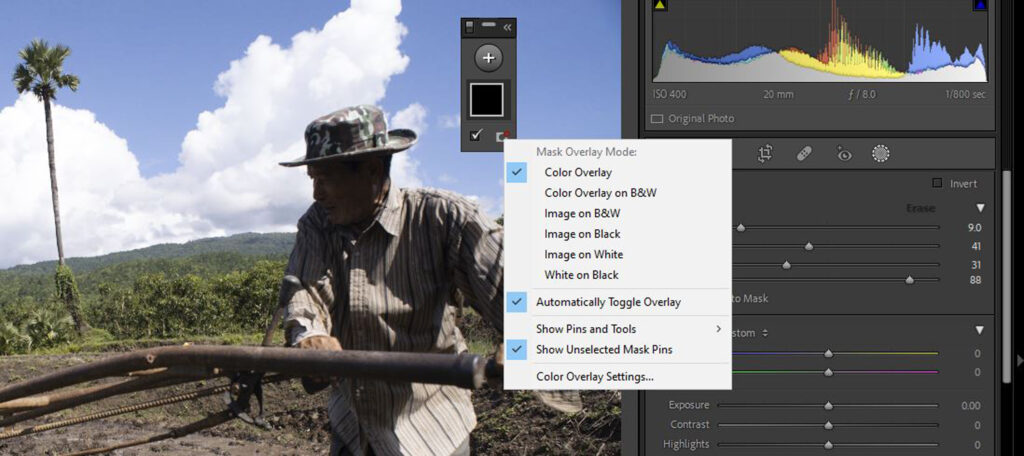
Clicking on the brush tool icon now opens a small pop-up control panel. In this window labeled Masks, you can manage the areas you create when you paint. There are options for how the mask appears. You’ll need to tweak this depending on the content and tone of each photo you work on so you can clearly see the masked area. The pop-up window can be compacted and expanded by clicking the << icon at the top right. There’s also an information icon that opens up another window where you can find all kinds of help with masking.
Before you start painting, these controls will have no visible effect. When you begin to paint, you’ll see the area highlighted. By default, it’s a semi-opaque red color. If it’s not clear enough, you can alter the color and/or opacity in the small pop-up window by clicking on the little icon at the bottom right. Numerous new options allow for a greater degree of control than in previous versions of Lightroom.
Once you learn how effective this tool is to make detailed changes to specific areas of a photo you want to work on, you’ll love it.
To start with, use the default settings unless the color you are painting is too similar to the overlay color. If you need to change the color, click on the icon at the lower right of the little window. Then click Color Overlay Settings. This will open up another window where you can choose the color you want the overlay to be. Pick one that contrasts with the most predominant color you are painting over.
You can adjust the size of your brush to best suit the area you are painting. I like to work with a brush that’s slightly larger than what I am painting over. To adjust the size of the brush, use your mouse scroll wheel, the [ and ] keys, or the slider on the left side panel.
The brush tool also has a Feather control. This manages how hard or soft the edges of the brush appear. Two other sliders control Flow and Density. Flow is similar to how much pressure you paint with, and Density affects the opacity.
Key Lesson: Experiment with the various basic brush controls. Try different brush sizes and feathering amounts. Adjust the flow and density to find out which settings work best for you. These will produce different results if you’re using a mouse or if you are painting with a pen and tablet.
Where to Paint With the Brush Tool
Being able to select only certain areas of a photo using the brush tool provides you with a great deal of control over how a photo looks. There are many different changes you can make once you have painted an area. And because you’re working in Lightroom’s non-destructive environment, you can always undo any edits you make.
Choosing where to paint and what adjustments to make is a creative choice. Under the brush controls, you’ll find many sliders to help you manage the color, tone, and texture of the painted area.
Controlling the Color Temperature and Tint

For these two examples, I radically adjusted the Temp slider for the area where the sky has been painted. Photograph by Kevin Landwer-Johan.
You can use these sliders to control the balance between blue and yellow and between green and magenta. I find it’s often best to make subtle adjustments with these sliders, especially when working on an area that contains a person’s skin. If you make strong adjustments to the color balance of skin tone, you’ll end up with sick-looking people in your photos.
Managing the Tone
There are six sliders in the next set you can use to manage the tone of the painted area. Here you have a huge range of possibilities to brighten and darken painted areas. I usually use these to lighten shadows and bring out more detail in darker areas.
I find the highlights and white sliders often have limited practical use, especially when they are poorly exposed. Overadjustment of these sliders can render the area to represent a gray smudge.
The most effective way to use this collection of sliders is to experiment. The density and exposure value of an area you work on will vary from image to image. Make small adjustments to the black and shadow sliders, along with the exposure and contrast sliders. This way you can see the combined effect as you tweak each one.
If you make more severe adjustments, you run the risk of losing image quality. I find it’s best to use a combination of the different sliders to bring out the best in a photo. If you want deep, rich blacks, try using a combination of black, shadows, and exposure sliders to achieve this. If you rely on dragging only the black slider far to the left, this can cause quality degradation in the image.
Making Other Adjustments

In this example, I have exaggerated the brushwork on the farmer. You can see how unnatural this looks, especially when compared to the rest of the photograph. Photograph by Kevin Landwer-Johan.
Further down the panel, you’ll find sliders for making adjustments to texture, clarity, dehaze, and a selection of other aspects of image editing. Again, be careful not to overdo the adjustments you make with these sliders.
Pushing the texture, clarity, or sharpness sliders to their extremes will rarely produce realistic-looking results. Remember that no amount of adjusting these sliders will improve the quality of an out-of-focus photo. Subtle use of the dehaze slider is also best to avoid a fake look.
Key Lesson: Making adjustments that are too strong tends to make the painted area look radically different than the rest of your photo. At times this might work, but most often you’ll probably want the painted area to integrate with the whole photo.
More Brush Tool Tweaks

Photograph by Kevin Landwer-Johan
When you want to work on more than one specific area in an image, you add more masks. In the small Mask window, click on the + icon to add another area and begin to paint. You can control each area you add individually.
With the mask selected in this panel, you can hover your mouse on the right and click the eye icon to turn that mask off and on again. There’s also a menu available when you click the three dots. This provides you with a variety of other options.
Remember that no amount of adjusting these sliders will improve the quality of an out-of-focus photo.
Back over in the main left-hand Brush panel, down at the bottom, there’s an option to turn off and on all the masks you add to an image. It’s helpful to turn off masks to clearly see how the adjustments you make have affected the original image.
As you paint with the brush, at times you may make mistakes and paint over areas you don’t want to affect. When this happens, you can switch the brush mode to Erase. You’ll find this option in the basic brush control panel on the right above the sliders.
When working on detailed areas you can use the zoom function (press the Z key) and resize the brush for more precise control.
If you don’t want the Mask panel floating over your photo, you can drag and drop it into the right-hand side panel.
A Practical Example of How I Use the Brush Tool

Photograph by Kevin Landwer-Johan
Here’s a simple example of how I work on an image using the brush tool. I chose this photo to work with because of its high contrast. I aim to bring out the detail in the shadow area of the farmer (my neighbor).
First, I made some global adjustments and then painted the shadow areas on my neighbor and the machine he is working with. This image shows the red overlay of the painted area.
I’ve included the parts of his machine that are closest to him. This helps to integrate the changes I make more naturally. I was mainly concentrating on bringing out the detail in his face. Had I only painted his face and made adjustments there, the shadows on his clothes and the machine would have looked unbalanced.

Photograph by Kevin Landwer-Johan
Next, I adjusted the exposure and shadow sliders a little to the right. I took the dehaze slider a little to the left, which had the effect of further lightening the painted areas. Then I pushed the texture and clarity sliders to the right, a touch. I then went back to further adjust the shadows slider more to the right. The slight tweaking of the black slider adds a little contrast to the darkest parts of the area which helps to keep the changes more natural-looking.

Photograph by Kevin Landwer-Johan
I then added another brush and painted over the hills. In this area, I moved the contrast and dehaze sliders to the right a little. Then I tweaked the texture and contrast slightly.
Once I’d done this, I used the Select Sky tool, which is new to Lightroom. You can see from the screengrab that I changed the color of the overlay to make it easier to see the selected area. This made a clean selection of the sky, which was quicker and easier than using the brush tool. With this selection, I decreased the exposure level and pushed the dehaze slider to the right to add some punch to the clouds and blue sky.
Key Lesson: There’s a new tool in the Mask panel that gives you the option to select your subject. This works best when the subject of your photo is clearly defined; otherwise, there can be some spillover. I chose not to use it on this image because I only wanted to select the shadow areas of my main subject.
Recommended Reading: If you want to learn how to enhance your photos and create better images, grab a copy of Photzy’s premium guide: Ultimate Guide to Fundamental Editing.
Conclusion
The brush tool provides you with endless options for making serious edits or slight tweaks to specific areas of your photographs. With this guide, I have introduced you to its basic functionality. Now it’s up to you to become familiar with these things and then discover what else you can do with them.

The RAW file with no adjustments. Photograph by Kevin Landwer-Johan.

The edited version. Photograph by Kevin Landwer-Johan.
Self-Check Quiz:
- When using the brush tool in Lightroom, what are you painting with: color or light?
- Is the brush tool used mainly for global or specific adjustments?
- What are you creating when you paint with the brush tool in Lightroom?
- Can you change the color of the overlay the brush tool makes?
- Is it possible to adjust the color temperature of an area you have painted?
- Can you adjust a painted area to bring an out-of-focus photo into focus?
- Are you able to add more than one brush mask to an image?
- Can you erase some areas where you make mistakes when using the brush tool?


