

Light is a powerful way to create mood in your photographs. We respond on a deep emotional level to light. Bright, warm light reminds us of sunny, summer days. It makes us feel warm and happy. Dim, cool light signals the coming of a storm or the onset of night. It makes us shiver and warns us to take cover.
With today’s digital cameras, we can even out the light in any scene. We use longer shutter speeds, wider apertures, and higher ISOs to brighten low-light scenes. External lights can bring daylight anywhere we want it. We can see into the dark corners of life. But in brightening the shadows, we change the mood.
Embracing low-light situations allows you to explore powerful moods in your photographs. The faintest sliver of light in the darkness is all you need. Even the most everyday scene becomes dramatic in low light. In this guide, we’ll talk about creating mood in low-light situations.
What we’ll cover:
- Defining low light photography
- Finding and creating low light situations
- Creating mood in a photograph
- Post-processing for mood

Light cutting through a darkened room makes an everyday scene like this breakfast table more dramatic. Photograph by Jenn Mishra
Recommended Reading: If you’re interested in learning more about light and how you can use it to improve your photography, grab a copy of Photzy’s bestselling premium guide: Understanding Light Book Two.
What Is Low Light Photography?
Low light photography does not mean “no light photography.” All photography uses light. A photograph without light is a black rectangle. It holds no emotion or visual interest. But in low light photography, the light source is limited. Much of the image is in shadow. The emotion lies in the relationship between light and darkness.
Low light photography may mean that the overall intensity of the light is low. This can happen when clouds or other structures block the sun and create shade, or when the light source itself is weak. There may be only one source of light, such as the sun coming through a window, a street lamp at night, or a softbox in a studio. The light may be bright, but it illuminates only a small portion of the scene. Low light photography emphasizes limited light, but in doing so it also accents the darkness and the shadows.
One candle illuminates this child’s face in the darkness. Photograph by Jenn Mishra
Most digital cameras and photo editing programs have a histogram that lets you see where the light falls. In low light situations, the peaks of your histogram will cluster on the left side.

Histogram for a low light photo showing the peaks clustered on the left-hand side of the chart. This indicates a higher proportion of blacks and shadows in the image. Photograph by Jenn Mishra
If you are new to histograms, they chart the range of light in your image. From left to right, they show the number of blacks, shadows, mid-tones, highlights, and whites that are in your photo. The higher the peak, the more of that tone is in your image.
Most photographers advocate exposing so that the peaks are in the center of the histogram or on the right. This is the origin of the instruction, “expose to the right.” Brightening your image so that the peaks are on the right ensures that you can see into the shadowed portion of your image. But for low-light photography, you want darker tones. There is a mystery in the shadows.
Brightening your image so that the peaks are on the right ensures that you can see into the shadowed portion of your image.
For low light images, the peaks of a histogram will be higher on the left side of the graph. Although this is considered an underexposed image, there is nothing technically wrong with your image. Exposure is a choice. Exposure helps you create emotion in your images.
Finding and Creating Low Light Situations
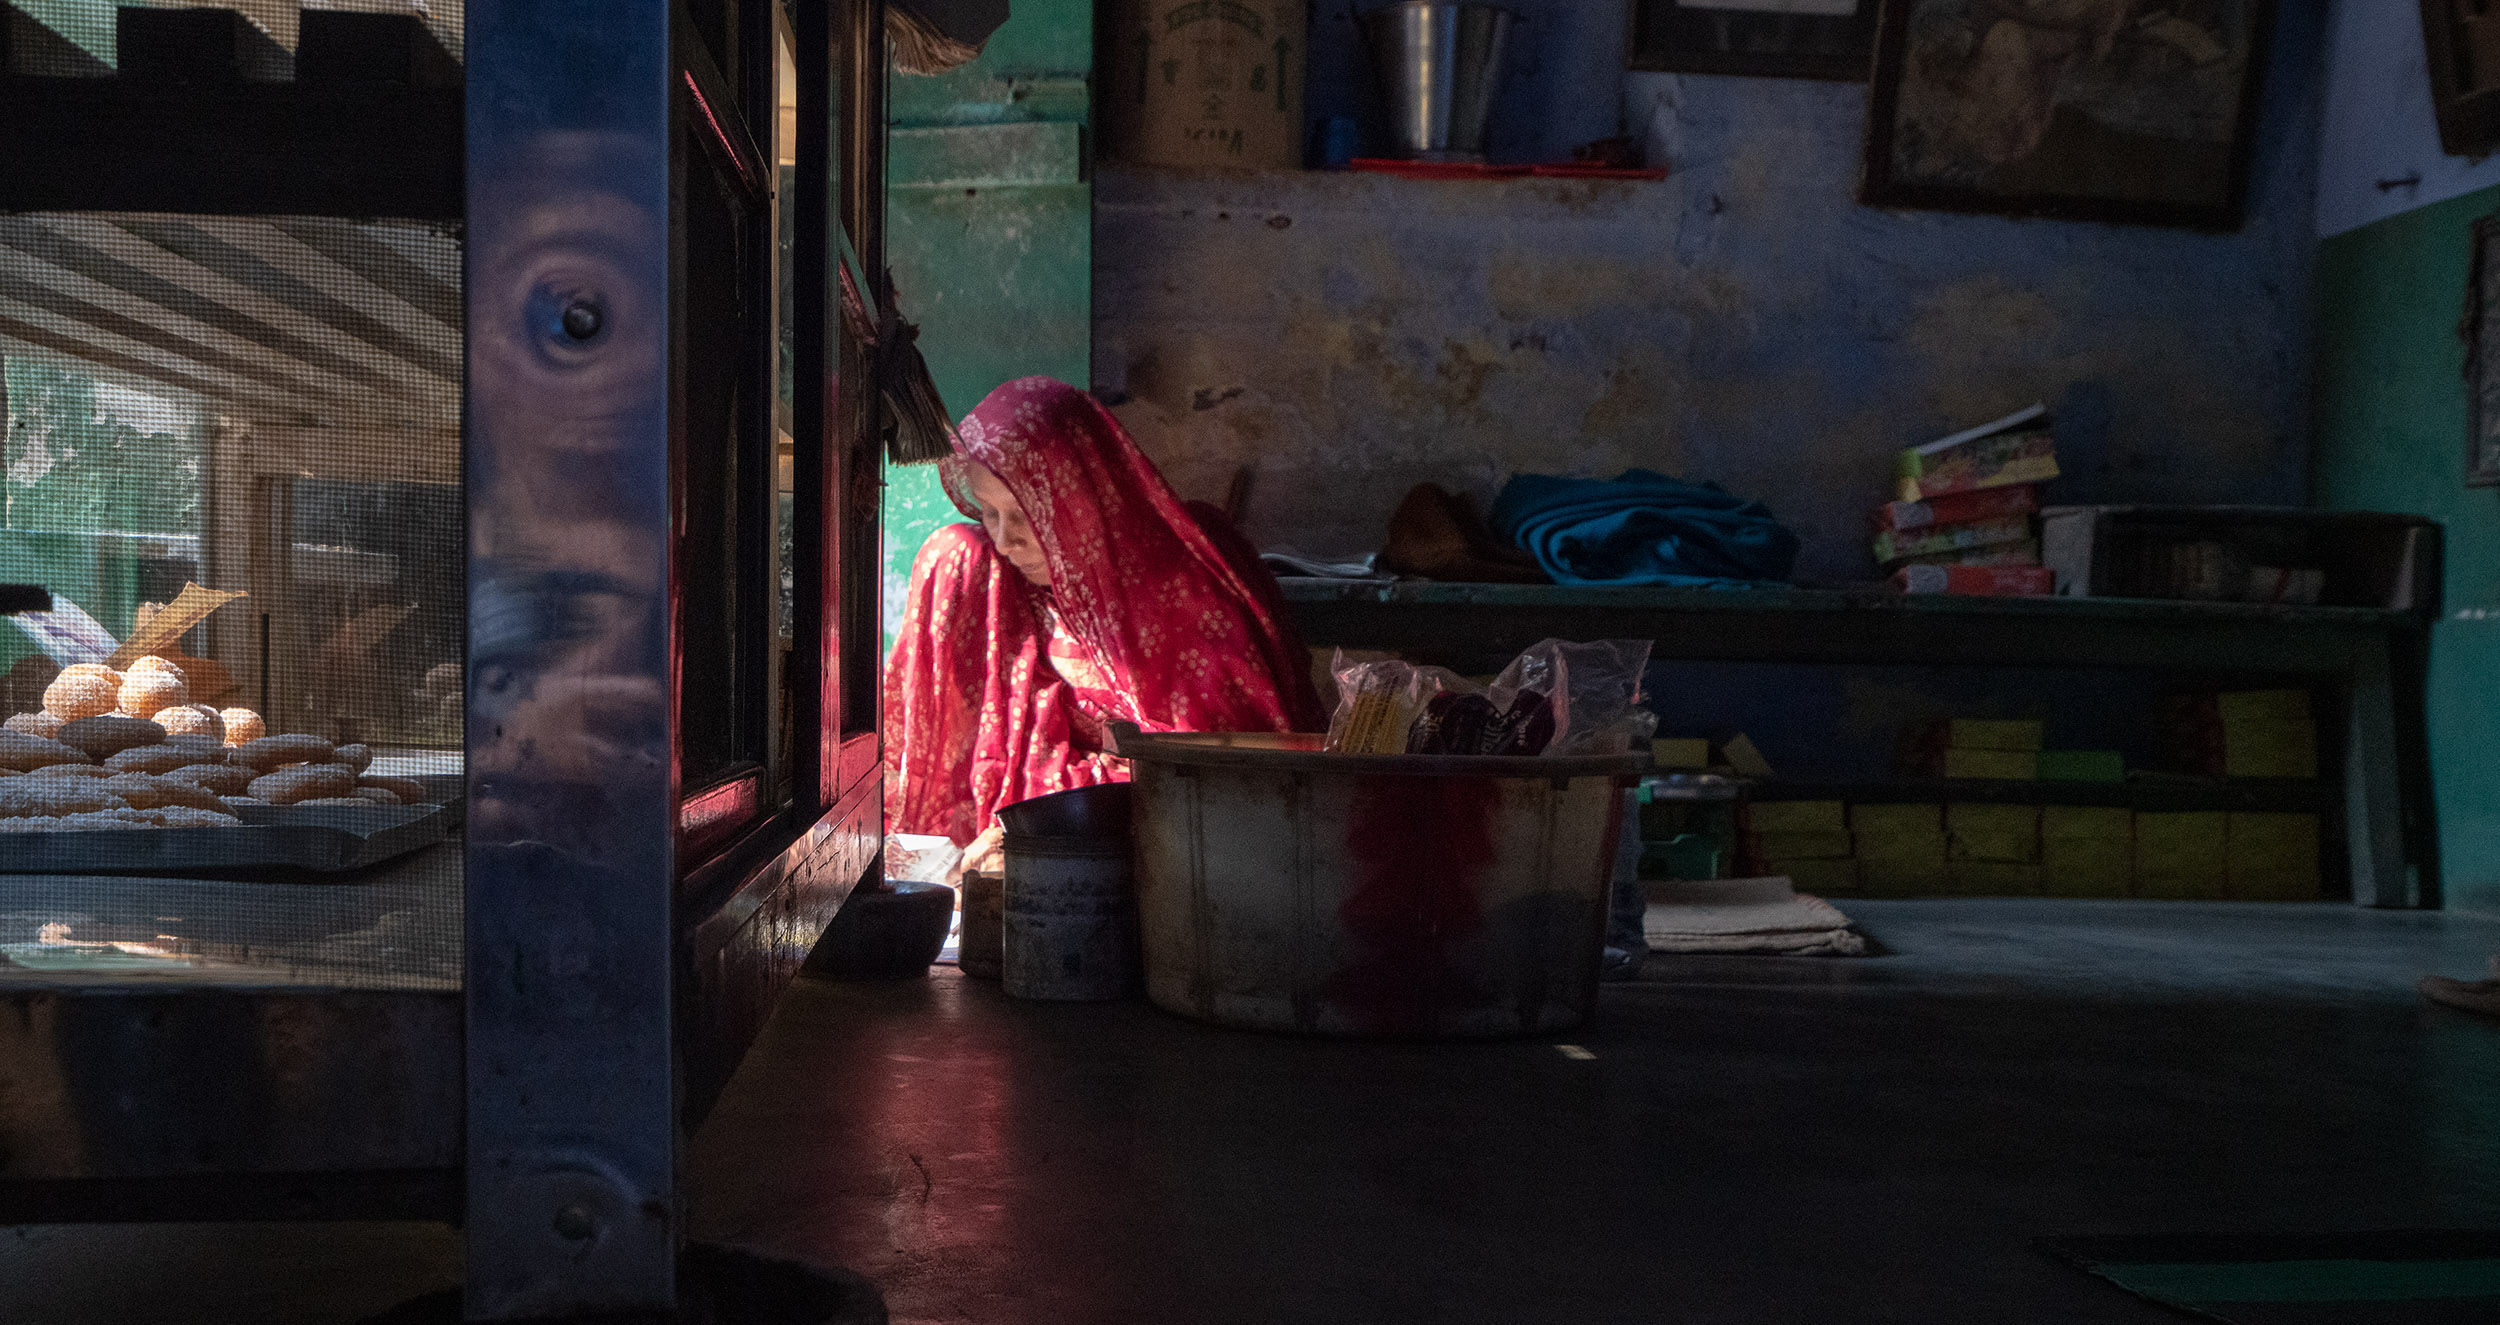
Sometimes we control the lighting in the scene. Other times, we work with the light that we have. Many low light situations occur naturally; for instance, during blue hour, before sunrise, or after sunset. For a moody image, photograph at dusk, in heavy shade, or with storm clouds overhead. Interiors often have low light. Our eyes adjust to the dim light, but our cameras don’t. Look for locations that are dim or dark. Find an alleyway with minimal light or an abandoned building with boarded-up windows. Look closer to home – even the brightest room may have a dark corner.
Rather than adjusting your camera to compensate for the low light, go in the other direction. Lower your exposure compensation, narrow your aperture, lower your ISO, and raise your shutter speed. All these reduce the amount of light coming into your camera.
You may also need to change your metering mode. You want your camera to meter for the brightest light. This should darken the shadows around the light. Choose spot or focus point metering mode rather than a metering mode that averages the light across the scene.

Low key portraits use few lights, leaving much in shadow, and do not light the backdrop. Photograph by Jenn Mishra
If you introduce a light source like a flash, lower the intensity. You may also want to narrow the light’s focus to illuminate only a portion of the scene. Your image will feel darker if the light does not spill over onto the backdrop. This is low-key lighting.

The shadows in this church are emphasized when a shaft of light spills through the window. Expose for bright light and the surrounding shadows deepen. Photograph by Jenn Mishra
Counter-intuitively look for bright light. A sunbeam or patch of sunlight highlights the surrounding shadows by contrast. Expose to the bright light, and the surrounding shadows will be darker.

Saguaro cactus during blue hour near Phoenix, Arizona. Photograph by Jenn Mishra
Take a moment to look at a few low-light images. Your eyes will go naturally to the light. Where do your eyes go? What is illuminated by the light? What is the light source? How does the light come into the scene? Now, investigate the shadows. Where is the darkest part of the image? What do the shadows hide? Is there a gradual or sudden drop of light into the shadows?

Window light in a darkened bedroom in Havana, Cuba. Photograph by Jenn Mishra

New Orleans street musician at midnight. Photograph by Jenn Mishra
Recommended Reading: If you’re interested in learning more about light and how you can use it to improve your photography, grab a copy of Photzy’s bestselling premium guide: Understanding Light Book Two.
Creating Mood in a Photograph
The mood is the feeling evoked by the picture. Humans can feel a wide range of emotions. Many are complex, and we don’t have labels to describe them. We are even capable of experiencing contradictory emotions at the same time. Through the arts, like photography, we explore these complex emotions.
The mood is how you make your viewers feel, each viewer reads something different into a photograph. You can guide their vision by understanding how the elements in an image interact to create a mood. While you can’t control how your viewer feels, you can create a photo that stops people in their tracks and stops them scrolling through social media. You can create an image with impact.
In photography, light is one of the main factors in creating mood. We have a strong, emotional connection with light. We feel sad on a rainy day or cheerful when the sun shines on a bright morning. Low light images tap into our connection with light.
The mood is how you make your viewers feel, each viewer reads something different into a photograph. You can guide their vision by understanding how the elements in an image interact to create a mood.
Low light can evoke darker emotions like loneliness, melancholy, guilt, or sadness. Shadows can also emphasize more active moods like anger, despair, fear, or anxiety. You might think that people would want to avoid negative emotions, but this is not the case. People watch scary movies and listen to sad songs. Art lets people explore challenging moods in a safe space.
Many different factors combine to create mood in a photograph. The amount of light is one of the most important, but the direction of light is also key. Light directs attention and in a low light image, even more so because of the limited light. When we talk of moody light, we are talking about light that casts a small footprint. This leaves much of the scene in shadow. Even the dimmest light attracts attention when all else is dark. So, make sure the light falls on something that deserves our attention.
The mood is very different between high contrast and a low contrast image. The light in the high-contrast image is more dramatic. The limited light is more intense. The shadows are deeper and more mysterious. The image will be more dramatic. The relationship between the light and the dark suggests a more active emotion. By comparison, low contrast images have a more even distribution of light. It will be dimmer overall. The emotion may be less active, like depression or malaise.

Compare the high contrast image on the left with the low contrast image on the right. Photograph by Jenn Mishra
The color of the light is as much a part of the mood as the amount of light. Warm light reminds us of the sun. Cool light suggests the cool tones of night. We even talk of being “blue” as an emotional state.

A night street scene processed with warm light (top), and a night street scene processed with cool light (bottom). Photograph by Jenn Mishra
In general, our eyes will go to the brightest part of the image. However, other factors like color and line also draw the eye. Colors can add or detract from the mood suggested by the light. This is why many dramatic images are converted to black and white. This eliminates color as a factor, and the focus is on the light. Bright colors often suggest a cheerful emotion. Muted colors are more somber. If you include color in your image, use colors that support the mood you have established with the light.
Factors other than light evoke mood. If you are photographing a model, their facial expressions and body language carry emotion. You can also use composition to emphasize a mood. A lot of negative space shows emptiness. Your perspective also adds to the feeling of an image. Shooting from a low position upwards gives the subject prominence. Shooting from above makes the subject feel less significant.
Including negative space makes the subject feel more isolated and alone. Photograph by Jenn Mishra
Generally, combine elements that support the mood you are creating with the light, but you can have a discordant feature like a bright red umbrella on a rainy day or a warm patch of sunlight in the darkness. Moods can be complex and layered. Your photograph can show this emotional complexity.
Photo Editing for Mood
You can create a low-light look to your images in post-processing with almost any photo. The results are better if you are working with a RAW file. You can start by adding a vignette. This darkens the corners and brings attention to the center of the frame.
You can lower the overall exposure and darken shadows and blacks. Try reducing the exposure one stop and then two stops. The shadows deepen and the light dims. Make the shadows as dark as you want. Now, brighten some of the light using local adjustments. You have a lot of control over where the light hits in your composition. You can even create a beam of light that wasn’t in the original scene.
The evenly lit landscape before low light processing. The shadows are bright enough to show detail. Photograph by Jenn Mishra

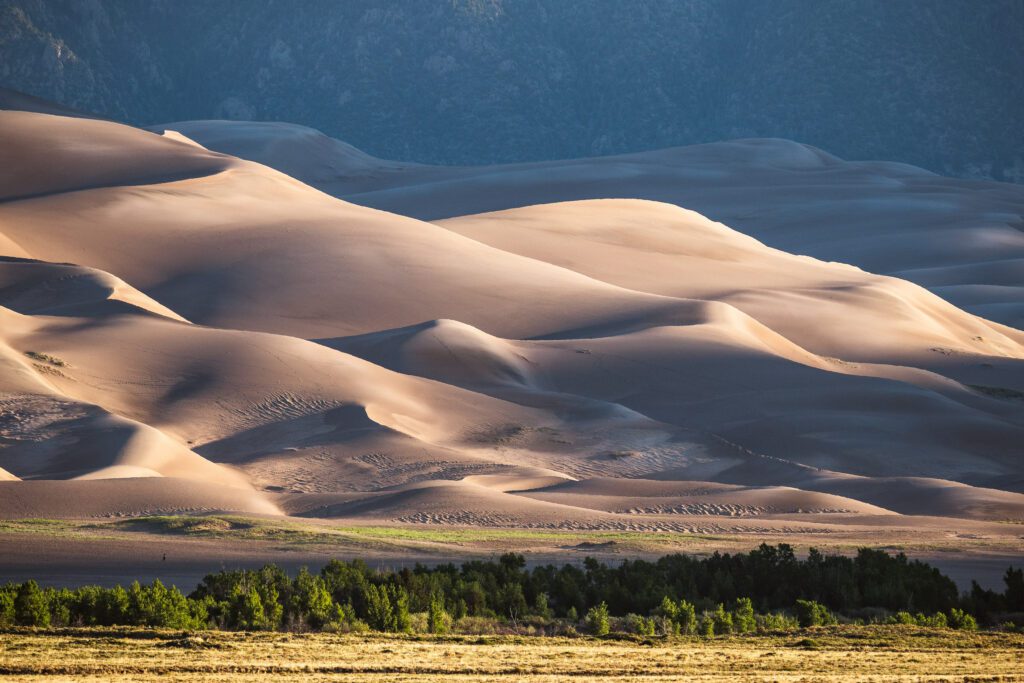
The low-light landscape was created in post-processing. I lowered the overall exposure. Then I used radial filters to bring out the light on the peaks of the dunes. Photograph by Jenn Mishra
Other edits will enhance mood. For instance, you can use split toning to add a blue or teal color to the shadows. Adjusting contrast will make the image more or less dramatic. You can lower color saturation and vibrance to mute colors, or convert the image to black and white to remove color information altogether. Many photo editing programs let you add a soft glow or fog to further obscure details.
You have choices when post-processing an image. The mood of your image changes depending on the choices you make.
Recommended Reading: If you’re interested in learning more about light and how you can use it to improve your photography, grab a copy of Photzy’s bestselling premium guide: Understanding Light Book Two.
Conclusion

Photograph by Jenn Mishra
Light is a powerful way to create mood in your photographs. Bright light tends to evoke moods on the positive end of the spectrum. Low light tends to evoke darker or more mysterious moods. Along with light, other elements like color and contrast help you create moody and atmospheric images. Creating mood in low light situations is as much about the shadows as it is about the light. Where are the shadows? How deep are they? What do they obscure? By embracing the darkness, you can create dramatic and powerful images.
Self-Check Quiz:
- True or False. Low light photography is lowering the overall intensity of light.
- True or False. Low light photography can be one intense light in an otherwise dark image.
- Describe how the histogram differs between a low light photograph and the exposures often advocated.
- Where might you find low-light scenes?
- Define mood.
- Other than light, what other factors help set the mood of a photograph?
- How might contrast affect the mood of a photo?
- How can you use split toning to affect the mood of your photo?
- How can you adjust your camera settings to emphasize low light?
- What sorts of moods can be evoked by low-light photos?


